In the need for a simple and easy to use OS X based Always On VPN solution? If so, I may have something for you.
We are using a straight forward L2TP over IPSec VPN connection for connecting into our Pentesting lab. Beside giving me access to many of my most needed tools it also allows me to surf the web without any proxy or firewall limitation. As I encountered several VPN disconnects over my work day I decided to solve it once an forever by automatically reconnecting the VPN after a dropout.
global PING_HOST
global VPN_NAME

set PING_HOST to "vpn.example.com" # A host on the web to ensure the current connection is working at all
set VPN_NAME to "Your VPN" # The name of the VPN connection to dial (works with PPTP, L2TP over IPSec and Cisco IPSec)

on idle

	try
		# as the ping causes an exception if no response is received we only try to connect to the server if it's really reachable and thereby surpress error messages
		do shell script "ping -c 1 -W 500 " & PING_HOST

		tell application "System Events"
			tell current location of network preferences
				set myConnection to the service VPN_NAME
				if myConnection is not null then
					if current configuration of myConnection is not connected then
						connect myConnection
					end if
				end if
			end tell
		end tell

	end try

	return 2 # schedule to run again in two seconds
end idle
Simply save it as an application and check the box “Stay open after run handler”:
As long as the App it is running, your VPN connection will be redialed automatically. This small helper gained a permanent spot in my Dock!
PS: To give the App a nicer appearance you may want to change it’s icon to this free one. Here is a tutorial on how to do that.
Edit: Updated the code to use the “on idle” handler
In this last part of the series IPv6 for pen testers we will now cover how address autoconfiguration works without the need for a central DHCP server. I really encourage you to read part 1, 2 and 3 of this series as they cover the IPv6 fundamentals needed to understand the following paragraphs.
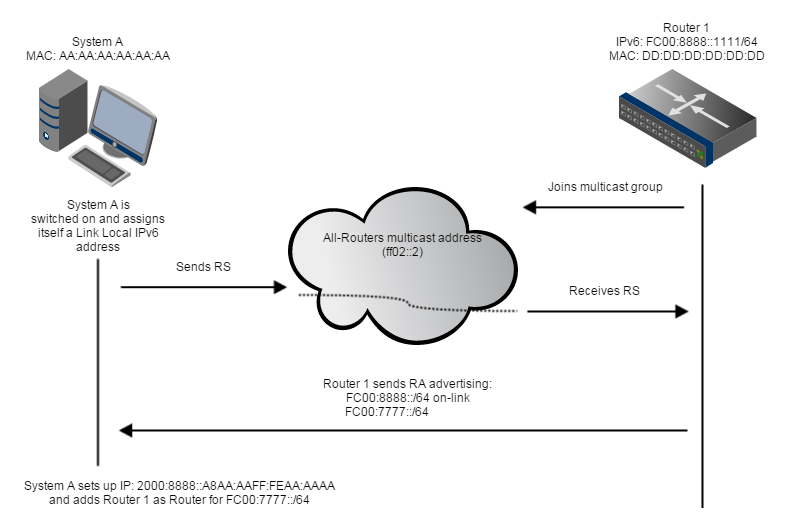
In IPv4 a central DHCP server was used to autoconfigure the IP addresses and the standard gateways for all clients. In IPv6 however, routers advertise the on-link networks and the available routes on their own using multicast. That means that as soon as a new client is connected to a network, all the available routers advertise all the avilable network prefixes. The client then assigns itself an IPv6 address within each on-link network and adds all other prefixes to his routing table. The full IPv6 addresses for the on-link networks are created by appending the host portion as generated by the EUI-64 algorithm as discussed in part 3 to the advertised network prefixes. We will now discuss this process in more detail with the help of the following image:
In IPv6 all routers on a network join the so called All-Routers multicast address FF02::2. This group is then used to periodically advertise all available on-link network prefixes and all routable destinations. However as it takes up to two minutes to receive all information a recently booted system can trigger a full re-advertisement of all prefixes by sending a Router Solicitation message to the All-Routers multicast group. After that all routers directly reply with Router Advertisement messages with all on-link and all routable destinations. As already mentioned the client than adds a new IPv6 address for each prefix by appending its EUI-64 host ID. This process allows a client to join a network without any prior configuration.
If it is necessary to provide more information to the clients (like DNS servers) the special “Other configuration” bit can be set in the Router Advertisement message. It indicates that other configuration information is available via DHCPv6. This type of DHCP server is called stateless because it only hand out static configuration and does not track its clients.
Beyond using Stateless Address Autoconfiguration (SLAAC), as this process is called, it is still possible to use a fully featured DHCPv6 server instead.
Router Advertisement Flood
A pen tester specific IPv6 technique was discovered by Sam Bowne, a well known IT security expert. He developed a Denial of Service exploit for all up-to-date operating systems (Linux, Windows and OS X) based on Router Advertisement messages. It works by flooding the network with new route advertisements that get processed by the attacked clients. During this processing the systems get practically unusable. Sam captured several videos to showcase the result of the flood on this website.
Further Reading
Before rounding this series up here are some references for your further reading:
Although already standardized in 1998 IPv6 still has not fully reached the end customers. Only very few ISPs in Europe by default even provide IPv6 address to their customers and even less companies use IPv6 within their networks. However as IPv4 addresses will eventually run out in the not too distant future companies have to prepare their equitement and train their employees. This is especially important as virtually every new network component is IPv6 capable and most of them even have it pre-enabled. As we have learned in this series IPv6 introduces many new concepts and some of them can be misused. I currently advise everyone to disable the IPv6 stack on their network components if not used and I highly recommened companies to train their administrators so that they know how IPv6 works and what challenges it brings with it.
Welcome back at part three of my blog post series about IPv6 for pen testers. In part 1 we already covered the advantages of IPv6 and how IPv6 addresses look like and in part 2 we discussed the three different IPv6 address types and how Link Local adresses are generated. I encourage you to read both posts before continuing as they cover the basics for this entry. We will now take a closer look at IPv6 multicast and how Layer 2 address discovery is implemented.
Multicast
Although already available in IPv4 almost nobody ever heard of multicast before. What it does is, it enables a one-to-many communication pattern on a network level. To do so, so called multicast groups are formed. These groups are basically special IP adresses within the so called IP multicast range (224.0.0.0/4 in IPv4 and ff00::/8 in IPv6). A client that is interested in joining the communication in such a group instructs the network to send this group specific communication to its network port. All clients that are not interested do not even receive the traffic as they did not join the group. If you are interested in what multicast groups a system is joined you can use the following commands:
Linux: netstat -g
Windows: netsh interface ipv6 show joins
With IPv6, multicast will be a fundamental part of every network and will even replaced all broadcasts. This is especially important as broadcasts have been a problem for years in large networks as they are sent so all systems in the whole network and thereby cause a lot of unnecessary network traffic. Furthermore every broadcast has to be processed by the end device and thereby wastes processing power.
Neighbour Discovery
However without broadcasts a problem arises: ARP the Address Resolution Protcol used for resolving IPv4 to MAC addresses and thereby enabling the necessary OSILayer 2 communication can not be used anymore and a replacement has to be defined.
This replacement is called Neighbour Discovery (ND) and is built on ICMPv6 and IPv6 multicast. It works by sending a Neighbour Solicitation (NS) request to the address dependent Solicited-Node multicast address while listening for the correspoding Neighbour Advertisement (NA) answer. Before covering this process in detail here are the commands used for showing all known neighbours similar to the ARP table:
Linux: ip -6 neigh
Windows: netsh interface ipv6 show neighbors
Layer 2 Address Discovery
By enabling IPv6 and by configuring an address the system not only allows you to communicate using this address but also automatically joins two IPv6 multicast groups. The first is the already mentioned Solicited-Node multicast group. It is dynamically generated by taking the last 24 bits of the corresponding IPv6 address while prepeding the ff02::1:ff00:0/104 Solicited-Node multicast prefix. The second is the IPv6 All-Nodes multicast group ff02::1 that is joined by all IPv6 capable systems.
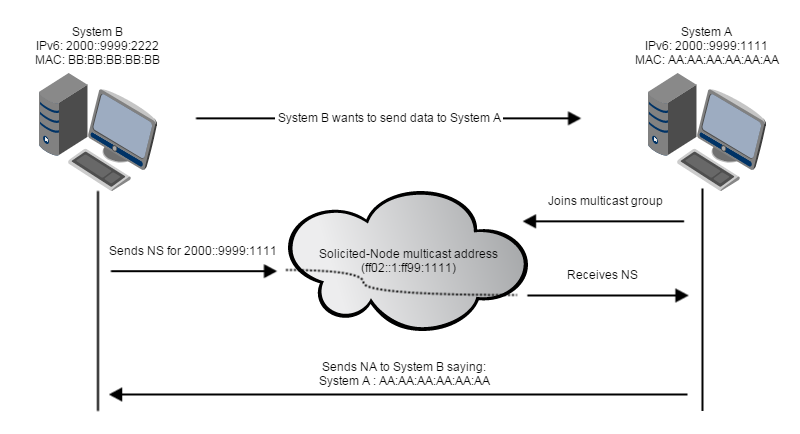
Now let us recap using an example: By setting up the IPv6 address 2000::9999:1111 on System A it will join the Solicited-Node multicast address ff02::1:ff99:1111 and the All-Nodes multicast address ff02::1.
If in turn System B wants to send data to System A (2000::9999:1111) it needs both the IPv6 address and the corresponding MAC address. To get the MAC address, it sends a Neighbour Solicitation (NS) message to the Solicited-Node multicast address ff02::1:ff99:1111. System A will reply with a Neighbour Advertisement (NA) containing its MAC directly to System B. After that System B has all the necessary information and can send data to System A. The image below illustrates the process.
Duplicate Address Detection
Beside the discovery of Layer 2 addresses this process is is also used to avoid address collisions. Before a new IPv6 address is assigned to an interface the systems sends a Neighbour Solicitation message to the corresponding Solicited-Node multicast address. However instead of using the interface’s IPv6 address – which has not been set up yet – the unspecified address :: is used instead. If the address is already in use the owner replies with a Neighbour Advertisement to the IPv6 All-Nodes multicast address and the setup process is aborted. If no answer is received within a given time frame it is assumes that no-one else is using it and the setup continues. This process is called Duplicate Address Detection (DAD).
Before summing up let us briefly cover a good trick that can be used by pen testers to detect all IPv6 capable devices. As we already discussed there is the All-Nodes IPv6 multicast group. In contrast to IPv4’s broadcast you can ping this group while getting a reply from all IPv6 devices on the network. This is a great way to find your targets! The following commands show how to ping the All-Nodes IPv6 group:
To summarize, we covered what IP multicast is and what it is used for. Furthermore we talked about IPv6’s ARP replacement namely Neighbour Discovery and how it works in detail. In the next and final part we will then cover how IPv6 Addresses are managed without the need for a DHCP service and why you still need one.
Welcome to part two of my introduction to IPv6 for pen testers. If you did not read the first part I really encourage you to do so before reading any further. In the next paragraphs we will briefly discuss the different IPv6 address types and cover Link Local addresses in detail.
IPv6 Address Types
In IPv6 there are three different kinds of address:
Unicast: These addresses are used for direct one-to-one communication. There are global and local unique unicast and Link Local addresses. Global one’s are managed by IANA and right now all are within the 2000/3 network. Local one’s can be used within organisations to for example identify the location of a system and can either use the FC00/8 or FD00/8 network. Finally, Link Local one’s use the FE80/10 network and are only valid for the directly connected network segment. We will dicuss those shortly.
Multicast: These special reserved addresses in the FF00/8 network are used for one-to-many communication. IPv6 multicast completely replaced the need for broadcasts and are used extensivly during IPv6 operation.
Anycast: Any unicast address can be used for anycast as soon as it is assigned to multiple systems. Thereby a client automatically connects to the closest anycast server. This enables load balancing on the network layer.
A system in an IPv6 world will almost ever have multiple addresses assigned to its interfaces. For example as soon as IPv6 is used on an interface a Link Local address is generated and assigned, furthermore the network will provide one or more unicast addresses used for communicating with the outside world or the company network.
Link Local Addresses
We will now cover Link Local addresses in more detail. As already briefly discuessed they are automatically generated and are only valid for the directly connected network segment. Any device that claims to speaks IPv6 supports and uses them. As soon as a new device is connected it can be reached using its Link Local IPv6 address. The following steps (based on RFC2464) show how to generate the IPv6 Link Local address from a NIC’s MAC:
Get the 48bit MAC address of the NIC
Convert the MAC to binary and flip the 7th bit. This is necessary as in the MAC address if set, this bit identifies a locally administrated and thereby modified address. However in the desired EUI-64 format the bit is interpreted in the the exact opposite way, so that a set bit indicates a globally unique address as burned in by the manufacturer (again see RFC2464).
In the middle of the MAC address with the already flipped bit add FFFE.
Finally, the Link Local FE80 network prefix has to be prepended while filling everything in between with zeros so that a valid IPv6 address is generated.
The following example shows how to apply this algorithm:
1.) Get the MAC address:
a4:52:6f:44:7e:69 => a4526f447e69
2.) Convert the MAC to binary:
10100100 01010010 01101111 01000100 01111110 01101001
3.) Flip the 7th bit:
10100110 01010010 01101111 01000100 01111110 01101001 => a6526f447e69
4.) In the middle add FFFE
a6526fffee447e69
5.) Add the Link Local FE80 network prefix and generate final IPv6 address
fe80::a652:6fff:fe44:7e69
I covered this algorithm in that much detail because it is the first really interesting IPv6 aspect from a pen tester’s point of view. Many systems already have IPv6 preenabled however most administrators only block access using IPv4 firewalls. That means that it is always worth a try to check if a server offers more services using IPv6 than it does over IPv4. To do so you simply ping the server using IPv4 to get its MAC address cached in your ARP table. Then you apply the above algorithm to this MAC and voilá you now have the server’s Link Local IPv6 address ready to be scanned. As I was tired of repeating this steps over and over again a colleage and I wrote IPv4_to_IPv6_address_generator. It is a small python tool that simply automates the above steps and it works on Windows and Linux.
After all that hard work of generating the Link Local IPv6 address we can now connect to the network and the device is ready to be used. If you are interesting if your computer already has IPv6 enabled just use one of the following commands. They will list all your currently assigned IPv6 addresses:
Linux: ip -6 addr
Windows: netsh interface ipv6 show addresses
Summing up we discussed the different IPv6 address types and generated a Link Local address from a NIC’s MAC. In the next post of this series we will take a closer look on IPv6 multicast and why it will completely replace broadcasts. Furthermore we will discuss how Layer 2 address discovery works with IPv6.
Due to the shortage of IPv4 addresses IPv6 has been developed. It is the successor protocol that will be used in parallel to IPv4 to drive the Internet’s underlying infrastructure. In this series of four blog posts I will give a general introduction to the most important aspects of IPv6 with a focus on the pen tester’s point of view. Be aware that this series is about the fundamentals and thereby does not cover all the dirty little details.
In part 1 we will cover IPv6 in general and how an IPv6 address look like.
IPv6 Overview
The easiest to spot change is that the IPv6 addresses are a lot longer than its IPv4 siblings. The additional bits increases the available address space and thereby allow us to address a lot more devices. Here are the numbers:
IPv4 address: 32bit (4294967296 available IP addresses)
IPv6 address: 128bit (340282366920938463463374607431768211456 available IP addresses – And yes, every single atom on the earth surface can be addressed with IPv6. You can even assign more than 100 addresses to each one – Reference)
Furthermore IPv6 has many great features built in like:
Mobility (you always use the same IP address wherever you are)
Now let’s take a more close look at how an IPv6 address looks like:
How does an IPv6 address look like
Here is an IPv6 address in its full glory: fe80:0000:0000:0000:02aa:00ff:fe28:9c5a/64
As you can clearly see, IPv6 addresses are not as easy to write and remember as IPv4 addresses. They are composed of 8 sections each representing 16bits of the full 128bit address space written in hexadecimal notation. Furthermore it is compose of two parts: the network portion and the host portion. The network portion is defined using the CIDR notation (/64 in the above example) and is used for traffic routing. To make it a bit easier for us humans, there are three tricks that can be applied to make the address a little easier to handle:
The first thing you need to know is that is does not matter if you use lower case or capital letters. You can even mix case if you like to. That means that the following examples are valid addresses and all three represent the same host:
Example 1: fe80:0000:0000:0000:02aa:00ff:fe28:9c5a
Example 2: FE80:0000:0000:0000:02AA:00FF:FE28:9C5A
Example 3: Fe80:0000:0000:0000:02Aa:00fF:fE28:9c5A
Secondly, leading zeros can be removed for each section. However be aware that if a section contains only zeros at least one has to remain. Again the following examples are valid addresses for the same host:
Example 1: fe80:0000:0000:0000:02aa:00ff:fe28:9c5a
Example 2: fe80:0:0:0:02aa:00ff:fe28:9c5a
Example 3: fe80:0:0:0:2aa:ff:fe28:9c5a
3) Finally, rule number three allows you to replace consecutive sections of zeros with ::. However be aware that this is allowed only once. While parsing the address the computer knows that IPv6 addresses always have to have eight sections and simply replaces the :: with the correct number of sections filled with zeros. The following examples illustrate the process:
Example 1: fe80:0:0:0:2aa:ff:fe28:9c5a => fe80::2aa:ff:fe28:9c5a
Example 1: 2000:0:0:0:111:ffdc:0:8f21 => 2000::111:ffdc:0:8f21
In this post we discussed some advantages of IPv6, how addresses look like and what tricks can be used to shorten them. In the next one we will take a closer look at the different addresse types and IPv6 Link Local addresses.
Today I want to introduce a small helper tool, namely lsdns. I wrote it as I always struggle to find the correct IP and hostname mappings while writing my pentest reports. lsdns is a small python script that queries a DNS server for a given IP range and outputs the results in a CSV compatible format. In this post I will explain why it is useful to me, where you can get it and how to use it. All our pentest reports document the found vulnerabilities, possible mitigation strategies and logically list all affected systems. To help our customers we always try to provide both, the IP address and the corresponding hostname for any computer mentioned. Although this is generally quite easy, it can be quite a pain if you can not access the original DNS server while documenting the findings either because it is only available from the internal company network (and you did not find a vulnerability that allows you to query it externally) or split DNS is used.
To at least partially solve this issue for me I wrote lsdns. It is a small application that uses reverse DNS to get all hostnames for a given IP range. The output can be redirected to a CSV file and can be used while writing the report to look up either the hostname or the IP address of a vulnerable system.
Installation
To install it you need to have python2 and the python setuptools already preinstalled. Then you can either clone the git repository or simply download the latest ZIP from GitHub. Before you can use it you have to manually install the dependencies from within the dependencies folder by running the corresponding setup.py scripts. After that you are ready to go.
Usage
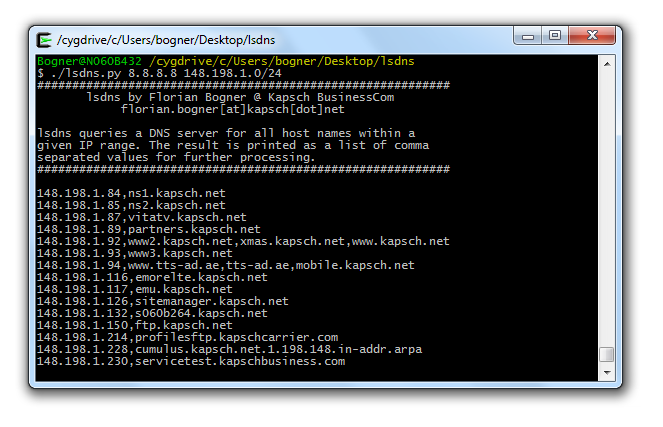
dnsls is a very simple to use command line utility. The following example shows how to do so:
./lsdns.py <dns server to query> <IP address or range>
Example: ./lsdns.py 8.8.8.8 148.198.1.0/24
By redirecting stdout to a file a valid CSV file is created. To still give you feedback about the progress a dot is printed for each host. A sample is available here.
I hope someone else also sees a value in dnsls. If so, it is freely available for you under the terms of the MIT licence.
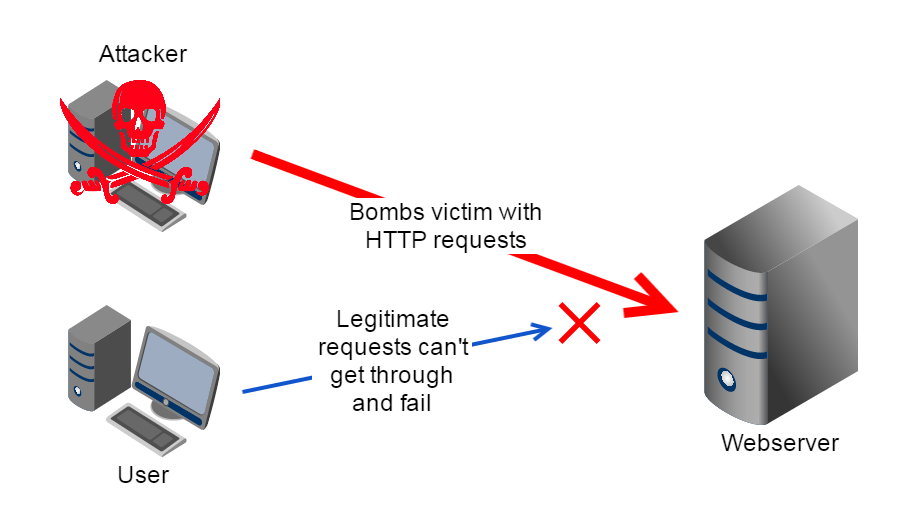
Recently our team was tasked with creating a demo to illustrate the effects of Denial of Service (DoS) attacks. As I was particularly interested in how the available attack tools work I studied the sourcecode of one of them – the Low Orbit Ion Cannon. In this post is will cover the surpising simplicity of the implementation. However to get a context let’s start first with discussing how DoS attacks generally work, illustrated on the basis of the following setup:
In our simple demo network there are only three participants: A central webserver as victim, a legitimate user that wants to connect to the webserver and an attacker. In the beginning the legitimate user can browse the webpage hosted on the webserver smoothly. However as soon as the attacker starts his DoS attack the legitimate user’s requests either take very long to finish or even fail completely. This instability is caused by the attack overloading either the webserver’s connection or the server process itself.
One tool an attacker could use for these kind of attack is the free and open source Low Orbit Ion Cannon. It is a very easy to use application with a nice graphical user interface. The video embedded below contains a short walk though.
Now let’s get our hands dirty: To find out how the application attacks the victim’s server in detail we have to download and analyse the source. Below is a cleaned up and simplified version of the method responsible for carrying out the actual HTTP Denial of Service attack.
byte[] buf = System.Text.Encoding.ASCII.GetBytes(String.Format("GET {0} HTTP/1.0{1}{1}{1}", Subsite, Environment.NewLine));
var host = new IPEndPoint(System.Net.IPAddress.Parse(IP), Port);

while (this.IsFlooding) {
	byte[] recvBuf = new byte[64];
	var socket = new Socket(AddressFamily.InterNetwork, SocketType.Stream, ProtocolType.Tcp);

	socket.Connect(host);
	socket.Send(buf, SocketFlags.None);

	socket.Receive(recvBuf, 64, SocketFlags.None);
}
To my surprise the method was a lot shorter and less complex than I expected. I will now try to walk you trough the functionality so that you also understand what is going on even if you are not a developer .
In the first two lines the application prepares the attack’s underlying HTTP request and sets the target IP address and the target port. Although it’s done in an rather unusual way it’s a legitimate implementation for an application requesting data from an external HTTP service. In the following third line the while command tells the system to repeat all enclosed and indented further commands. Within this section the actual attack is launched. However to do so two more things need to be prepared: At first in line 5 a buffer called recvBuf is created that is used to store the subsequential answer from the victim and in line 6 further connection details like the use of the TCP protocol are specified. Finally in line 8 the network connection to the victim’s server is established and in line 9 the HTTP request that was created in the beginning is sent. The subsequent receive method call in line 10 stores the first 64 byte of the server’s reply in the previously created receive buffer recvBuf. This forces the application to wait for the server to reply before it moves on. Until now we behaved like a normal web browser. However as the last command within the while loop was reached the whole process beginning at line 5 is repeated. Again and again and again …
What that means is we didn’t really use any service and just created unnecessary load on the server and the network connection. As the attack requests are generally repeated as fast as possible and are executed in parallel this load can render services unusable or even bring them down completely. This is especially true for Distributed Denial of Service (DDoS) attacks where many attackers or their bots join forces to attack a target as happend to the Playstation Network in 2014.
To recap: The sourcecode contains no nasty little tricks or algorithms that require any special knowledge. That means you don’t need to be a genius to write an effective and widely used Denial of Service attack tool. For me that is somewhat frightening!
The first and most important thing you need to know about the Pass the Hash (PtH) attack is, that it is not a single attack but actually a whole group of attacks that should correctly be called Pass the X. In any of these, the attacker obtained some kind of user identifying information (like the plaintext user password, a password hash or a Kerberos ticket) and uses them to impersonate as that user. This post focuses on the NTLM hash and the Kerberos tickets as they are the most interesting one’s from the Pass the X’s point of view. This attack is possible not because of a security vulnerability or design issue but because of the infrastructure necessary to enable single sign on (SSO). Although it can be used on any operating system and any version, Windows networks are the primary target.
At TechEd North America 2014Mark Russinovich and Nathal Ide gave a great talk on the technical background of Pass the Hash styled attacks. It’s available on Youtube and I really encourage you to watch it.
In the following paragraphs I will try to give an overview about the different Pass the Hash attacks and scenarios. However this is not a tutorial and so I will not document the specific commands. Please see the section “Your Toolbox” for further details, tutorials and the necessary tools.
Where To Obtaining User Identifying Information From?
Before an attacker can start a Pass the X attack he has to obtain something to pass along. There are two ways to do so. Either he gains local administrator rights on a client and dumps the hashes of all currently logged in users from the so called Local Security Authority or he gains access to a Domain Controller and dumps possibly all user hashes from the AD.
Dumping from a Client
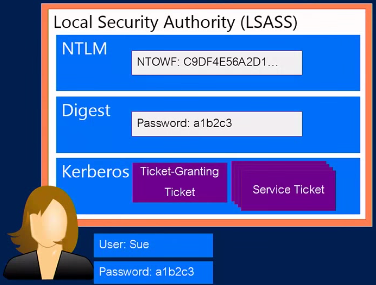
Let’s start with the somewhat less severe scenario of a client overtaken by an attacker with access to a local administrator. In Windows the Local Security Authority or lsass.exe is the process responsible for enforcing the security policy on the system. Furthermore it is also responsible for transparently authorizing the users to the services they want to use. For example if a user connects to a file server the system negotiates the protocol to use and the Local Security Authority transparently tries to sign the user in. It supports many different protocols like NTLM, Digest and Kerberos and it can also be extended by plugins.
The important thing is that depending on the protocol, the system has to cache a varied of user identifying data in order to successfully reauthorize the user. For example the Digest module needs to cache the user password in reversible encrypted form. An attacker can use any of this user idenfitiying information for this Pass the X attack.
With that knowledge any local administrator can dump the memory of the lsass process (with for example mimikatz, WCE or Task Manager’s Create Dump File) and thereby obtains the cached user identifying information of all currently signed in users. Depending on the enabled modules this at least reveals some password hashes but it might also already dump their plaintext password.
Dumping from Active Directory
The second way of dumping user identifing information can only be used by an attacker that already gained access to a Domain Controller. There he can dump the LM and/or the NTLM hashes of all users as they are stored in the Active Directory. Again it does not really matter which one he captures as both can be misused.
You may ask why an attacker with Domain Admin access still leverages Pass the Hash styled attacks? Well, it allows him to impersonate as any user on the domain without knowing or resetting the user password. Thereby he can easily access the user’s Exchange and Sharepoint account as well as connect to any file share the user has access to. This approach is especially great when giving presentations to C level executives. They may not care about an attacker being Domain Admin but they will care for sure if it allows them to access their mailbox or calendar.
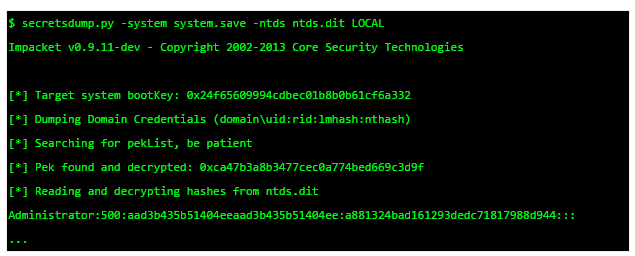
As it is a little more complex to dump the hashes out of the Active Directory I will cover this process briefly. Generally there are two steps: At first an attacker creates an offline copy of the registry and the AD. This can be done with the help of ntdsutil and VSS. Then he moves the files off the Domain Controller to his local machine. There he uses a tool like secretsdump to extract the hashes as shown in the picture above.
Using the Hashes
Although you already know that the hashes allow an attacker to impersonate as that owner of the hash, we will now cover this is more detail. If you are interested in a live demonstration I recommend you to watch the first 26 minutes of the talk “Still Passing the Hash 15 Years Later” from Black Hat USA 2012.
As discussed in the beginning the Local Security Authority is responsible for caching the user identifying information. To use the stolen hashes an attacker now simply replaces the user identifying information within the lsass.exe process on his own computer (again with for example mimikatz or WCE) with a stolen one. From the network’s point of view he thereby basically transformed his account to someone else’s. Mark Russinovich and Nathal Ide also talk about this process in their presentation “Pass-the-Hash: How Attackers Spread and How to Stop Them” starting at minute 7:10.
By doing so he also gains the single sign on (SSO) capabilities of the original account because the is what the hashes are intended for. That in turn allows him to use any service and application that builds upon the Windows Integrated Authentication including but not limited to:
Microsoft Exchange
SMB Filesharing (NTLM authentication over IP, Kerberos authentication over DNS)
Microsoft SQL Server
Microsoft Navision
Microsoft Sharepoint
Many business critical web applications
Any SAP Application
Again: By replacing the information within the Local Security Authority the attacker changed his identity to someone else’s without knowing the corresponding password. He can use any service the rightful account holder could use as long as it supports single sign on. This also works for accounts that use a two factor authentication like a smartcard as they still rely on the same single sign on infrastructur.
The Golden Ticket
A special case I want to highlight is the Golden Ticket attack. If an attacker obtained the NTLM hash of the KRBTGT domain account he can create a so called Golden Ticket. This is nothing else than a valid self created Kerberos Ticket Granting Ticket (TGT). With that ticket it is not only possible to impersonate as some else but it is also possible to authorise yourself. It is basically an attackers dream. The video below shows that attack in action.
Final Thoughts
For an attacker or pentester Pash the Hash styled attacks are a very valueable attack vector. Virtually all companies are prone to it as single sign on is used by many of the most business critical applications. Furthermore it often allows an attacker to rapidly elevate his priviledges after obtaining initial access to a low profile client.
Although Microsoft already actively participates in the ongoing debate about Pass the Hash it is still a long road before all organisations understand the associated risks. I have commited myself to actively point people to Microsoft’s Pass-the-Hash portal so that the words spreads a little faster.
If you have any questions or additional input please leave a comment below.
Your Toolbox
Finally here is a list of applications and the corresponding documentation for your further reading. All this links really helped me to deeply understand Pass the Hash styled attacks and to write this summary. Hereby I want to thank all the authors for their great job!
Recently some colleagues and I discussed the possibility to obfuscate known malware samples so that they successfully pass a virus scan. This works because most scanning engines detect threats due to their signature. These signatures in turn are based on the program code of the malware. An attacker can now modify or obfuscate the source code of already known malware and thereby avoids detection.
As we were unsure about the real-world feasability and the ease of use of the available obfuscation tools I decided to test one of them: The Veil-Framework. To do so I set up a fully patched Windows 7 Professional 32Bit VM secured with AVG AntiVirus FREE 2015 with the goal to modify a previously detected and blocked malware so that it sucessfully executes.
Creating the malware
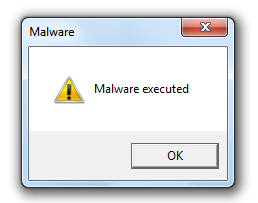
The first thing I had to do was to create a malware for this test. As I wanted a “safe” malware, I decided to use the Metasploit windows/messagebox payload. It only opens a messagebox but it is detected as malicious by many scanners.
To ensure that we use exactly the same source for all further tests I used the msfpayload command line utility to create a Windows application (malware.exe) and to dump the corresponding raw shellcode (malware.raw)
msfpayload windows/messagebox TITLE="Malware" TEXT="Malware executed" ICON="WARNING" X >malware.exe
msfpayload windows/messagebox TITLE="Malware" TEXT="Malware executed" ICON="WARNING" R >malware.raw
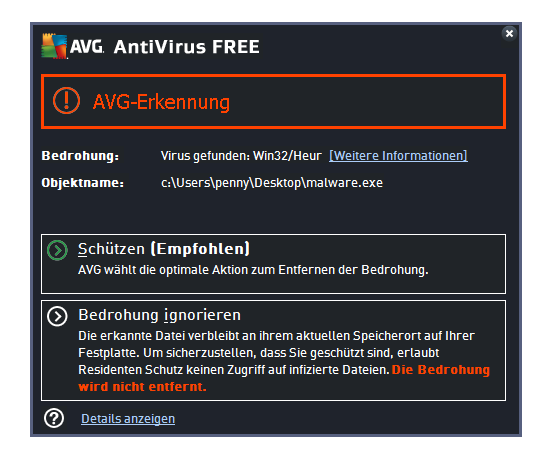
As expected, the unobfuscated malware (malware.exe) was immediately detected by the AVG scanning engine:
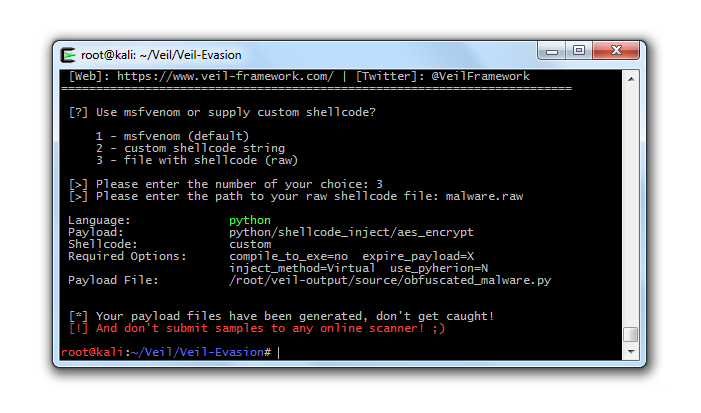
Before the obfuscation progress starts we have to provide the previously created raw shellcode of our malware:
Veil-Evasion supports many different programming languages (C, CS, Powershell, Python, …) and methods (shellcode injection, different meterpreter payloads, …) for obfuscation. For an up-to-date list browse the payloads subfolder in the source code repository.
Although the Veil-Framework is capable of directly creating a Windows application I had some problems with the thereto necessary Wine installation. As a workaround I simply copied the obfuscated malware to my Windows computer and used PyInstaller to convert it there to a self contained application.
In the background PyInstaller analyses the Python script and packs all the necessary modules and libraries including the Python Runtime into a single and redistributable Windows application.
Playing Hide & Seek
Finally I copied the newly obfuscated malware to the test machine and double clicked it. To my pleasure, it passed the on-access virus scan and executed.
As I was eager to know how well I masked my “malicious” intends I uploaded the file to VirusTotal. Although it was detected by 7 out of 56 scanners this is still a major improvement over the initial 35 detections.
Conclusion
With this demo I clearly showed that it is fairly easy for malware applications to avoid detection from off-the-shelf virus scanners by using obfuscation. This targeted attacks are hard to mitigate and they require special security tools with for example virtualisation and malware analysis capabilities to do so. The good thing is that modified malware will most likely be detected by virus scanners within days after their initial deployments. Additionally more and more engines already detect the obfuscation itself and also block the file.
This all boils down to the fact that virus scanners are only one tool in the ongoing fight for protecting your critical infrastructure.
We are using Acunetix’s Web Vulnerability Scanner to help us automatically test web applications for SQL injection, cross-site scripting and other vulnerabilities. To scan login protected areas the Web Vulnerability Scanner features the so called Login Sequence Recorder. It basically recordes all the HTTP requests necessary to login and replays them whenever the current user session was terminated.
This works great as long as there is no CAPTCHA and no CSRF token. If any of those two is used we have to manually take action by using another feature called Manual Intervention. It basically opens a web browser window with the current site’s login already preloaded and you are requested to proceed manually until the user session is successfully reestablished. This is quite annoying as you have to re-login several hundred times if the application aggressively terminates user sessions.
With Sikuli we can now automate the scan even with CSRF secured logins. Check out this video to get a rough overview about what Sikuli is all about. We will use it to script the necessary mouse and keyboard actions needed for logging into the web application and execute them everytime the user session is destroyed.
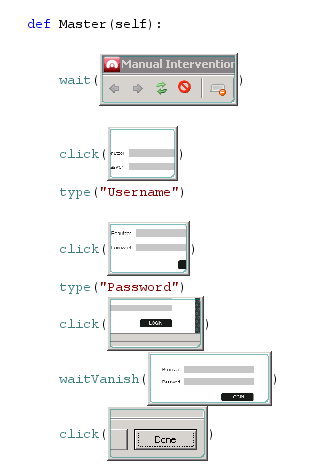
Below is a workflow I used for my last vulnerability scan: At first we wait for the Manual Intervention window to appear and then we click into the username field and type the corresponding name. We repeat this actions for the password. Then we submit the form and wait until the login vanished. Finally, we close the window by clicking Done. Thereby we created a new user session and the scan continues. By using this workflow you can completely automate the login of CSRF protected web applications.
 In the need for a simple and easy to use OS X based Always On VPN solution? If so, I may have something for you.
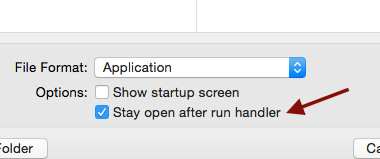
