Nov 162018
 

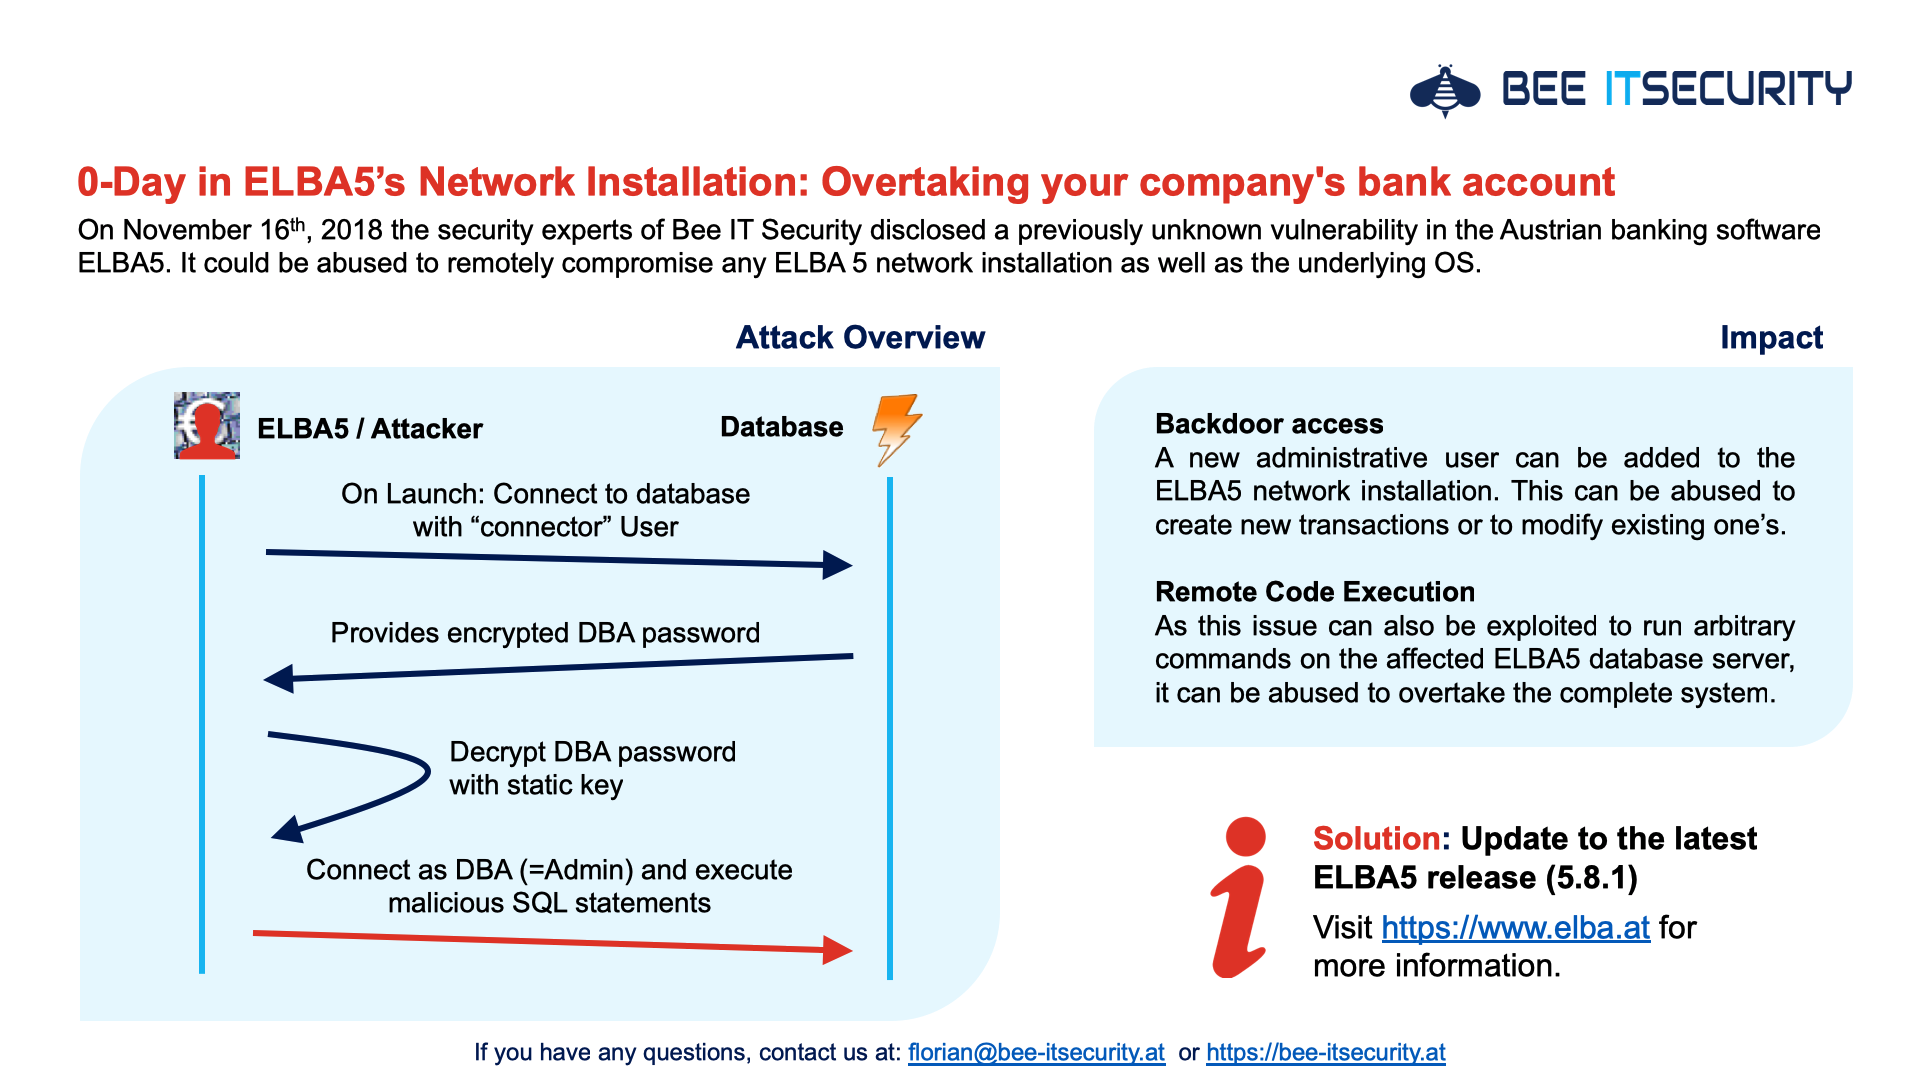
This blog post is about a previously unknown critical vulnerability in the Austrian electronic banking application ELBA5. The issue discussed here could be abused to gain full control over any ELBA5 database server as well as the underlying operating system. It has a confirmed CVSSv3 score of 10.0.

TL;DR: To secure your ELBA5 network installation, please update to the latest available ELBA5 release (5.8.1). For further information please see https://www.elba.at

What is ELBA5?

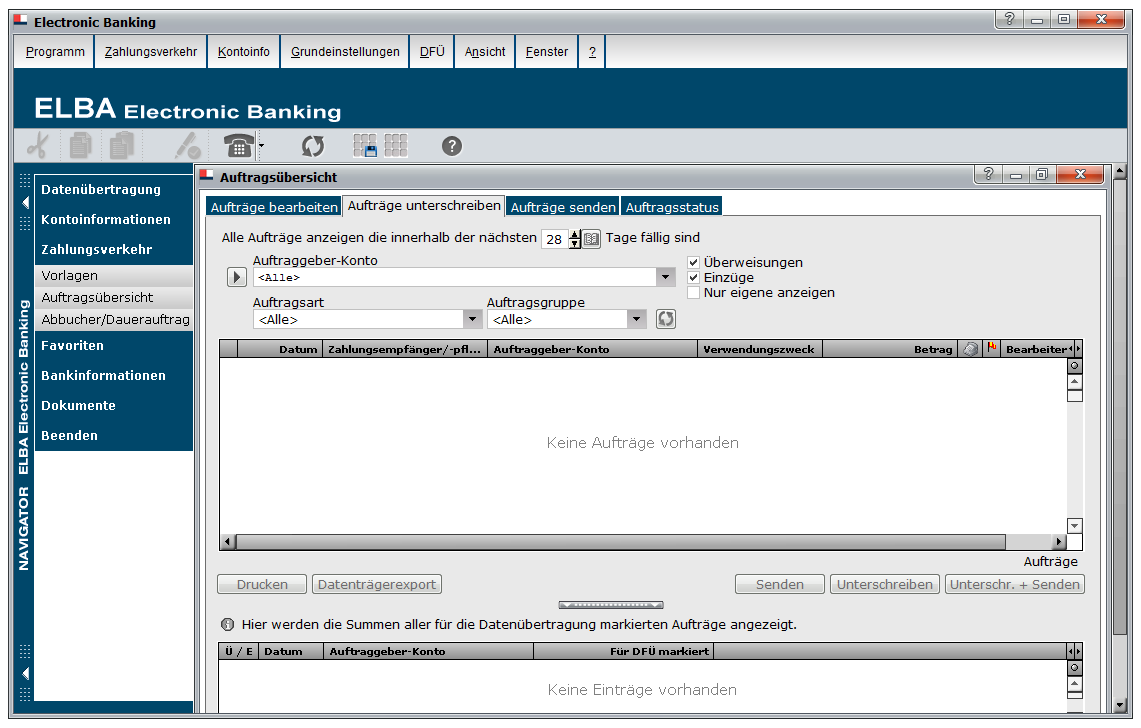
ELBA5, as shown below, is one of Austria’s most important business-focused electronic banking applications. It is used by the finance departments of many large organisations and supports about 24 different banks.

It is important to note that there are two distinct ELBA5 releases, namely: ELBA5 single-seat and ELBA5 multi-user (aka network installation). The vulnerability discussed here is only exploitable for the ELBA5 network installation. However, I have also reported several other, although less critical issues for the single-seat release. So it’s highly recommended to updated to the latest version anyway.

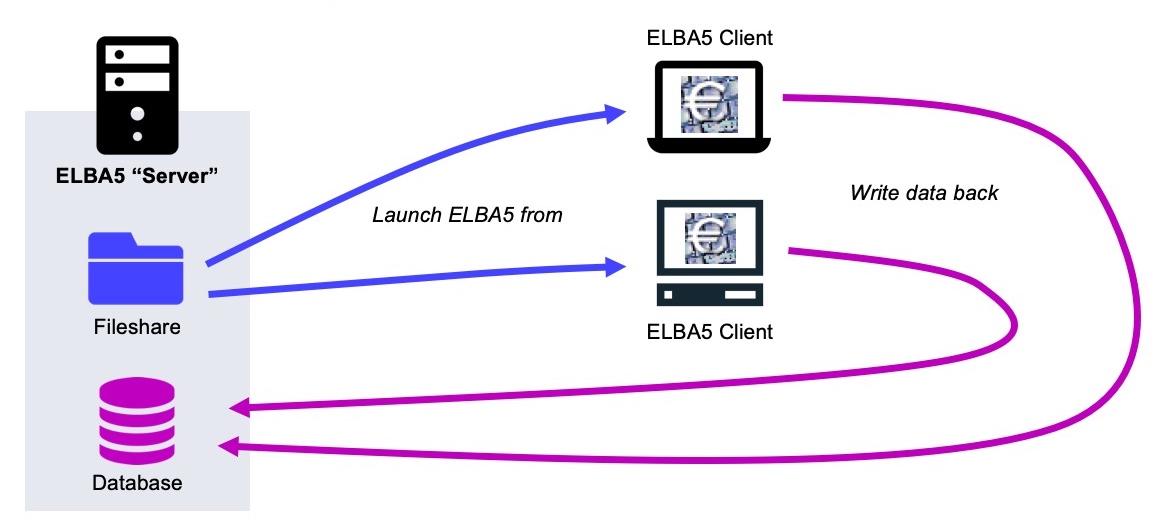
To give you a broad understanding of how the ELBA5 software stack works in a multi-user configuration, I create the following diagram. On the left side there is the ELBA5 server: This machine has two distinct functions: On the one hand it serves the ELBA5 binary application to all clients using a standard Windows file share. On the other hand it provides the ELBA5 backend, which is basically a SAP SQL Anywhere Database.

The enduser systems simply connect to the mentioned file share and launch the ELBA5 client from there. This makes it easy to update the application, as there is only a single package that is used by everyone. All the data that is viewed, modified or created from within the ELBA5 client is directly stored into the backend database. This is everything you need to know in order to understand the following exploit…

How everything started

The story of this vulnerability began during a penetration test last year. There I was able to gain access to the finance department’s terminal server. Amongst other’s they also used the ELBA5 network installation for their daily business. As I’m curious by nature I immediately launched all the interesting looking applications. Below is an image illustrating the sequence of things that happened right after. Can you spot the (possible) issue?

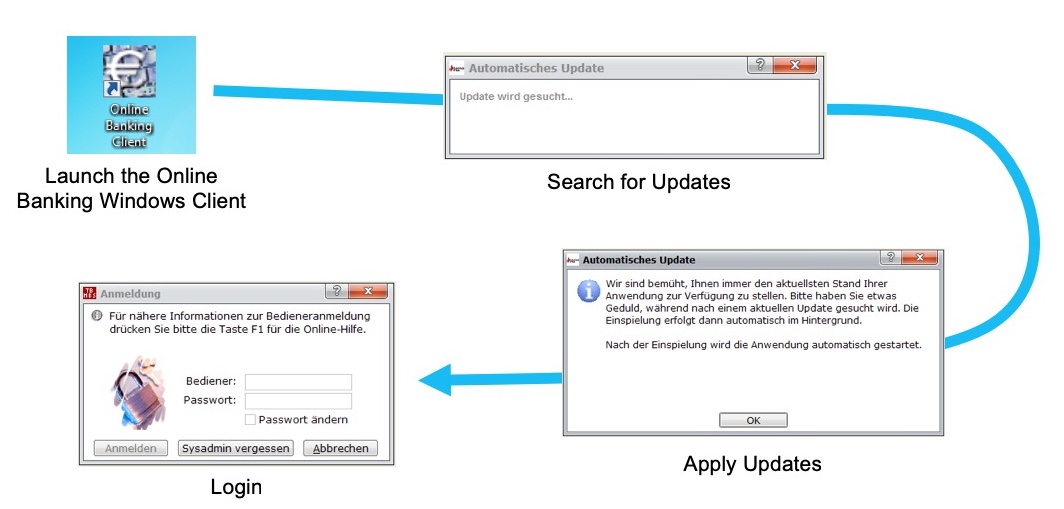
Well, here is the thing that caused my attention: How is it possible to install automatic updates without any previous authentication? Is the ELBA5 application using hardcoded credentials to connect to the backend service?

Initial Analysis

With this initial discovery I started to dig a little deeper. As ELBA5 is developed in Java I used the CRF decompiler to learn more about the inner workings of the application. Strangely, I could not really find any code that established the connection with the database backend. At that point I got really interested…

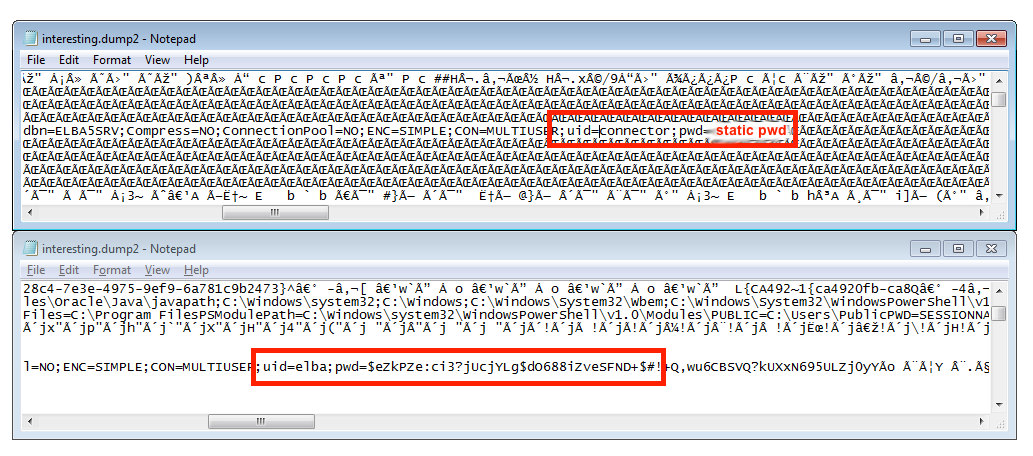
As my first try failed, I switched to a more brute force-like method: As I guessed that the ELBA5 client uses hardcoded credentials, they have to be somewhere in memory. A quick search for strings like user, uid, password, pwd however did not reveal anything interesting. Hence I thought, these credentials may get cleaned up immediately after establishing the initial connection. This is where the brute force part comes into play: I downloaded Microsoft’s procdump and took memory dumps as fast as I could while launching ELBA5. As shown in the screenshot below, this worked out. I was able to capture the credentials of not one, but two valid backend users. Namely, “connector” and “elba”:

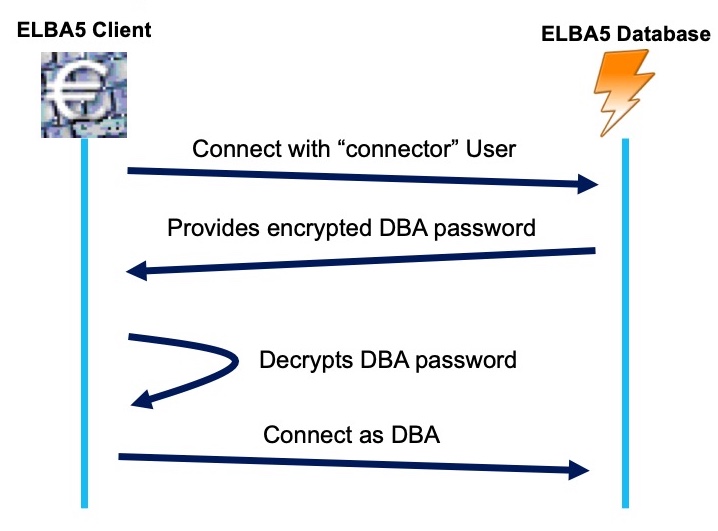
By setting up a second ELBA5 network installation, I verified that the connector user always uses the same static password, whereas the elba user’s password did not work there. This was a problem as only the elba user holds administrative DBA privileges. Based on what I had learned already I came up with the assumption that there has to be a two step process for authentication:

The 1 Million Dollar Question: How is this working in Detail?

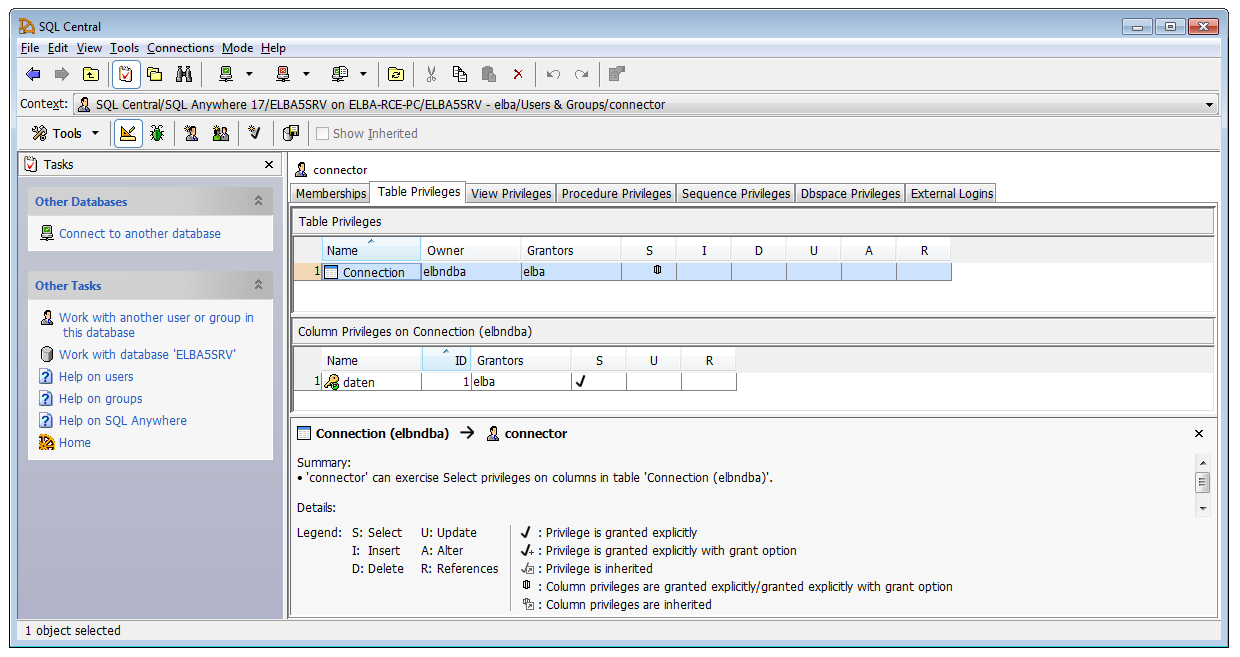
After taking a closer look at the privileges of the “connector” user on my debug machine (where I knew the DBA password), I discovered that this account is only authorised for a single column in a single table. Well, now I knew where the encrypted DBA password was stored. That it is encrypted (or at least obfuscated) was clear after I compared the content of the daten column with my known elba password. They were completely different.

So, I again had to take a closer look at the source code of the application. Finally, after many hours of debugging I discovered an interesting comment:

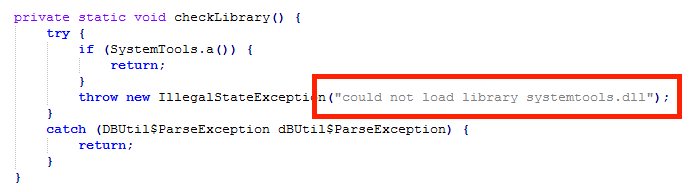
Has the database logic been “outsourced” into a separate library? To get a first glance I extracted all the strings from the systemtools.dll library… Some stood out immediately:

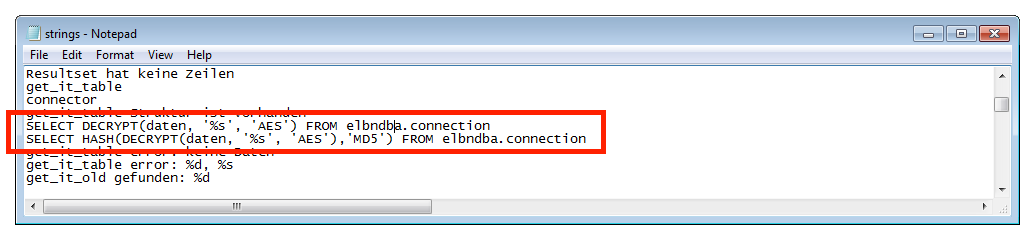
The highlighted SQL commands in the above screenshot are likely used to decrypt the secret elba DBA database password. Presumedly the AES encryption algorithm was used to secure the password. From the static strings alone however, I was not able to exfiltrate the required password. So I had to switch to something more dynamic: Immunity Debugger.

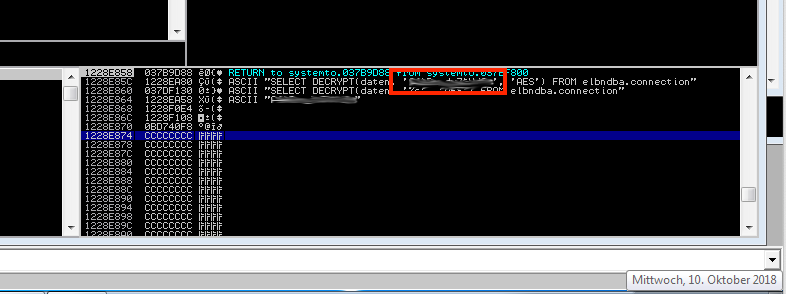
After setting an access breakpoint on the memory addresses of the above strings (and a few hours of debugging), I found the following information on the stack. The highlighted part contains the hardcoded key that is used to decrypt the elba user’s password.

Bringing it all together

By combining what I had learned by now, it was possible to reliably gain DBA permissions for every single ELBA5 network installation:

  1. Connect to the database with the hardcoded “connector” user and SELECT the AES encrypted DBA’s user password
  2. Decrypt the password with the static AES key, as obtained with the help of Immunity Debugger
  3. Connect to the database with the user elba and the decrypted password. We now have full control over all information that is stored in the DB.

However, this was where the real fun began…

Adding a Backdoor User

As I was targeting a banking application I thought it would be great to earn a bit of extra cash. So, what about adding a backdoor user?

After again analysing the source code I found out how the user’s password is stored in the table “BEDIENER”:

By analysing all the involved methods, I was able to make it more readable as:

This finally made it possible to remotely add arbitrary users to the ELBA5 installation. Logically with admin permissions:

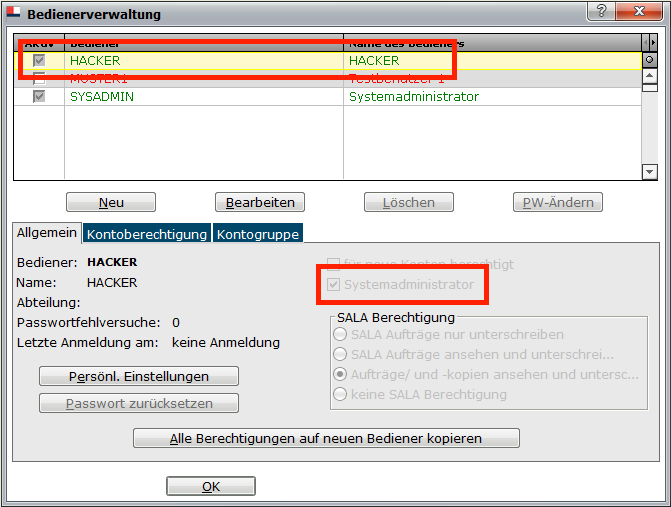
Because everyone wants to have a user called “HACKER” in this electronic backing application – Right?

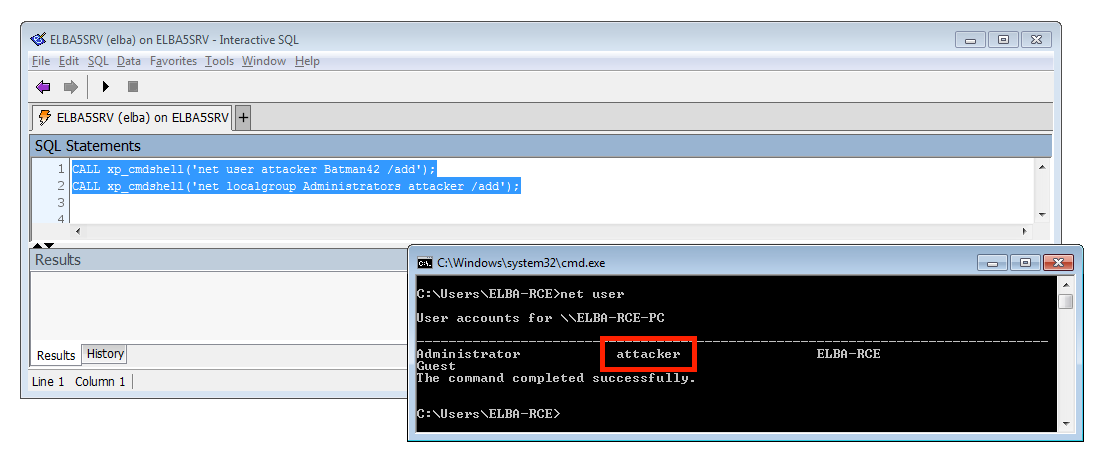
Remote Code Execution

But wait, there is more. Because from a pentester’s point of view we care more about overtaking a server than stealing money…. Luckily there is an old friend in the ELBA5 SQL Anywhere database server that we can use: xp_cmdshell. This SQL command can be used to run arbitrary applications on the operating system level. What makes this even more interesting was, that the database runs with full SYSTEM level permissions:

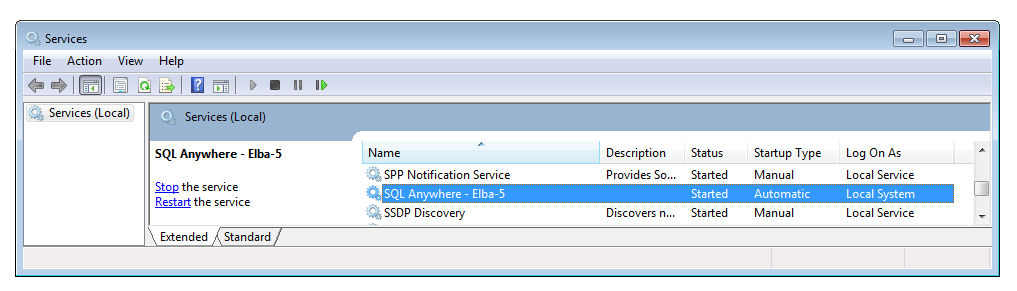
That means, we can also add a new Windows Admin. This give us full control over the affected server. Mimikatz anyone?

PoC Exploit

To automate the process discussed in this blog post, I wrote a fully fledge python exploit. It can either be used to add a new ELBA5 user to the database or remotely run a command with SYSTEM permissions on the target system. The only thing that is required is that the ELBA5 SQL Anywhere Database service is running a vulnerable version and is accessible over the network (TCP port 2640).

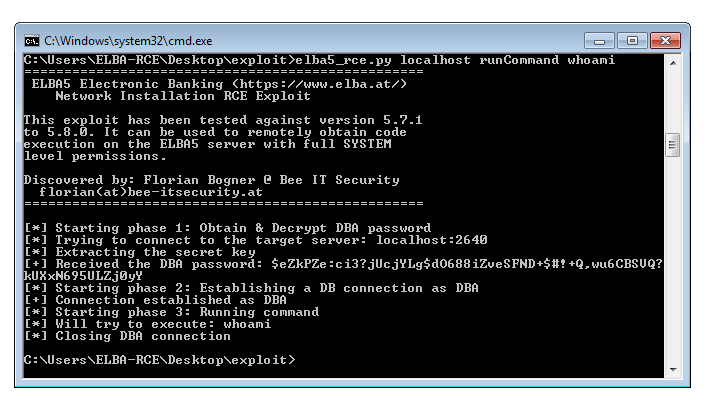
You can download the full exploit here:

Coordinate Public Disclosure Process

I also want to briefly discuss the coordinated public disclosure process that I went through with the developers of ELBA5. The initial issue was reported last year and triaged within days. As some may have already guessed, this is more an architectural issue and so it required intense rewrites and testing. I was invited twice during this process to discuss the current state. We openly talked about the risks and how they can be mitigated.

I really want to everyone involved for how professionally this matter was resolved. Not many companies take IT security that serious. It really shows how they values their partners and endusers. THANK YOU! 

Mitigation

This coordinated process is also important for endusers. Why? Well, because the only thing they have to do is: Please install the lastest ELBA5 5.8.1 release from https://www.elba.at. A lot of testing went into making the transition to the new authentication module completely transparent.

Summary

As I always think it is important to summaries the key aspect, I created the following overview. It gives a great high level introduction into the underlying vulnerability and the suggested solution. This slide is also available in German.

If you have any questions, please contact me directly at florian@bee-itsecurity.at or use the comment form below.

Thanks for reading that far 😉

Sep 062018
 

Für die meisten Unternehmen ist es undenkbar selbst “Malware Analyse” zu betreiben. Dennoch reichen oft schon wenige Tricks um relevante Eigenschaften einer Malware (sogenannte IOCs) zu finden. Über diese IP Adressen, Hostnamen, Dateien oder Registry Keys kann anschließend abgeleitet werden, ob und welche Endgeräte im eigenen Netzwerk infiziert wurden.

Im folgenden Video stelle ich einige Methoden und Tools vor, wie auch Sie einfache Analysen selbst vornehmen können und so die Sicherheit in Ihrem Unternehmen mit eigener “Threat Intelligence” erhöhen.

Hier noch eine Liste mit Link zu den im Video genutzten Tools:

  • oledump – Analysiert Office Dateien auf gefährliche Inhalte
  • Process Monitor – Protokolliert die Systemaktivität
  • Process Hacker – Task Manager On Steroids
  • Autoruns – Welche Anwendungen werden beim Systemstart geladen?
  • HashMyFiles – Berechnet den MD5 und SHA1 Hash für eine Datei
Jul 262015
 

In this last part of the series IPv6 for pen testers we will now cover how address autoconfiguration works without the need for a central DHCP server. I really encourage you to read part 1, 2 and 3 of this series as they cover the IPv6 fundamentals needed to understand the following paragraphs.

In IPv4 a central DHCP server was used to autoconfigure the IP addresses and the standard gateways for all clients. In IPv6 however, routers advertise the on-link networks and the available routes on their own using multicast. That means that as soon as a new client is connected to a network, all the available routers advertise all the avilable network prefixes. The client then assigns itself an IPv6 address within each on-link network and adds all other prefixes to his routing table. The full IPv6 addresses for the on-link networks are created by appending the host portion as generated by the  EUI-64 algorithm as discussed in part 3 to the advertised network prefixes. We will now discuss this process in more detail with the help of the following image: 

In IPv6 all routers on a network join the so called All-Routers multicast address FF02::2. This group is then used to periodically advertise all available on-link network prefixes and all routable destinations. However as it takes up to two minutes to receive all information a recently booted system can trigger a full re-advertisement of all prefixes by sending a Router Solicitation message to the All-Routers multicast group. After that all routers directly reply with Router Advertisement messages with all on-link and all routable destinations. As already mentioned the client than adds a new IPv6 address for each prefix by appending its EUI-64 host ID. This process allows a client to join a network without any prior configuration.

If it is necessary to provide more information to the clients (like DNS servers) the special “Other configuration” bit can be set in the Router Advertisement message.  It indicates that other configuration information is available via DHCPv6. This type of DHCP server is called stateless because it only hand out static configuration and does not track its clients.

Beyond using Stateless Address Autoconfiguration (SLAAC), as this process is called, it is still possible to use a fully featured DHCPv6 server instead.

Router Advertisement Flood

A pen tester specific IPv6 technique was discovered by Sam Bowne, a well known IT security expert. He developed a Denial of Service exploit for all up-to-date operating systems (Linux, Windows and OS X) based on Router Advertisement messages. It works by flooding the network with new route advertisements that get processed by the attacked clients. During this processing the systems get practically unusable. Sam captured several videos to showcase the result of the flood on this website.

Further Reading

Before rounding this series up here are some references for your further reading:

Roundup

Although already standardized in 1998 IPv6 still has not fully reached the end customers. Only very few ISPs in Europe by default even provide IPv6 address to their customers and even less companies use IPv6 within their networks. However as IPv4 addresses will eventually run out in the not too distant future companies have to prepare their equitement and train their employees. This is especially important as virtually every new network component is IPv6 capable and most of them even have it pre-enabled. As we have learned in this series IPv6 introduces many new concepts and some of them can be misused. I currently advise everyone to disable the IPv6 stack on their network components if not used and I highly recommened companies to train their administrators so that they know how IPv6 works and what challenges it brings with it.

Jul 142015
 

Welcome back at part three of my blog post series about IPv6 for pen testers. In part 1 we already covered the advantages of IPv6 and how IPv6 addresses look like and in part 2 we discussed the three different IPv6 address types and how Link Local adresses are generated. I encourage you to read both posts before continuing as they cover the basics for this entry. We will now take a closer look at IPv6 multicast and how Layer 2 address discovery is implemented.

Multicast

Although already available in IPv4 almost nobody ever heard of multicast before. What it does is, it enables a one-to-many communication pattern on a network level. To do so, so called multicast groups are formed. These groups are basically special IP adresses within the so called IP multicast range (224.0.0.0/4 in IPv4 and ff00::/8 in IPv6). A client that is interested in joining the communication in such a group instructs the network to send this group specific communication to its network port. All clients that are not interested do not even receive the traffic as they did not join the group. If you are interested in what multicast groups a system is joined you can use the following commands:

Linux: netstat -g
Windows: netsh interface ipv6 show joins

With IPv6, multicast will be a fundamental part of every network  and will even replaced all broadcasts.  This is especially important as broadcasts have been a problem for years in large networks as they are sent so all systems in the whole network and thereby cause a lot of unnecessary network traffic. Furthermore every broadcast has to be processed by the end device and thereby wastes processing power.

Neighbour Discovery

However without broadcasts a problem arises: ARP the Address Resolution Protcol used for resolving IPv4 to MAC addresses and thereby enabling the necessary OSI Layer 2 communication can not be used anymore and a replacement has to be defined.

This replacement is called Neighbour Discovery (ND) and is built on ICMPv6 and IPv6 multicast. It works by sending a Neighbour Solicitation (NS) request to the address dependent Solicited-Node multicast address while listening for the correspoding Neighbour Advertisement (NA) answer. Before covering this process in detail here are the commands used for showing all known neighbours similar to the ARP table:

Linux: ip -6 neigh
Windows: netsh interface ipv6 show neighbors

Layer 2 Address Discovery

By enabling IPv6 and by configuring an address the system not only allows you to communicate using this address but also automatically joins two IPv6 multicast groups. The first is the already mentioned Solicited-Node multicast group. It is dynamically generated by taking the last 24 bits of the corresponding IPv6 address while prepeding the ff02::1:ff00:0/104 Solicited-Node multicast prefix. The second is the IPv6 All-Nodes multicast group ff02::1 that is joined by all IPv6 capable systems.

Now let us recap using an example: By setting up the IPv6 address 2000::9999:1111 on System A it will join the Solicited-Node multicast address ff02::1:ff99:1111 and the All-Nodes multicast address ff02::1.

If in turn System B wants to send data to System A (2000::9999:1111) it needs both the IPv6 address and the corresponding MAC address. To get the MAC address, it sends a Neighbour Solicitation (NS) message to the Solicited-Node multicast address ff02::1:ff99:1111. System A will reply with a Neighbour Advertisement (NA) containing its MAC directly to System B. After that System B has all the necessary information and can send data to System A. The image below illustrates the process.

Duplicate Address Detection

Beside the discovery of Layer 2 addresses this process is is also used to avoid address collisions. Before a new IPv6 address is assigned to an interface the systems sends a Neighbour Solicitation message to the corresponding Solicited-Node multicast address. However instead of using the interface’s IPv6 address – which has not been set up yet – the unspecified address :: is used instead. If the address is already in use the owner replies with a Neighbour Advertisement to the IPv6 All-Nodes multicast address and the setup process is aborted. If no answer is received within a given time frame it is assumes that no-one else is using it and the setup continues. This process is called Duplicate Address Detection (DAD).

Before summing up let us briefly cover a good trick that can be used by pen testers to detect all IPv6 capable devices. As we already discussed there is the All-Nodes IPv6 multicast group. In contrast to IPv4’s broadcast you can ping this group while getting a reply from all IPv6 devices on the network. This is a great way to find your targets! The following commands show how to ping the All-Nodes IPv6 group:

Linux: ping6 -I eth0 ff02::1
Windows: ping ff02::1

To summarize, we covered what IP multicast is and what it is used for. Furthermore we talked about IPv6’s ARP replacement namely Neighbour Discovery and how it works in detail. In the next and final part we will then cover how IPv6 Addresses are managed without the need for a DHCP service and why you still need one.

Jul 082015
 

Welcome to part two of my introduction to IPv6 for pen testers. If you did not read the first part I really encourage you to do so before reading any further. In the next paragraphs we will briefly discuss the different IPv6 address types and cover Link Local addresses in detail.

IPv6 Address Types

In IPv6 there are three different kinds of address:

  • Unicast: These addresses are used for direct one-to-one communication. There are global and local unique unicast and Link Local addresses. Global one’s are managed by IANA and right now all are within the 2000/3 network. Local one’s can be used within organisations to for example identify the location of a system and can either use the FC00/8 or FD00/8 network. Finally, Link Local one’s use the FE80/10 network and are only valid for the directly connected network segment. We will dicuss those shortly.
  • Multicast: These special reserved addresses in the FF00/8 network are used for one-to-many communication. IPv6 multicast completely replaced the need for broadcasts and are used extensivly during IPv6 operation.
  • Anycast: Any unicast address can be used for anycast as soon as it is assigned to multiple systems. Thereby a client automatically connects to the closest anycast server. This enables load balancing on the network layer.

A system in an IPv6 world will almost ever have multiple addresses assigned to its interfaces. For example as soon as IPv6 is used on an interface a Link Local address is generated and assigned, furthermore the network will provide one or more unicast addresses used for communicating with the outside world or the company network.

Link Local Addresses

We will now cover Link Local addresses in more detail. As already briefly discuessed they are automatically generated and are only valid for the directly connected network segment. Any device that claims to speaks IPv6 supports and uses them. As soon as a new device is connected it can be reached using its Link Local IPv6 address. The following steps (based on RFC2464) show how to generate the IPv6 Link Local address from a NIC’s MAC:

  1. Get the 48bit MAC address of the NIC
  2. Convert the MAC to binary and flip the 7th bit. This is necessary as in the MAC address if set, this bit identifies a locally administrated and thereby modified address. However in the desired EUI-64 format the bit is interpreted in the the exact opposite way, so that a set bit indicates a globally unique address as burned in by the manufacturer (again see RFC2464).
  3. In the middle of the MAC address with the already flipped bit add FFFE.
  4. Finally, the Link Local FE80 network prefix has to be prepended while filling everything in between with zeros so that a valid IPv6 address is generated.

The following example shows how to apply this algorithm:

1.) Get the MAC address:
a4:52:6f:44:7e:69 => a4526f447e69
2.) Convert the MAC to binary:
10100100 01010010 01101111 01000100 01111110 01101001
3.) Flip the 7th bit:
10100110 01010010 01101111 01000100 01111110 01101001 => a6526f447e69
4.) In the middle add FFFE
a6526fffee447e69
5.) Add the Link Local FE80 network prefix and generate final IPv6 address
fe80::a652:6fff:fe44:7e69

I covered this algorithm in that much detail because it is the first really interesting IPv6 aspect from a pen tester’s point of view. Many systems already have IPv6 preenabled however most administrators only block access using IPv4 firewalls. That means that it is always worth a try to check if a server offers more services using IPv6 than it does over IPv4. To do so you simply ping the server using IPv4 to get its MAC address cached in your ARP table. Then you apply the above algorithm to this MAC and voilá you now have the server’s Link Local IPv6 address ready to be scanned. As I was tired of repeating this steps over and over again a colleage and I wrote IPv4_to_IPv6_address_generator. It is a small python tool that simply automates the above steps and it works on Windows and Linux.

After all that hard work of generating the Link Local IPv6 address we can now connect to the network and the device is ready to be used. If you are interesting if your computer already has IPv6 enabled just use one of the following commands. They will list all your currently assigned IPv6 addresses:

Linux: ip -6 addr
Windows: netsh interface ipv6 show addresses

Summing up we discussed the different IPv6 address types and generated a Link Local address from a NIC’s MAC. In the next post of this series we will take a closer look on IPv6 multicast and why it will completely replace broadcasts. Furthermore we will discuss how Layer 2 address discovery works with IPv6.

Jul 012015
 

Due to the shortage of IPv4 addresses IPv6 has been developed. It is the successor protocol that will be used in parallel to IPv4 to drive the Internet’s underlying infrastructure. In this series of four blog posts I will give a general introduction to the most important aspects of IPv6 with a focus on the pen tester’s point of view. Be aware that this series is about the fundamentals and thereby does not cover all the dirty little details.

In part 1 we will cover IPv6 in general and how an IPv6 address look like.

IPv6 Overview

The easiest to spot change is that the IPv6 addresses are a lot longer than its IPv4 siblings. The additional bits increases the available address space and thereby allow us to address a lot more devices. Here are the numbers:

  • IPv4 address: 32bit (4294967296 available IP addresses)
  • IPv6 address: 128bit (340282366920938463463374607431768211456 available IP addresses – And yes, every single atom on the earth surface can be addressed with IPv6. You can even assign more than 100 addresses to each one – Reference)

Furthermore IPv6 has many great features built in like:

  • Mobility (you always use the same IP address wherever you are)
  • Security (IPsec is built in)
  • It eliminates the need to use NAT

Now let’s take a more close look at how an IPv6 address looks like:

How does an IPv6 address look like

Here is an IPv6 address in its full glory: fe80:0000:0000:0000:02aa:00ff:fe28:9c5a/64

As you can clearly see, IPv6 addresses are not as easy to write and remember as IPv4 addresses. They are composed of 8 sections each representing 16bits of the full 128bit address space written in hexadecimal notation. Furthermore it is compose of two parts: the network portion and the host portion. The network portion is defined using the CIDR notation (/64 in the above example) and is used for traffic routing. To make it a bit easier for us humans, there are three tricks that can be applied to make the address a little easier to handle:

  1. The first thing you need to know is that is does not matter if you use lower case or capital letters. You can even mix case if you like to. That means that the following examples are valid addresses and all three represent the same host:
    Example 1: fe80:0000:0000:0000:02aa:00ff:fe28:9c5a
    Example 2: FE80:0000:0000:0000:02AA:00FF:FE28:9C5A
    Example 3: Fe80:0000:0000:0000:02Aa:00fF:fE28:9c5A
    
  2. Secondly, leading zeros can be removed for each section. However be aware that if a section contains only zeros at least one has to remain. Again the following examples are valid addresses for the same host:
    Example 1: fe80:0000:0000:0000:02aa:00ff:fe28:9c5a
    Example 2: fe80:0:0:0:02aa:00ff:fe28:9c5a
    Example 3: fe80:0:0:0:2aa:ff:fe28:9c5a
    
  3. 3) Finally, rule number three allows you to replace consecutive sections of zeros with ::. However be aware that this is allowed only once. While parsing the address the computer knows that IPv6 addresses always have to have eight sections and simply replaces the :: with the correct number of sections filled with zeros. The following examples illustrate the process:
    Example 1: fe80:0:0:0:2aa:ff:fe28:9c5a => fe80::2aa:ff:fe28:9c5a
    Example 1: 2000:0:0:0:111:ffdc:0:8f21 => 2000::111:ffdc:0:8f21
    

In this post we discussed some advantages of IPv6, how addresses look like and what tricks can be used to shorten them. In the next one we will take a closer look at the different addresse types and IPv6 Link Local addresses.