Jan 122015
 

If you are responsible for backup or archiving systems you know for sure how important it is to get system notifications. You want to know if a job failed! My backup/archiving software of choice Archiware P5 however does not yet support SMTP user authentication or TLS and so we have to build a workaround to support most generally available mail servers.

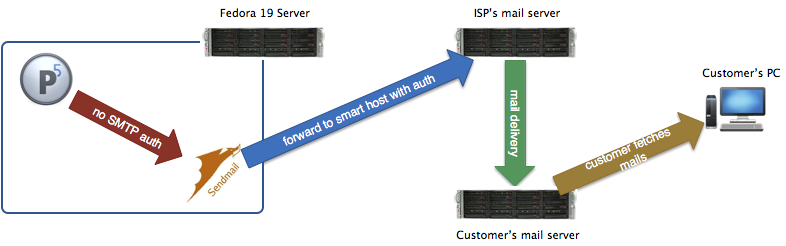
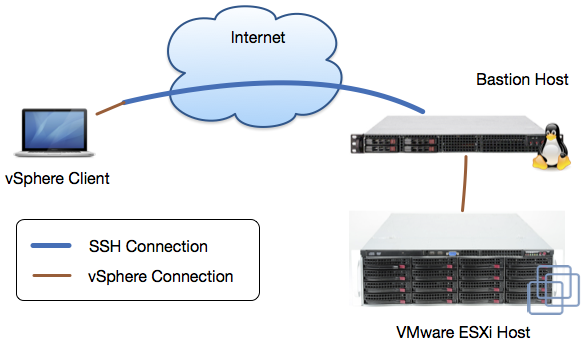
In this post I will explain how to install sendmail on Fedora 19 and how to configure it to use a smart host. I opted for sendmail as I already used it before and mostly know how to configure it. Furthermore I will also show what to change in P5’s interface. The image below illustrated the desired resulting mail delivery path.

P5 smart host

The following steps should work on any Red Hat-based distribution without further changes and should be easily adaptable to other Linux-based operating systems. Many commands in this post are based on the one’s used in my previous article “UNIX & PHP: Configure sendmail to forward mails“.

Install Software

The first thing we have to do is to install the required software. It’s very important to also also add the sendmail-cf configuration files package.

yum install sendmail sendmail-cf

Mail Credentials

In the next step we have to append the mail server credentials to “/etc/mail/authinfo”.

AuthInfo:your_mail_server.your_domain.tld "U:your_username" "P:your_password"

Update Configuration

After that we have to update the “/etc/mail/sendmail.mc” sample configuration.

At first we have to do is to append the smart host configuration to the end of the file.

FEATURE(`authinfo',`hash /etc/mail/authinfo')
define(`SMART_HOST', `your_mail_server.your_domain.tld')

After that uncomment the following line by removing the dnl prefix:

define(`confAUTH_MECHANISMS', `EXTERNAL GSSAPI DIGEST-MD5 CRAM-MD5 LOGIN PLAIN')dnl

Select MTA

To ensure that we really use sendmail as MTA we have to choose “/usr/sbin/sendmail.sendmail” after running the following alternatives command.

alternatives --config mta

Apply Configuration

To apply all our changes run the following commands:

cd /etc/mail/
makemap hash authinfo < authinfo
m4 sendmail.mc >sendmail.cf
service sendmail restart

We now have a fully functional SMTP server running on our local machine that forwards all incoming mails to the configured smart host.

Archiware P5 Configuration

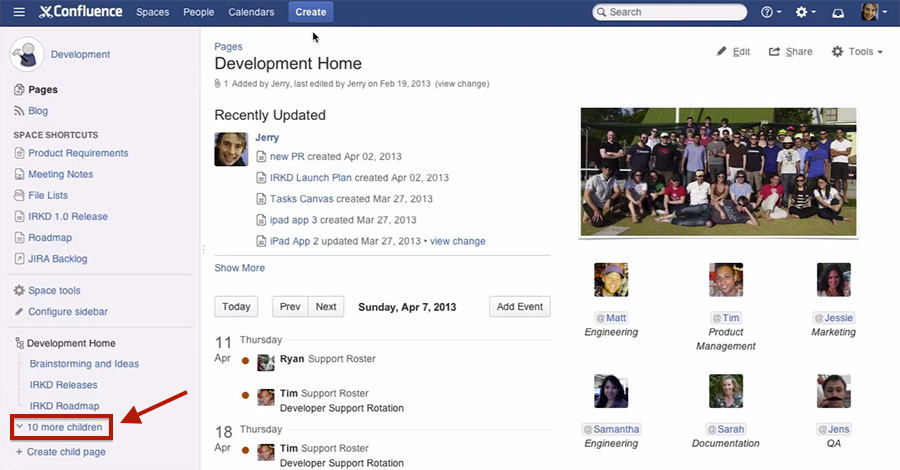
To finish the configuration we have to ensure that Archiware P5 uses the correct mail server and sender address. To do so log into the P5 interface and open the localhost Client preferences as shown on the screenshot below. Then enter “localhost” as Mail server. Furthermore provide a valid Mail sender address.
P5 Mail Interfae

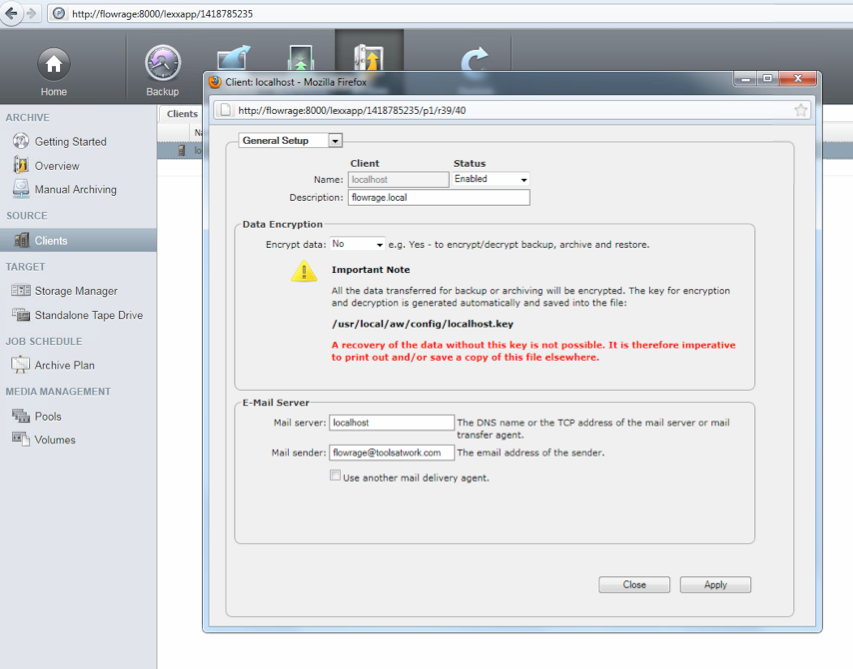
Finally, within the Notification section in the User Settings provide the user’s email address and select the desired notifications for the user. By hitting the “Send test mail” button you are able to test your configuration. Don’t forget to customise the list of events that should trigger a notification.
Screen Shot 2015-01-08 at 14.17.33


Dec 152014
 

A few weeks ago I learned about LinEnum. It’s original author owen described it as follows:

It’s a very basic shell script that performs over 65 checks, getting anything from kernel information to locating possible escalation points such as potentially useful SUID/GUID files and Sudo/rhost mis-configurations and more.

The first thing that came to my mind was if this script will work on OS X. I cloned the GitHub repository to my Mac and was immediately greeted with multiple error messages. As I had some spare minutes I forked the repository and fixed the most major bugs.

LinEnum

As I had to disable some tests I hope to find some more time to fix and reenable them. My goal is to maintain the Linux compatibility and only extend the script to fully work on OS X. I think this could become be a handy quick-check tool.

Nov 272014
 

Connection DiagramI’m responsible for several VMware ESXi hosts that are secured using a Bastion host. These Bastion hosts help to protect our client’s infrastructure and only allow access over some specifically enabled network protocols.

It’s clear that they don’t allow traffic from the Internet to our VMware ESXi systems, so we have to go a different route to manage them. Fortunately we can connect to our Bastion host using SSH and then tunnel the vSphere connection from the client machine to the ESXi system. The diagram on the right shows the corresponding data flow. This post will focus on the necessary configuration as I always forget how to setup a new client machine.

Before we start, here’s a screenshot that summarises all the steps:
ESXi over SSH Steps

1.) hosts File

The first thing you need to do is to add a new localhost alias in your hosts file. If you don’t know where to find it or how to modify it, check out this great article. At the bottom of the file append the following line:

127.0.0.1	esxilocal

2.) Connect to your Bastion host

Now connect to your Bastion host using a client that supports SSH Tunneling. I always go with PuTTY.

3.) Tunnel Configuration

In the next step we have to configure the three necessary tunnels. For the vSphere Client to successfully connect we have to forward the TCP ports 443, 902 and 903. Please ensure that you use the same ports locally.

4.) Connect

If you have setup everything correctly you are now able to connect over the SSH connection. Be aware that you have to use the hostname that you configured in the first step (like esxilocal) not the machine’s real one.

Congratulation, that’s it!

Oct 232014
 

Screen Shot 2014-10-23 at 16.17.09Currently I’m busy building several automated workflows that run on our flow:rage Video Storage System and that move files and directories from A to B while processing them in some way.

During qualifying this workflows for production we discovered that moved items were not immediately visible for Windows clients connected using SMB. Sometimes it took several minutes for the files and directories to show up. Even manually refreshing the parent folder did not help. Linux and OS X clients were not affected by this issue and so it was clear that this had to be a client side caching problem.

My google-fu helped me to find the TechNet article SMB2 Client Redirector Caches Explained that explains the Windows SMB2 Cache and it’s configuration options. Based on the I created the following .reg file [download]:

Windows Registry Editor Version 5.00

[HKEY_LOCAL_MACHINE\SYSTEM\CurrentControlSet\services\LanmanWorkstation\Parameters]
"DirectoryCacheLifetime"=dword:00000000

This configuration change disables the client side directory content cache. That means that file and directory changes are immediately visible for the client. This was exactly what I needed to solve my issue. However be aware that this change causes the client to contact the server more frequently.

Oct 172014
 

We are using Confluence as our internal documentation platform. It’s a gorgeous tool that really helped to bring our documentation to the next level. There is only one thing that I dislike about it: The show “X more child pages” link in the sidebar. I highlighted the troublemaker in the picture below that I captured from one of Atlassian’s demo videos.

confluence

Tired of all the complex solutions? found on Google I created a simple Tampermonkey userscript that automatically clicks the link if present. It is inserted into all pages that contain the keyword confluence in the URL and checks if it’s really a Confluence page. If so, it clicks the “X more children” link as soon as the page is ready. Thereby you immediately see all available child pages. It’s a major timesaver in my daily workflow.

Download SmallYou can download it for free on GreasyFork.

Oct 072014
 

We have several smaller customers that use a VMware ESXi host with just a single Windows Server VM. To backup these VMs we often use either Windows Backup or a third party application running within the guest that saves all important data to an external USB drive. To be prepared for things like water damage we always suggest to use two rotating disks with one stored securely at another location.

USB Pass-throughThe problem here is that many of our customers are not very tech savvy and they generally don’t want to change anything on the server. That means I had to find a way so that they just have to replace the physical USB backup drive and don’t have to think about how the USB drive is forwarded to the VM.

To solve this I use the PCI pass-through option on the ESXi server. The screenshot on the right shows how that looks on an ESXi 5.0. After shutting down the VM add a new PCI device and select the USB controller of the host system. After switching the VM back on you can connect any device to any USB interface on the host and everything is forwarded automatically. However be aware that only a single VM can access the USB ports because you can forward a PCI device only once.

Another solution regarding USB devices is discussed in the VMware KB entry “USB support in ESXi/ESX 4.1 and ESXi 5.x“.

Aug 312014
 

This blog post is first of all a reminder for myself as I often have to rerun the preview generation within Archiware P5 to test my custom preview generator PresSTORE Media Converter 3. The procedure it also described in this knowledgebase entry and the official CLI documentation. The command returns the ID of the verify job.

/usr/local/aw/bin/nsdchat -c "ArchivePlan <ArchivePlan Name> verify <Client> <Job ID>"

All the needed information can be found in the extended log of the original archive job. The naming of the ArchivePlan Name placeholder is a bit ought as you have to provide the ArchivePlan ID instead.

Extended Archive Log

For this example the following command is the correct one:

/usr/local/aw/bin/nsdchat -c "ArchivePlan 10002 verify localhost 10738"

Be aware that all the original files still have to be located at the original archive path. If they were already deleted you have to restore them first.

Aug 122014
 

Last week I had to build a watchfolder that converts an interlaced input movie to an H264 proxy using FFmbc. It took me quite some time to figure out that if you scale an interlaced video (with the scale filter) it automatically gets converted to progressive in this step. However as I further had to deinterlace it (with the yadif filter) this caused me some problems. This Google Search revealed a lot of useful information.

Scale Deinterlace

In the end I learned that whenever you work with FFmbc or FFmpeg on interlaced material that has to be deinterlaced you have to do that with the first filter. Here’s an example:

ffmbc -i Interlaced_Input.mov -vcodec libx264 -acodec aac -strict experimental -b 5120k -vf "yadif,scale=720:576" -y H264_Output.mp4

Happy Deinterlacing!

Aug 072014
 

Currently I’m confronted with a lot of ignorance around LTFS. This is interesting as there are some very good resources [1,2] on what LTFS is good at and what should be solved using a dedicated backup or archiving application (like Archiware P5).

If you want to use LTFS consider the following best practice rules:

  • LTFS is good at transporting data – Archiving is hard as there is no real index database
  • LTFS should be used like a WORM (Write Once Read Many) tape
  • The bigger the files the better as small files have a horrible performance
  • If you only want to access files mount the tape read only to this increases the performance
  • Don’t force nonsequential tape operations with things like browsing a folder in thumbnail view
  • Try to only access top level folders (copy those folders to or from tape)

If you still think LTFS is the right solution for you go ahead and use it! On OS X most vendors [for example: Tandberg, HP] ship the same FUSE based filesystem and a small manager application. The following video gives a not so short introduction on how to use it:

Aug 062014
 

In this post I want to show how to convert movies encoded as MPEG IMX using ffmbc. It’s important to note that this is not working with FFmpeg at the time of writing as IMX was not supported.

If you try to convert an IMX video wrapped in either a MOV or MXF container using ffmbc without any further options the resulting clip contains a few additional lines (Update: these lines are called VBI) of black pixels at the top. The same result can be observed within VLC. It may be caused by the fact that IMX gets misdetected as MPEG2.

ffmbc and IMX
To solve this problem we use a combination of ffmbc’s video filters. At first we crop off the black pixels, than we ensure that we get a 720×576 PAL resolution and finally we deinterlace the input.

ffmbc -i IMX_Input.mov -vcodec libx264 -acodec aac -strict experimental -b 5120k -vf "crop=720:576:10:42,yadif,scale=720:576" -y H264_Output.mp4

With this command we get the expected H264 proxy with a 5MBit bitrate. However often you have to deal with multiple input formats. To do that efficiently we have to detect IMX files and apply the workaround. I was able to detect them if they were wrapped in MOV containers with the following command:

ffmbc -i IMX_Input.mov 2>&1|grep IMX

By combining the IMX detection and by applying the video filters when necessary we can convert (nearly) all input files automatically.

The only thing left is the detection of IMX videos wrapped in MXF containers. So far I have been unable to solve this with my toolset (ffmpeg, ffmbc and mxfdump). If you find a way please leave a comment.