If you are responsible for backup or archiving systems you know for sure how important it is to get system notifications. You want to know if a job failed! My backup/archiving software of choice Archiware P5 however does not yet support SMTP user authentication or TLS and so we have to build a workaround to support most generally available mail servers.
In this post I will explain how to install sendmail on Fedora 19 and how to configure it to use a smart host. I opted for sendmail as I already used it before and mostly know how to configure it. Furthermore I will also show what to change in P5’s interface. The image below illustrated the desired resulting mail delivery path.
The following steps should work on any Red Hat-based distribution without further changes and should be easily adaptable to other Linux-based operating systems. Many commands in this post are based on the one’s used in my previous article “UNIX & PHP: Configure sendmail to forward mails“.
Install Software
The first thing we have to do is to install the required software. It’s very important to also also add the sendmail-cf configuration files package.
yum install sendmail sendmail-cf
Mail Credentials
In the next step we have to append the mail server credentials to “/etc/mail/authinfo”.
AuthInfo:your_mail_server.your_domain.tld "U:your_username" "P:your_password"
Update Configuration
After that we have to update the “/etc/mail/sendmail.mc” sample configuration.
At first we have to do is to append the smart host configuration to the end of the file.
FEATURE(`authinfo',`hash /etc/mail/authinfo')
define(`SMART_HOST', `your_mail_server.your_domain.tld')
After that uncomment the following line by removing the dnl prefix:
define(`confAUTH_MECHANISMS', `EXTERNAL GSSAPI DIGEST-MD5 CRAM-MD5 LOGIN PLAIN')dnl
Select MTA
To ensure that we really use sendmail as MTA we have to choose “/usr/sbin/sendmail.sendmail” after running the following alternatives command.
alternatives --config mta
Apply Configuration
To apply all our changes run the following commands:
cd /etc/mail/
makemap hash authinfo < authinfo
m4 sendmail.mc >sendmail.cf
service sendmail restart
We now have a fully functional SMTP server running on our local machine that forwards all incoming mails to the configured smart host.
Archiware P5 Configuration
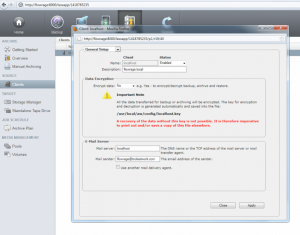
To finish the configuration we have to ensure that Archiware P5 uses the correct mail server and sender address. To do so log into the P5 interface and open the localhost Client preferences as shown on the screenshot below. Then enter “localhost” as Mail server. Furthermore provide a valid Mail sender address.

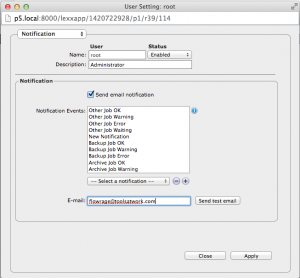
Finally, within the Notification section in the User Settings provide the user’s email address and select the desired notifications for the user. By hitting the “Send test mail” button you are able to test your configuration. Don’t forget to customise the list of events that should trigger a notification.

