This is the first RAID front panel that does not suck. Unbelievable nobody else adds a touch screen…
Nov 122014
This is the first RAID front panel that does not suck. Unbelievable nobody else adds a touch screen…
… since I last saw a SCSI terminator in action.
We have a client that uses Final Cut Pro 7 on several Mac Pros running Mavericks to edit and capture videos on our flow:rage video storage. They are working with SD material encoded as either IMX 50 or ProRes. They reported that sometimes after stopping the capture within Final Cut Pro 7 using the ESC key the newly created video would not show up.
After hours trying to reliable reproduce the issue I gave up. What I can say is that some capture files (like 1 in 20) stop to grow during the ingest on network volumes. No log entries are created. I think that the network connection or the network stack within the kernel stalls. All network protocols tested (AFP, SMB and NFS) suffered the same problem on multiple servers. The temporary capture file with the “-av” postfix stays within the destination folder with a broken and presumably unrecoverable QuickTime header.
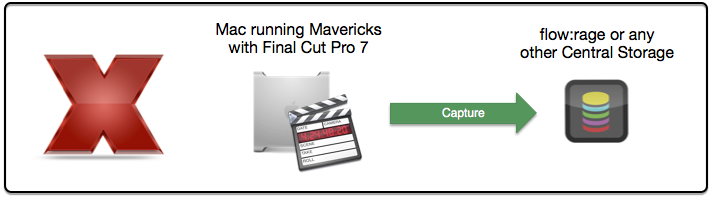
I further discussed the issue with the main developer of just:in, ToolOnAir’s ingest solution. He confirmed that just:in successfully uses the QuickTime 7 API to write IMX and ProRes encoded video files to network storages.
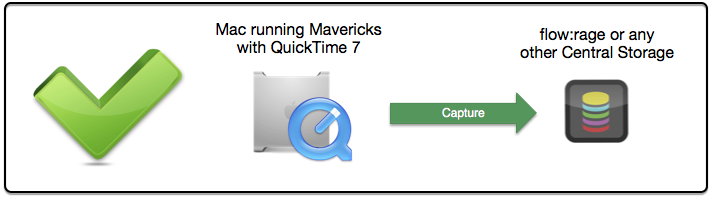
As the underlying QuickTime 7 API is still working as expected I conclude that this issue is another bug affecting Final Cut Pro 7 under Mavericks. I worked around this problem by creating a local watchfolder that moves the captured file automatically to the flow:rage.
In my post How to Create a RAM Disk – The Easy Way I released RamDiskCreator. As the name suggest it’s only duty is to create a RAM disk. The following AppleScript function does the same. I wrote it for Uwe to create two RAM disks at startup.
on createRamDisk(sizeInMB, volumeName)
	set sizeInSectors to round sizeInMB * 1024 * 1024 / 512 rounding up
	set cmd to "diskutil erasevolume HFS+ '" & volumeName & "' `hdiutil attach -nomount ram://" & sizeInSectors & "`"
	try
		do shell script cmd
		return true
	on error
		return false
	end try
end createRamDisk
You can download the source here.
I do have quite a few customers who still have PHP websites that use the quite old mail function.
This function uses the local sendmail application on UNIX based systems to forward mails.
Therefore if the responsible mailserver for a given domain is not installed on the same server the mail will be rejected by most recipients. Two possible solutions exist:
I always choose option 2, as it’s easier to configure and maintain. You only have to have a valid SMTP user for the existing mailserver and root access to the webserver. The following steps show how to set mail relaying up:
Before we can start we have ensure, that sendmail is installed. This can be running the following command:
whereis sendmail
If it is installed the full path to the executable will be printed. Otherwise you can install it using your distributions’s package manager. On Debian-style distributions you can use the following command:
sudo apt-get install sendmail
The installation can take quite some time on slow internet connections.
Now we have to configure the mailserver and the corresponding user credentials. This is done by appending the following line to /etc/mail/authinfo using your favorite text editor.
AuthInfo:your_mail_server.your_domain.tld "U:your_username" "P:your_password"
You have to replace the dummy information.
This step updates the sendmail configuration to include the previously added server credentials. Add the following lines in the file /etc/mail/sendmail.mc after the “FEATURE(`access_db’, , `skip’)dnl” directive.
FEATURE(`authinfo',`hash /etc/mail/authinfo')
define(`SMART_HOST', `your_mail_server.your_domain.tld')
Replace the hostname!
Use the following commands to save the configuration. After that you should be able to send mails through PHP.
cd /etc/mail/
sudo makemap hash authinfo < authinfo
sudo m4 sendmail.mc >sendmail.cf
sudo /etc/init.d/sendmail restart
Mac OS X is built on top of a strong UNIX foundation. Thereby it also inherits its multiuser capabilities. User separation allows us to have different system accounts for different users, making the system more secure by restricting access to system functions for particular users.
However sometimes it is necessary to launch an application as System Administrator (root). As long as you have an administrator account, this can be done using one of the following approaches:
 MacSudoer is a small droplet written in AppleScript that launches the dropped application as root. This can for example be used to allow OmniDiskSweeper to analyse the whole disk including all system folders.
To install MacSudoer just download the application and drag it to your Dock. Now you can drop any application onto the bomb icon to launch it as root.
For security reasons you have to enter your password before the dropped application is launched. Furthermore not all programs can or should be launched as root. A malfunction of such a privileged application can render your system unusable or delete your data. Therefore only launch trusted applications using MacSudoer.
For me a good media archive has to have great preview support.
Think about the following: You’re looking for footage in your archive for a current project but only find several similar tagged files. How do you know what you get?
This is exactly the point where previews help a lot!
Archiware PresStore Archive helps you as it automatically generates previews for some types of media – but it’s rather limited. To work around this limitation custom generators can be added.
Yesterday I released “PresStore Media Converter”, a small toolkit based on FFmpeg, ImageMagick, Poppler and node.js to generate previews of hundreds of file types – including several raw file types.
Here aare some supported types:
I’ve release it as open source under the GPL2 license.
You can download it at Google Code.
I have already posted about the great bindfs FUSE filesystem.
In this special case we use it as a destination for Avid’s Media Composer. The problem with Avid is, that they use some fcntl calls that are not yet supported by fuse4x. This calls are used to preallocate storage.
When you search around the Web you will find out that fcntl is based on ioctl – therefore it was clear for us to find a FUSE implementation that supports ioctl on Mac OS X. The only current solution is to use fuse4x and Anatol’s (the main developer) “private” kext repository. I built this version, updated bindfs but was still not able to get it working.
After digging in even further, I found the corresponding kernel source file, where the F_PREALLOCATE attribute is handled. With this information I was able to update the fuse4x kext to “support” the VNOP_ALLOCATE VFS interface.
With this patched kext Avid is able to consolidate on a FUSE volume. The sources and a binary packages is available to download at Google Code.