Apr 102015
 

We are using Acunetix’s Web Vulnerability Scanner to help us automatically test web applications for SQL injection, cross-site scripting and other vulnerabilities. To scan login protected areas the Web Vulnerability Scanner features the so called Login Sequence Recorder. It basically recordes all the HTTP requests necessary to login and replays them whenever the current user session was terminated.

This works great as long as there is no CAPTCHA and no CSRF token. If any of those two is used we have to manually take action by using another feature called Manual Intervention. It basically opens a web browser window with the current site’s login already preloaded and you are requested to proceed manually until the user session is successfully reestablished. This is quite annoying as you have to re-login several hundred times if the application aggressively terminates user sessions.

With Sikuli we can now automate the scan even with CSRF secured logins. Check out this video to get a rough overview about what Sikuli is all about. We will use it to script the necessary mouse and keyboard actions needed for logging into the web application and execute them everytime the user session is destroyed.

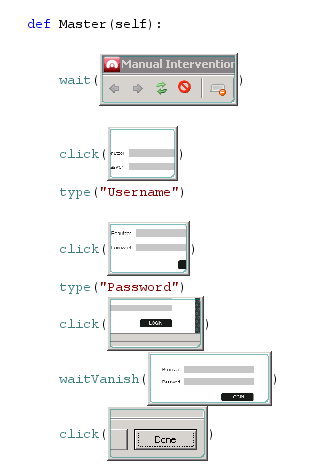
Below is a workflow I used for my last vulnerability scan: At first we wait for the Manual Intervention window to appear and then we click into the username field and type the corresponding name. We repeat this actions for the password. Then we submit the form and wait until the login vanished. Finally, we close the window by clicking Done. Thereby we created a new user session and the scan continues. By using this workflow you can completely automate the login of CSRF protected web applications.

Sikuli Workflow

Mar 262015
 

Cygwin is a great tool to run Linux application on Windows. I primarly use it to run my already written shell scripts. What I always missed was the ability to launch shell scripts with a simple double click. However this is very easy to setup. Just right click on a .sh file and select “Open with…”. Now browse to “C:\cygwin(64)\bin” and select mintty.exe. Don’t forget to check the checkbox at the bottom of the dialog to always use the selected application. From now on just double click any .sh file and it gets executed automatically.

openwith

Feb 022015
 

BonjourOverWan2For me and many of my customers it would be a great feature to have Bonjour working over VPN connections. Apple’s Bonjour (also called mDNS or multicast DNS) is the service responsible for discovering other machines and the services provided by these machines in your network. The most important feature for me is the fileserver integration in Finder as shown on the right. Thereby all detected fileservers are integrated into the left Finder sidebar and you can simply connect by clicking them. Unfortunately this does not work over VPN connections as multicast traffic is generally not routed.

To simulate this fileserver discovery over a VPN connection I wrote a small wrapper script for dns-sd. It checks if a given server is available by pinging it’s IP and if so it adds it to the sidebar by using dns-sd’s proxy feature. You can check out the script at my Google Code snippet repository. The following diagram shows the inner workings.

dns-sd

To install it just download serverProxy.sh, rename it to myServerProxy.sh to allow multiple proxies, make it executable, adapt the settings at the top and create a launchd configuration. I recommend to use Lingon to create a “My Agent” launchd job that gets loaded at startup and that keeps the script alive. In theory it should not crash but who knows. You can use as many proxies as you like. Finally reboot and check if the configured server is now shown after you connected to your VPN.

Jan 272015
 

Just a quick Linux hint today. If you put an unsupported SFP+ module into an Intel Corporation 82599EB 10-Gigabit SFI/SFP+ card the corresponding network interface (pXpY or ethX) is removed from the system. The following messages is logged in “/var/log/messages”:

Nov 19 11:07:03 hostname kernel: ixgbe 0000:0f:00.0: failed to load because an unsupported SFP+ module type was detected.

To restore the interface you have to remove and reload the card’s kernel driver. To do so run the following commands as root. Please note that all other ports using this driver are also temporary unavailable during that time. That means that active transmissions will probably fail.

rmmod ixgbe; modprobe ixgbe

Red Hat features a similar issue in their knowledgebase article #275333.

Jan 202015
 

At a recent Linux video storage installation my colleague Georg and I encountered really strange problems that we had never seen before. Our initial goal was to connect five Windows 7 machines running Avid Media Composer 7 to separate NICs on the new storage system. As it was impossible to install new cables we simply added a second IP address to the LAN connection to ensure correct traffic routing and to fulfil the bandwidth requirements. What we did not know was that this change caused the NetBIOS name resolution and discovery to fail – a not that unusual issue. For me this would have been just a minor annoyance however the client had several workflows that depended on it. Hence we had to revert everything and find another workaround.

In the end we agreed to simply connect all NICs to the client’s unmanaged core switch and assigned a dedicated IP to each of them. The image below gives a simplified network and traffic overview. We believed to have solved the NetBIOS issue while still being able to guarantee the bandwidth. If only we had known!

overview

The first issue we encountered was that we were unable to connect to the internet but only from the new Linux system. We did not investigate this further as the client reported several other issues with their firewall configuration. We proceeded with our performance test that yielded miserable results!

After several hours we finally found out that the Windows clients correctly sent their traffic to their designated NIC on the central Linux storage however the corresponding replies were all sent from one single NIC limiting the total read performance to the bandwidth of this single link. The picture below illustrates the traffic flow we observed.

what really happend

Given this, we found several articles, like “Routing packets back from incoming interface“, describing this behaviour. Linux, by design, considers packages individually for routing purposes. This means that the routing decision is only based on the package itself and not if it’s a response of some sort.

This also explained why we were not able to connect to the internet. Although we had only one interface with a default gateway configured, the entries in the routing table were not correct. What the means is, we sent the Ethernet frame over say NIC0 with the source IP address of NIC1 to the standard gateway. The firewall on it however detected that the MAC of the incoming frame did not match the MAC of NIC1 and thereby suspected an ARP spoofing attack. Logically it was blocked!

Luckily we can use additional custom routing tables to build a workaround. Novell’s KB entry “Reply packets are sent over an unexpected interface” explains in detail how to do it. With that help we could solve our issue and now all NICs get utilized as expected. As we did not know about this behaviour before it was a quite unexpected for us. However from a developer’s point of view this design makes absolute sense.

Jan 122015
 

If you are responsible for backup or archiving systems you know for sure how important it is to get system notifications. You want to know if a job failed! My backup/archiving software of choice Archiware P5 however does not yet support SMTP user authentication or TLS and so we have to build a workaround to support most generally available mail servers.

In this post I will explain how to install sendmail on Fedora 19 and how to configure it to use a smart host. I opted for sendmail as I already used it before and mostly know how to configure it. Furthermore I will also show what to change in P5’s interface. The image below illustrated the desired resulting mail delivery path.

P5 smart host

The following steps should work on any Red Hat-based distribution without further changes and should be easily adaptable to other Linux-based operating systems. Many commands in this post are based on the one’s used in my previous article “UNIX & PHP: Configure sendmail to forward mails“.

Install Software

The first thing we have to do is to install the required software. It’s very important to also also add the sendmail-cf configuration files package.

yum install sendmail sendmail-cf

Mail Credentials

In the next step we have to append the mail server credentials to “/etc/mail/authinfo”.

AuthInfo:your_mail_server.your_domain.tld "U:your_username" "P:your_password"

Update Configuration

After that we have to update the “/etc/mail/sendmail.mc” sample configuration.

At first we have to do is to append the smart host configuration to the end of the file.

FEATURE(`authinfo',`hash /etc/mail/authinfo')
define(`SMART_HOST', `your_mail_server.your_domain.tld')

After that uncomment the following line by removing the dnl prefix:

define(`confAUTH_MECHANISMS', `EXTERNAL GSSAPI DIGEST-MD5 CRAM-MD5 LOGIN PLAIN')dnl

Select MTA

To ensure that we really use sendmail as MTA we have to choose “/usr/sbin/sendmail.sendmail” after running the following alternatives command.

alternatives --config mta

Apply Configuration

To apply all our changes run the following commands:

cd /etc/mail/
makemap hash authinfo < authinfo
m4 sendmail.mc >sendmail.cf
service sendmail restart

We now have a fully functional SMTP server running on our local machine that forwards all incoming mails to the configured smart host.

Archiware P5 Configuration

To finish the configuration we have to ensure that Archiware P5 uses the correct mail server and sender address. To do so log into the P5 interface and open the localhost Client preferences as shown on the screenshot below. Then enter “localhost” as Mail server. Furthermore provide a valid Mail sender address.
P5 Mail Interfae

Finally, within the Notification section in the User Settings provide the user’s email address and select the desired notifications for the user. By hitting the “Send test mail” button you are able to test your configuration. Don’t forget to customise the list of events that should trigger a notification.
Screen Shot 2015-01-08 at 14.17.33


Dec 312014
 

This year’s last post is all about time. In fact, it’s about how to get NTP working within an isolated network. The Network Time Protocol is a network protocol used to synchronise computer clocks across networks. It is necessary as computers measure time using oscillating crystals. However each computer has a slightly different oscillating interval that causes the local clocks of different systems to drift apart. This can cause problems in distributed systems.

One such problem occurs within redundant playout systems with multiple servers. All systems need to have exactly the same time reference (and to do so they often use the local system time) to play the same video frame all the time. Otherwise there is a visible service disruption during fallback.

Timesync

As this example shows it’s more about a coherent time source / reference than it is about a correct one. What that means is that it is more important that all systems have exactly the same time, however it does not really matter if it’s 0,5 seconds ahead the correct one.

To do so I always use one Linux system within the isolated broadcast network as NTP server using ntp. This server gets queried by all other systems and shares his local time.

Timesync Server

There is only a small problem with this setup. As the time source for the Linux NTP Server is only his oscillating crystal and not a precise system like an atomic clock the other systems don’t trust his information. His strata is simply too high. There are two solutions to solve this issue:

Whichever you use, you will get a coherent time reference on all nodes within the network. However be aware that it’s just a relative time.

Guten Rutsch ins neue Jahr 2015

Dec 152014
 

A few weeks ago I learned about LinEnum. It’s original author owen described it as follows:

It’s a very basic shell script that performs over 65 checks, getting anything from kernel information to locating possible escalation points such as potentially useful SUID/GUID files and Sudo/rhost mis-configurations and more.

The first thing that came to my mind was if this script will work on OS X. I cloned the GitHub repository to my Mac and was immediately greeted with multiple error messages. As I had some spare minutes I forked the repository and fixed the most major bugs.

LinEnum

As I had to disable some tests I hope to find some more time to fix and reenable them. My goal is to maintain the Linux compatibility and only extend the script to fully work on OS X. I think this could become be a handy quick-check tool.

Dec 052014
 

Today’s blog post is a summary of several useful formulas for dimensioning video storage systems. Before you start reading it, it is very important to understand the connection between the Kilo, Mega, Giga and Tera prefix, the difference between Bit and Byte and difference between an indication of size (like MB) and an indication of speed (like MBps respectively MB/s). I created all the equation using the great Online LaTeX Equation Editor.

This post uses the following terminology:

  • A capital B stands for Byte
    Example: MB means Megabyte
  • A lower case b stands for Bit
    Example: Mb means Megabit
  • To indicate a transmission speed the “per second” postfix is appended
    Example: MBps means Megabytes per second

Now let’s start…

How much Space of my Volume should I use?

You should never use all the available space as this forces the filesystem to split new files into many small junks. These small junks lead to increased seek times and thereby slower transfer rates.


Tipp: Use quotas to limit the user visible size.

How much Storage do I need?

As described above you have to add a little extra space to avoid high seek times.

CodeCogsEqn (7)

How much Hours of Video can I Store on my Volume?

This is often used to find out if there is already enough storage capacity to handle a new project or if you have to add more.

CodeCogsEqn (8)

What Performance do I need?

The first formula calculates the Theoretical Minimum Performance Requirement in MBps. To be honest, it’s a pretty useless calculation as you need a lot more raw storage performance than this formula indicates. For examples it doesn’t take disk seek times or CPU limitations into account.

CodeCogsEqn (4)

For a more realistic estimate use the following one. However this is still just an estimate to get a rough overview. It is very hard to size a video storage correctly and I haven’t found the correct formula yet.

CodeCogsEqn (9)

Can I go with 1Gb Ethernet or do I need 10Gb Ethernet?

Many people think that they have to use 10Gb Ethernet if they want to edit videos using AFP, SMB or NFS. However in reality they often don’t need that much performance and can better spend the money on more storage capacity or better networking infrastructure.

CodeCogsEqn (6)

It’s fine to go with 1Gb Ethernet if the Theoretical Minimum Connection Speed is 850Mbps or less. Go with 10Gb Ethernet as long as you need less than 3000 Mbps otherwise please talk to the system manufacturer.

What Network Protocol should I use?

That’s an easy one: Always use SMB on Linux, OS X and Windows!

(Except if you use OS X in combination with FCPX libraries stored on your NAS than go with NFS)

Nov 272014
 

Connection DiagramI’m responsible for several VMware ESXi hosts that are secured using a Bastion host. These Bastion hosts help to protect our client’s infrastructure and only allow access over some specifically enabled network protocols.

It’s clear that they don’t allow traffic from the Internet to our VMware ESXi systems, so we have to go a different route to manage them. Fortunately we can connect to our Bastion host using SSH and then tunnel the vSphere connection from the client machine to the ESXi system. The diagram on the right shows the corresponding data flow. This post will focus on the necessary configuration as I always forget how to setup a new client machine.

Before we start, here’s a screenshot that summarises all the steps:
ESXi over SSH Steps

1.) hosts File

The first thing you need to do is to add a new localhost alias in your hosts file. If you don’t know where to find it or how to modify it, check out this great article. At the bottom of the file append the following line:

127.0.0.1	esxilocal

2.) Connect to your Bastion host

Now connect to your Bastion host using a client that supports SSH Tunneling. I always go with PuTTY.

3.) Tunnel Configuration

In the next step we have to configure the three necessary tunnels. For the vSphere Client to successfully connect we have to forward the TCP ports 443, 902 and 903. Please ensure that you use the same ports locally.

4.) Connect

If you have setup everything correctly you are now able to connect over the SSH connection. Be aware that you have to use the hostname that you configured in the first step (like esxilocal) not the machine’s real one.

Congratulation, that’s it!