Dec 052014
 

Today’s blog post is a summary of several useful formulas for dimensioning video storage systems. Before you start reading it, it is very important to understand the connection between the Kilo, Mega, Giga and Tera prefix, the difference between Bit and Byte and difference between an indication of size (like MB) and an indication of speed (like MBps respectively MB/s). I created all the equation using the great Online LaTeX Equation Editor.

This post uses the following terminology:

  • A capital B stands for Byte
    Example: MB means Megabyte
  • A lower case b stands for Bit
    Example: Mb means Megabit
  • To indicate a transmission speed the “per second” postfix is appended
    Example: MBps means Megabytes per second

Now let’s start…

How much Space of my Volume should I use?

You should never use all the available space as this forces the filesystem to split new files into many small junks. These small junks lead to increased seek times and thereby slower transfer rates.


Tipp: Use quotas to limit the user visible size.

How much Storage do I need?

As described above you have to add a little extra space to avoid high seek times.

CodeCogsEqn (7)

How much Hours of Video can I Store on my Volume?

This is often used to find out if there is already enough storage capacity to handle a new project or if you have to add more.

CodeCogsEqn (8)

What Performance do I need?

The first formula calculates the Theoretical Minimum Performance Requirement in MBps. To be honest, it’s a pretty useless calculation as you need a lot more raw storage performance than this formula indicates. For examples it doesn’t take disk seek times or CPU limitations into account.

CodeCogsEqn (4)

For a more realistic estimate use the following one. However this is still just an estimate to get a rough overview. It is very hard to size a video storage correctly and I haven’t found the correct formula yet.

CodeCogsEqn (9)

Can I go with 1Gb Ethernet or do I need 10Gb Ethernet?

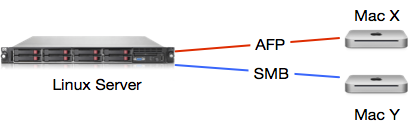
Many people think that they have to use 10Gb Ethernet if they want to edit videos using AFP, SMB or NFS. However in reality they often don’t need that much performance and can better spend the money on more storage capacity or better networking infrastructure.

CodeCogsEqn (6)

It’s fine to go with 1Gb Ethernet if the Theoretical Minimum Connection Speed is 850Mbps or less. Go with 10Gb Ethernet as long as you need less than 3000 Mbps otherwise please talk to the system manufacturer.

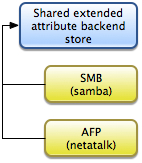
What Network Protocol should I use?

That’s an easy one: Always use SMB on Linux, OS X and Windows!

(Except if you use OS X in combination with FCPX libraries stored on your NAS than go with NFS)

Nov 272014
 

Connection DiagramI’m responsible for several VMware ESXi hosts that are secured using a Bastion host. These Bastion hosts help to protect our client’s infrastructure and only allow access over some specifically enabled network protocols.

It’s clear that they don’t allow traffic from the Internet to our VMware ESXi systems, so we have to go a different route to manage them. Fortunately we can connect to our Bastion host using SSH and then tunnel the vSphere connection from the client machine to the ESXi system. The diagram on the right shows the corresponding data flow. This post will focus on the necessary configuration as I always forget how to setup a new client machine.

Before we start, here’s a screenshot that summarises all the steps:
ESXi over SSH Steps

1.) hosts File

The first thing you need to do is to add a new localhost alias in your hosts file. If you don’t know where to find it or how to modify it, check out this great article. At the bottom of the file append the following line:

127.0.0.1	esxilocal

2.) Connect to your Bastion host

Now connect to your Bastion host using a client that supports SSH Tunneling. I always go with PuTTY.

3.) Tunnel Configuration

In the next step we have to configure the three necessary tunnels. For the vSphere Client to successfully connect we have to forward the TCP ports 443, 902 and 903. Please ensure that you use the same ports locally.

4.) Connect

If you have setup everything correctly you are now able to connect over the SSH connection. Be aware that you have to use the hostname that you configured in the first step (like esxilocal) not the machine’s real one.

Congratulation, that’s it!

Nov 192014
 

Power SupplyIf you are responsible for keeping systems up and running it’s important to keep an eye on your hardware. This especially denotes to hard disks, fans and power supplies as they break most often. Today’s post is about how to easily and automatically check the state of power supplies.

To do so I wrote a small script that uses ipmitool to check the state of all detected power supplies. I used it primarily on Supermicro X9 class motherboards however all systems supported by ipmitool should work.

The USPs of my script are that it supports more than two power supplies, that it is fully documented and that it reports a unique exit code per system state. All this features help you to integrate it perfectly into your workflow. Here’s how to use it:

$ ./checkPowerSupplies.sh -h
This tool checks the state of all installed power supplies and reports their current state. It can be used in automated monitoring tools like nagios.
It depends on ipmitool and supports all systems that report the state of the installed power supplies through the sensors subcommand. I used it primarily on Supermicro X9 class motherboards.

Usage: ./checkPowerSupplies.sh
	-h 	Shows this help
	-p=2	The number of expected power supplies
	-r=0x1	The value that indicates a working power supply (see ipmitool sensors)

Example:
./checkPowerSupplies.sh -p=3 	# Check 3 installed power supplies
./checkPowerSupplies.sh		# Check 2 installed power supplies
./checkPowerSupplies.sh -r=0x4	# A working power supply reports a state of 0x4

Exit codes:
	0	All power supplies are working
	1	ipmitool is not installed
	2	Found more power supplies than expected
	3	At least one power supply is missing
	4	At least one power supply failed

Version 1 released in 2014 by Florian Bogner - http://bogner.sh

If you are interested you can download the checkPowerSupplies.sh script over at Google Code.

Nov 102014
 

Over the last few years I encountered the following QuickTime 7 error message several times while trying to play a file:

The movie could not be opened. The resource map is incorrect

The cause of this message is a broken Resource Fork which is stored within the file’s extended attributes. This error often occurs if the file is or was stored on a network drive or an external disc. It also affect all applications that build upon QuickTime 7’s API. To verify if a file is unplayable because of it’s Resource Fork just try to play it with VLC. It should work fine. If so, it can be fixed.

To make it easy to repair such files I wrote QT7 EA FIX. Just launch the script and drop the broken file. The rest will be handled automatically and you should be able to play the file afterwards.

Screen Shot 2014-10-22 at 14.19.48 Click here to download QT7 EA FIX.command.

Nov 022014
 

SharedEAStoreExtended attributes on OS X allow applications to store additional metadata along data files. Filesystems like JHFS+ that natively support this feature store this metadata completely hidden from the user. On filesystems that don’t support extended attributes OS X writes this data into Dot Underscore (._) sidecar files. Many people including me have been bugged by this fallback and have searched for ways to remove those files. I described one possible way in my post Win & Mac: Clean Dot Underscore Files. However this post is about a very interesting problem that occurs only if you try to use a Linux server as a fileserver that exposes the same folder for OS X clients using SMB and AFP with extended attribute sharing.

The goal is that whatever network protocol you use you should always see the same data (including it’s metadata). To do that I disabled netatalk’s native EA support (ea = none in afpd.conf). Thereby SMB and AFP use the Dot Underscore fallback. In theory now all OS X clients independently of the network protocol they use should have a consistent view. However that’s only the theory.
SharedEA AFP/SMB

If you write extended attributes using SMB and read the data over AFP it get’s scrambled. Here’s an example executed on a mounted SMB sharepoint:

$ xattr -w sh.bogner.test.entry 1234567890abcdef testfile #write EA
$ xattr -l testfile #read EA
	sh.bogner.test.entry: 1234567890abcdef

Up to this point, everything is as expected: We could access the metadata and it was exactly what we put in. However, if you try to read the same metadata over an AFP-mounted sharepoint it’s a completely different picture: The metadata is completely unusable.

4The problem I described here is an issue by itself, however some applications depend on working extended attributes. These applications either don’t work at all or have issues on such storages. Possible solution are to either go with separate EA stores for SMB and AFP, to delete all Dot Underscore files in close-to-realtime or to only use one protocol.

Oct 232014
 

Screen Shot 2014-10-23 at 16.17.09Currently I’m busy building several automated workflows that run on our flow:rage Video Storage System and that move files and directories from A to B while processing them in some way.

During qualifying this workflows for production we discovered that moved items were not immediately visible for Windows clients connected using SMB. Sometimes it took several minutes for the files and directories to show up. Even manually refreshing the parent folder did not help. Linux and OS X clients were not affected by this issue and so it was clear that this had to be a client side caching problem.

My google-fu helped me to find the TechNet article SMB2 Client Redirector Caches Explained that explains the Windows SMB2 Cache and it’s configuration options. Based on the I created the following .reg file [download]:

Windows Registry Editor Version 5.00

[HKEY_LOCAL_MACHINE\SYSTEM\CurrentControlSet\services\LanmanWorkstation\Parameters]
"DirectoryCacheLifetime"=dword:00000000

This configuration change disables the client side directory content cache. That means that file and directory changes are immediately visible for the client. This was exactly what I needed to solve my issue. However be aware that this change causes the client to contact the server more frequently.

Oct 172014
 

We are using Confluence as our internal documentation platform. It’s a gorgeous tool that really helped to bring our documentation to the next level. There is only one thing that I dislike about it: The show “X more child pages” link in the sidebar. I highlighted the troublemaker in the picture below that I captured from one of Atlassian’s demo videos.

confluence

Tired of all the complex solutions? found on Google I created a simple Tampermonkey userscript that automatically clicks the link if present. It is inserted into all pages that contain the keyword confluence in the URL and checks if it’s really a Confluence page. If so, it clicks the “X more children” link as soon as the page is ready. Thereby you immediately see all available child pages. It’s a major timesaver in my daily workflow.

Download SmallYou can download it for free on GreasyFork.

Oct 072014
 

We have several smaller customers that use a VMware ESXi host with just a single Windows Server VM. To backup these VMs we often use either Windows Backup or a third party application running within the guest that saves all important data to an external USB drive. To be prepared for things like water damage we always suggest to use two rotating disks with one stored securely at another location.

USB Pass-throughThe problem here is that many of our customers are not very tech savvy and they generally don’t want to change anything on the server. That means I had to find a way so that they just have to replace the physical USB backup drive and don’t have to think about how the USB drive is forwarded to the VM.

To solve this I use the PCI pass-through option on the ESXi server. The screenshot on the right shows how that looks on an ESXi 5.0. After shutting down the VM add a new PCI device and select the USB controller of the host system. After switching the VM back on you can connect any device to any USB interface on the host and everything is forwarded automatically. However be aware that only a single VM can access the USB ports because you can forward a PCI device only once.

Another solution regarding USB devices is discussed in the VMware KB entry “USB support in ESXi/ESX 4.1 and ESXi 5.x“.