Feb 272013
 

Most pre-released movies contain the so-called timecode. This timecode accurately defines the current playback position. It is expressed in the format hour:minute:second:frame – for example 10:04:43:03.

Sadly ffmbc, the broadcast version of FFmpegdoes not support the drawtext filter’s timecode feature.

There are Two Possible Workarounds

  1. You can use subtitles to simulate a timecode. You can find lots of examples on Google.
  2. Alternatively you can combine ffmbc and FFmpeg. This can either be done using pipes (stdout and stdin), a named pipe (mkfifo) or an ordinary temporary file. The big disadvantage is, that you have to render twice.

I personally prefere to combine ffmbc and FFmpeg using the temporary file approach. It allows you to use any exchange format (in contrast to the pipe option). Furthermore it’s super easy to implement and monitor.

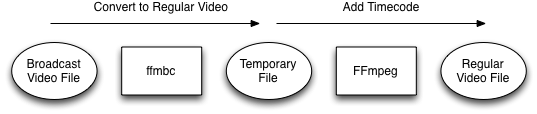
Broadcast => Regular Video File

  • Use ffmbc to convert the input broadcast format to something FFmpeg understands in a temporary location
  • Burn in timecode using FFmpeg and convert to output format
  • Clean up temporary file

ffmbc-ffmpeg

Regular =>Broadcast Video File

  • Create a temporary file while adding the timecode to the input file using FFmpeg
  • Export a broadcast version using ffmbc
  • Clean up temporary file


ffmpeg-ffmbc

Jan 252013
 

Mac OS X is built on top of a strong UNIX foundation. Thereby it also inherits its multiuser capabilities. User separation allows us to have different system accounts for different users, making the system more secure by restricting access to system functions for particular users.

However sometimes it is necessary to launch an application as System Administrator (root). As long as you have an administrator account, this can be done using one of the following approaches:

  • If you want to launch a single UNIX (command line) application the sudo command is the way to go. It allows you to run a single command as root. Furthermore it also allows you to spawn a new root shell using the -s switch. Thus you to run several commands as root without having to type sudo all the time.
  • It is also possible to enable the root account. After that you can use the Login Window to login as root. I would strongly recommend to not use this approach as it disables lots of security features.
  • Sometimes you may want an application to always launch as root (or another user). This can be done by setting the POSIX suid bit. If set, this application will run as the POSIX owner independently of who launched it. A good usage example is the passwd command.
  • Finally it is also possible to launch Mac OS applications as root. This can either be done by using the Terminal (by launching the binary located in “App Bundle.app/Contents/MacOS/” or by using my new tool MacSudoer.

MacSudoer

MacSudoer is a small droplet written in AppleScript that launches the dropped application as root. This can for example be used to allow OmniDiskSweeper to analyse the whole disk including all system folders.

To install MacSudoer just download the application and drag it to your Dock. Now you can drop any application onto the bomb icon to launch it as root.

For security reasons you have to enter your password before the dropped application is launched. Furthermore not all programs can or should be launched as root. A malfunction of such a privileged application can render your system unusable or delete your data. Therefore only launch trusted applications using MacSudoer.

Dec 282012
 

RAM disks are available since 1979. They offer a filesystem in RAM and therefore outperform most of all other storage systems. This can be used to do disk intensive operations in a fraction of the normally required time. This article covers Mac OS X 10.5 and later. If you STILL use earlier versions take a look at the article posted by OSXDaily.

Mac OS X includes a way to create RAM disks using the following Terminal command:

diskutil erasevolume HFS+ 'My 4GB RAM Disk' `hdiutil attach -nomount ram://8388608`

The size of the disk is based on the page size number of 512 bytes sectors. That means the size in bytes has to be divided by 512. For example to calculate the size parameter for a volume with 4GiB the following formular is used:

Be aware that the content of a RAM disk is permanently deleted as soon as it is ejected! Only use it as temporary storage!

RAMDiskCreator

To simplify the process I created RAMDiskCreator. It’s a freely available tool and offers a graphical user interface for the RAM disk creation. Only the size and the volume name have to be provided. In the background the same command is used as described above.

You can download RAMDiskCreator 1.4 for Mountain Lion or better here. If you are still on Lion or Snow Leopard please download RAMDiskCreator 1.2. Furthermore I will happily provide the source code on request.

Changelog

  • 2014-04-26 – Version 1.4: Fixed a bug that could lead to a wrong RAM disk size (Thanks to John VanDyk for reporting)
  • 2014-04-10 – Version 1.3: The configuration is stored after a successful RAM disk creation for easier usage (Thanks to rxflyer for suggesting this feature)
  • 2013-05-24 – Version 1.2: Fixed broken free memory calculation (Thanks Dave for reporting)
  • 2012-12-28 – Version 1.0: Initial version released
Dec 212012
 

Mac OS X extensively uses file metadata. As this post explains there are two fallback mechanisms if a volume is not able to handle this data.

On the one hand .DS_Store files are created to store mostly Finder specific settings. On the other hand metadata like resource forks or creator types are stored in “Dot Underscore” Files. For example the metadata for the file “Demo.avb” is stored in “._Demo.avb”. Both mechanisms are great in an all Mac environment but can cause troubles in mixed setups. Luckily there are ways to at least minimize the pain.

.DS_Store

Even Apple thought that this files are not always necessary and build in a setting to disable the creation on network drives.

defaults write com.apple.desktopservices DSDontWriteNetworkStores true

Furthermore the guys from BinaryAge (the creators of the epic TotalFinder) build a tool called Asepsis. It is used to redirect all .DS_Store files into a folder buried in the depth of the system. Thereby the Finder is still able to store folder specific settings but external drives aren’t effected anymore.

Dot Underscore Files…

… cause more trouble. As they eventually store application specific data there is no official way to disable them. A possible workaround is to schedule a script to delete them (every night). This is exactly what I did for Windows (Powershell script) and Unix (Bash script) operating systems. On Windows the script can be scheduled using the “Scheduled Tasks” system setting. On Mac OS X a launchd configuration should be used – it can easily be created using Lingon. Other Unix operating systems can use a cronjob!

The script recursively searches a given folder for Dot Underscore Files and deletes them. Be aware they will most likely be recreated! You can download the Windows and Unix version using this link.

Dec 062012
 

qt_tools is a free command line for the Quicktime infrastructure in Mac OS. As it is only a wrapper all audio and video formats supported by Quicktime can be used. This also allows the usage of products like Flip4Mac in automated workflows.

The problem is, that it is not that easy to find the needed parameters in the man page. Furthermore encoder specific settings can not always be configured using parameters. To work around this problem configuration files can be used. The following example illustrates how a specific Flip4Mac configuration can be created.

As already explained we first have to create a configuration file for the desired operation. To do that the –dodialog parameter is used to show the exporter specific configuration interface. As soon as the dialog is closed the configuration is saved to /tmp/wmv.conf.

qt_export --exporter=ASF_,TELE --savesettings=/tmp/wmv.conf --dodialog

After that it can be used to encode a file. It it important to note that Quicktime requires an existing display (as noted in the man page) and therefore can not be used in remote contexts like a webserver.

qt_export --loadsettings=/tmp/wmv.conf /path/to/your/input/video.m4v /path/to/your/export/video.wmv
Dec 052012
 

SAMBA the open source SMB implementation got replace in Lion with SMBX. SMBX supports SMB2 which is was first used in Windows Vista and reduces the chattiness of the protocol. Additionally Samba 3 was release under the GPLv3 licence which prevent Apple from packaging it in a commercial package.

While there are several advantages the overall stability decreased. Two examples are given below:

  1. Several multifunction printers are not able to connect to the new SMBX service to deliver scanned images as they only support SMB1. A possible workaround is to use a FTP server like PureFTPd.
  2. A race condition can occur after booting the system that prevents any user  to log in. The message “NTLM domain not configured” is logged. A possible solution is discussed here.

BUT the most frustrating part about SMBX is that there is no official documentation. Furthermore it’s not using plaintext configuration files anymore.

To track down errors it’s essential to have a good error log. To enable logging the launchd configuration file com.apple.smbd.plist has to be modified. After identifying the problem based on the logs you have to solve it. There are two different places where the configuration is stored. The overall service configuration is stored in the plist file /Library/Preferences/com.apple.smbd.plist. The share point configuration in turn has been moved into the Directory Service!!!!! This can be accessed using the dscl utility. After that you have to navigator into the “folder” /Local/Default/Sharepoints.

dscl localhost
> cd Local/Default/SharePoints/
> ls #this will list all you share points
> read SharepointName #lists all the configured settings

It’s awful to see a great software like Samba to be thrown out based on licensing issues.

Nov 292012
 

In previous versions of OS X it was easily possible through rc.shutdown.local to run commands before shutdown. I have not been able to use it in Lion or Mountain Lion.

Thankfully even if you restart or shutdown using the Apple menu the UNIX commands are used. This can be misused by replacing the system supplied tools with a self-written proxy script that runs your commands and the executes the original executables.

The script at the bottom is such a proxy. It should be created in /sbin/shutdown_proxy.sh. Then the original shutdown and reboot executables must be renamed to contain the suffix “.old” (shutdown.old and reboot.old). To complete the installation shutdown-proxy has to be symlinked to shutdown and reboot.

Terminal installation instructions

  1. sudo nano /sbin/shutdown_proxy.sh #insert and adjust the code from below
  2. sudo chmod 755 /sbin/shutdown_proxy #make the file executable
  3. sudo mv /sbin/shutdown /sbin/shutdown.old #move the old file aside
  4. sudo mv /sbin/reboot /sbin/reboot.old
  5. sudo ln -s /sbin/shutdown_proxy.sh /sbin/shutdown #link the proxy
  6. sudo ln -s /sbin/shutdown_proxy.sh /sbin/reboot

/sbin/shutdown_proxy.sh

#!/bin/bash
NAME="$0";
echo "Shutdown proxy executing"

# YOUR COMMANDS HERE

COMMAND="$NAME.old"
echo "Will run $COMMAND $@"

"$COMMAND" "$@"
Oct 222012
 

This time a client requested the ability to change the wireless network key of several dd-wrt Linksys WRT54GL routers at once.

Linksys WRT54G – CC BY-SA 3.0Wiki Commons

To simplify the process I wrote a small bash script that changes the WPA key of a given AP using only the web interface. This means no additional service (like SSH or Telnet) have to be enabled!

In the backend it uses curl to submit a specially crafted HTTP POST request to the router that applies the new key.

You can download change_wpa_key.sh under the WTFPL licence.

Sep 152012
 

Over the last few days I tried to automatically convert Avid OP-Atom MXF files to ProRes 422 HQ MOV files. At first this didn’t sound too hard but it took me several days to come up with an good solution.

So what’s the problem?

The problem is that Avid uses the so called Operational Pattern Atom. This pattern splits each audio channel and the video data into a separat MXF file. Additionally several audio and video MXF files are kept in the same folder without an easy way to match the corresponding files. After hours and hours I discovered mxfdump (based on MXFlib). This tool allows you to gather the UMID (unique material ID) and the data type (either audio or video) from a given file.

With this help I was able to find the associated media files – but the next problem arised immediately!

Another problem?

Sure! Avid uses a codec called DNxHD. My standard en/decoding tool ffmpeg is not able to handle it correctly. I was happy to discover a fork called ffmbc that is able to decode DNxHD and can encode ProRes HQ.

My solution

To create a good workflow I created a small script called MXFMuxer. It monitors a folder for incoming MXF files and builds up groups using their UMID. After that it validates them (for example if is there at least one audio and video file) and kicks in ffmbc to create a single ProRes 422 HQ MOV file.

Features

  • monitor a folder for incoming files
  • validate them to be sure they are OP Atom and we have a video file and one or two audio tracks
  • convert them to a single ProRes mov file
  • use all the available physical cores while converting (not handled by ffmbc)
  • can be daemonized and scheduled using launchd
  • uses ffmbc and MXFlib
  • delete or move the original MXF files
  • can be easily modified to generate previews for Archiware PresSTORE

Where can I get it?

That’s the best part of it! I have release it as a supplementary utility (see the utils folder) to PresSTORE Media Converter – you can freely download it at Google Code.

But be aware: It’s not that easy to install! You have to compile at least libx264, liblame, mxflib yourself. If you need help just leave a comment!

Aug 082012
 

Although Filemaker 9 and 10  aren’t supported on Lion and Mountain Lion anymore several of our customers still use it. As long as you upgrade from Snow Leopard everything is working as expected – even the “Open Remove” feature that is used to connect to a Filemaker Server.

The problem is, that whenever you try to reinstall Filemaker 9 Pro the required SSL Update fails to install. This happend because the OpenSSL used in this update is PPC only! After that you are still able to work on local FM databases but you are unable to connect to a remote server. The remote database list stays empty!

Luckily this problem can be easily fixed.

As far as I can tell the Filemaker application uses an SSL encrypted connection to transmit it’s data (or at least the database list 😉 ). To fix the encyption you only have to replace the certificate stored in the application bundle:

  • /…/FileMaker Pro.app/Contents/MacOS/root.pem
  • /…/FileMaker Pro.app/Contents/MacOS/server.pem

The following solutions are possible:

Obtain the certificates from a newer installation

The needed certificates are also installed by newer Filemaker versions. Just install the trail version or obtain the certificates from a different machine. To do that open the application bundle and copy the root.pem and server.pem files. To finish the surgery replace the original files (see above) in the Filemaker 9 bundle.

Download my files

To shorten the process I have uploaded my test certificates. You can also use them.