Aug 122014
 

Last week I had to build a watchfolder that converts an interlaced input movie to an H264 proxy using FFmbc. It took me quite some time to figure out that if you scale an interlaced video (with the scale filter) it automatically gets converted to progressive in this step. However as I further had to deinterlace it (with the yadif filter) this caused me some problems. This Google Search revealed a lot of useful information.

Scale Deinterlace

In the end I learned that whenever you work with FFmbc or FFmpeg on interlaced material that has to be deinterlaced you have to do that with the first filter. Here’s an example:

ffmbc -i Interlaced_Input.mov -vcodec libx264 -acodec aac -strict experimental -b 5120k -vf "yadif,scale=720:576" -y H264_Output.mp4

Happy Deinterlacing!

Aug 062014
 

In this post I want to show how to convert movies encoded as MPEG IMX using ffmbc. It’s important to note that this is not working with FFmpeg at the time of writing as IMX was not supported.

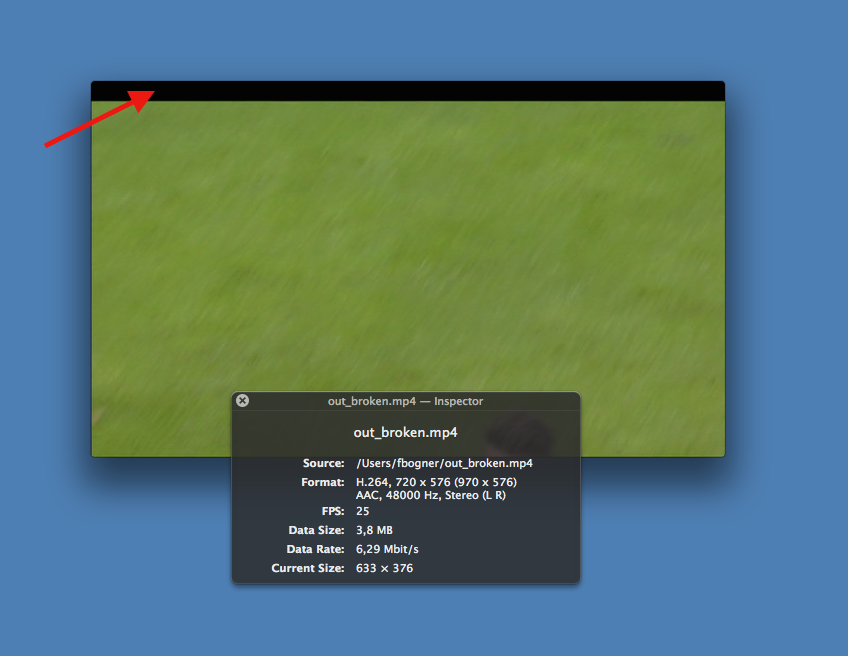
If you try to convert an IMX video wrapped in either a MOV or MXF container using ffmbc without any further options the resulting clip contains a few additional lines (Update: these lines are called VBI) of black pixels at the top. The same result can be observed within VLC. It may be caused by the fact that IMX gets misdetected as MPEG2.

ffmbc and IMX
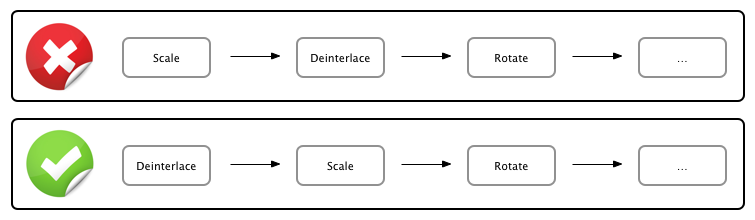
To solve this problem we use a combination of ffmbc’s video filters. At first we crop off the black pixels, than we ensure that we get a 720×576 PAL resolution and finally we deinterlace the input.

ffmbc -i IMX_Input.mov -vcodec libx264 -acodec aac -strict experimental -b 5120k -vf "crop=720:576:10:42,yadif,scale=720:576" -y H264_Output.mp4

With this command we get the expected H264 proxy with a 5MBit bitrate. However often you have to deal with multiple input formats. To do that efficiently we have to detect IMX files and apply the workaround. I was able to detect them if they were wrapped in MOV containers with the following command:

ffmbc -i IMX_Input.mov 2>&1|grep IMX

By combining the IMX detection and by applying the video filters when necessary we can convert (nearly) all input files automatically.

The only thing left is the detection of IMX videos wrapped in MXF containers. So far I have been unable to solve this with my toolset (ffmpeg, ffmbc and mxfdump). If you find a way please leave a comment.

Aug 052014
 

Recently a customer reported that he was unable to add new users to his OS X 10.8 Server. To be precise, he was even unable to login as diradmin to his local OpenDirectory master.

Workgroup Manager

Each login attempted created the following error message:

servermgrd: servermgr_accounts: got error 2100 trying to auth to local LDAP node

After ruling out all the common issues like discussed in “Why Is My OD LDAP Server Stopped & How To Fix It” it was time to move over to the dark side. In this case, one had to know that the auth database of the OD server itself is stored as a Berkeley DB in /var/db/openldap/authdata and that it is most likely damaged. Based on that (and after creating a backup) we can now use db_recover to repair it with the following commands:

sudo serveradmin stop dirserv
sudo db_recover -h /var/db/openldap/authdata
sudo serveradmin start dirserv

After a few seconds you should be able to login as diradmin again.

Aug 032014
 

heroLast week I observed a strange quirks of OS X Mavericks and AVFoundation: When writing a video using AVFoundation data caching is always enabled. Caching by itself provides a huge performance boost by the cost of reliability. Generally this wouldn’t be a problem, because you can easily disable caching by using fcntl and F_NOCACHE. However as AVFoundation does not expose the corresponding file descriptor this is not possible. Now think about the result of the following scenarios:

  1. You write a video file on an external storage while the volume is disconnected
  2. You write a video to a network volume and someone reboots a switch
  3. You write to a local disk and a power outage occurs

Yes, all these issues result in data loss as the cache has to be purged! This is especially problematic as the Unified Buffer Cache can grow up to hundreds of MB. This can result in the loss of several seconds or even minutes of video data.

I had to use all my Google-foo to find the blog post “Hacking the Mac OSX Unified Buffer Cache” that provides a possible solution. The undocumented? fcntl flag F_GLOBAL_NOCACHE allows you to disables the Unified Buffer Cache globally for a specific file. This even works for all already opened file handles. Thereby it is possible to mitigate all the problems outlined above. Stefan Bechtold wrote the command line wrapper UBCUtil that allows you to test the flag without modifying your code.

What a day…

Apr 222014
 

Bildschirmfoto 2014-04-22 um 21.47.50Have you ever wondered why Apple is moving from AFP to SMB2?

Well, here’s one example:
If you are connected to an AFP server (either OS X or netatalk) and you duplicate a really large file the complete AFP connection on the client stalls. In the background the client instructs the server to duplicate the file. However it blocks until the copy process is finished. This is a good idea implemented poorly. It causes all applications doing I/O operations on the sharepoint to either freeze until the operation is finished or even crash.

The best part: If you are using SMB you can duplicate files and don’t hang your applications. I could verify this behavior down to OS X Lion. Maybe it’s even true for Snow Leopard…

Feb 252014
 

e_mailI take care of several OS X mail servers for my customers and I always use the widely deployed OpenDirectory LDAP server for user management. However, from time to time one of these OD servers stops working. Based on my experience, there are two (and a half) main reasons for this malfunction:

  1. Power outage: After a power outage the database got corrupted. (This is a valid reason for a service outage 😉
  2. OD Backup: After creating an OpenDirectory backup the launchd org.openldap.slapd.plist configuration file is disabled. This means, that the LDAP server will not be started and all services (Mail, iCal, Address Book) stop working.
  3. OD Backup^2: There is an even more serious OD Backup Bug. Thankfully I have seen it only once. If this bug is triggered, not only is the default org.openldap.slapd.plist configuration disabled but there is a second hidden dot-file temporary configuration file with the same launchd key. Thereby we trigger undefined behaviour (two configuration files with the same key) and no usable error message is logged! (It was quite hard to find this problem).

After finding and fixing the cause you still have to repair your OpenDirectory database. Use the following three easy steps to do so:

  1. First you have to stop a possible running OD instance by unloading the launchd configuration:
    sudo launchctl unload /System/Library/LaunchDaemons/org.openldap.slapd.plist
  2. Then run the db_recover utility with the following parameters to recover your OpenDirectory database:
    sudo db_recover -v -h /var/db/openldap/openldap-data/
  3. And restart your OpenDirectory server:
    sudo launchctl load /System/Library/LaunchDaemons/org.openldap.slapd.plist

Voilà your OpenDirectory is working again and you have earned yourself another coffee 😉

Dec 122013
 

retrospect-345535-1268041934Once in a while one of our customer who still uses Retrospects 6 updates to the latest version using the built-in updater. Now he has two problems:

  • At first it’s a paid update that disables your backup software without a valid serial number. However most people don’t see the corresponding information and think it’s free. This is not a nice way to introduce people to your new version!
  • The more important problem is, that Retrospect 10 can’t handle Retrospect 6’s catalog files. Thereby all your tapes are completely useless! They even have a “Tip” on how to handle this situation. To quote one user’s forum post:

It´s so ridiculous … a Backup-Application that cannot read it´s former backup-sets

What I learned from this upgrade path is that I will never ever sell Retrospect again. I’m using Archiware P5 instead!

Jul 302013
 

It sounds like a simple task to configure a Windows client to connect to a L2TP/IPsec server hosted by Mac OS Server. However it’s not.

Requirements

To setup the connection you need the following informations:

  • Username and password of a VPN enabled account
  • the L2TP/IPsec shared secret
  • official IP or hostname of the VPN server
  • Administrator account on the Windows machine

Setup

The first step it the most important one. Open the registry editor (regedit) on the Windows PC as administrator and add the DWORD AssumeUDPEncapsulationContextOnSendRule with a hex value of 00000002 within HKEY_LOCAL_MACHINE\SYSTEM\CurrentControlSet\services\PolicyAgent. To apply the changes you have to reboot.

Then add a new VPN connection using the Set up new connection or network assistant in the Network and Sharing Center. Be sure to enable the checkbox Don’t connect now, just set it up so I can connect later.

To finish the last step open the Properties dialog of your newly created VPN connection. Within the Security tap change the type to L2TP/IPsec and set the shared secret within the Advanced settings. Furthermore change the dropdown menu Data encryption to Optional encryption.

Now you are able to connect to the VPN service!

Jul 192013
 

Think about the following rather unusual scenario: You own a current generation MacBook Air and a new iMac that you don’t use. This blog post will show you how you can use the iMac as a pure monitor without any manual intervention.

Introduction

The current generation iMacs (21″ and 27″) can be used as a Thunderbolt display using Target Display Mode. To enabled this mode you have to boot both Macs and connect them using a Thunderbolt cable. After that you have to press [Command]+[F2] on the keyboard of the “display” iMac. Although this feature is great for rare usage – it’s not very comfortable if you want to use the iMac as a permanent secondary display.

iMacMonitor

thunderbolt-logoTo solve this problem I created iMacMonitor. It’s a small application running on the “display” iMac that monitors the Thunderbolt bus and automatically switches to Target Display Mode if necessary. Thereby one only has to connect the main computer to the Thunderbolt cable and a few seconds later the iMac can be used as a secondary monitor. This works because Mac’s wake from standby if a Thunderbolt device is connected. As soon as the main computer is disconnected the display will sleep again. Be aware that you should not shutdown the “display” computer as it won’t switch to Target Display Mode anymore.

Setup

  1. First you have to download iMacMonitor.app on the “display” iMac and set it as Login Item.
  2. Then make sure that a user is automatically logged in (see this link).
  3. Restart
  4. Voilà

Now you can connect a Thunderbolt enabled Mac and the “display” iMac will switch to Target Display Mode automatically.

Sourcecode

As I have written this application for fun you can also download the Xcode project. It’s released under the MIT licence.

Update: Here’s the Xcode 5 Project for 10.9